普通视图

发现新文章,点击刷新页面。
昨天以前Tomshardware

Fractal Define One case review: Balancing noise and thermals

作者 Joe Shields
2026年9月2日 21:05

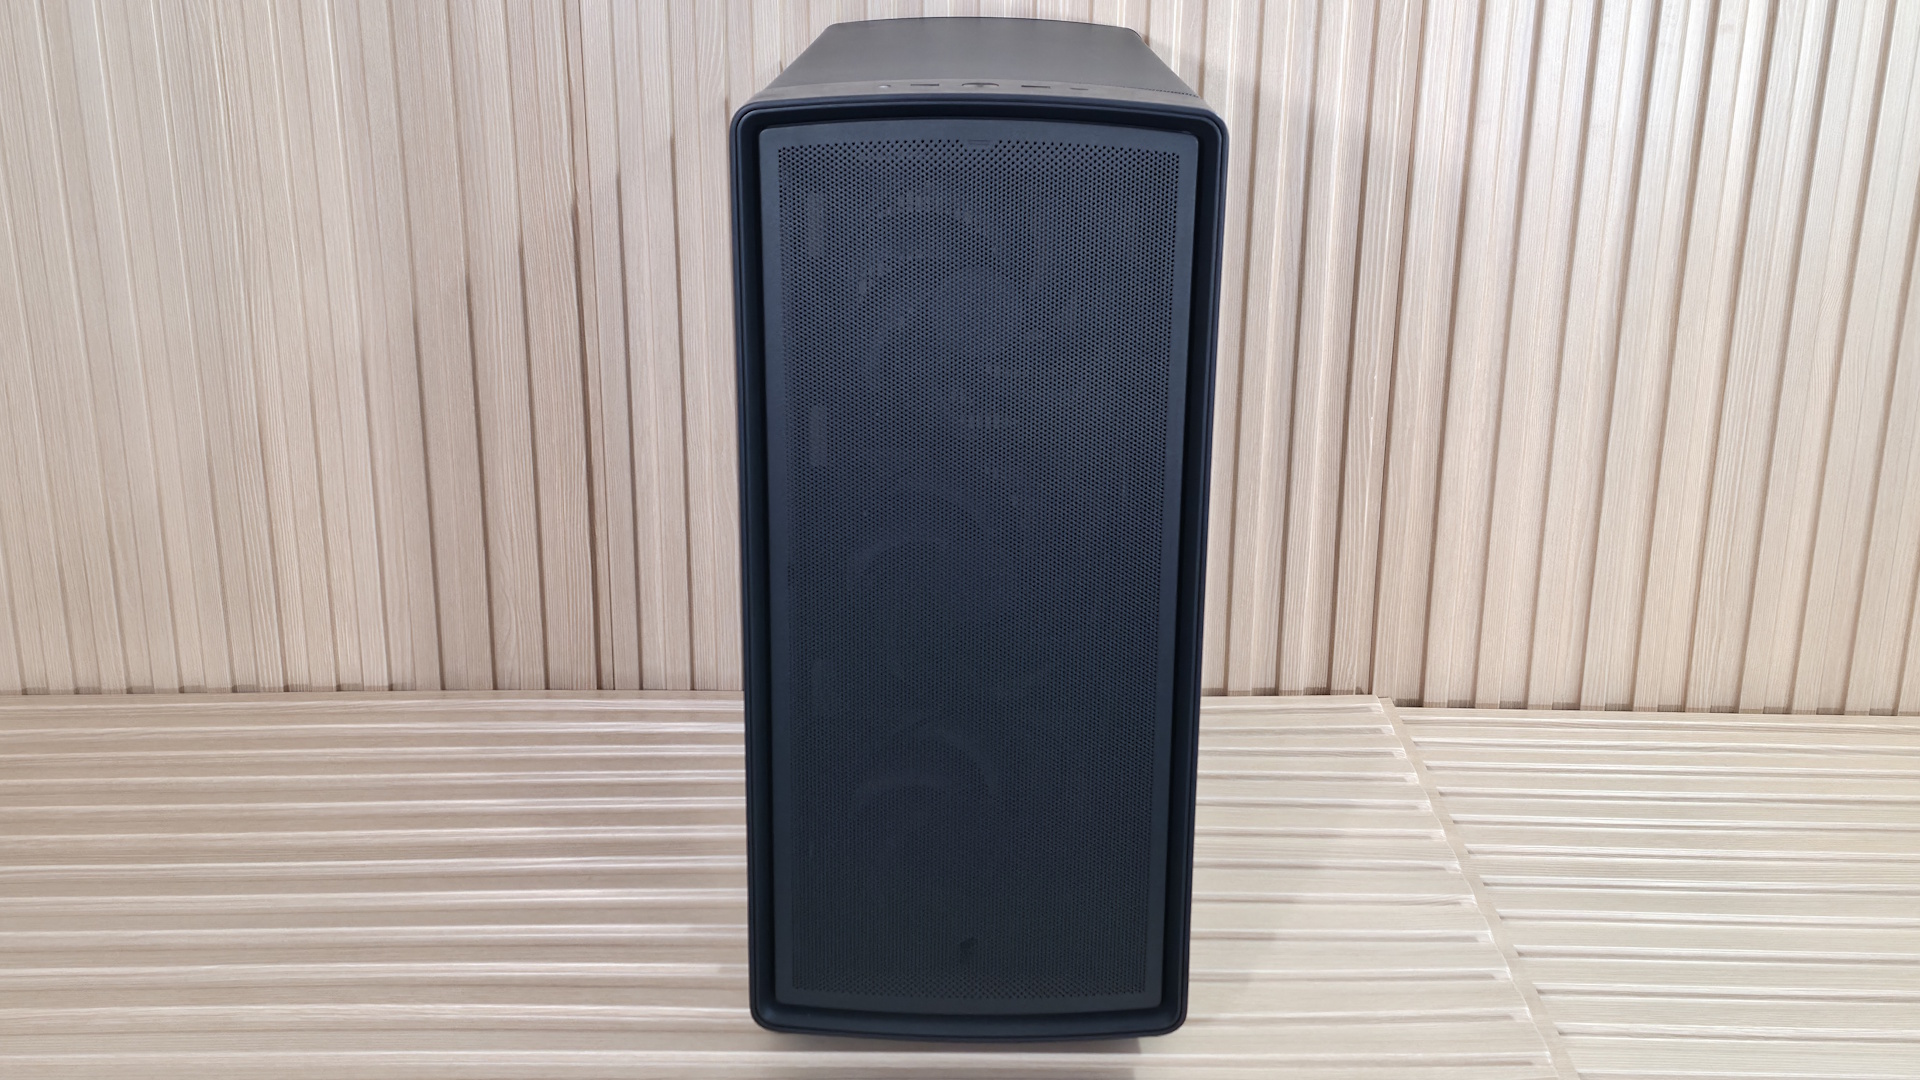
The Fractal Define series has been around since 2009, starting with the aptly named Fractal Define chassis. Since then, we’ve seen the Define R2/R3/R4/R5/R6/R7/7 XL cases over the years, all keeping the familiar closed-front design. Today, Fractal released the Define One, which they say is a “...modern expression of quiet performance and Scandinavian aesthetics”. This ‘expression’ includes aluminum side intake vents, premium details, and subtle curves that aim for a clean, understated look balancing airflow and thermal efficiency.

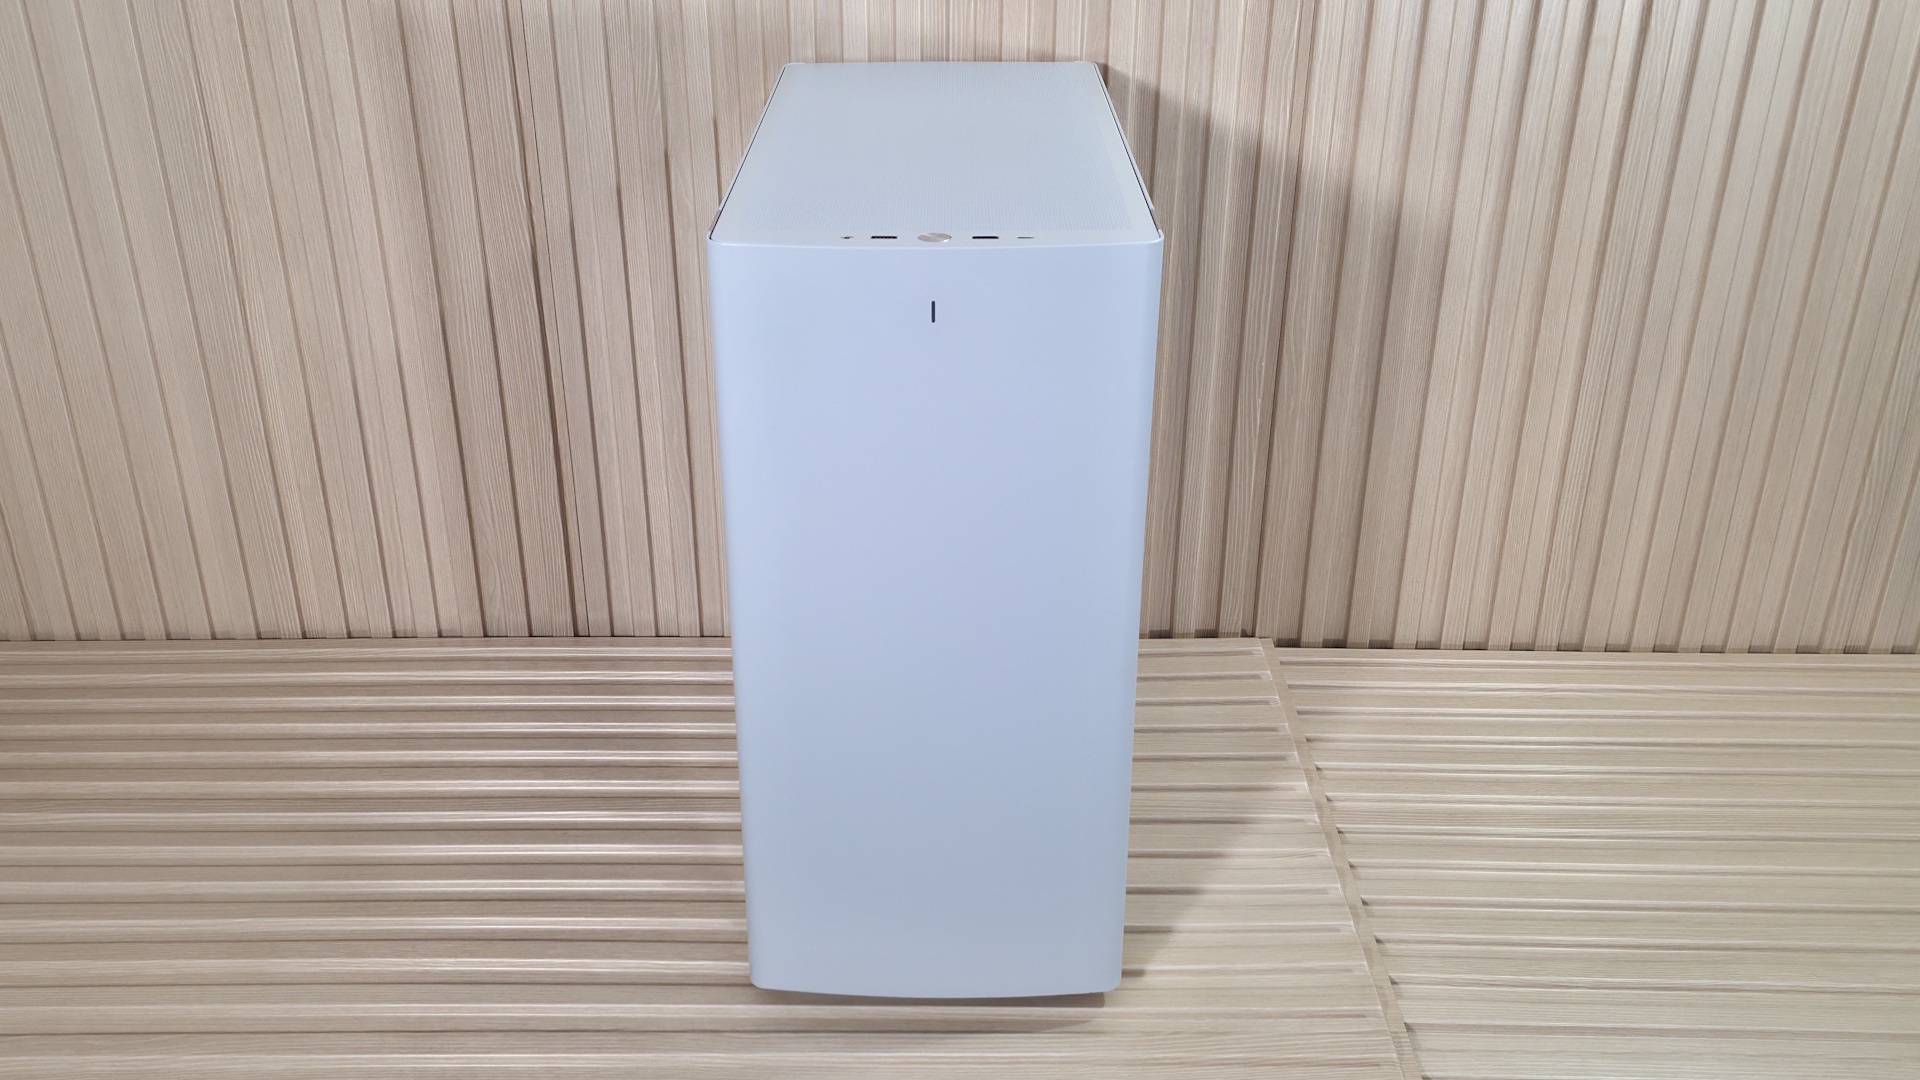
The new Define One achieves Fractal’s goals, offering users a clean, premium-looking chassis that achieves sound mitigation with its closed-front design. The previous Define 7 and 7 XL (and others before it) are all cuboids with sharp edges, whereas the Define One rounds the corners off for a softer, yet still premium appearance. This is one of the best-looking Define chassis to date.

Inside, there’s room for large graphics cards, multiple radiators (up to 360mm), and it even supports rear-connect motherboards. Fractal includes three pre-installed Momentum 14 fans in the front and has a unique integrated front air guide that feeds air directly from the bottom fan towards the video card. The interior is well thought out, with toolless access, removable brackets, and built-in cable management that makes building easier and leaves you with a clean, functional PC. Priced at $154.99, it gives off premium vibes you don’t normally find at this price point, or in previous Define iterations.

We'll cover many more details inside and outside the chassis, showcasing the features and any issues we may encounter during the build process. We also run the case through thermal and noise testing to show how it performs compared to others and whether it has a chance of making our best PC cases list. Below are the case's specifications from Fractal.

Define One Product Specifications

Type

Mid-Tower

Dimensions (H x L x W)

19.6 x 18.9 x 9.2-inches (500 x 482 x 235mm)

Motherboard Support

Mini-ITX, Micro ATX, ATX, E-ATX

Back-connect Motherboard Support

No

Color

Dark Solid
Dark TG Light Tint
Light Solid
Light TG Clear Tint

Storage Support

(2) 3.5-inch -or- (4) 2.5-inch
(Supports up to six 2.5-inch total)

PCIe Expansion Slots

7

Fan Support

Top - 2x120/140mm
Front - 3x120/140mm
Bottom - N/A
Rear - 1x120mm

Pre-installed fans

(3) 140mm LCP Blade Momentum 14 (Front)

Radiator Support

Front - Up to 360mm
Top - Up to 280mm
Rear - 1x120mm

CPU Cooler Clearance

171mm

GPU Clearance

368mm (w/ front fans installed)
338mm (w/ 30 thick front rad. installed)

Vertical GPU Support

Yes (required adapter, $79.99)

PSU Length

180mm

Dust Filters

Top, Front, Bottom

Other features

3x included fans, integrated GPU front air guide, noise/vibration dampening

MSRP

$154.99 (all four configurations)

Warranty

2 Years

Features of the Define One

▶️ External Features

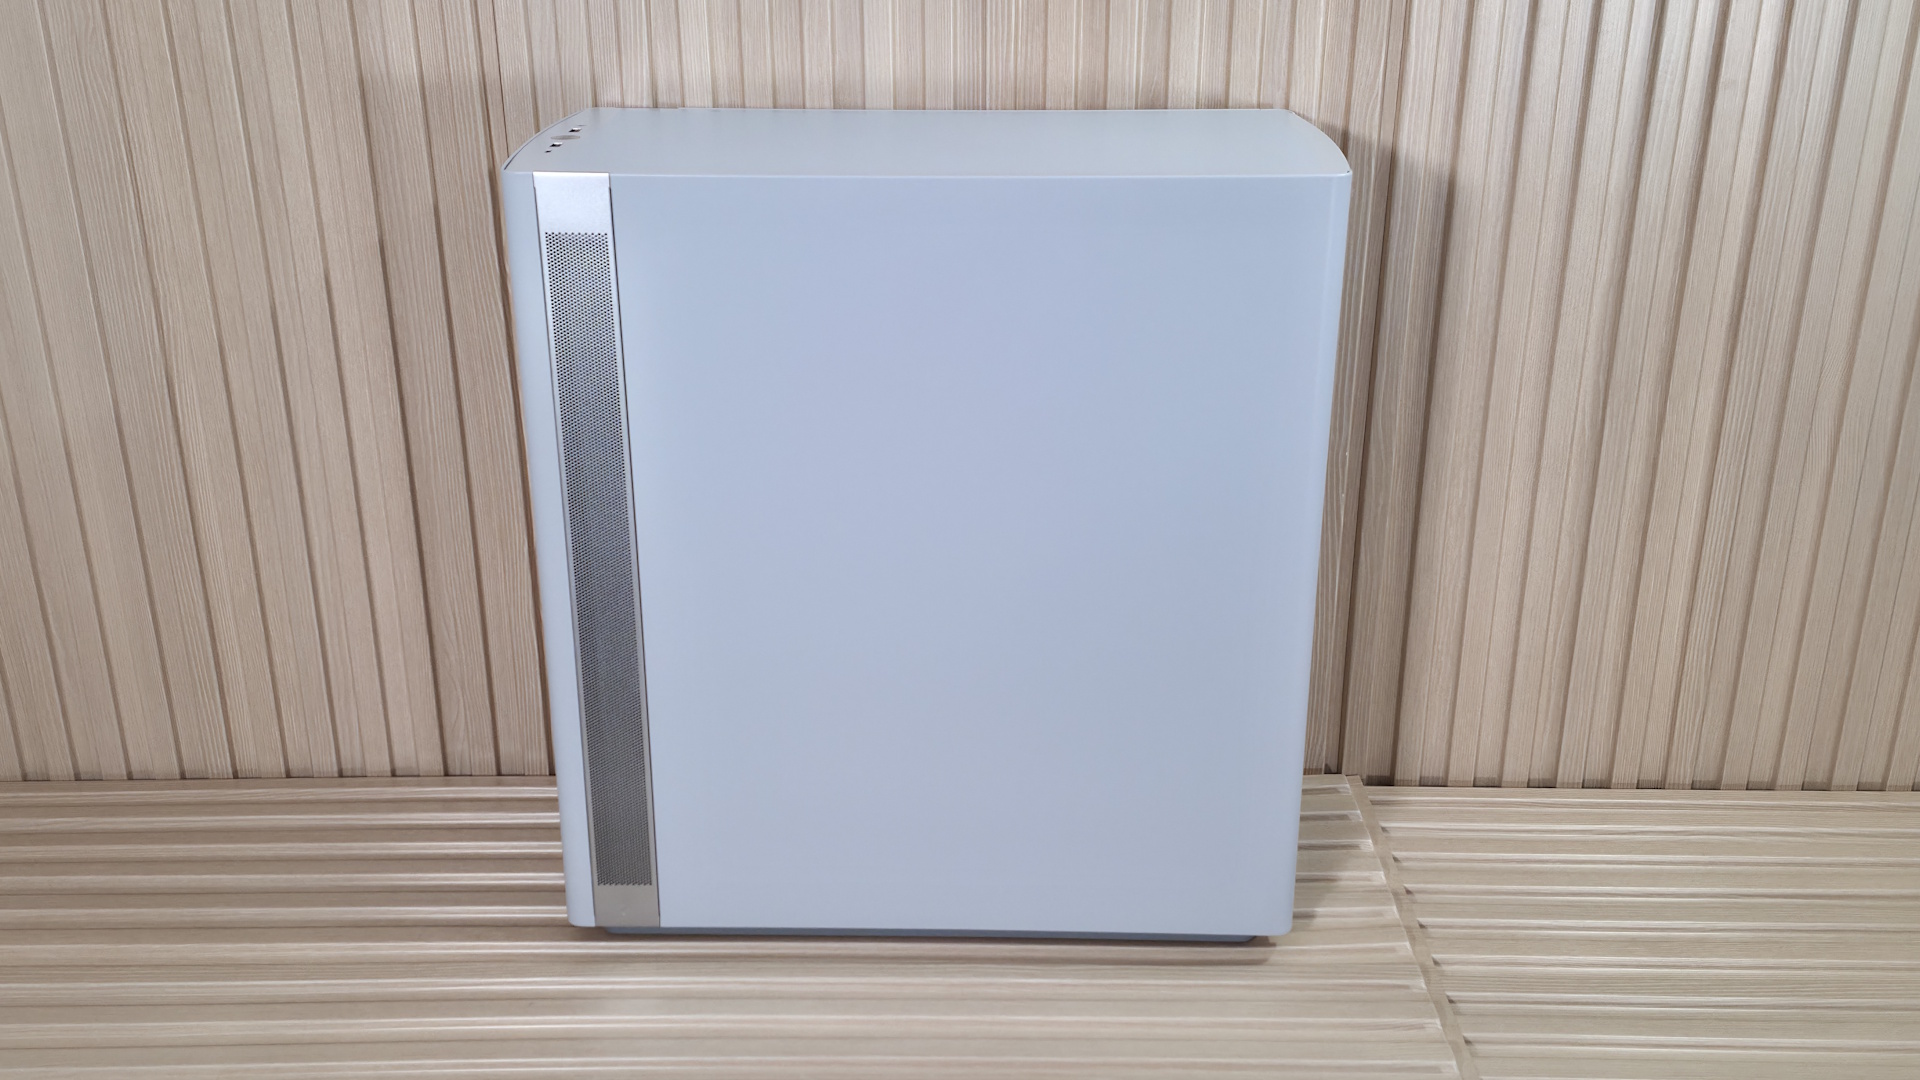
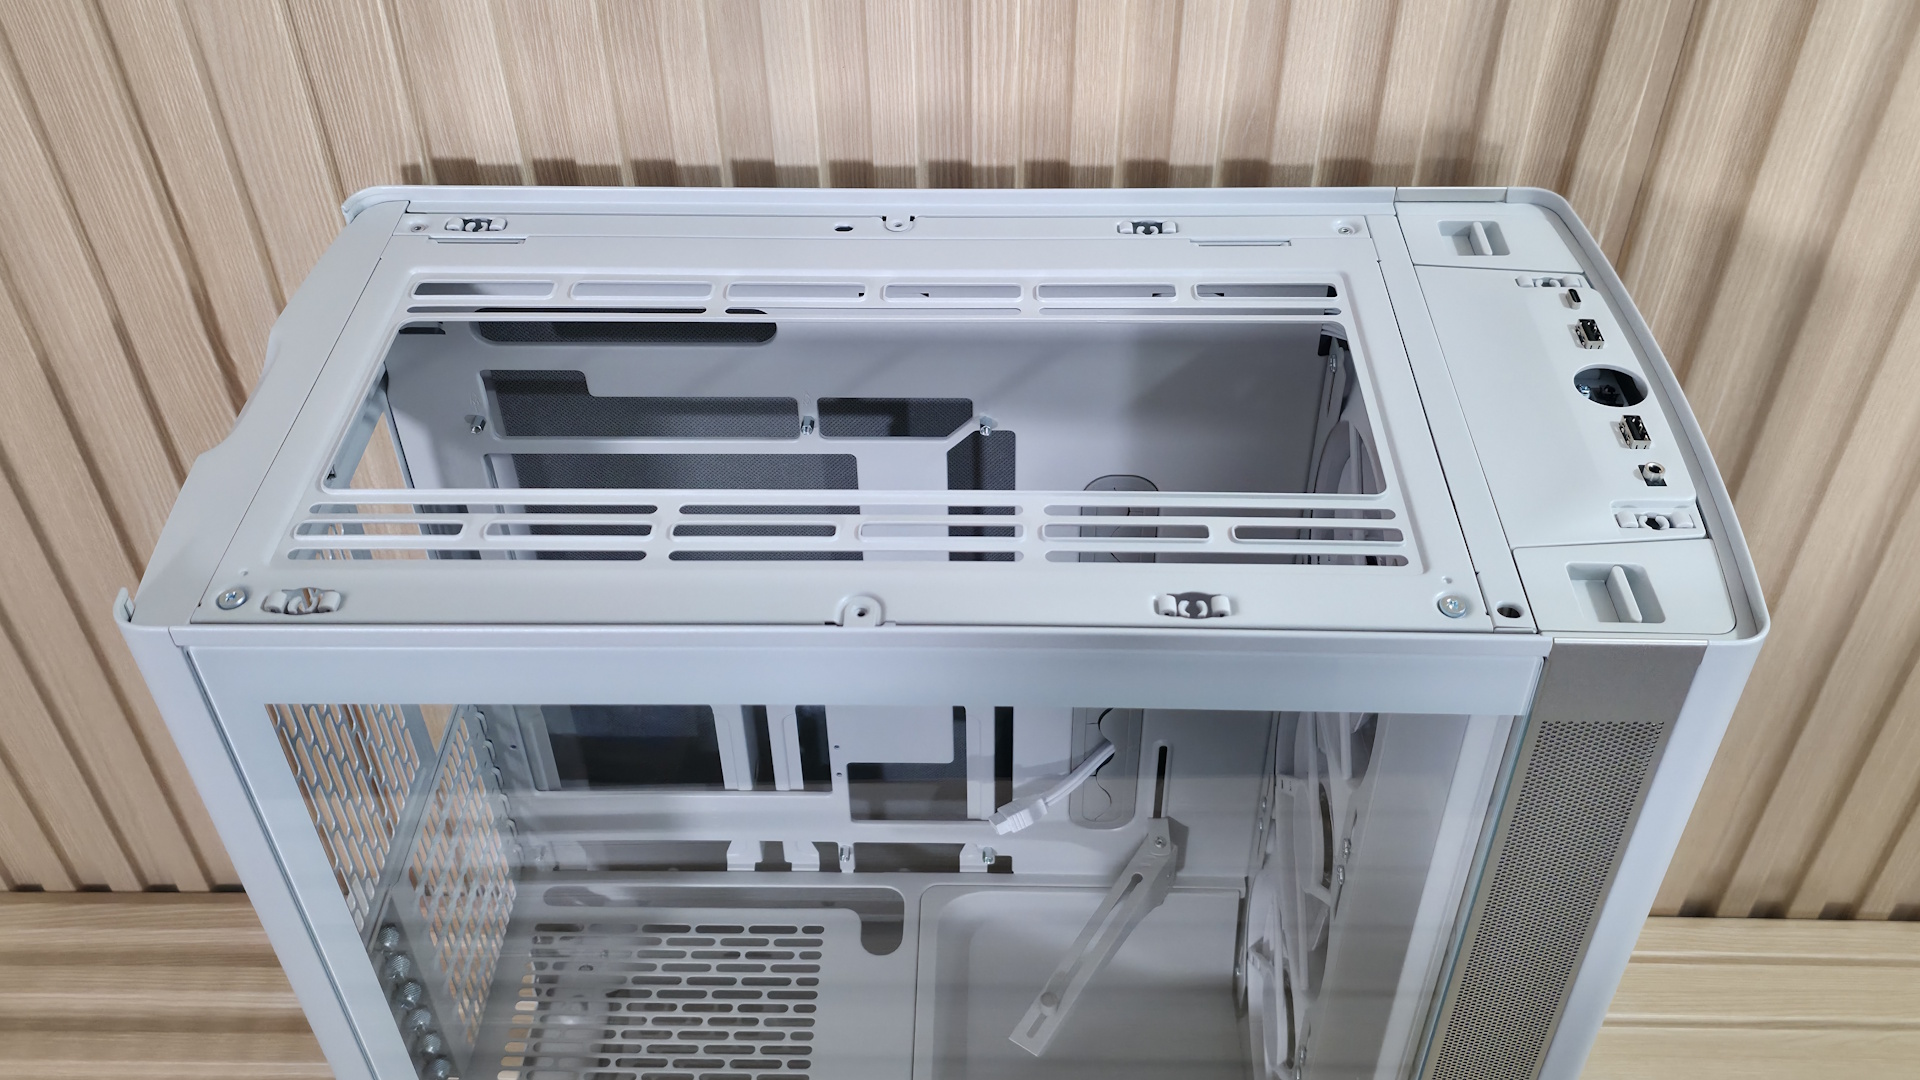
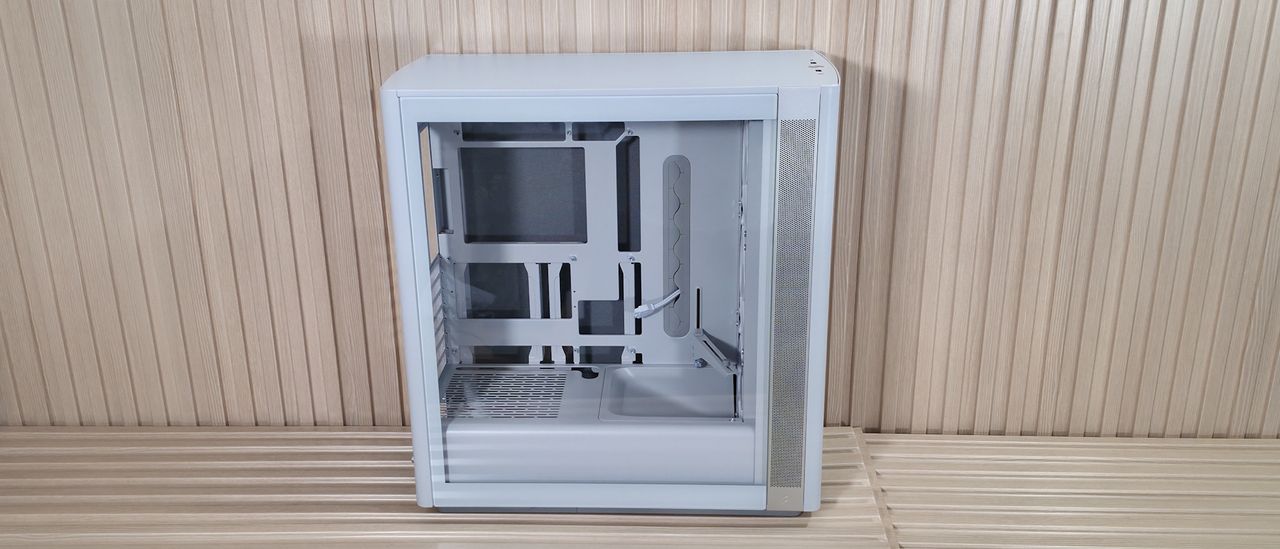
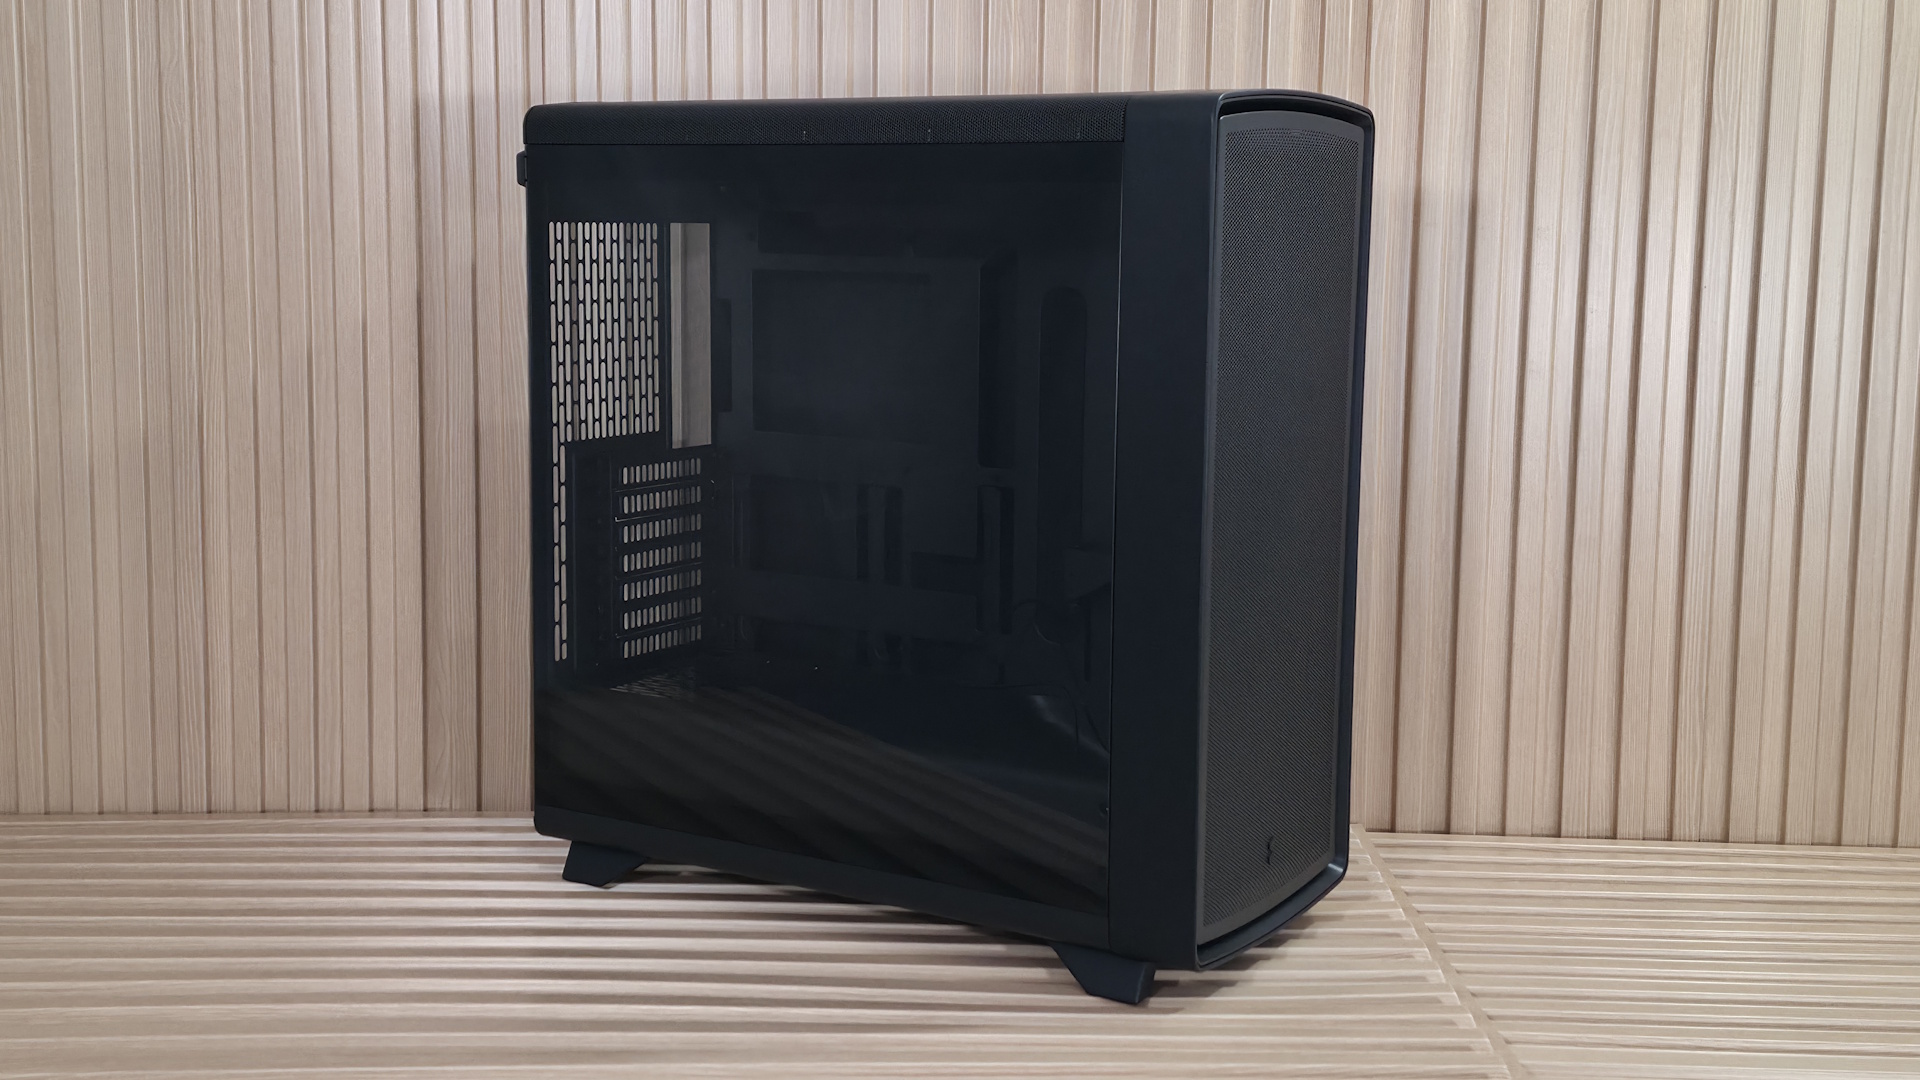
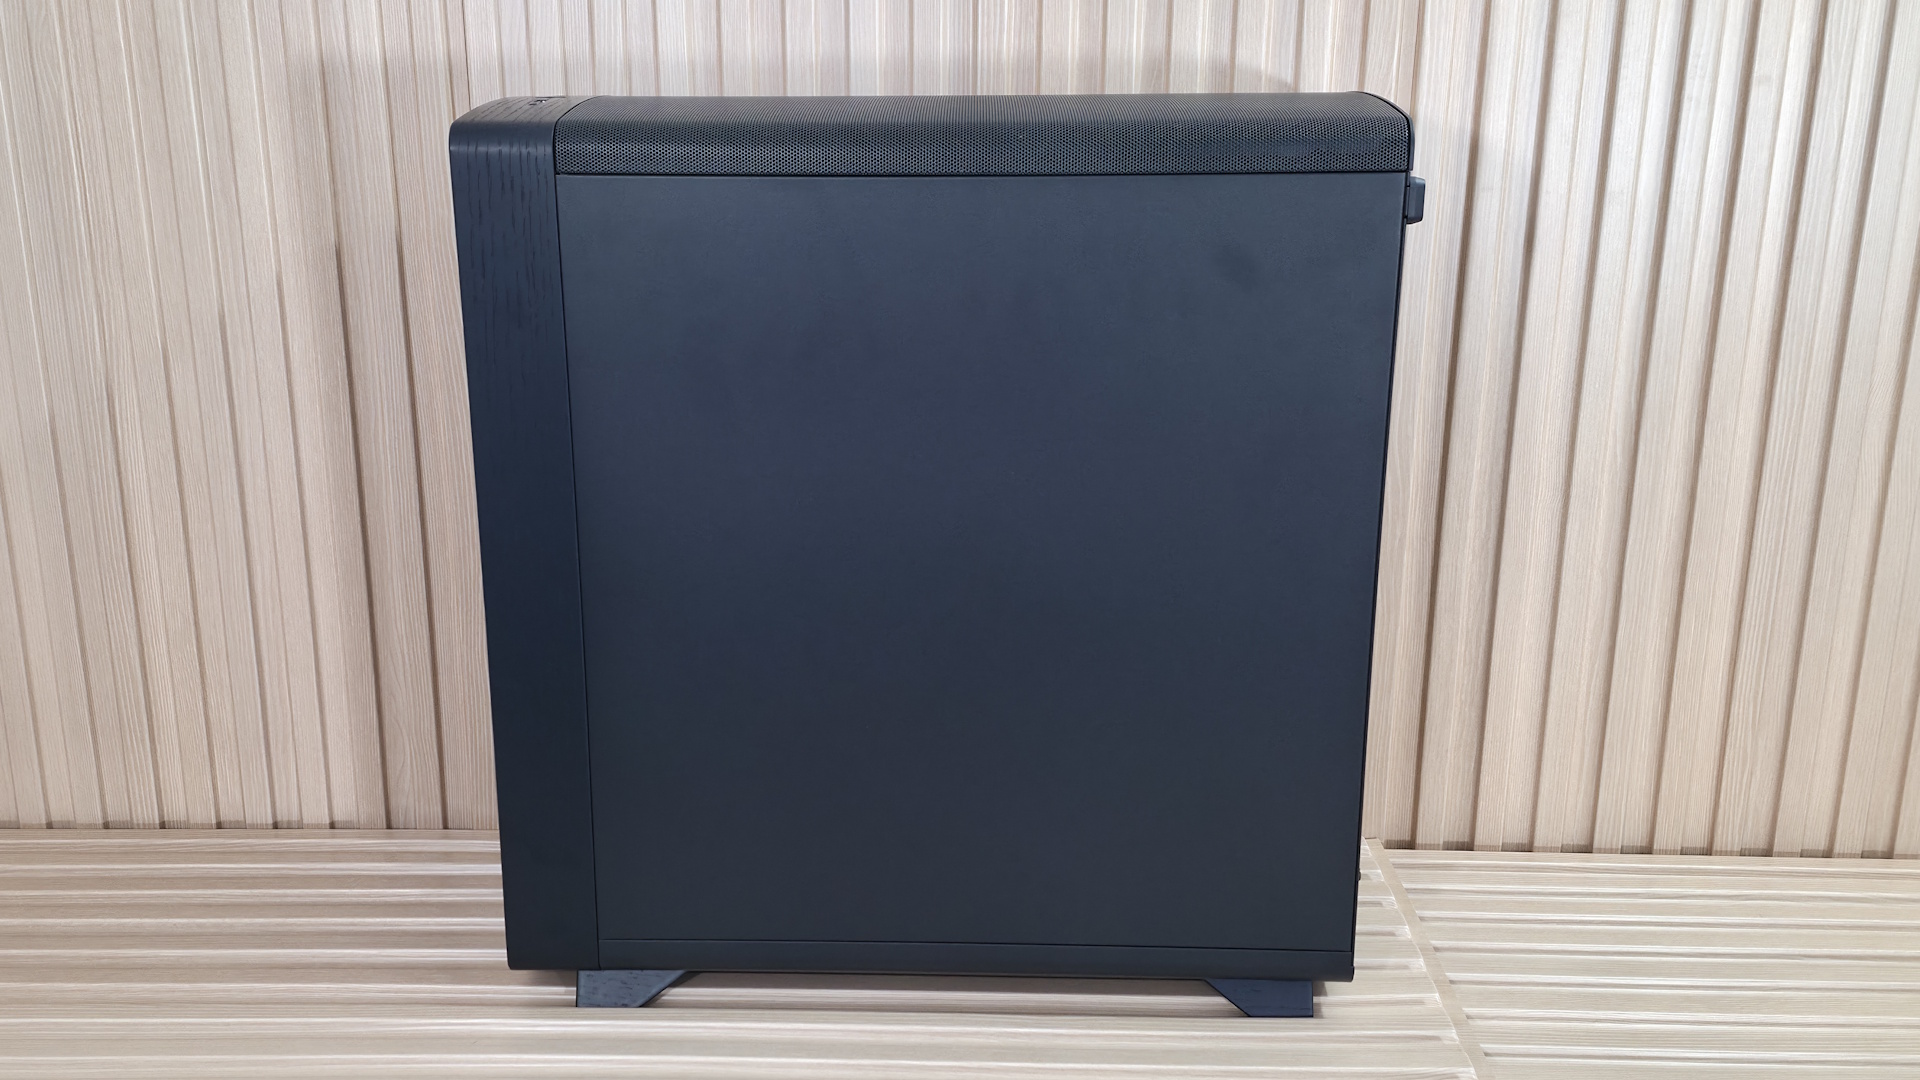
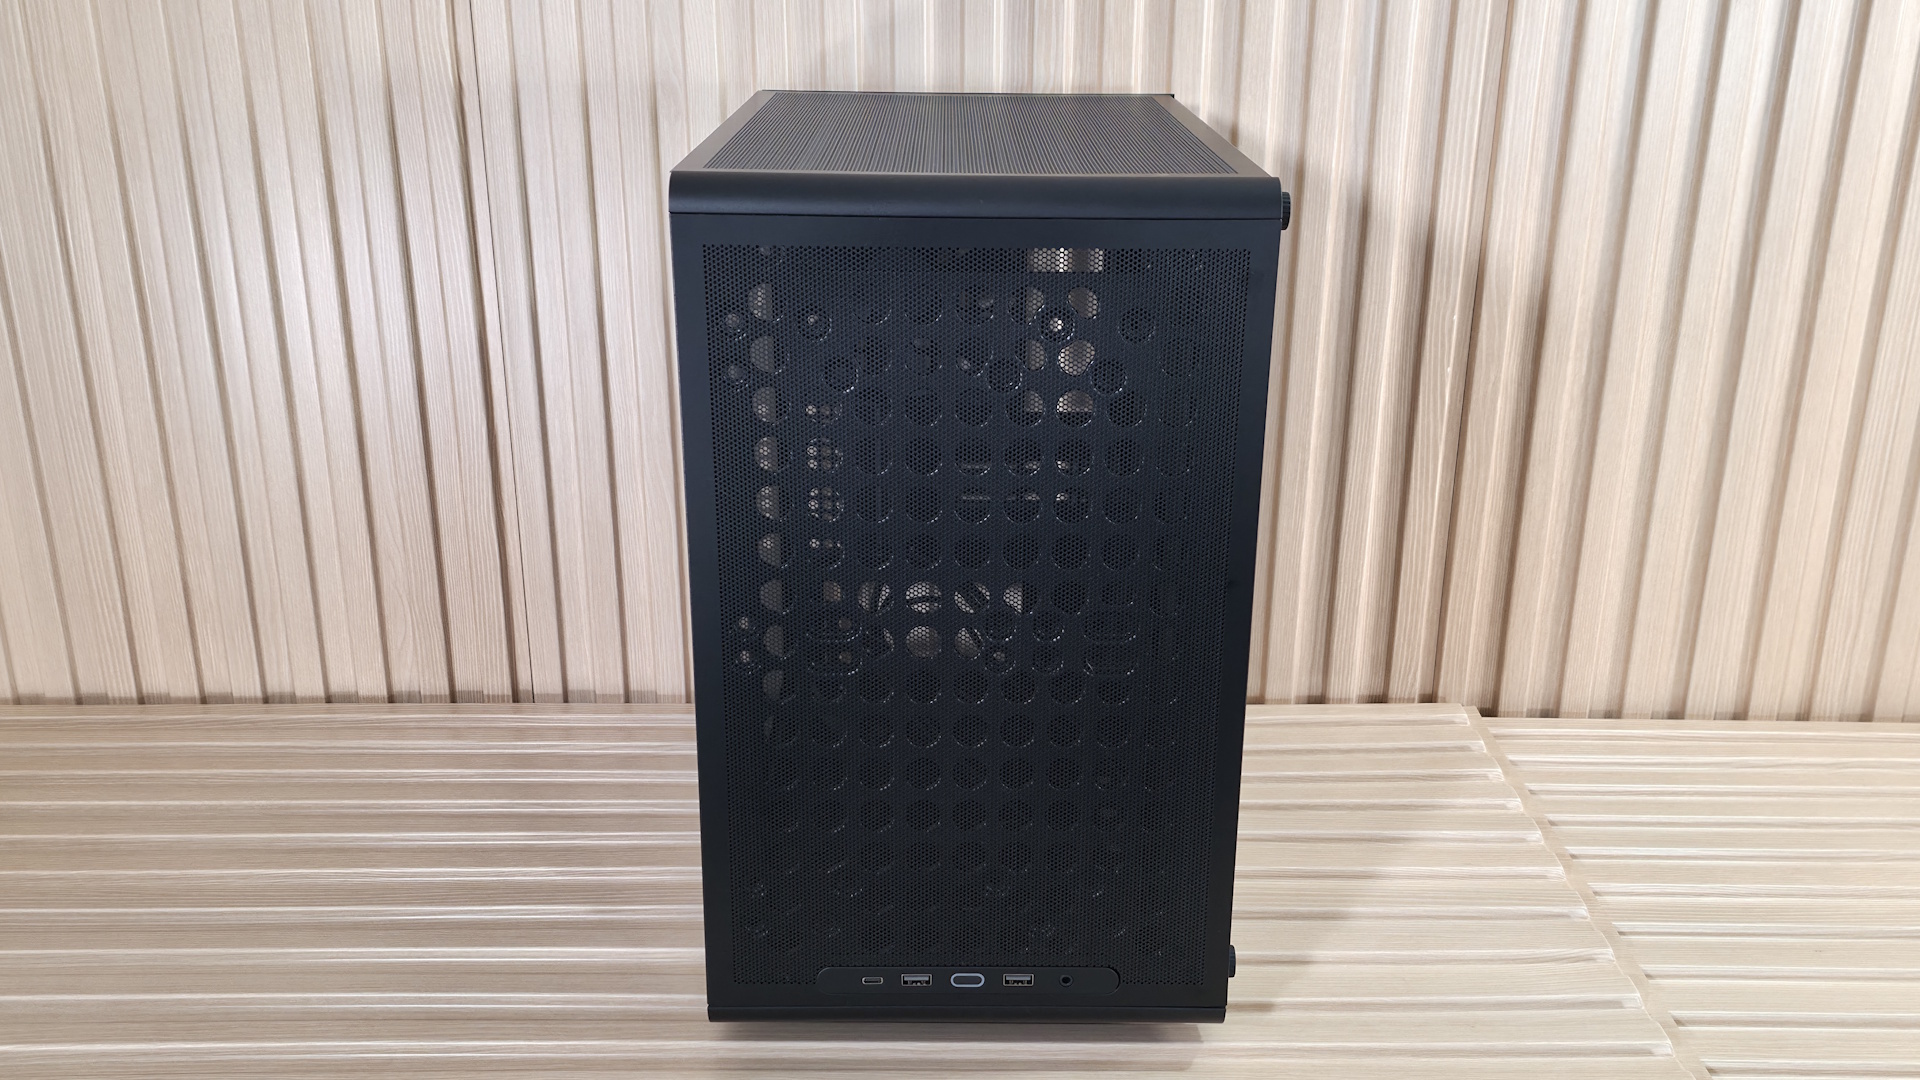
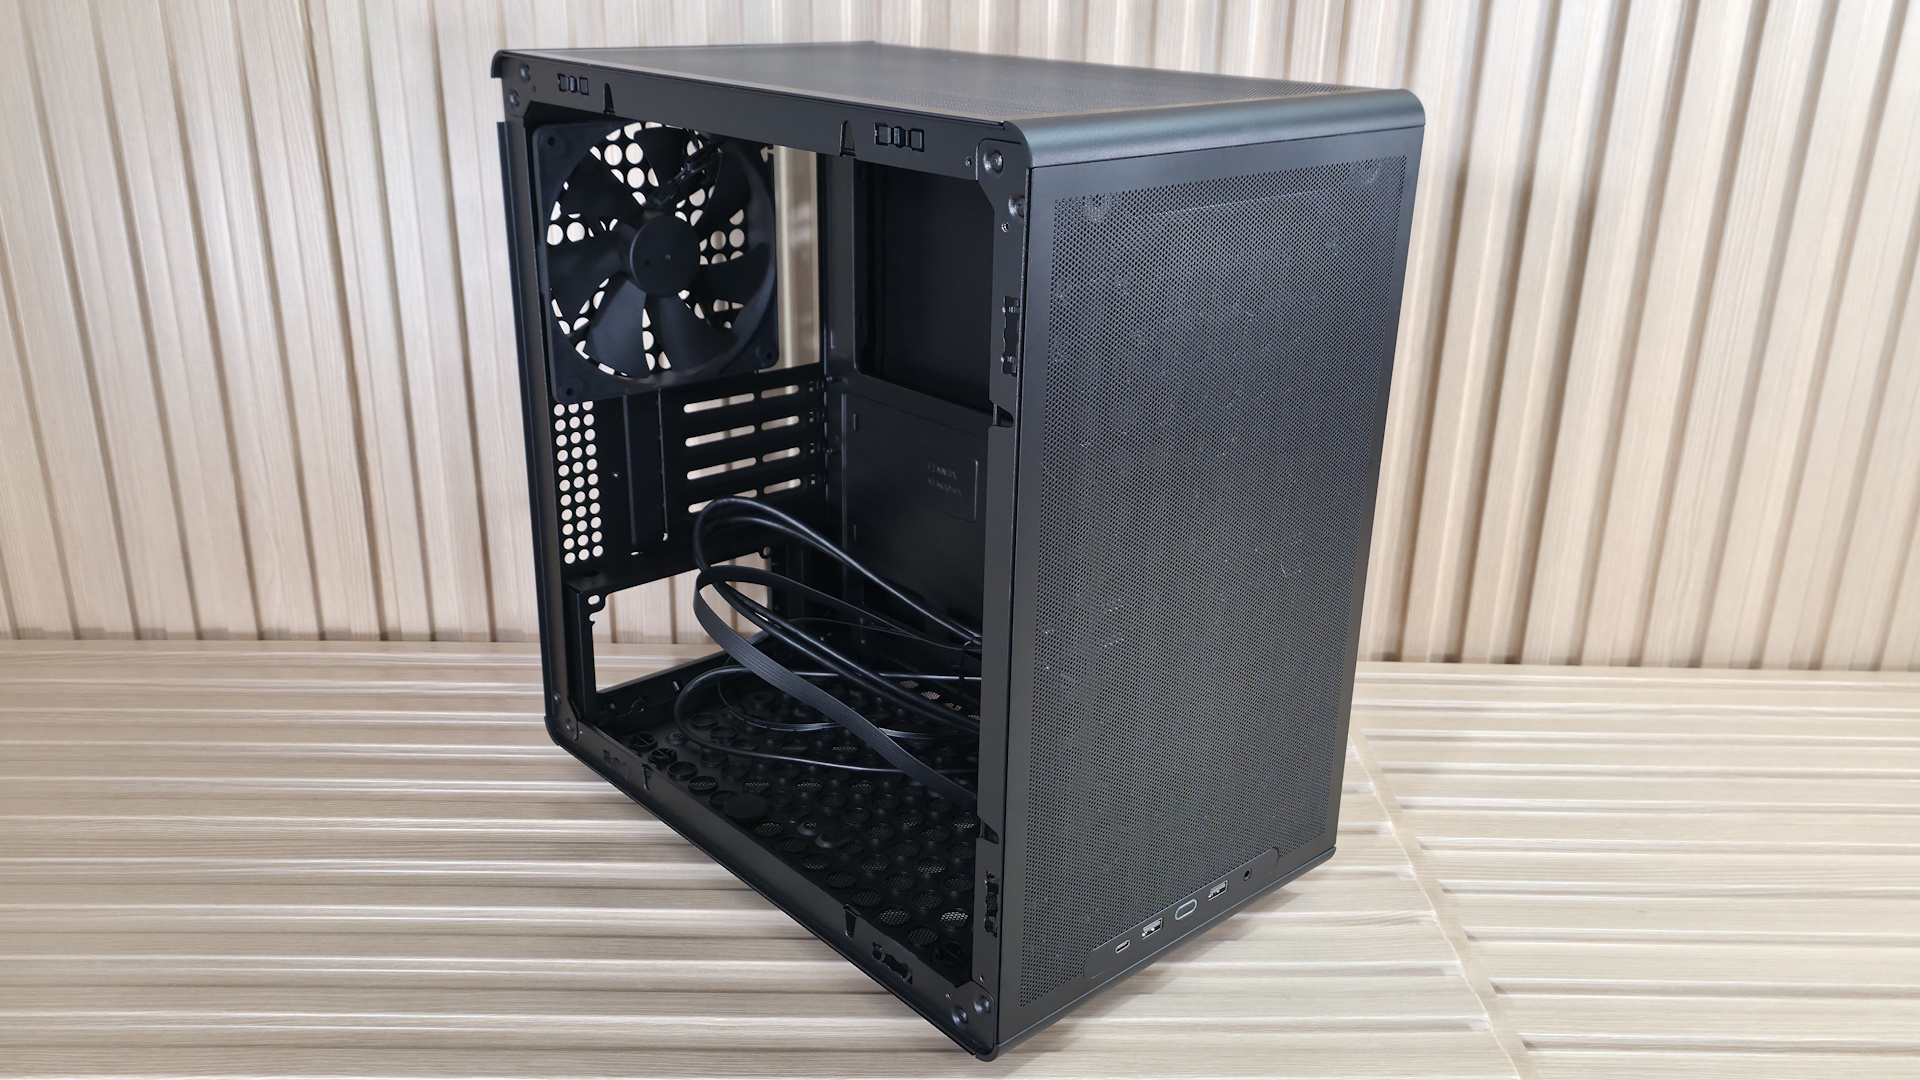
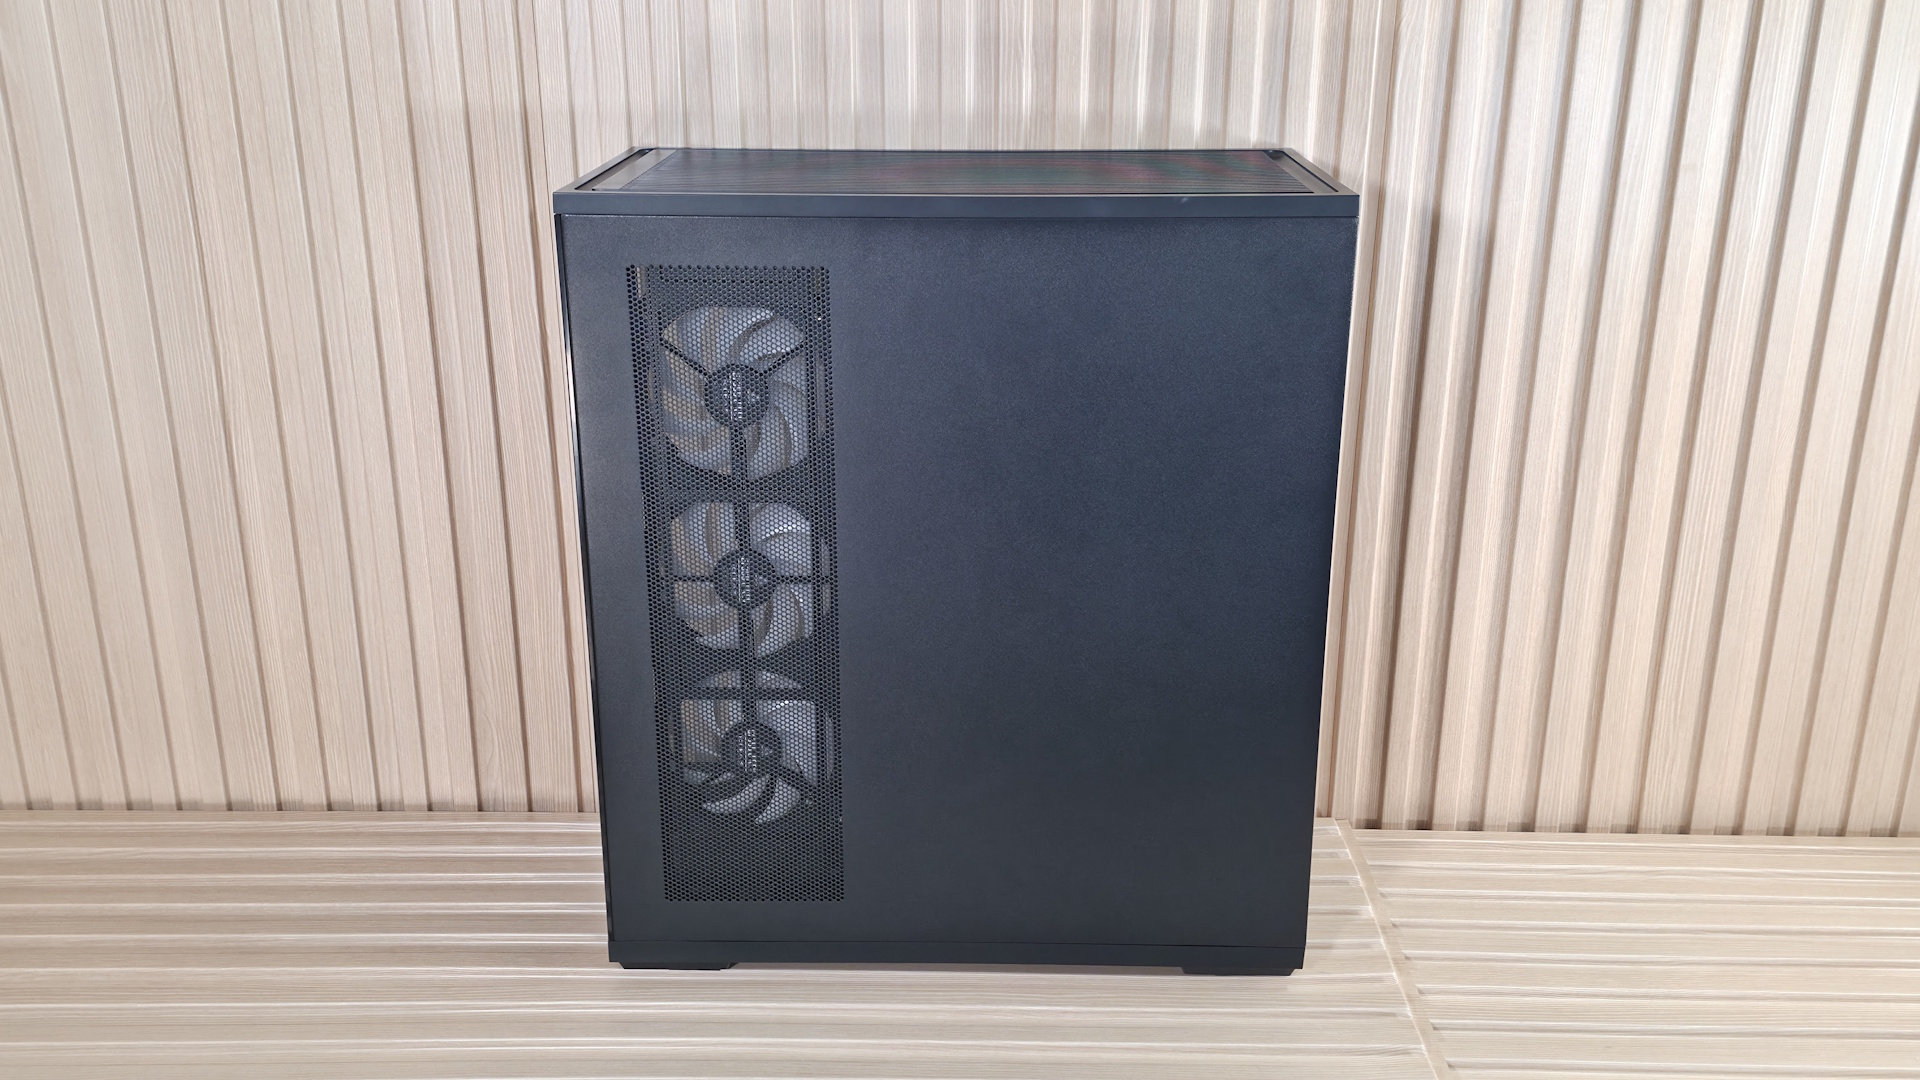
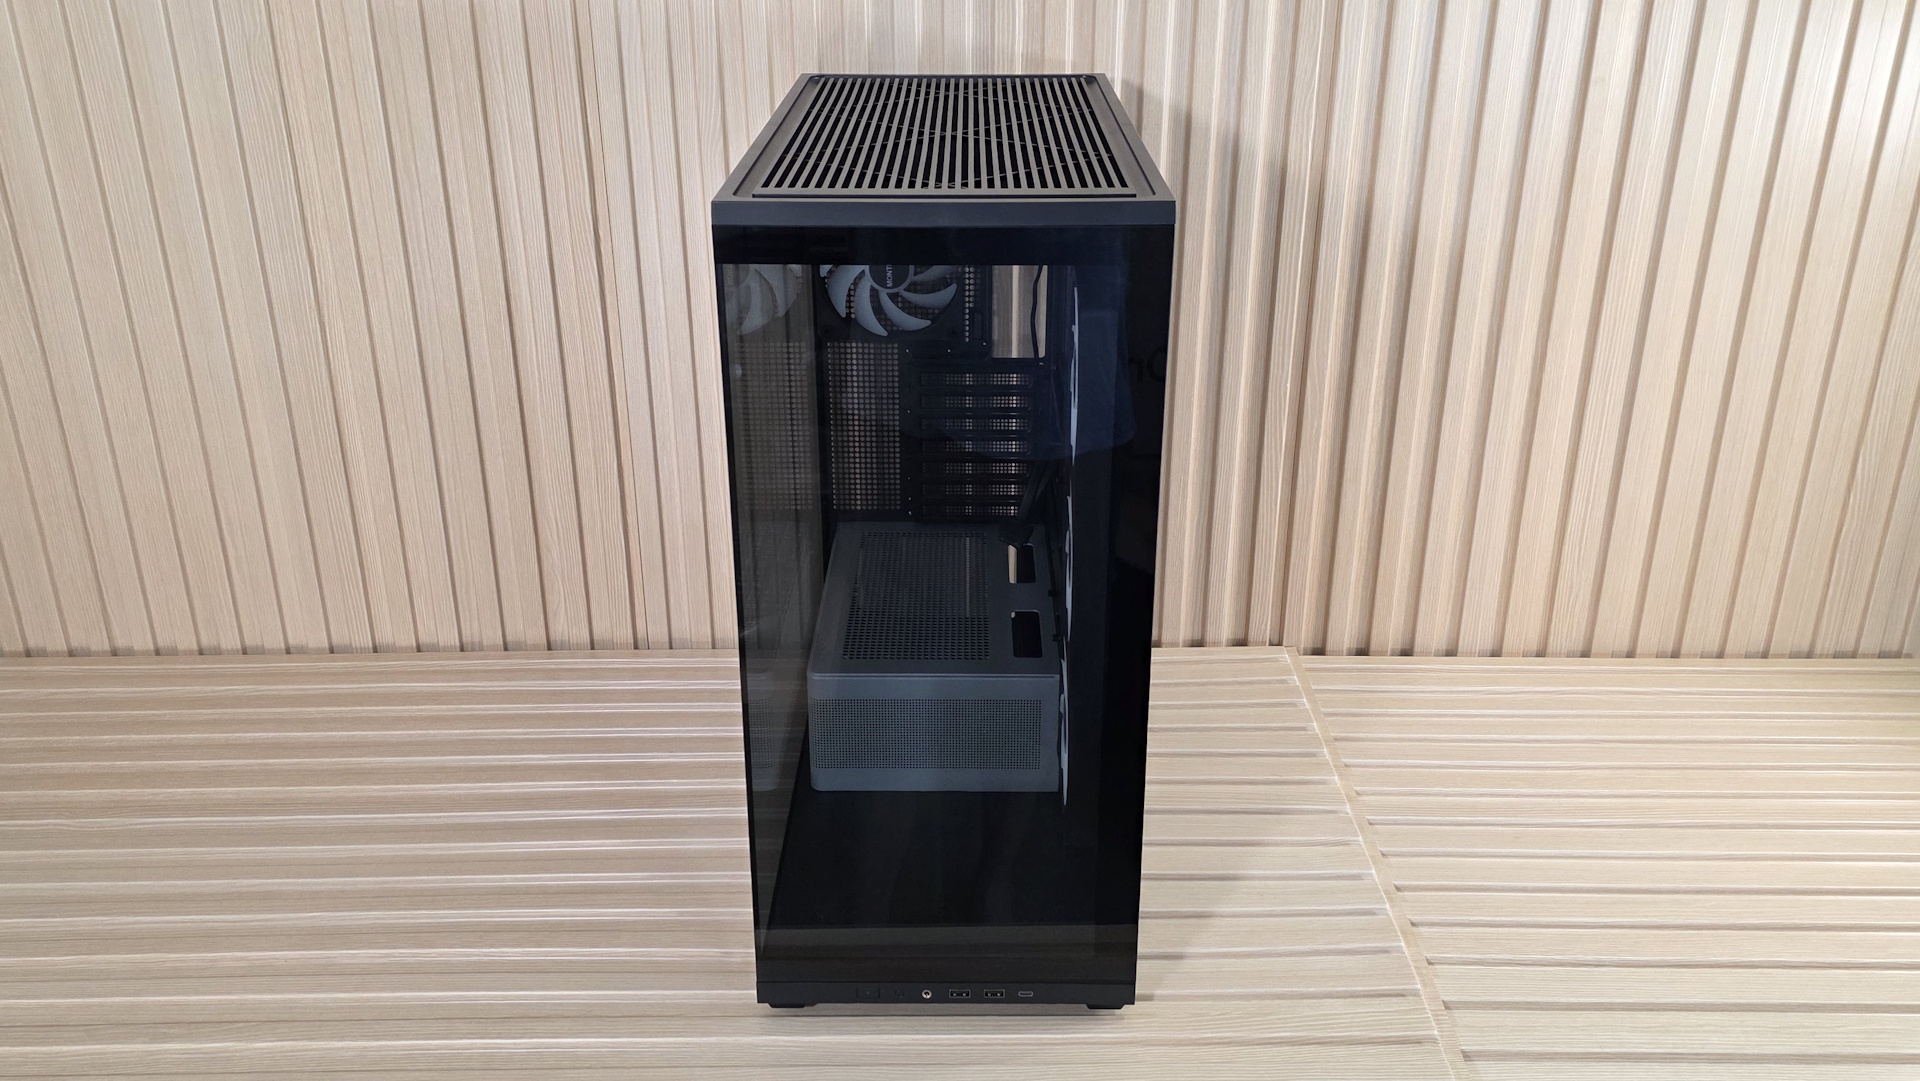
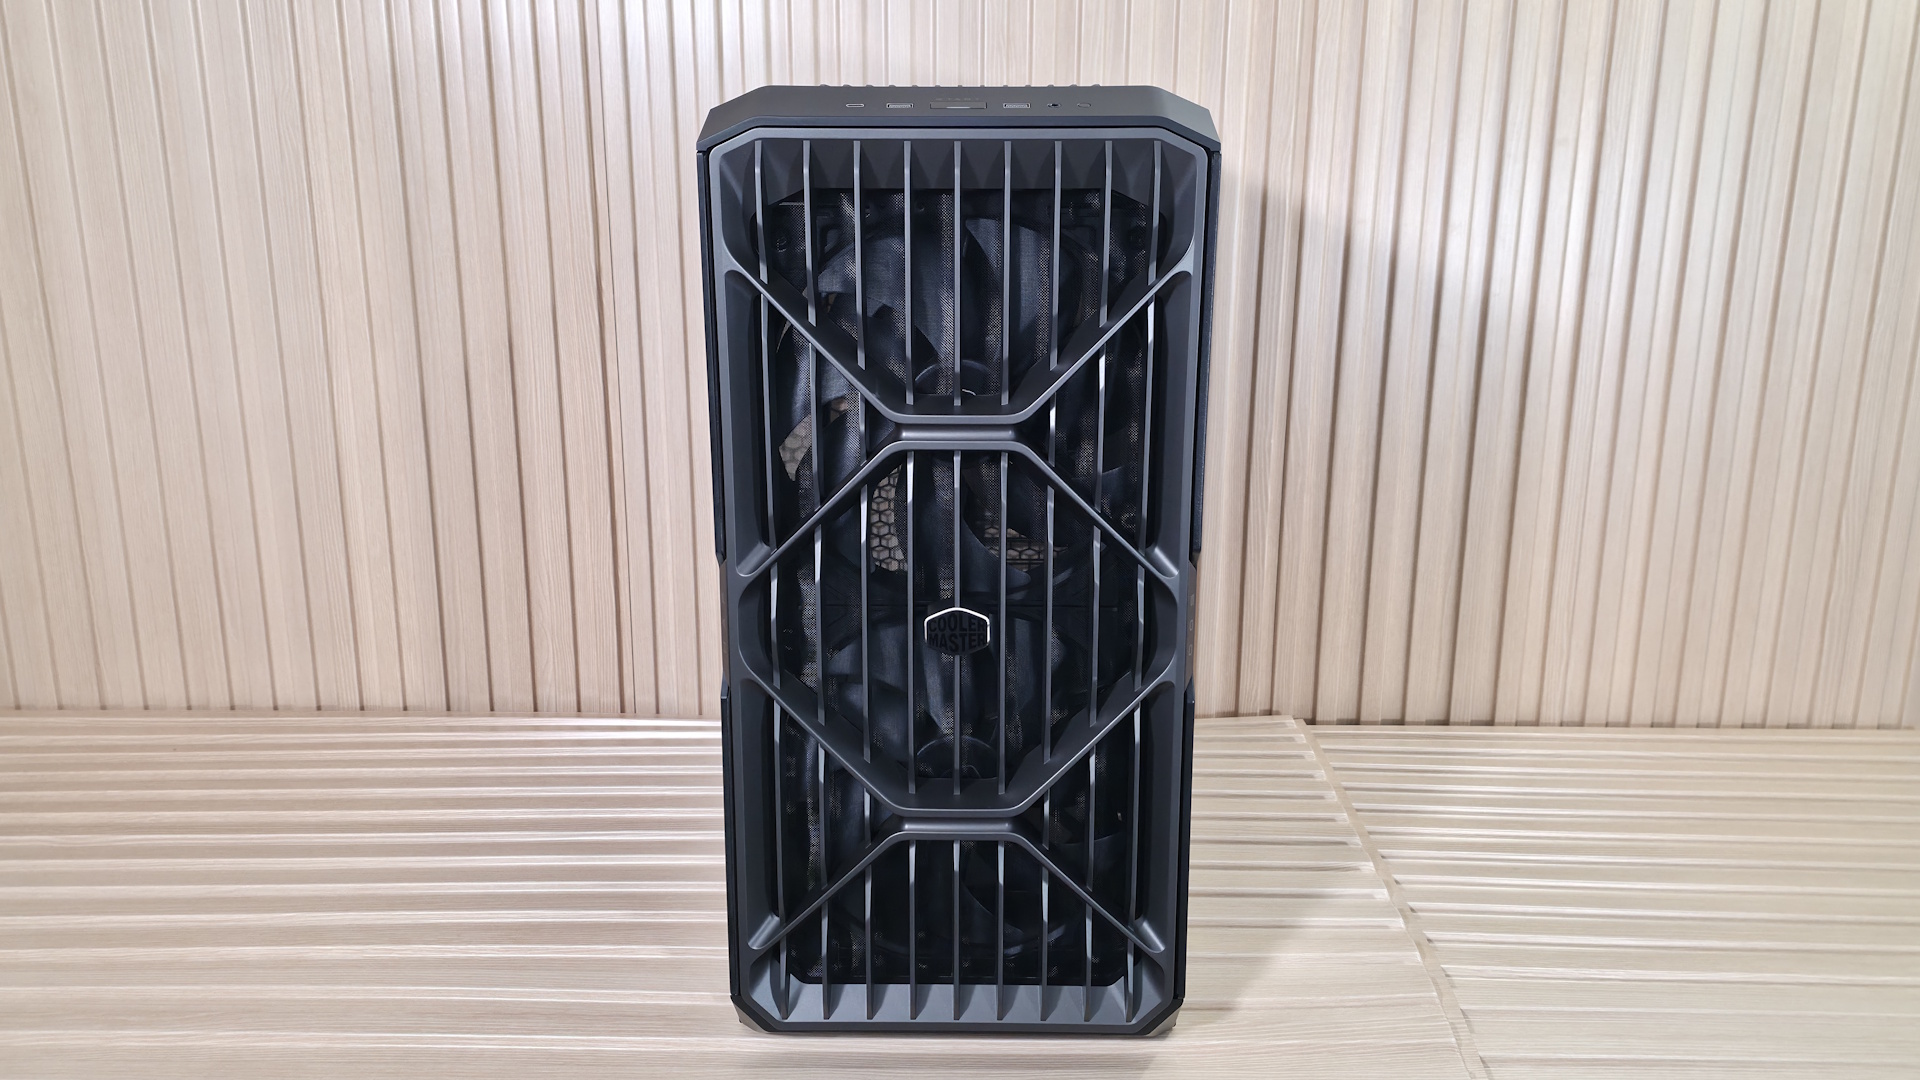
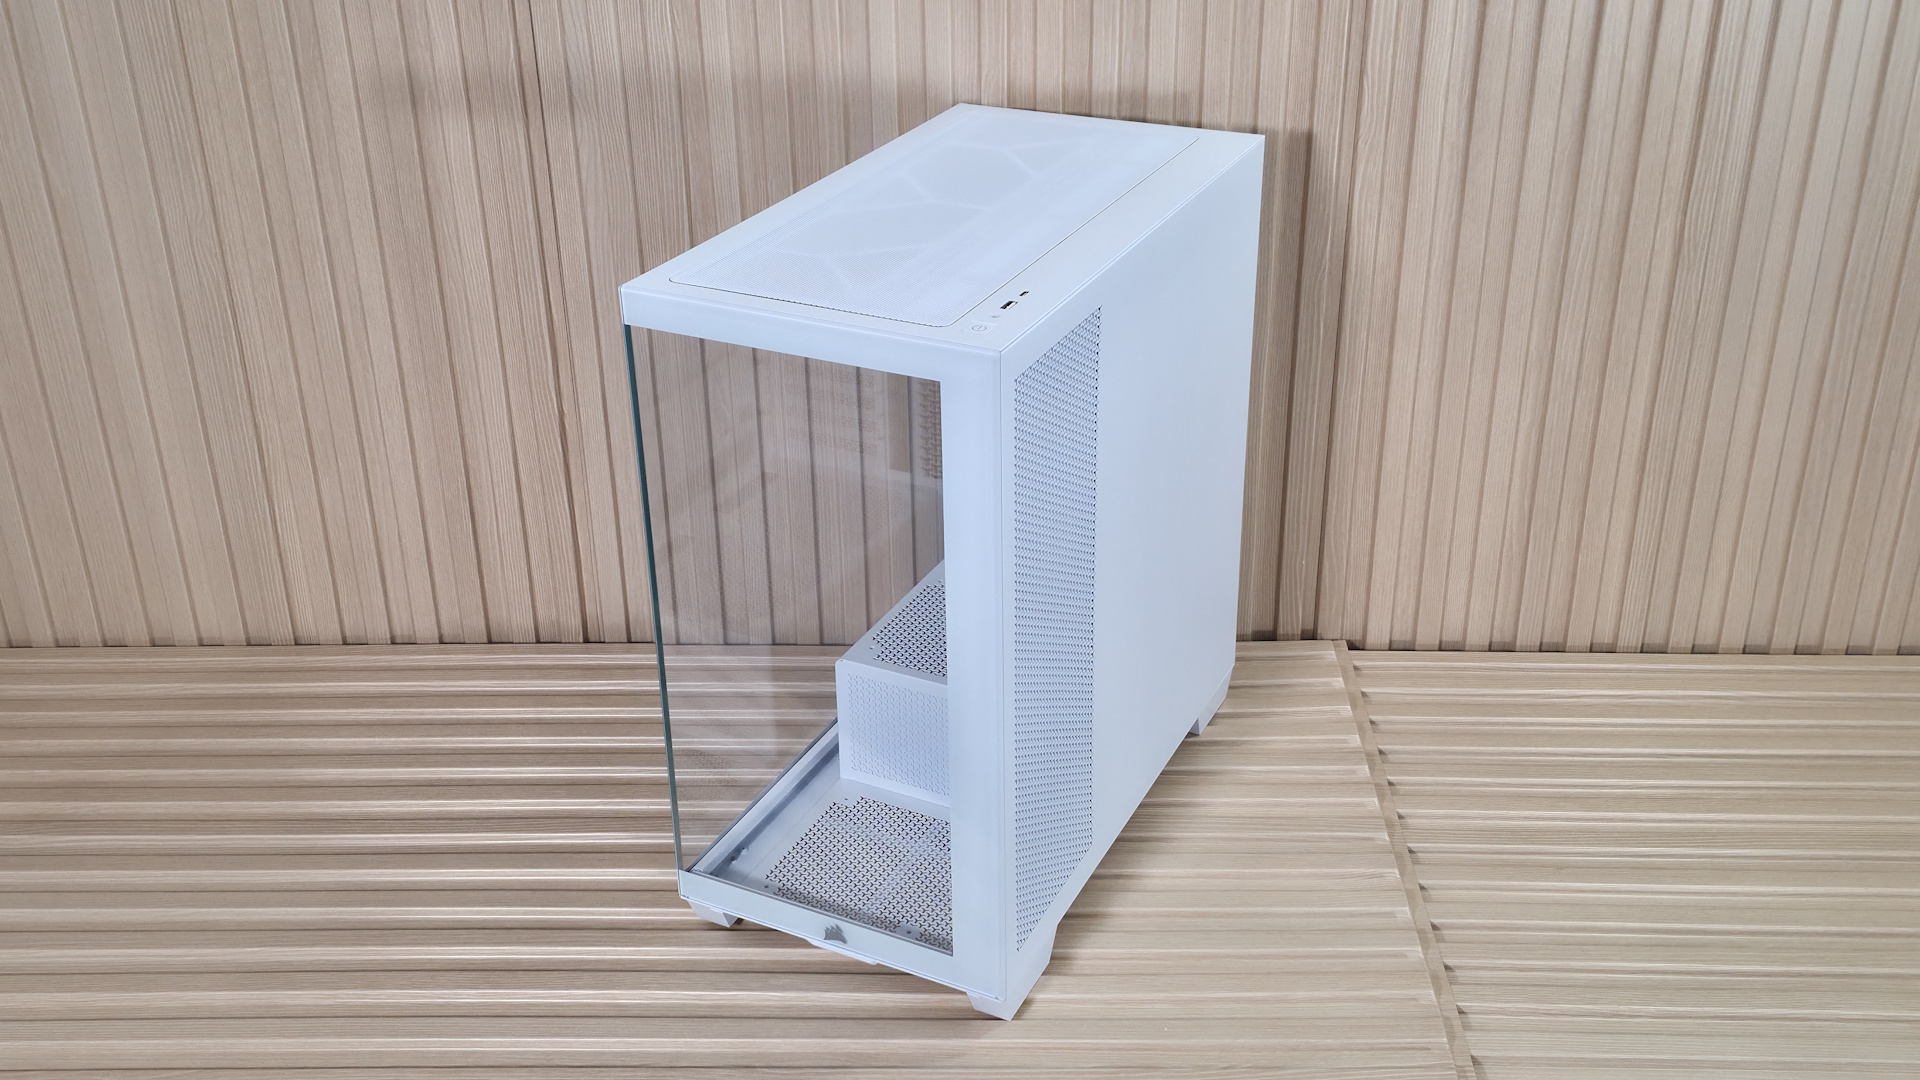
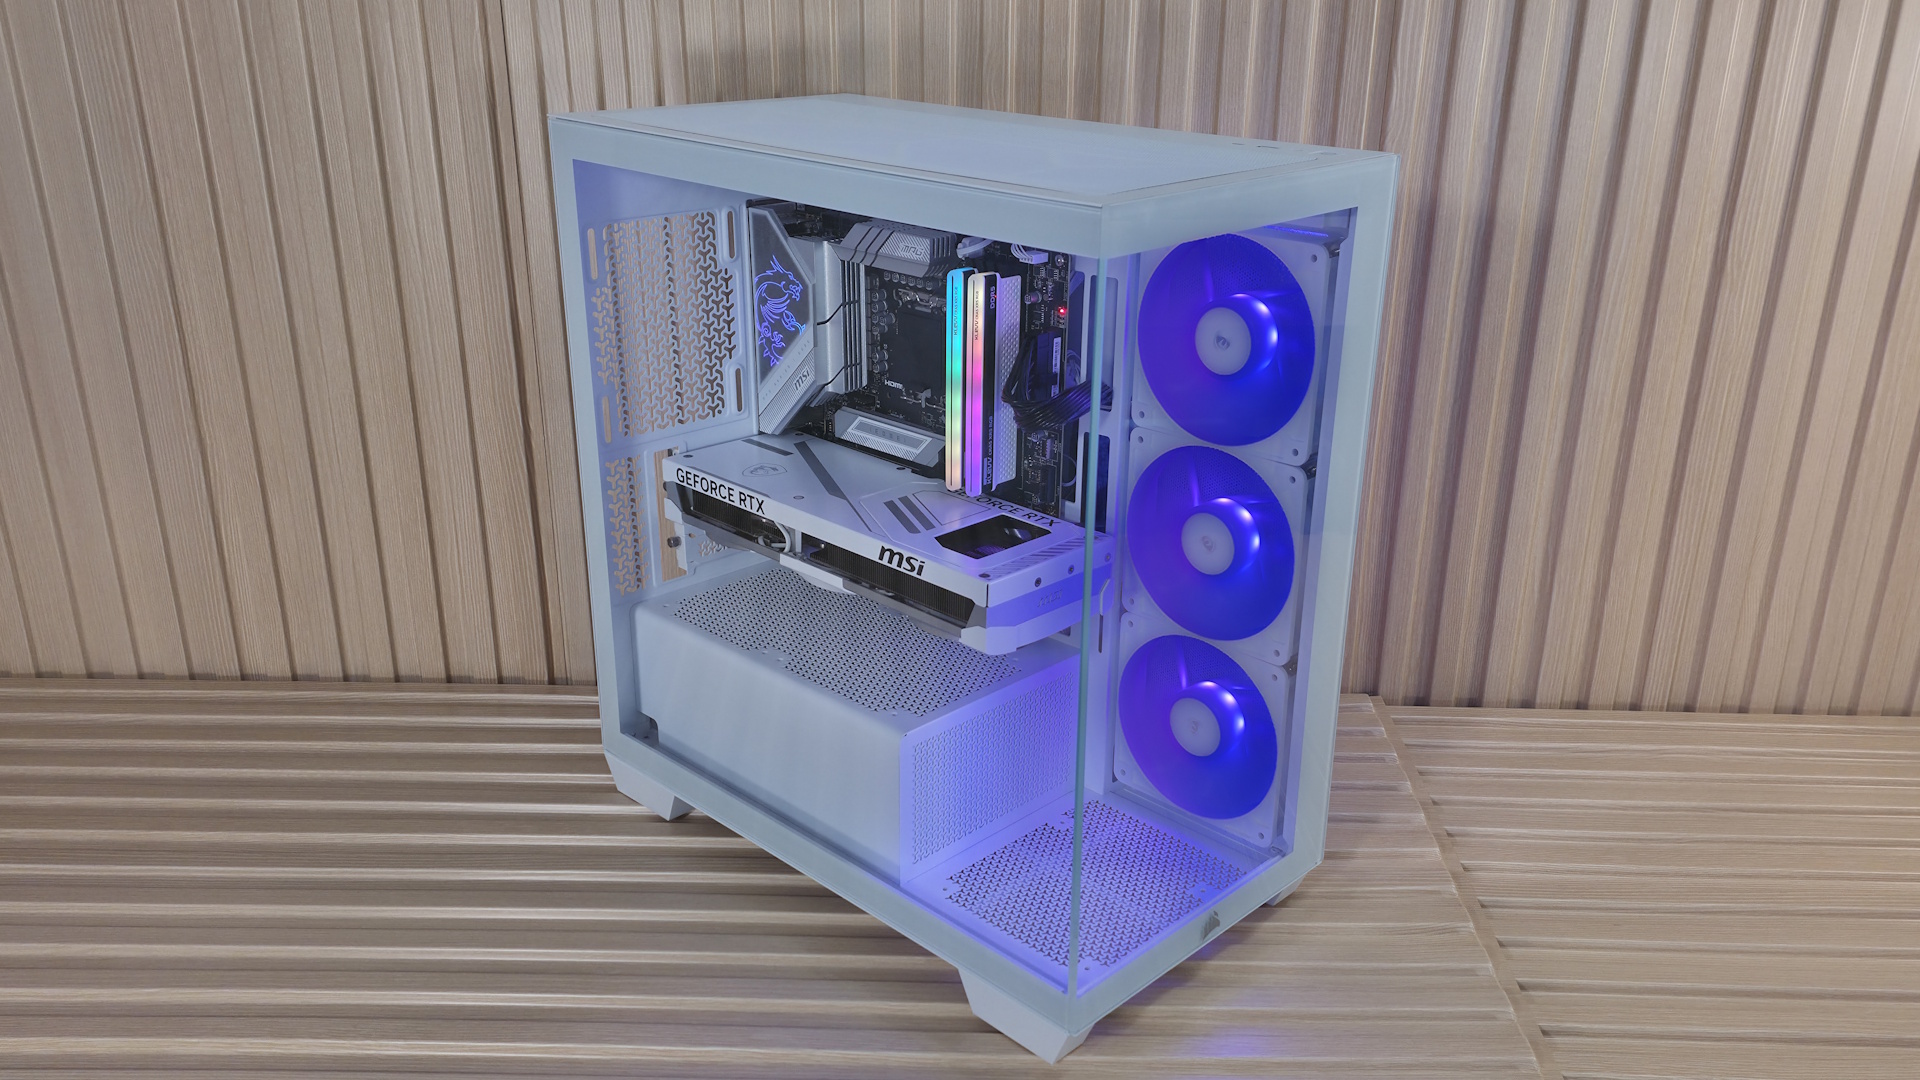
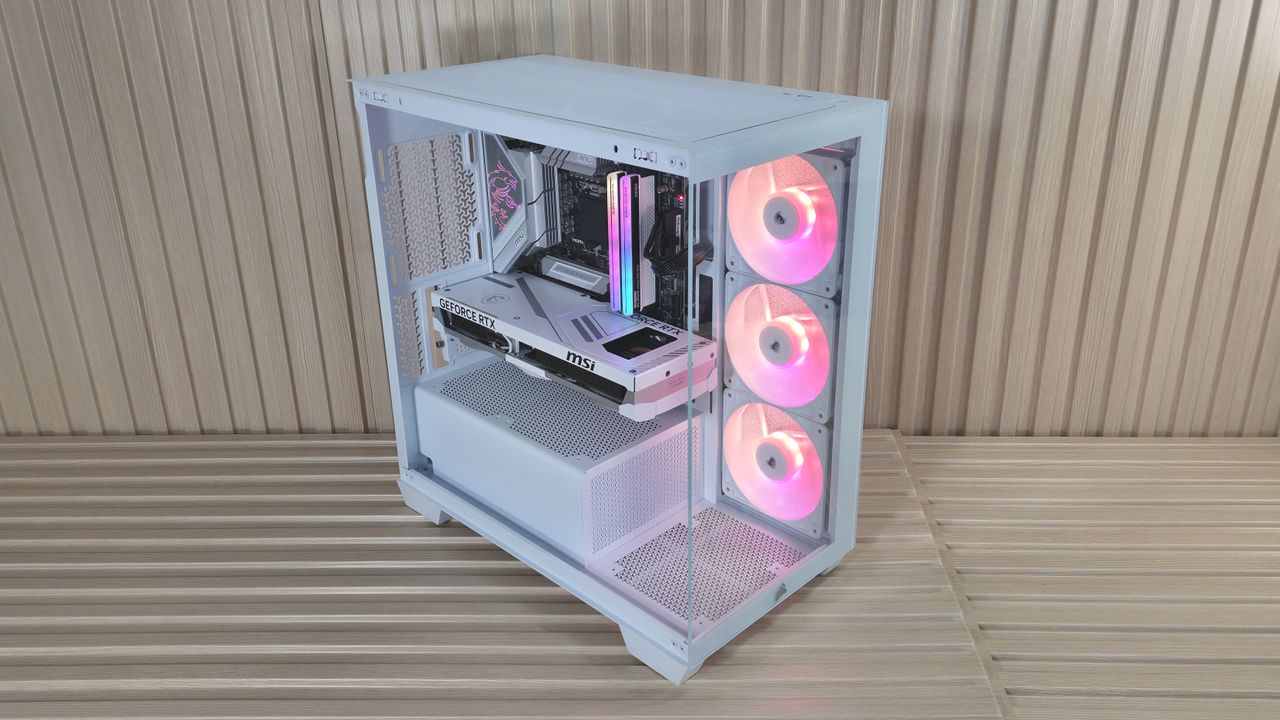
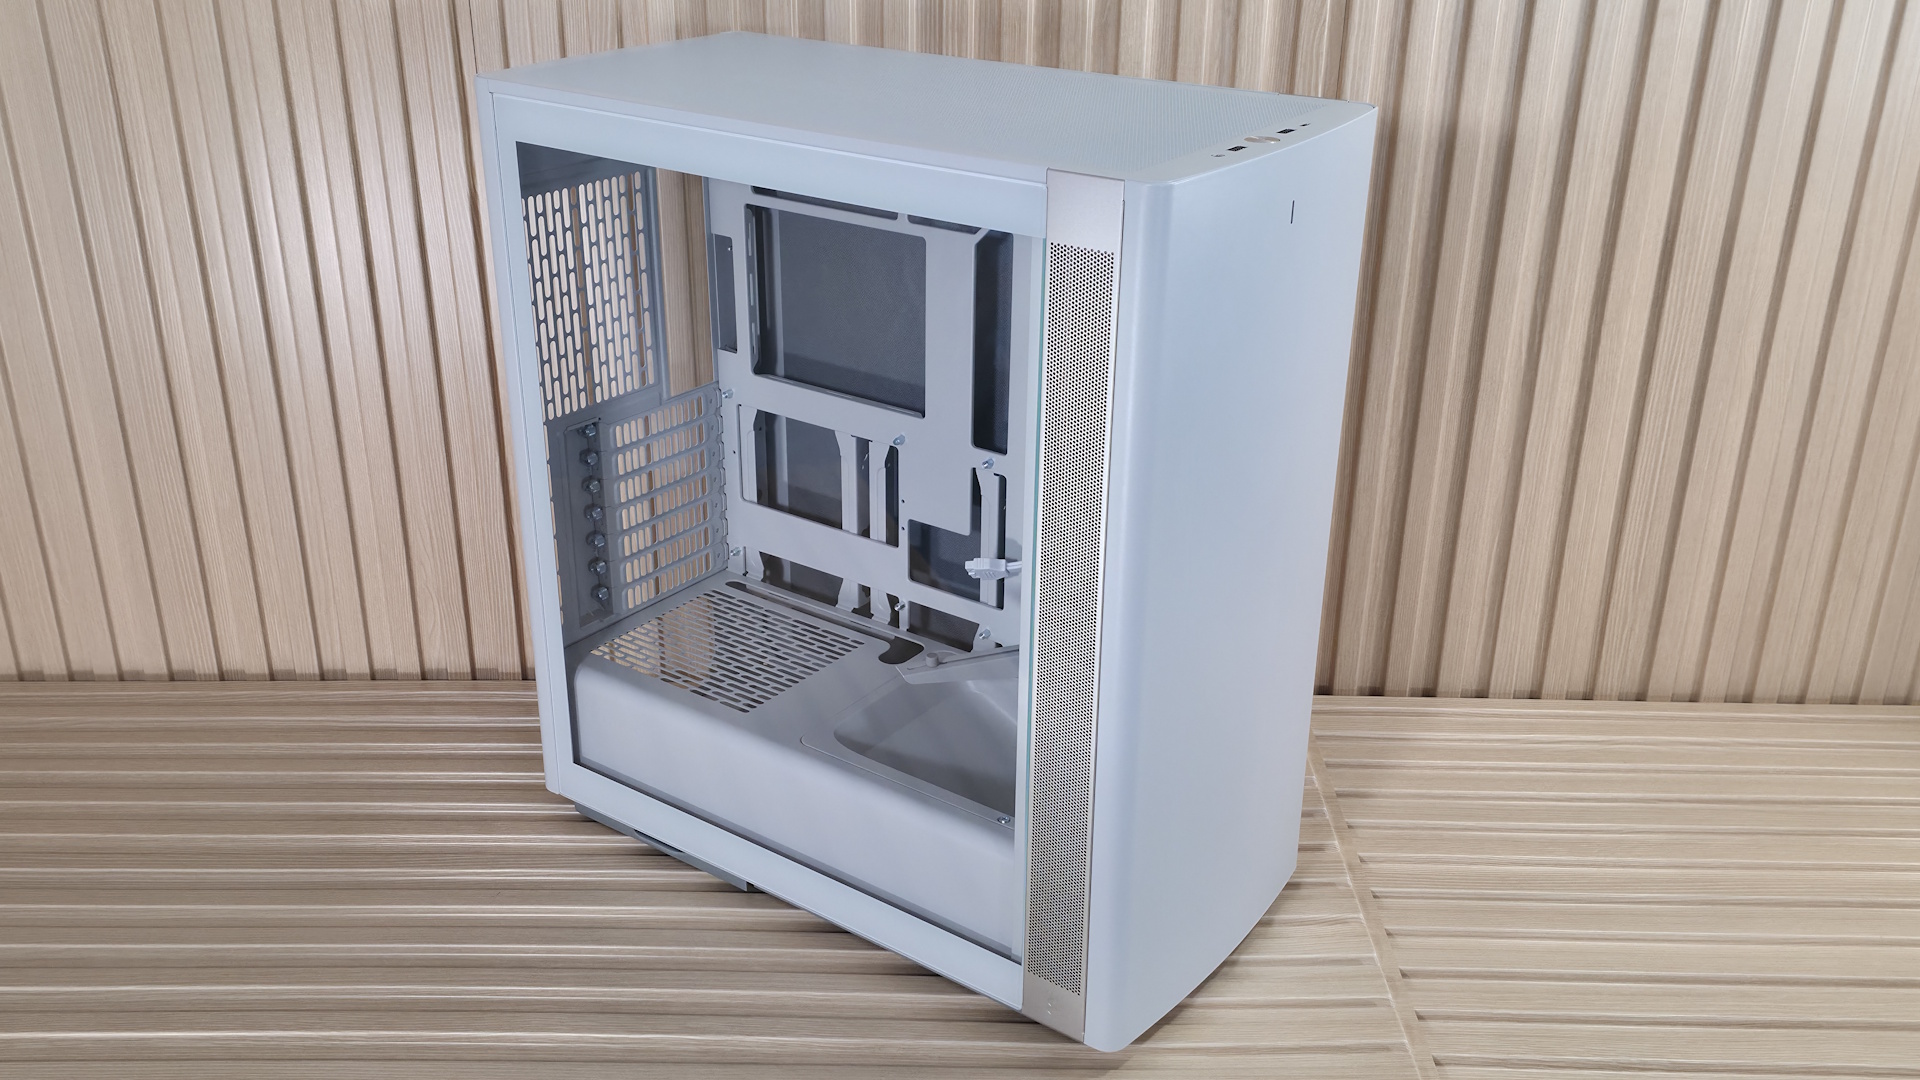
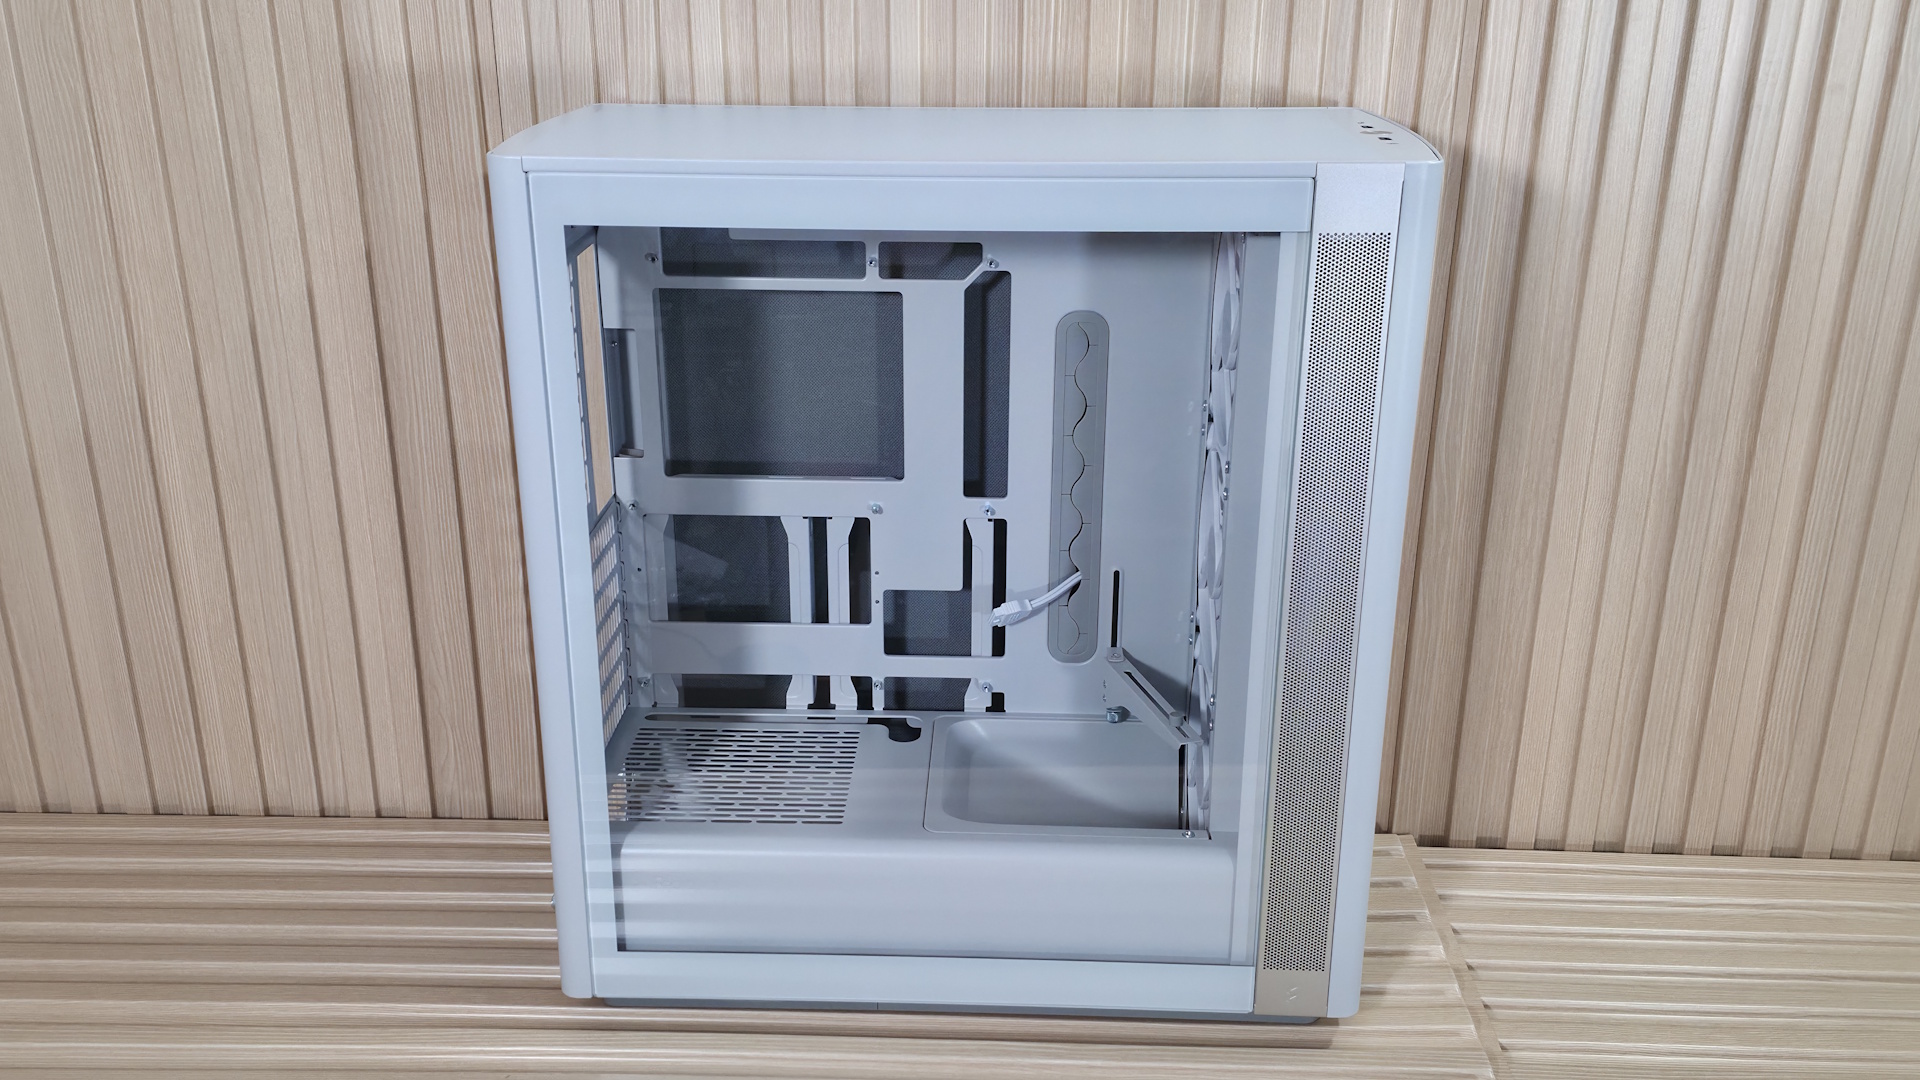
Externally, the case looks considerably different than previous versions. While it still screams "computer case," those rounded edges soften the look of the closed-front design. The IO panel is still on top, and there’s a single LED at the top of the front panel, like previous designs. Another holdover is the ability to take the chassis apart for easy access, a boon for building. Overall, I do like the look of the 'Light' colorway. The subtle rounding off of sharp edges makes the Define One stand out among past iterations. It comes in four flavors: Dark (black) and Light (off-white) with closed sides, or Dark with tinted tempered glass and Light with tempered glass and no tint – one should match your style and build preferences.
Fractal Define One - Outside
Future
Fractal Define One - Outside
Future
Fractal Define One - Outside
Future
Fractal Define One - Outside
Future
Fractal Define One - Outside
Future
Fractal Define One - Outside
Future
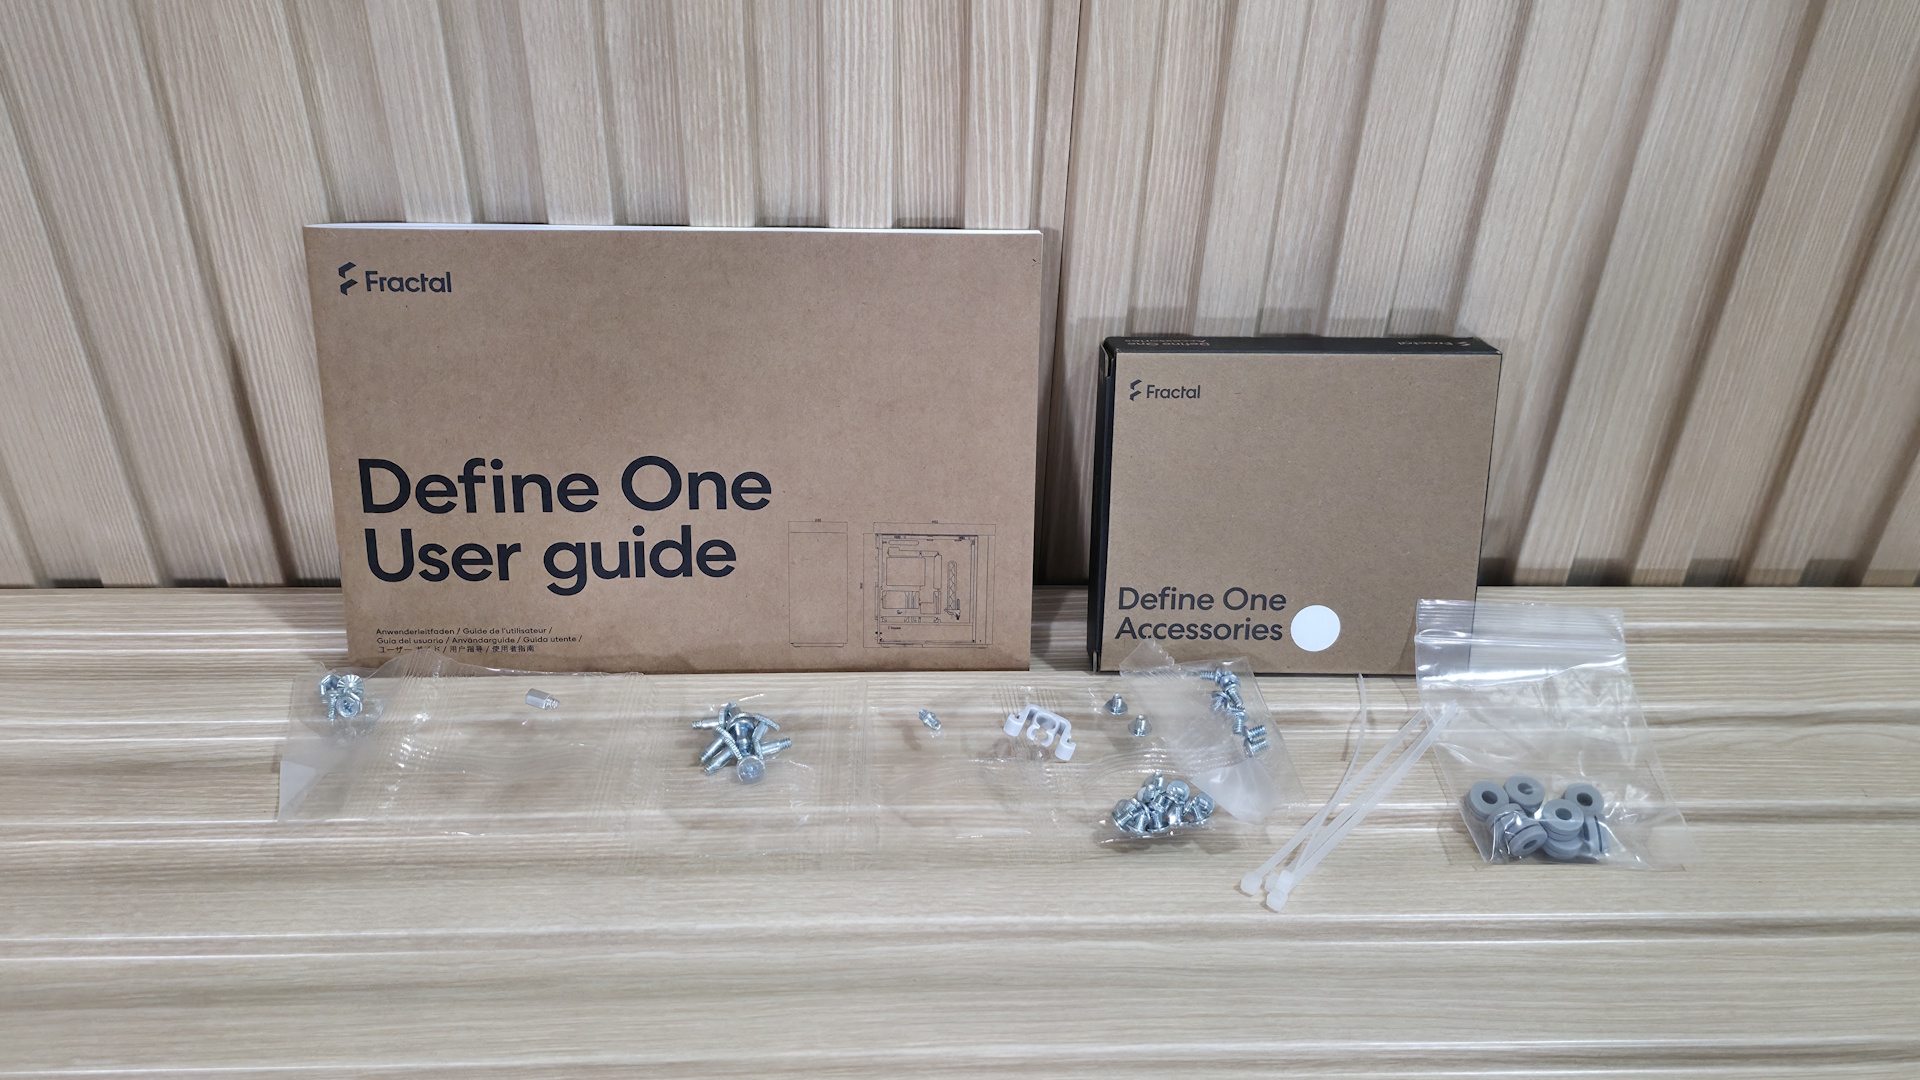
Fractal Define One - accessories
Future

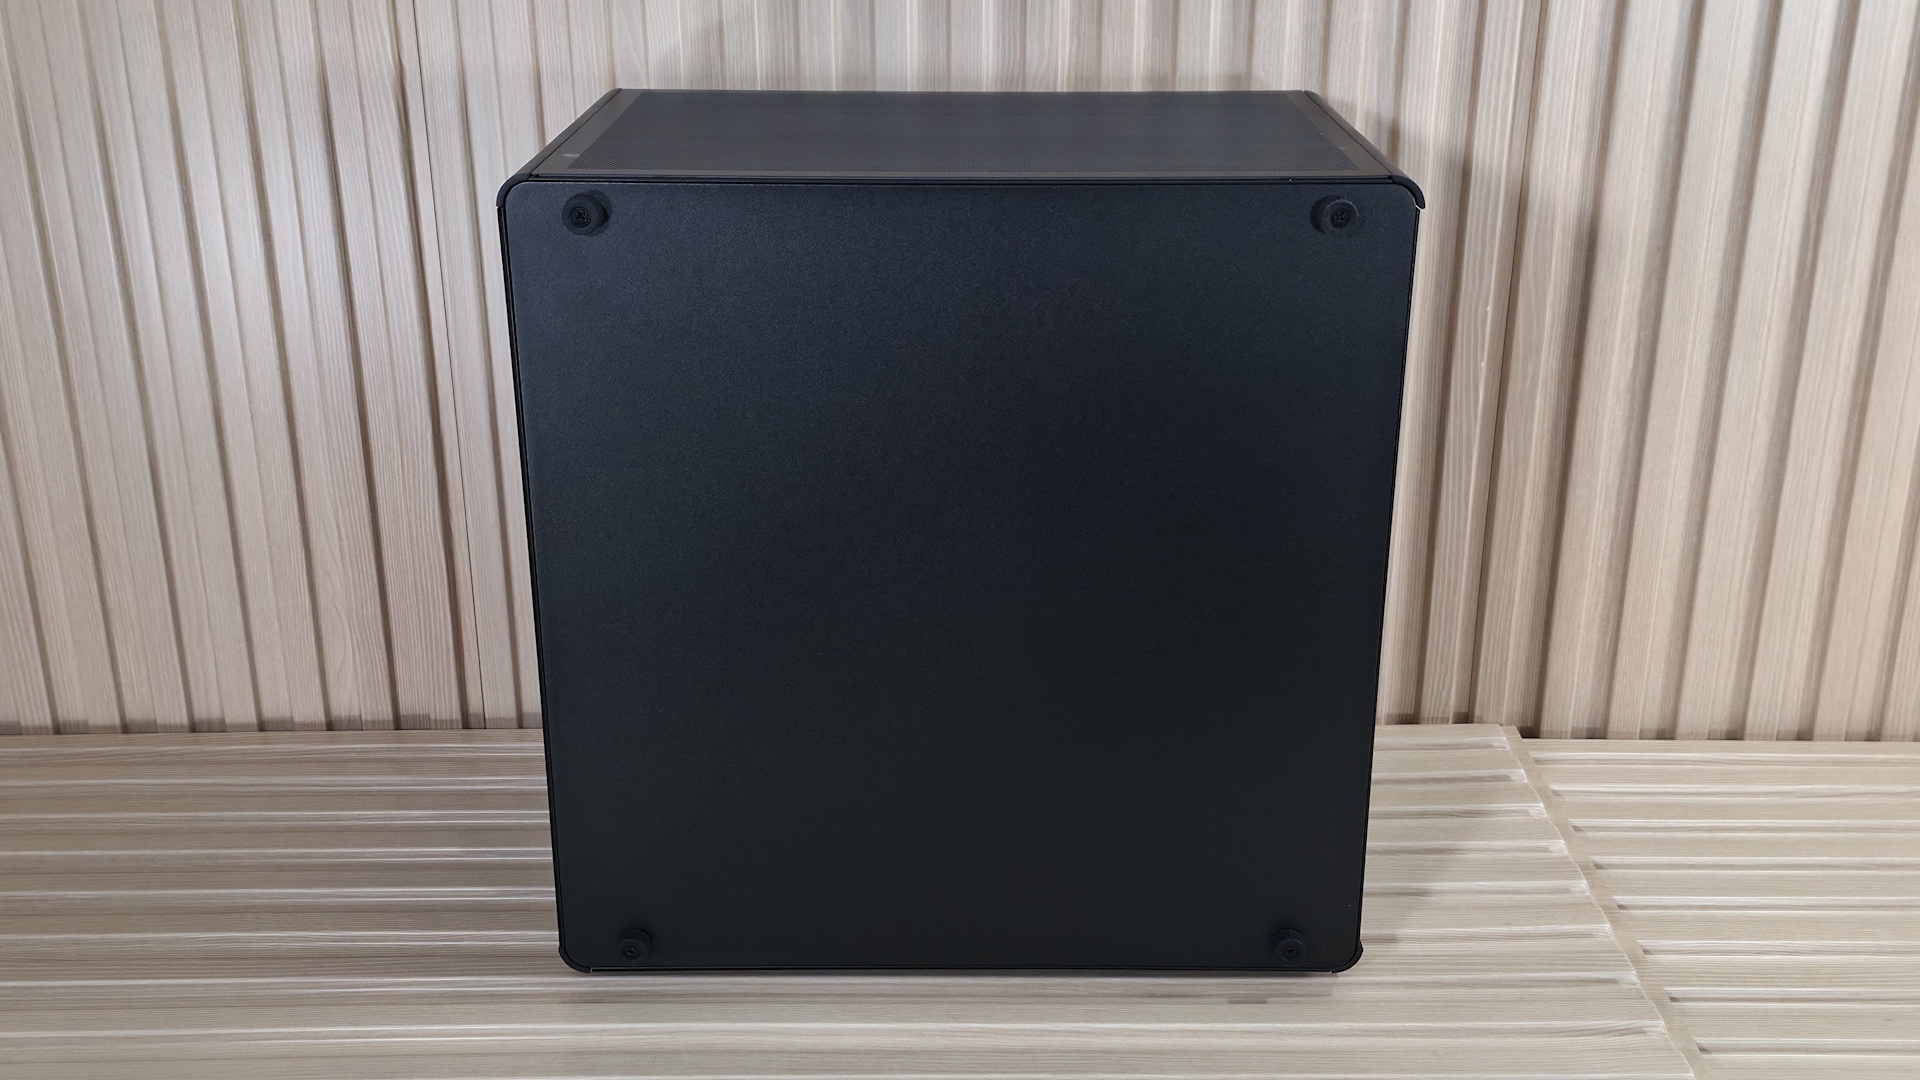
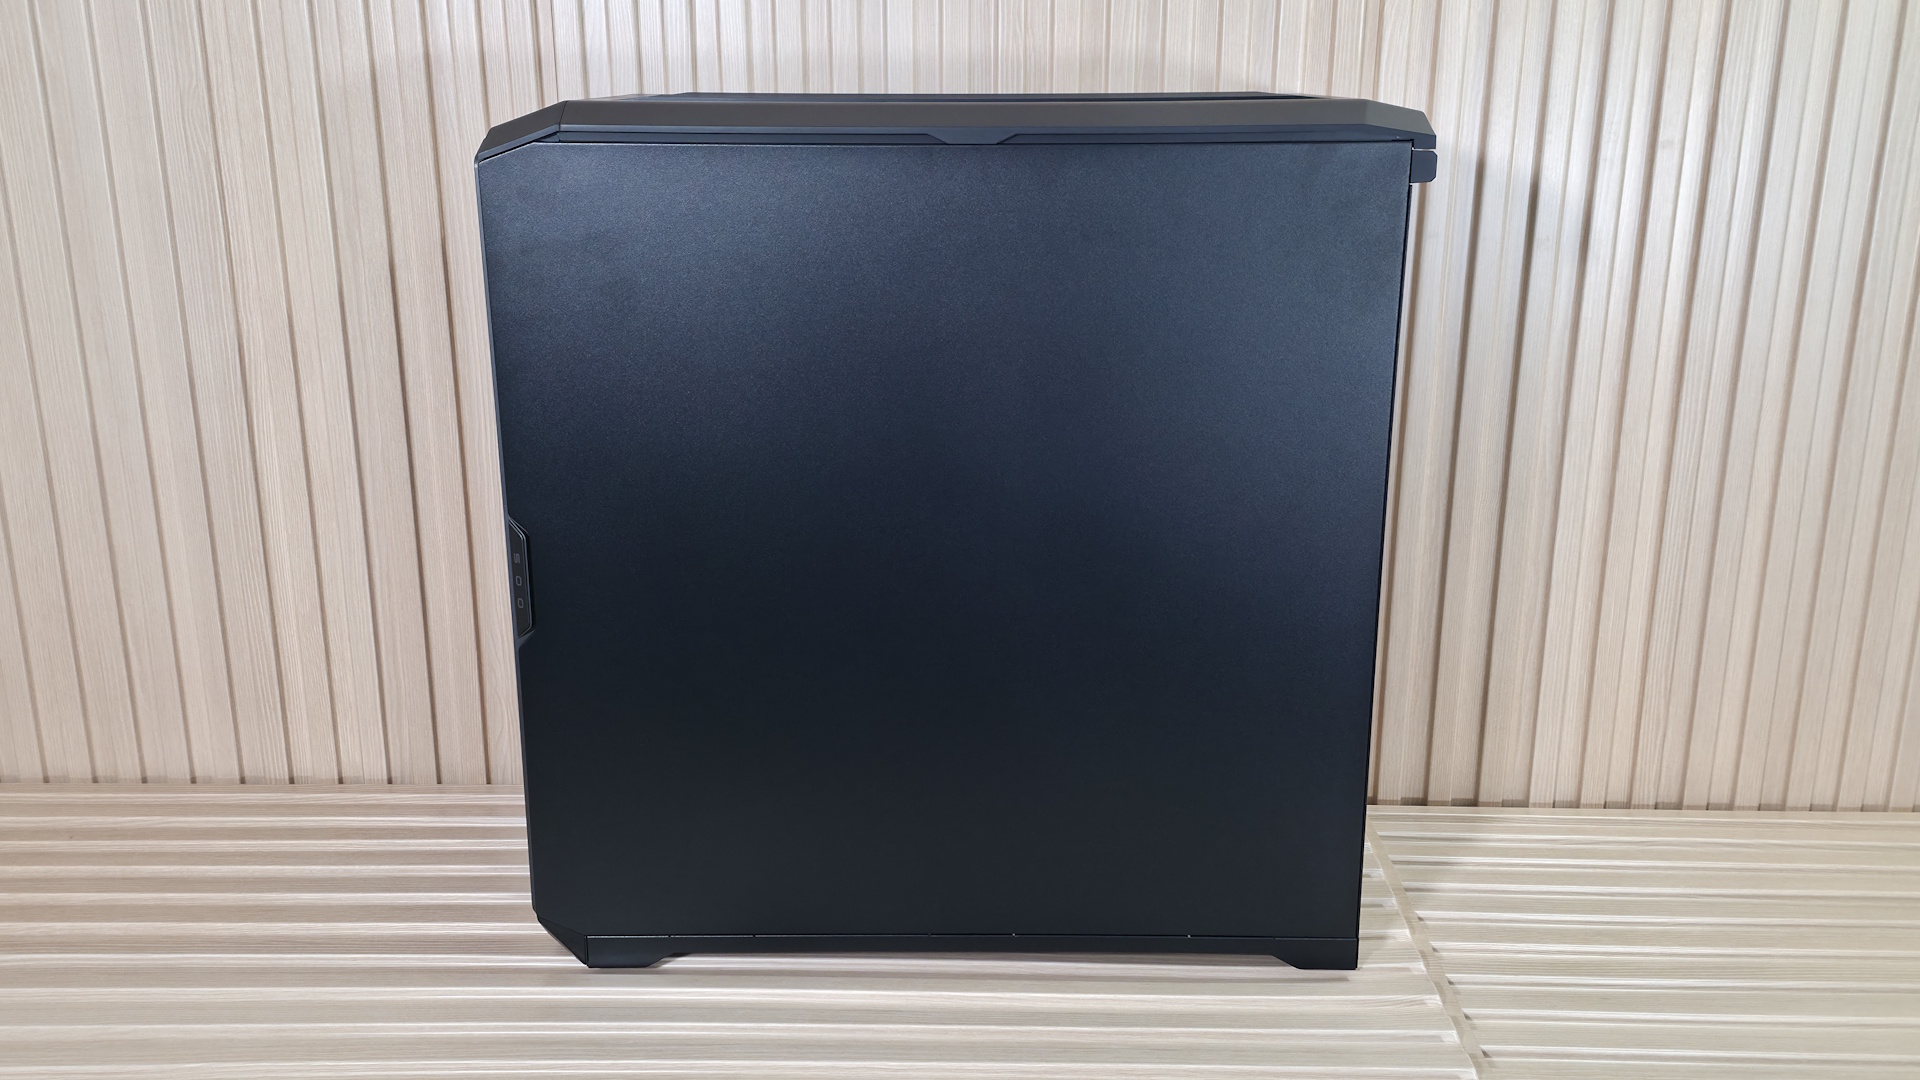
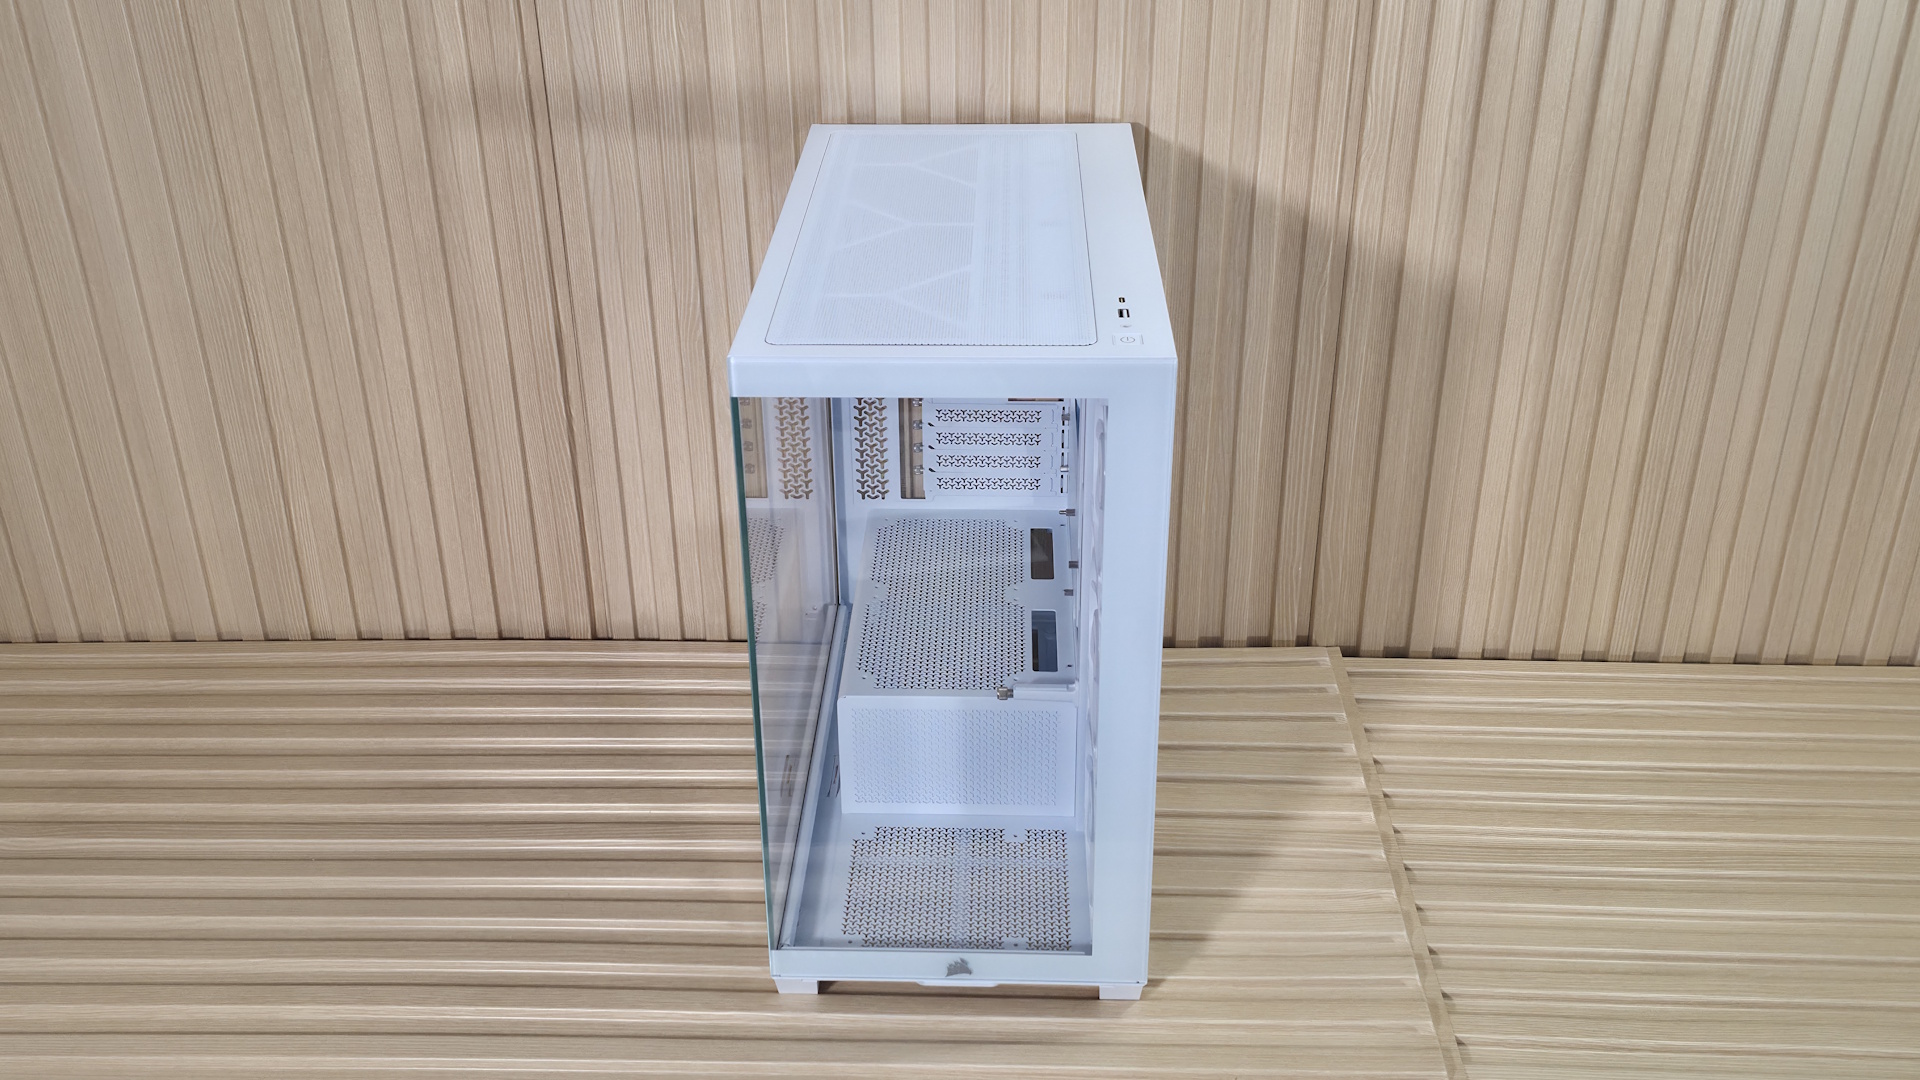
The side of the off-white Light case uses a clear tempered glass panel, secured by three tabs at the bottom and held to the frame by two ball-and-socket latching mechanisms on top. Slot the glass in and push on top and you're done. The clear glass allows for unobstructed views of the internals and easy access to the components inside. The other side panel is solid and bitumen-lined for sound dampening (like the front panel), and it attaches the same way, with tabs at the bottom and ball-and-socket mechanisms on top. Both have a small indentation at the top and rear of the case where you can easily grab and remove the panels.

Intake also comes through the sides. Two aluminum strips run vertically with small circular perforations, and on the Light chassis, the strips contrast with the rest of the off-white case and look good, breaking up the otherwise all-white colorway. These intakes also use a removable dust filter, accessible from the inside when you take off the front panel. It’s not the best situation for high airflow, but as we’ll see later, the Define One didn’t do a terrible job in our testing, especially on the GPU, using only one additional case fan, leaving the top empty.

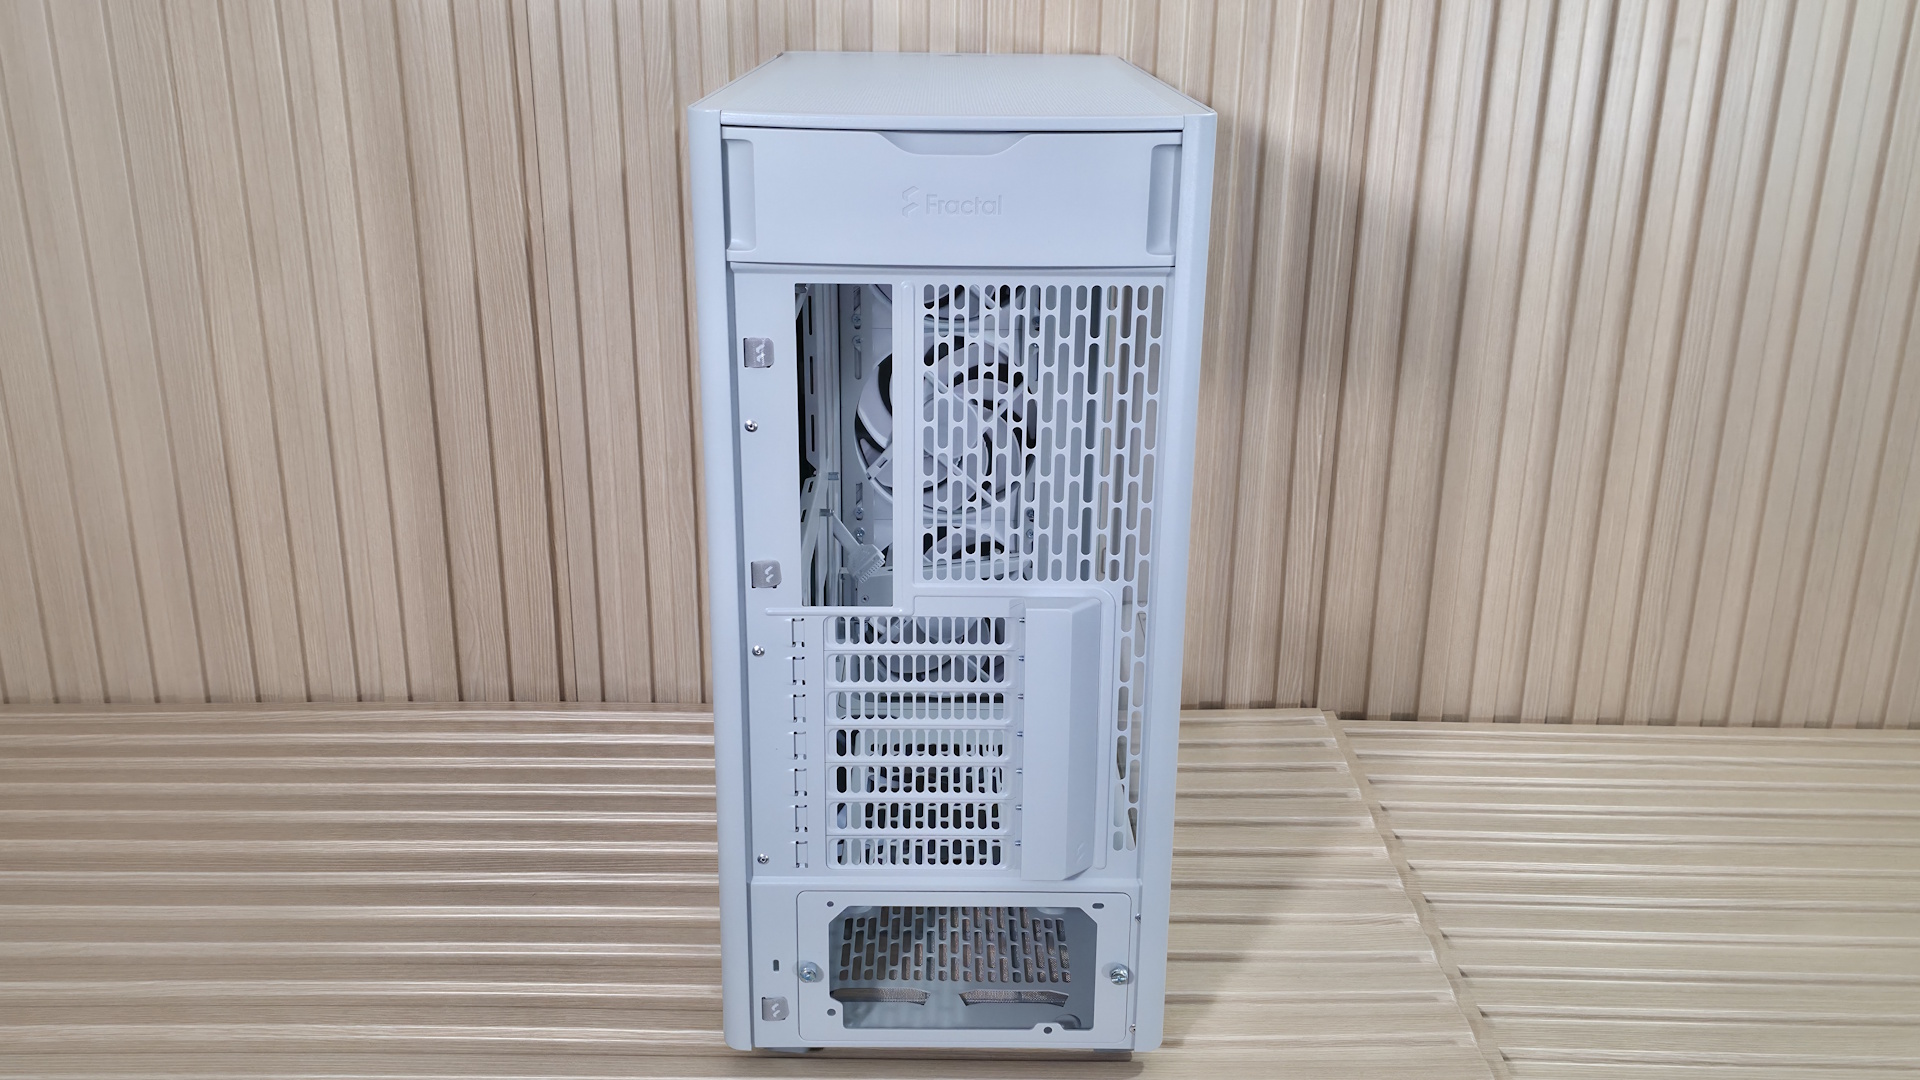
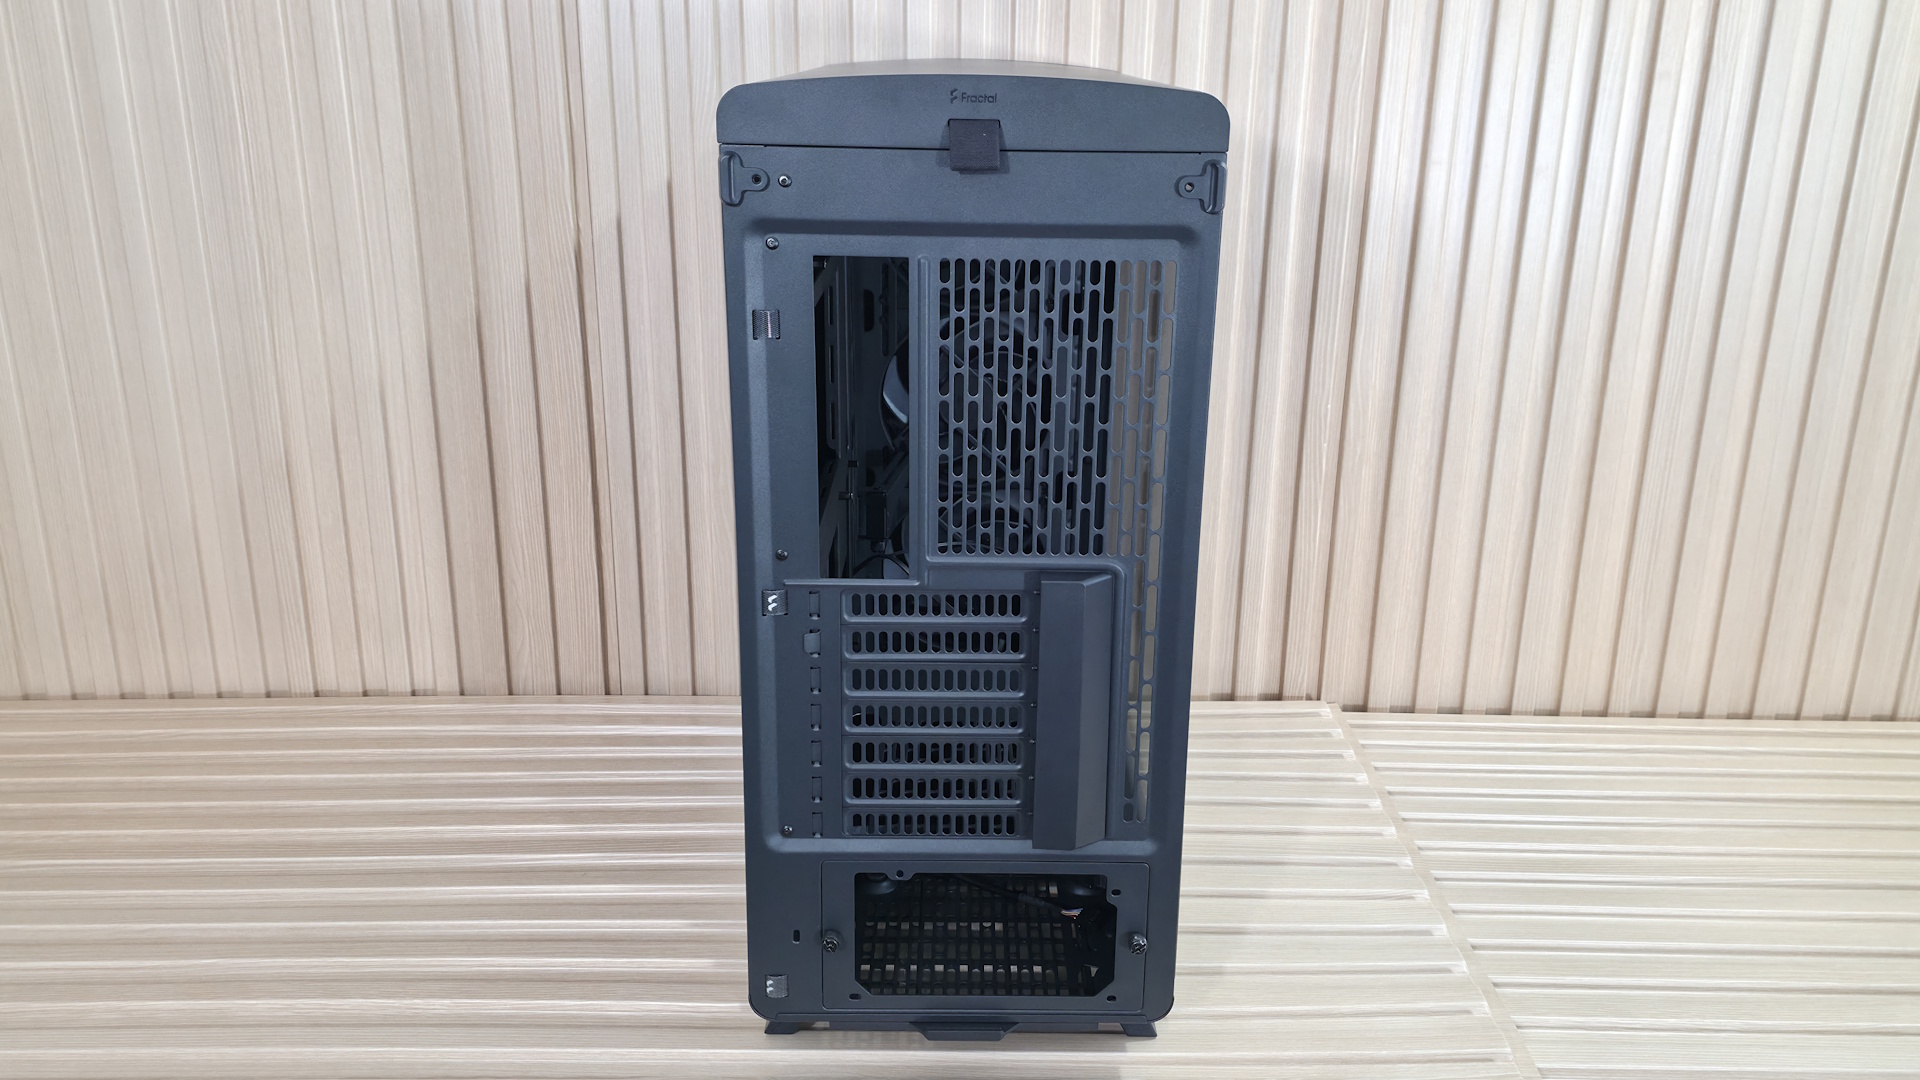
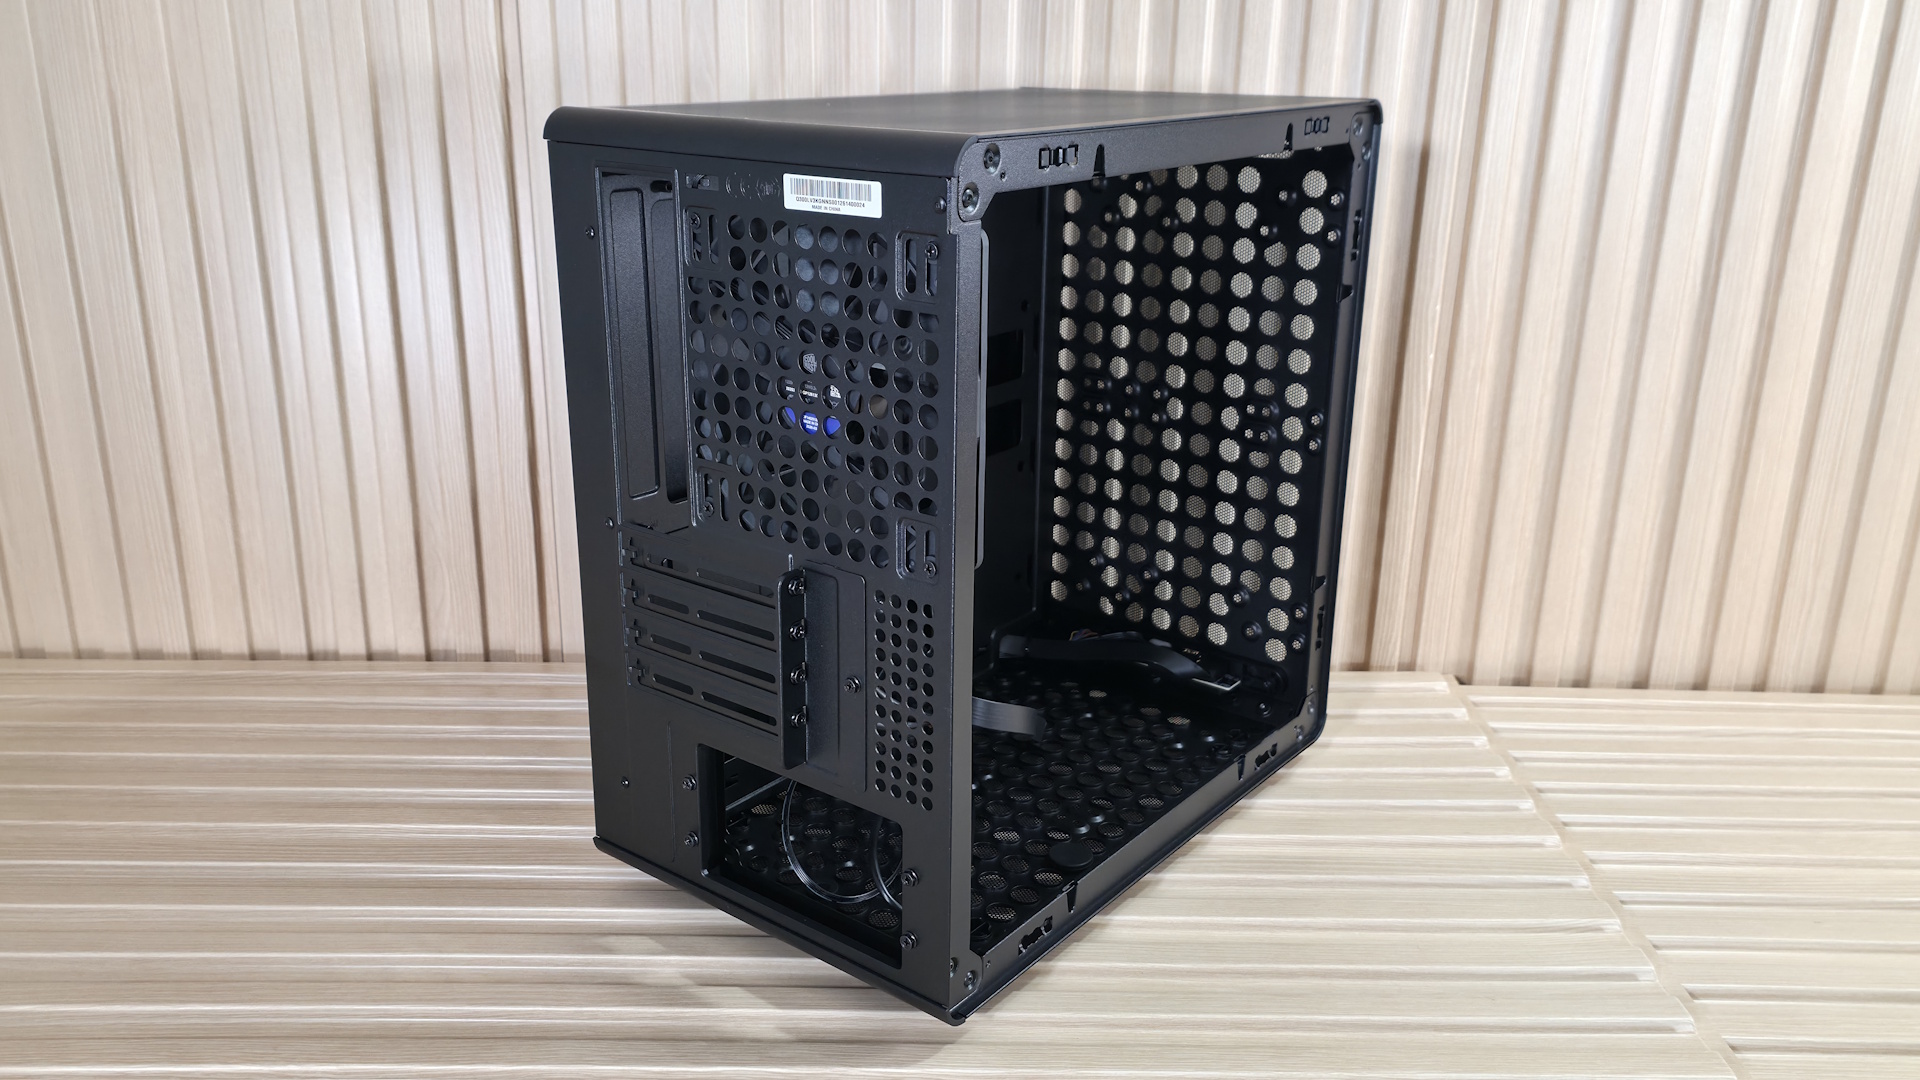
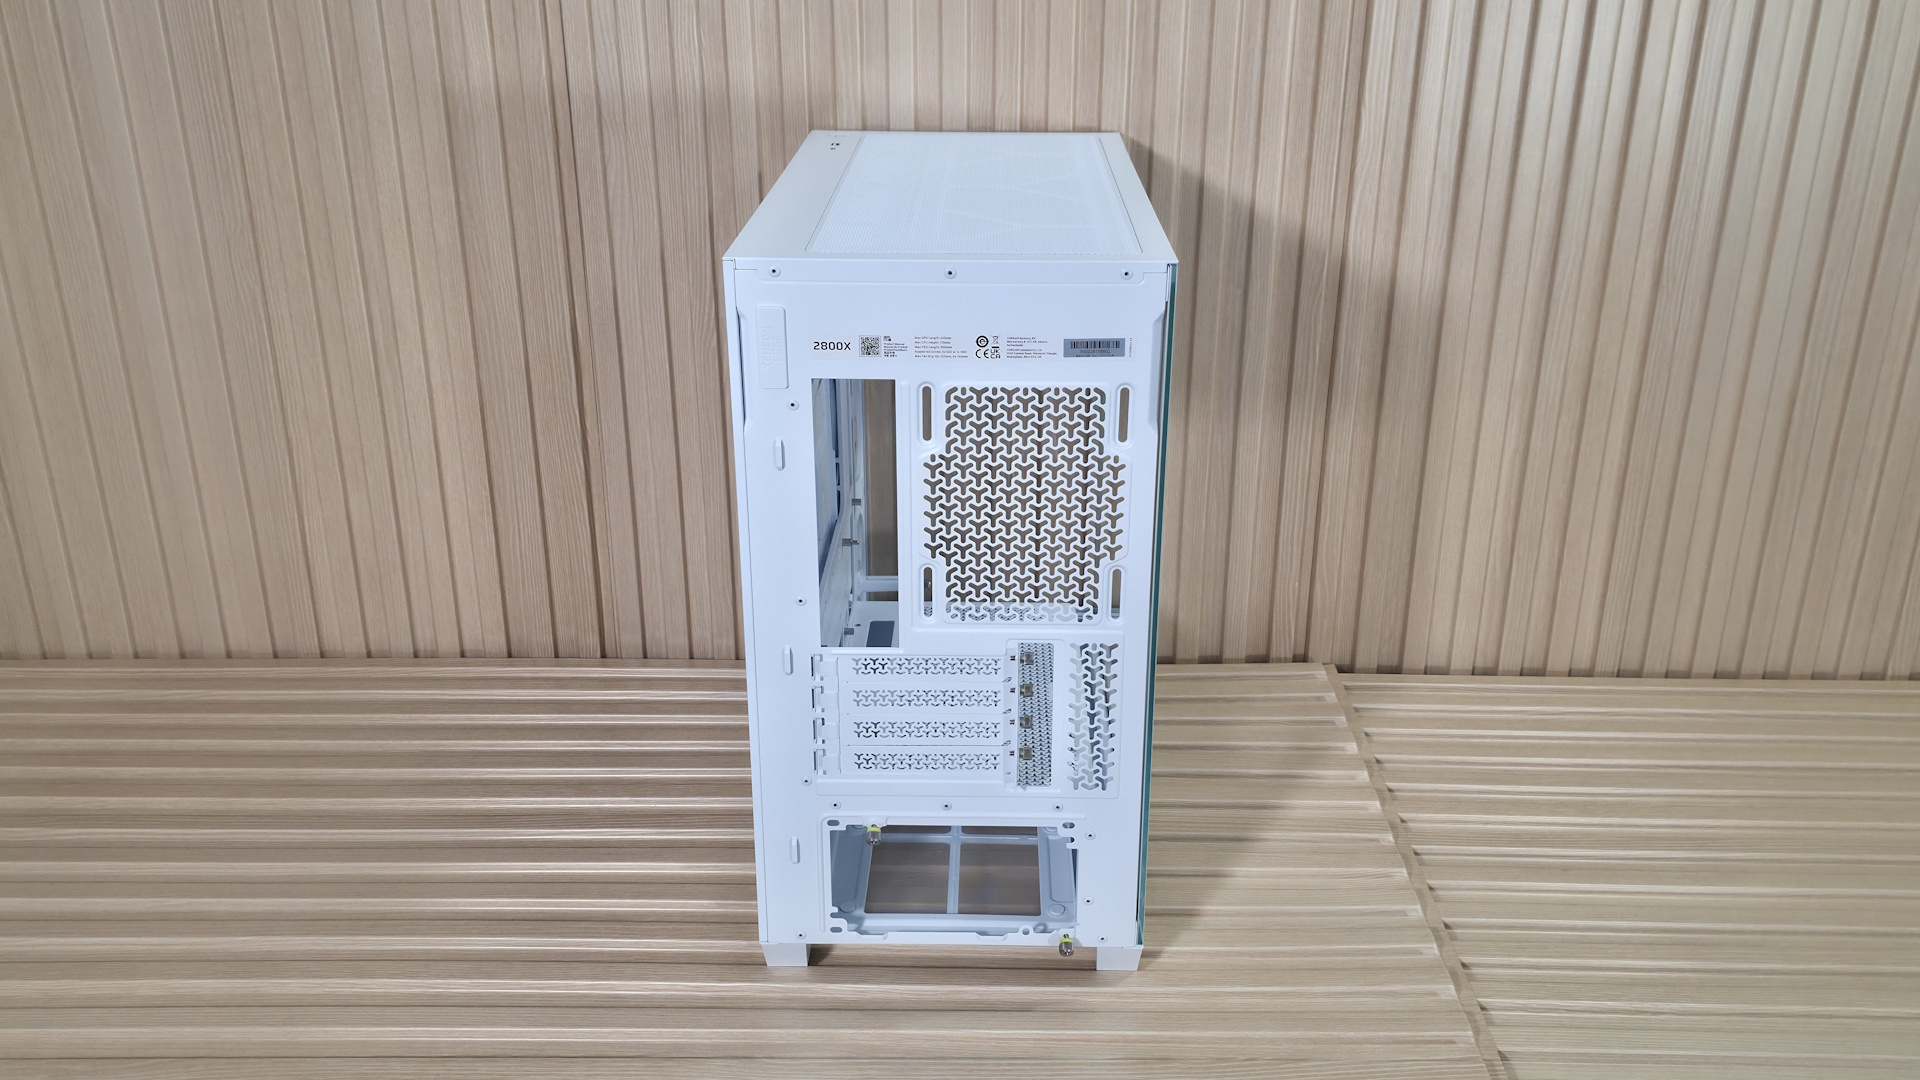
Turning the chassis around to the rear, we get a better view of the seven expansion slots (which also have a cover over the screws to clean up the appearance), the rear fan location supporting 120mm air movers, and the PSU mounting location at the bottom. The power supply uses a bracket with two captive thumbscrews. Simply mount it to your power supply, then install it in the case. Looking on the left, you’ll also see a couple of pre-installed Velcro straps to help with internal wire management.

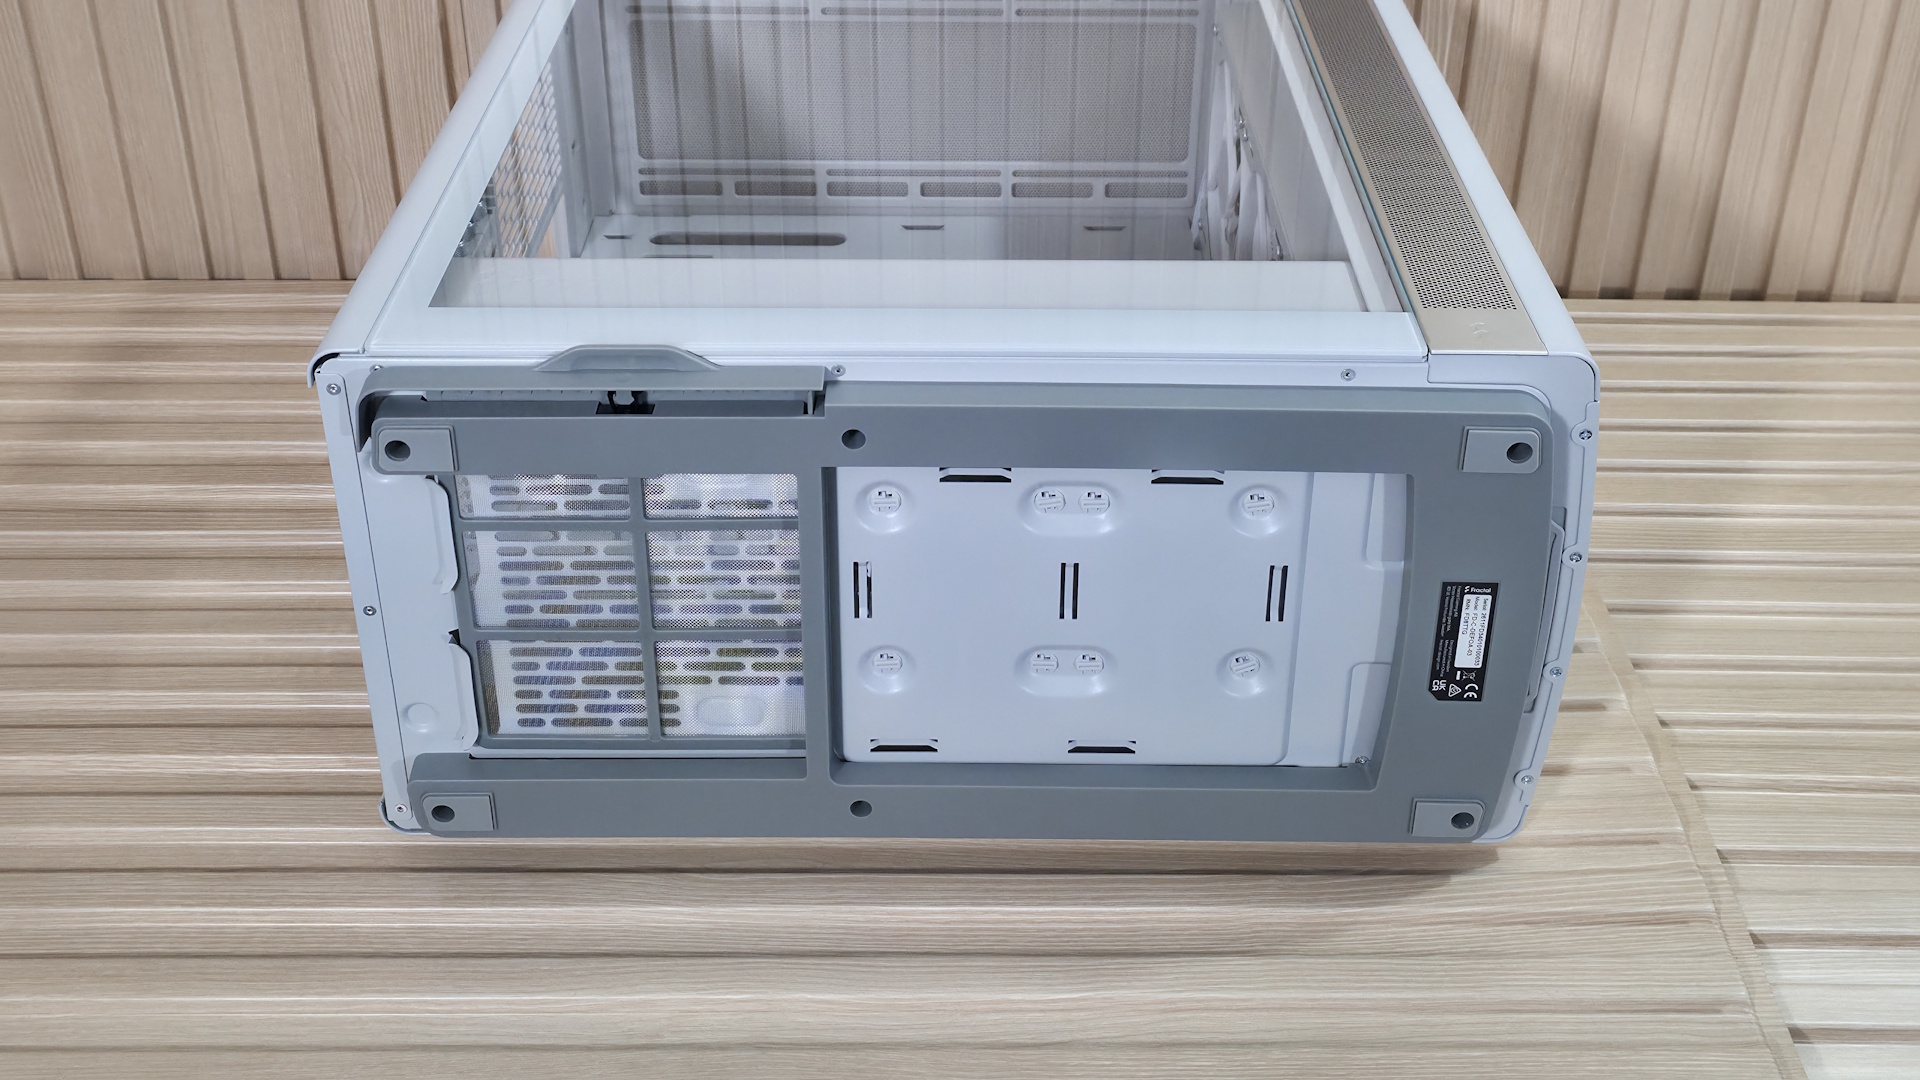
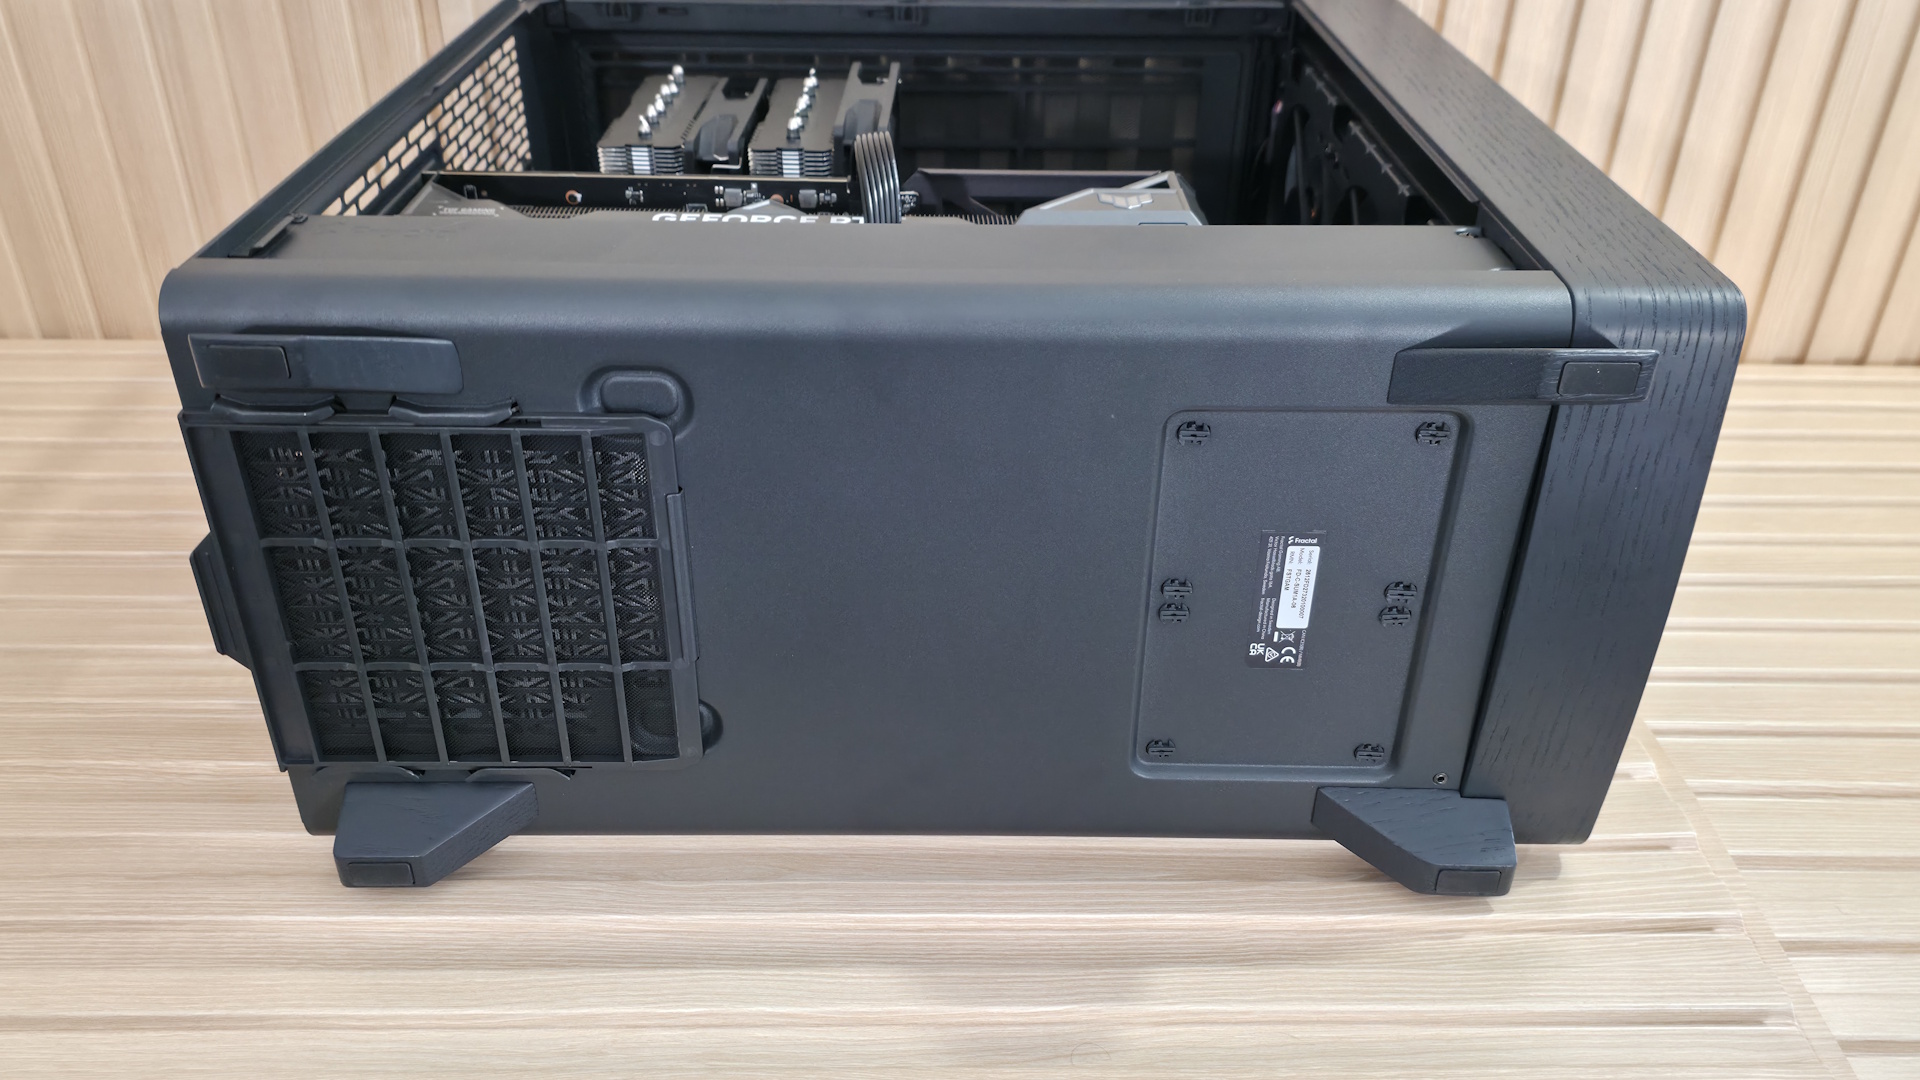
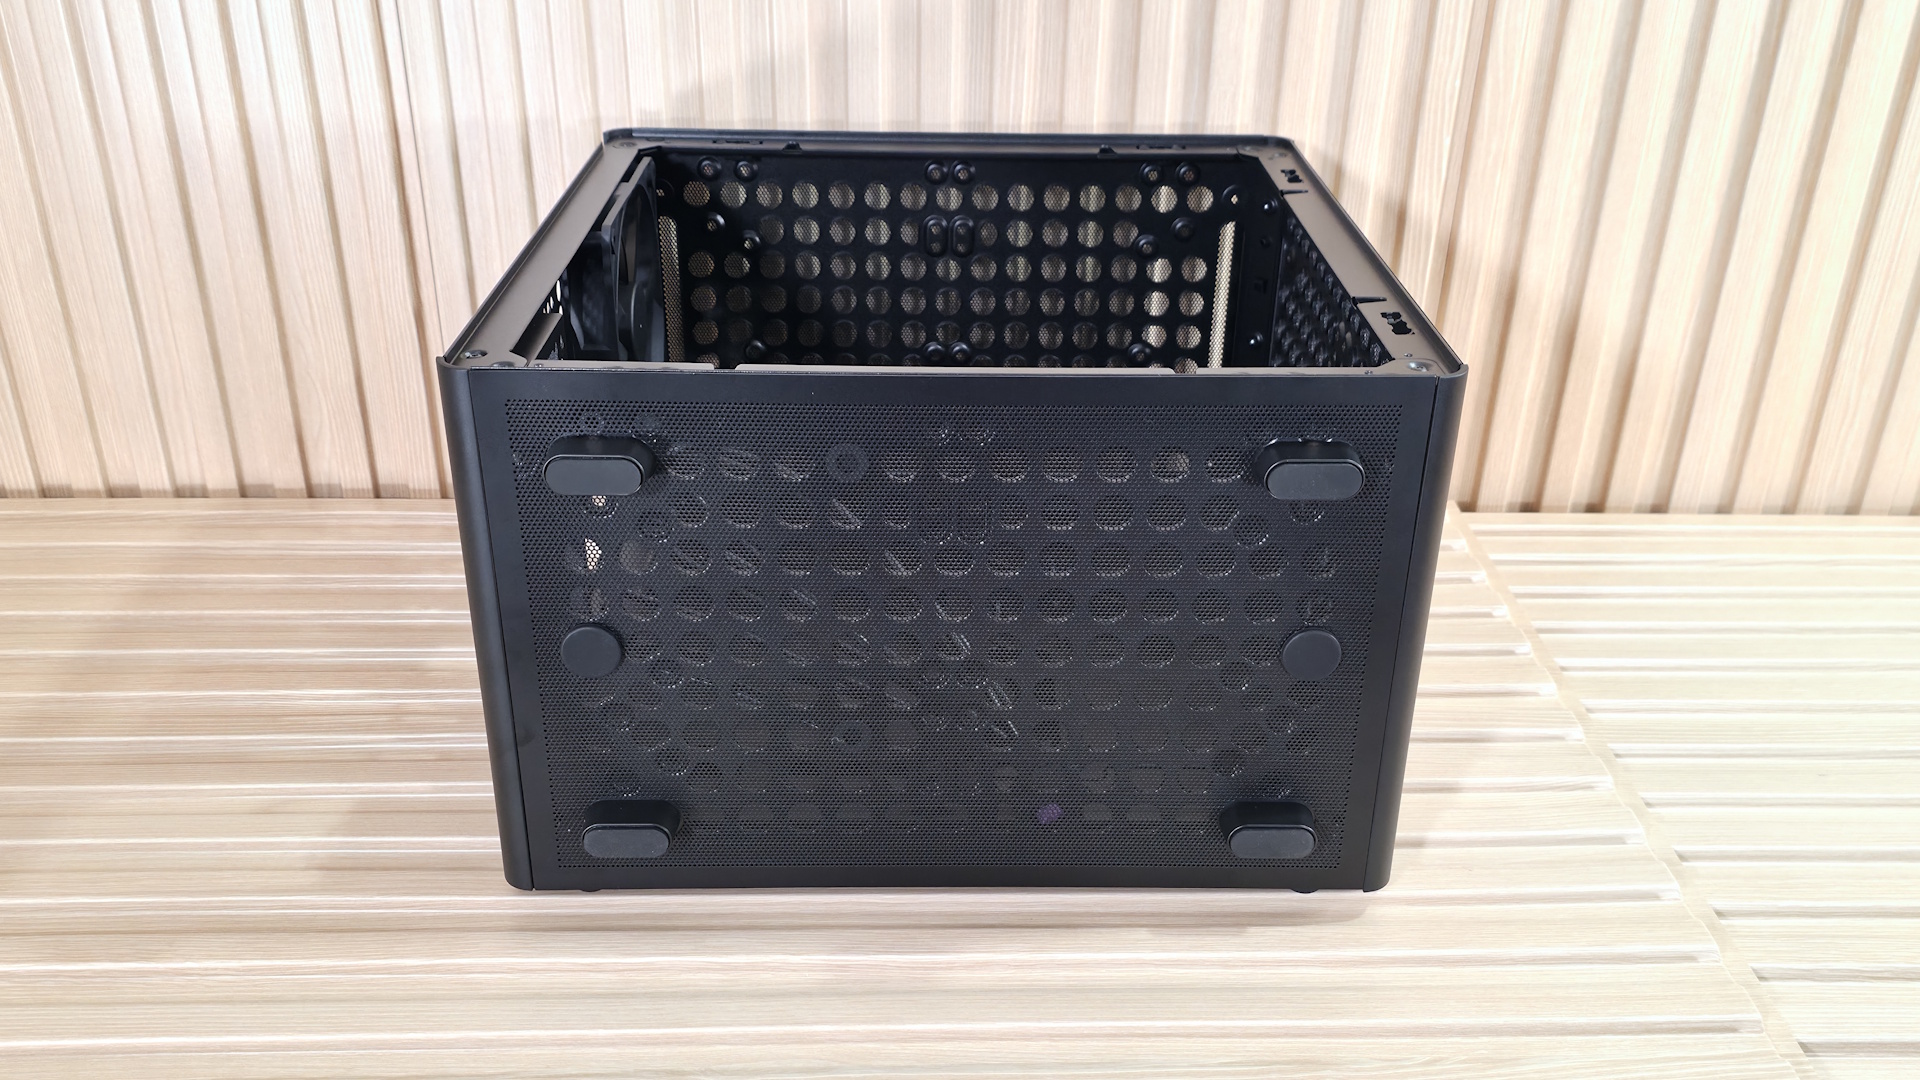
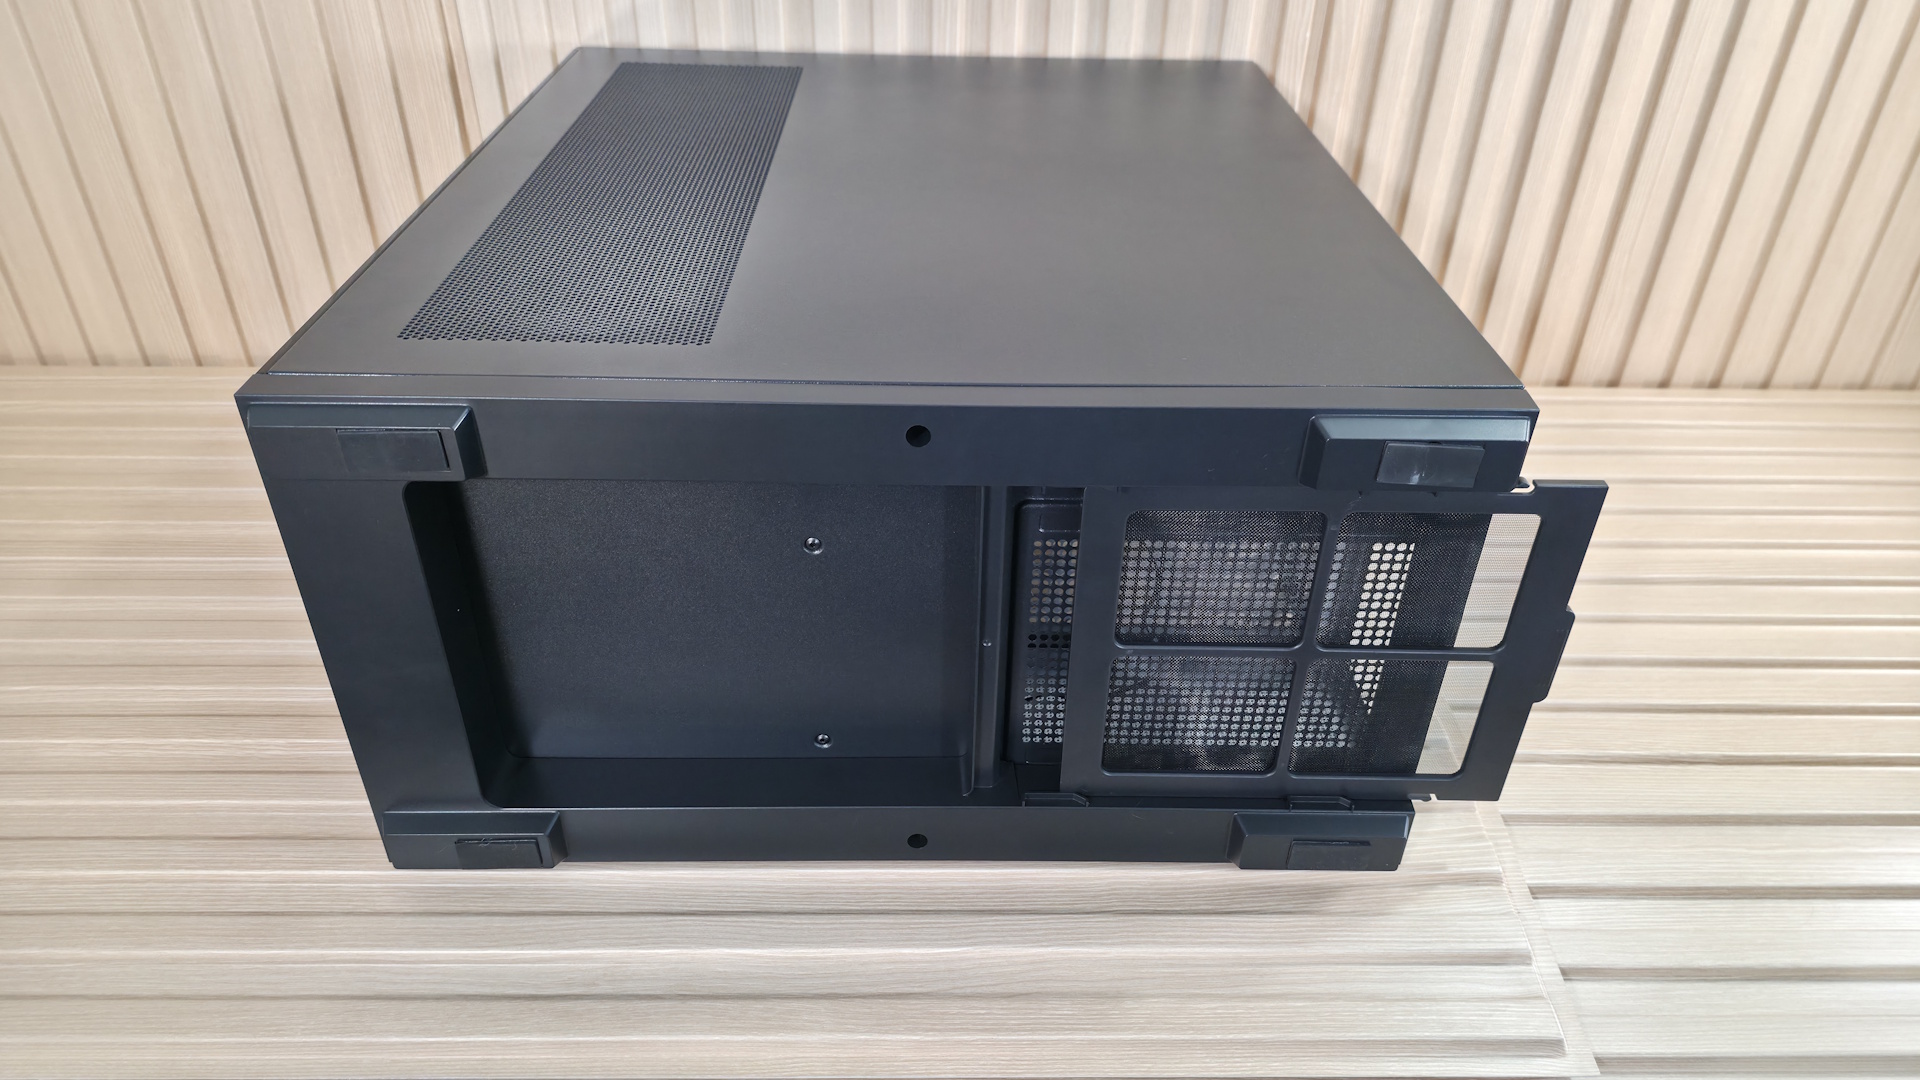
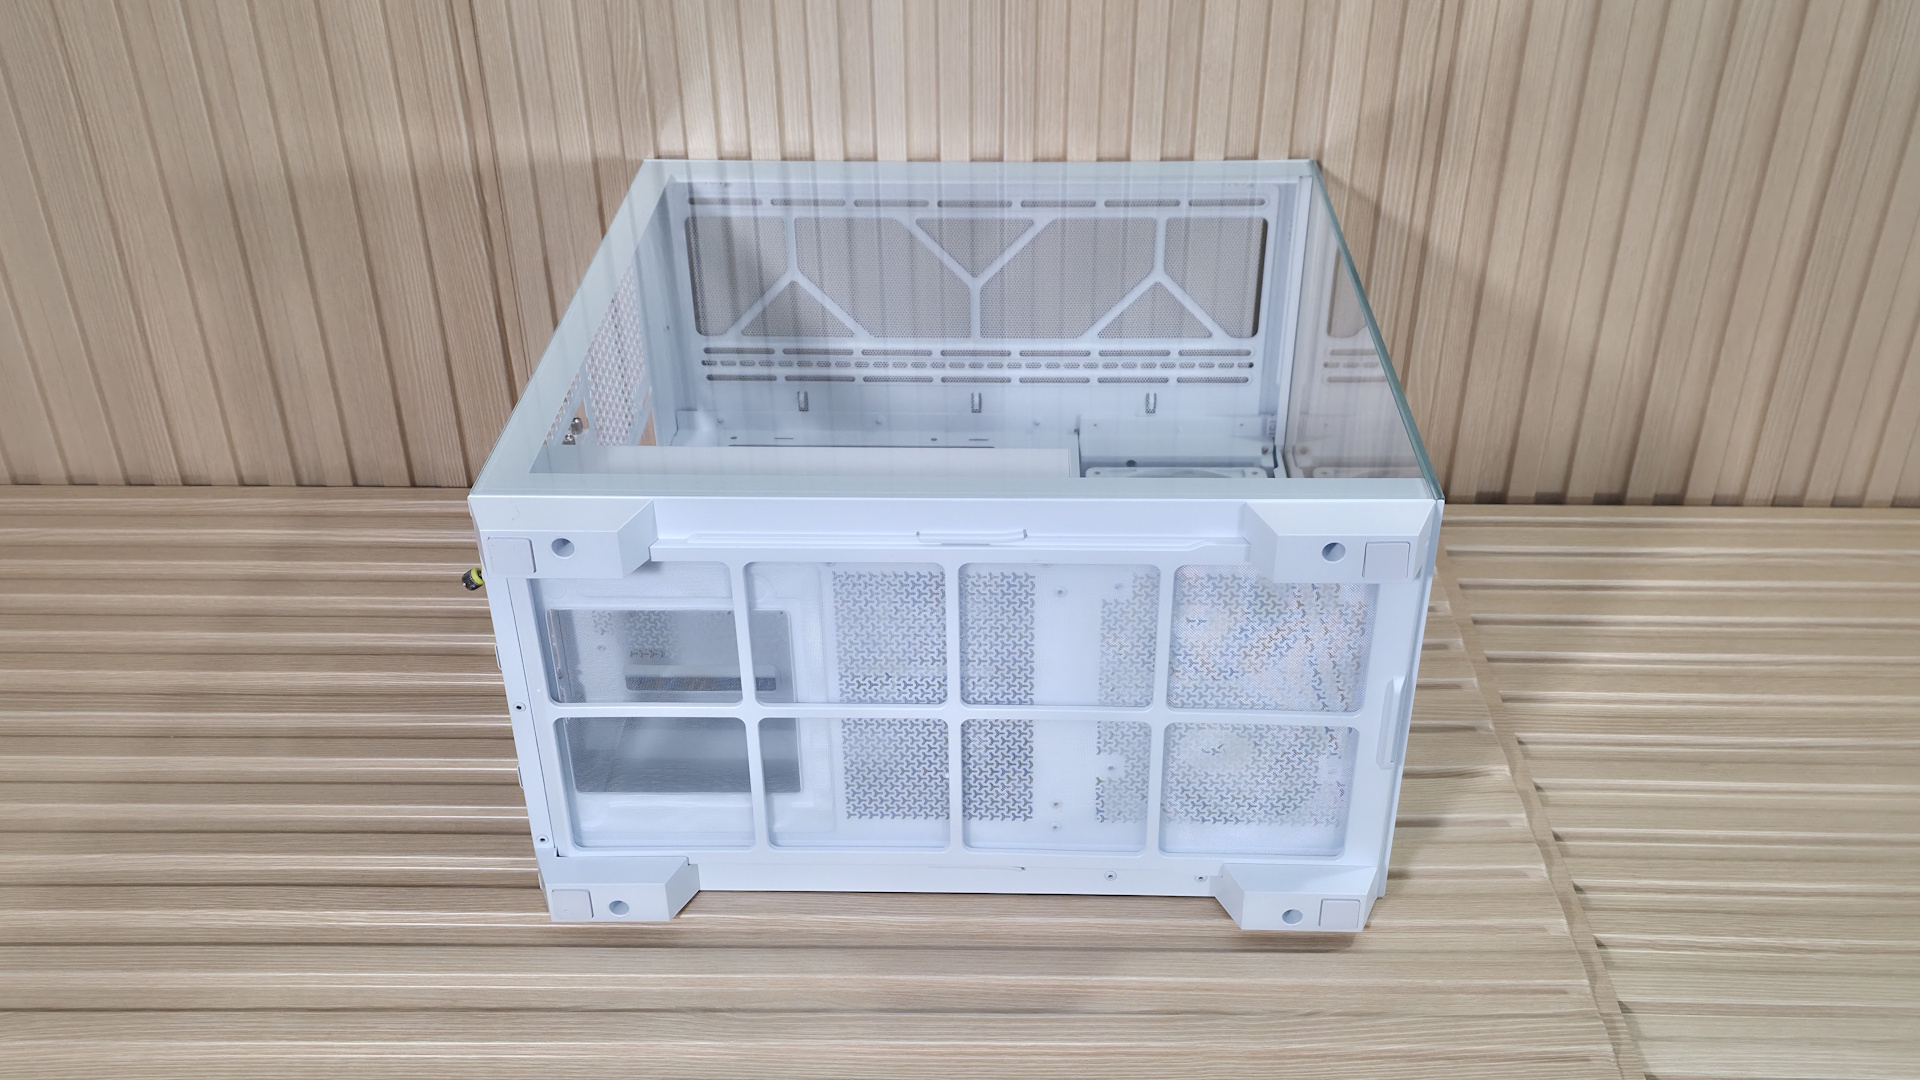
The bottom of the Define One uses a raised gray plastic frame that circles the entire bottom, with rubber ‘feet’ on the corners, giving your power supply about an inch of room to breathe. The dust filter on the bottom pulls out from the left side (window side), which is ideal since you likely won’t have to move your PC to remove it. In many cases, it comes out from the rear, requiring you to move your heavy PC to clean it.
Fractal Define One - Top and I/O
Future
Fractal Define One - Top and I/O
Future

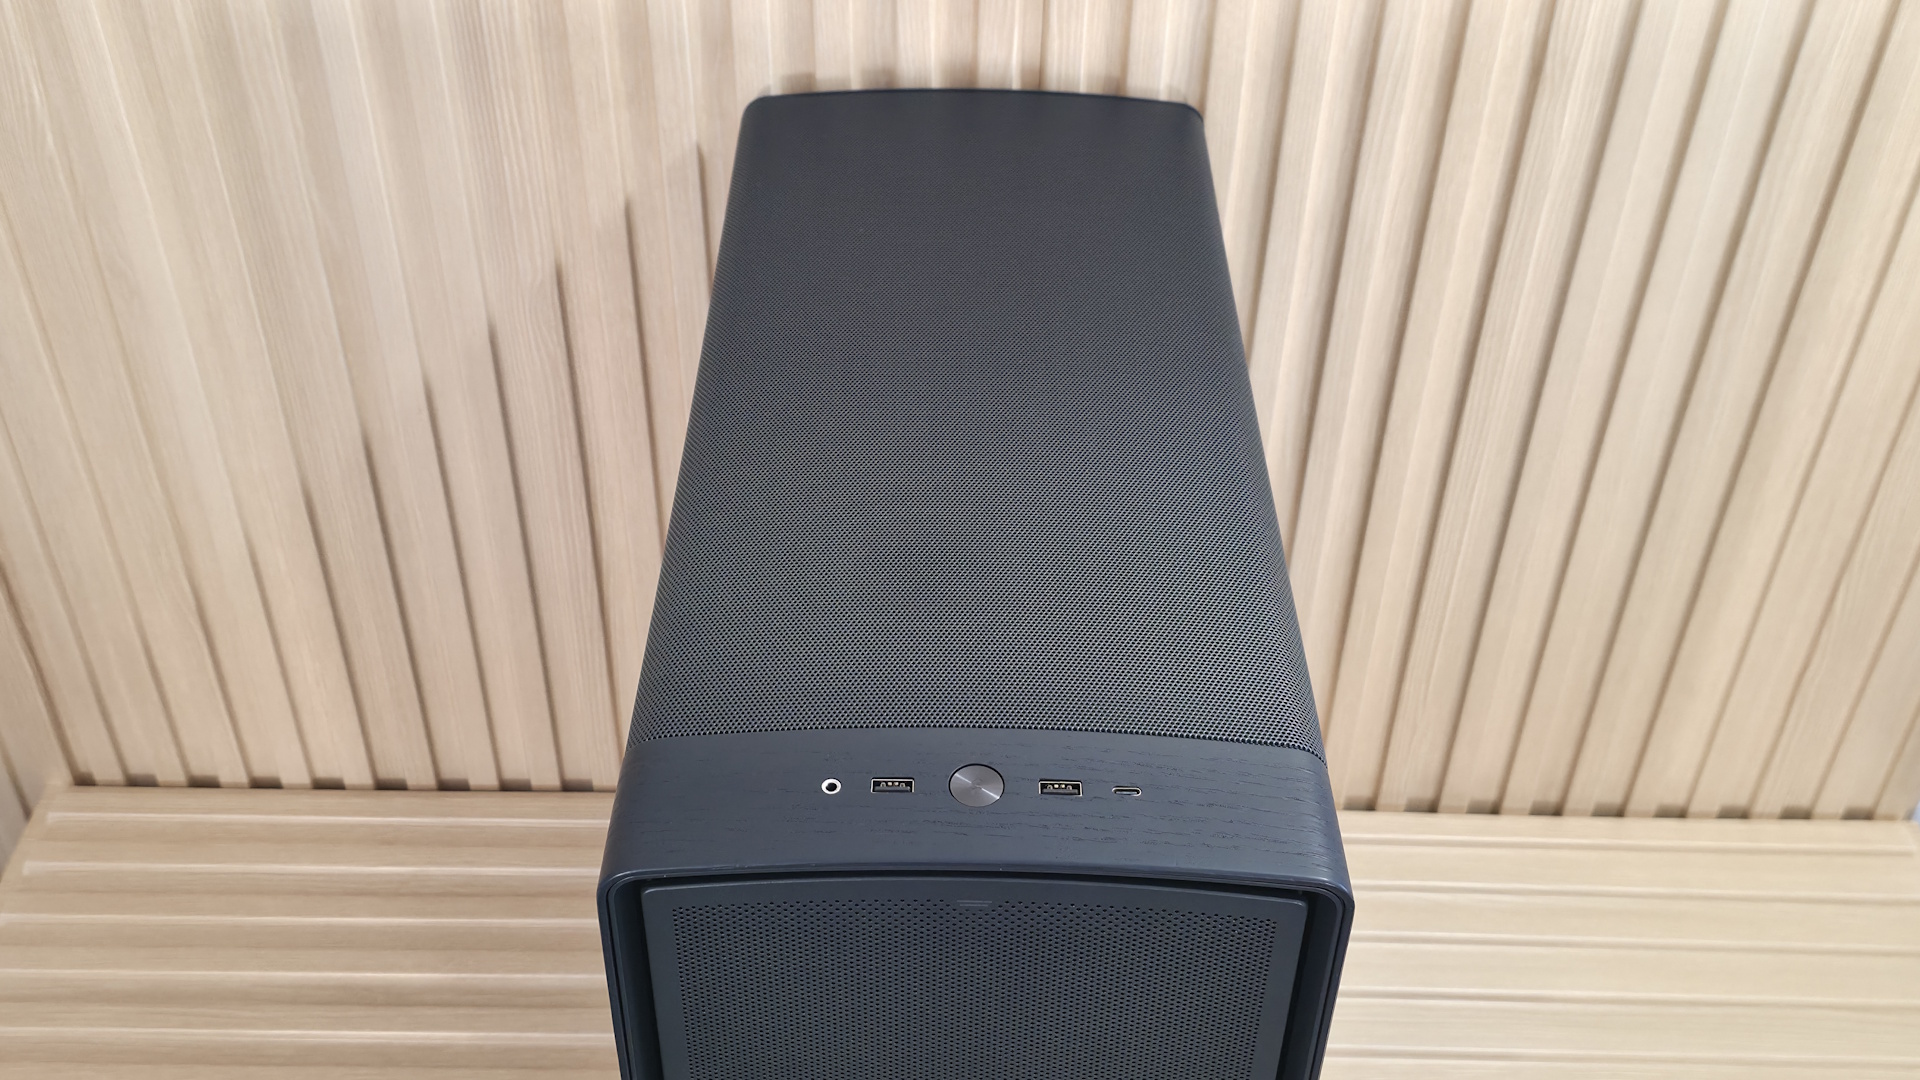
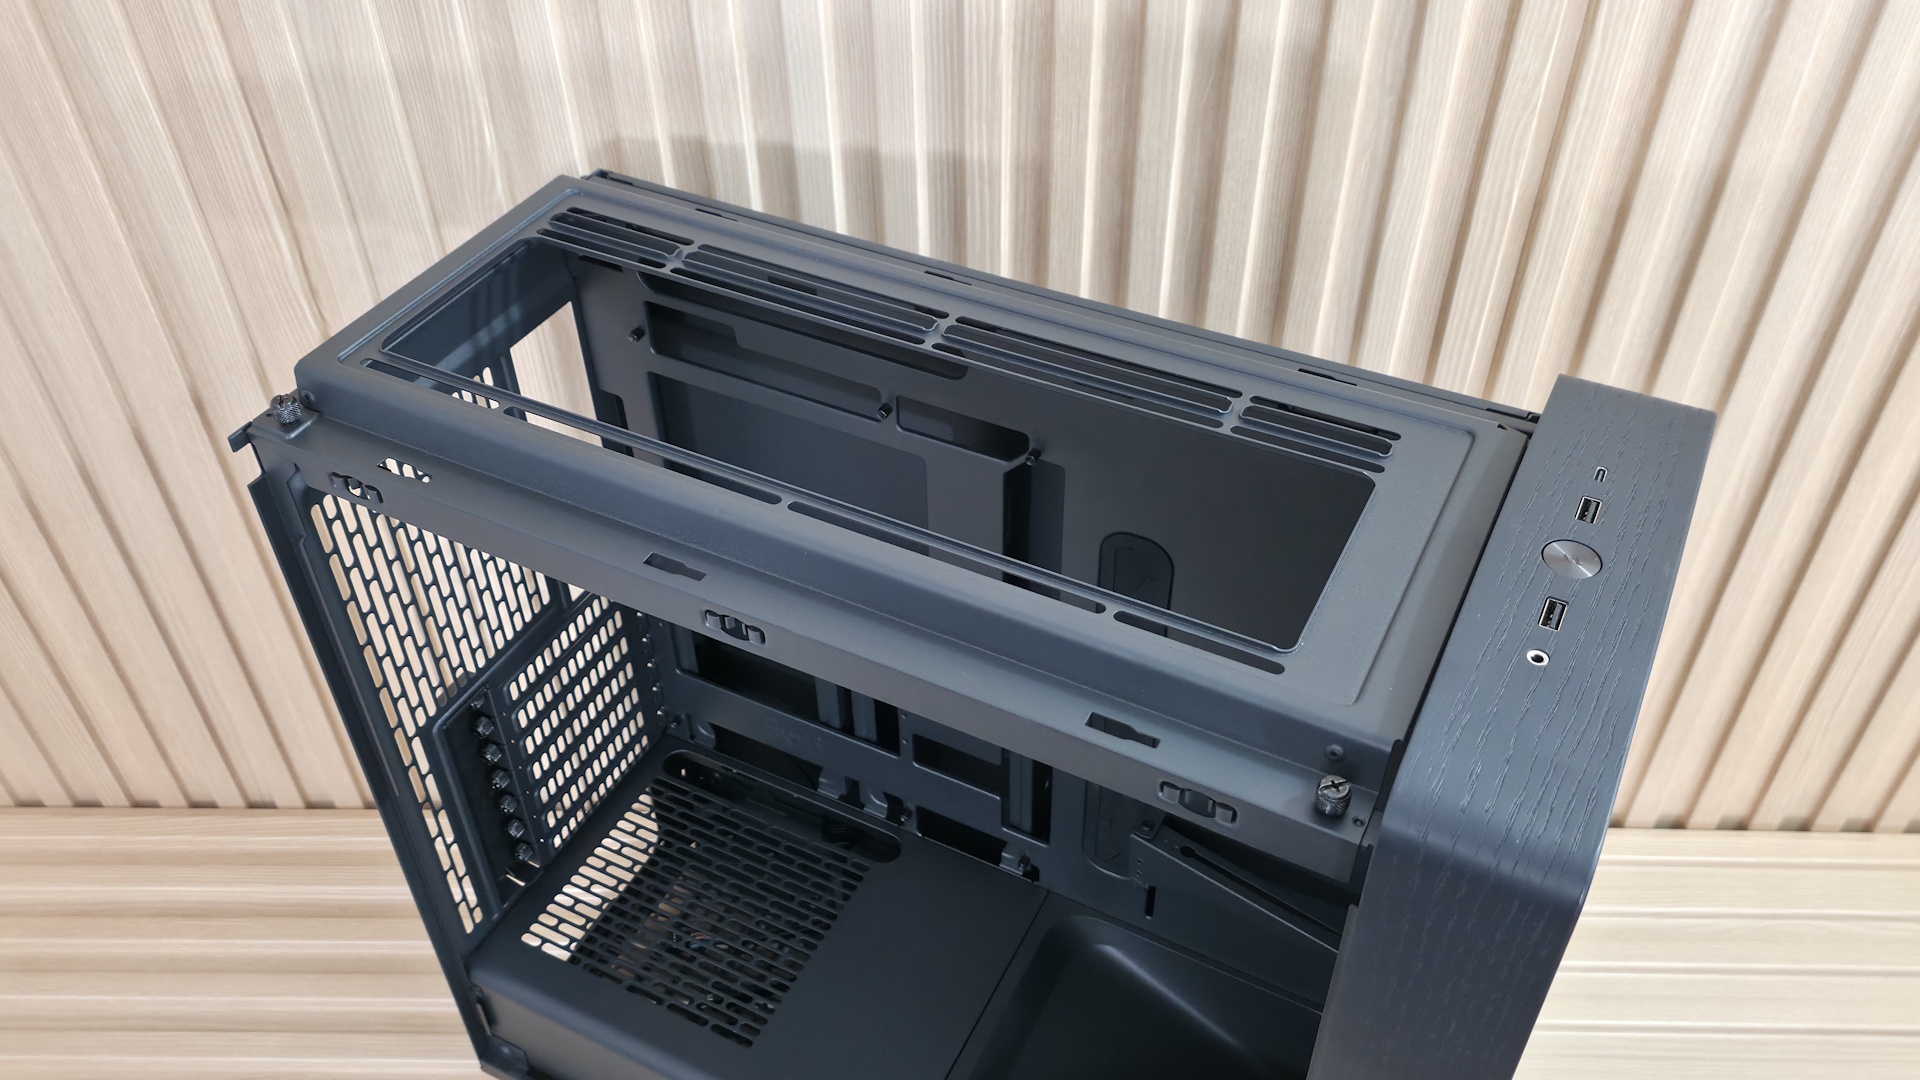
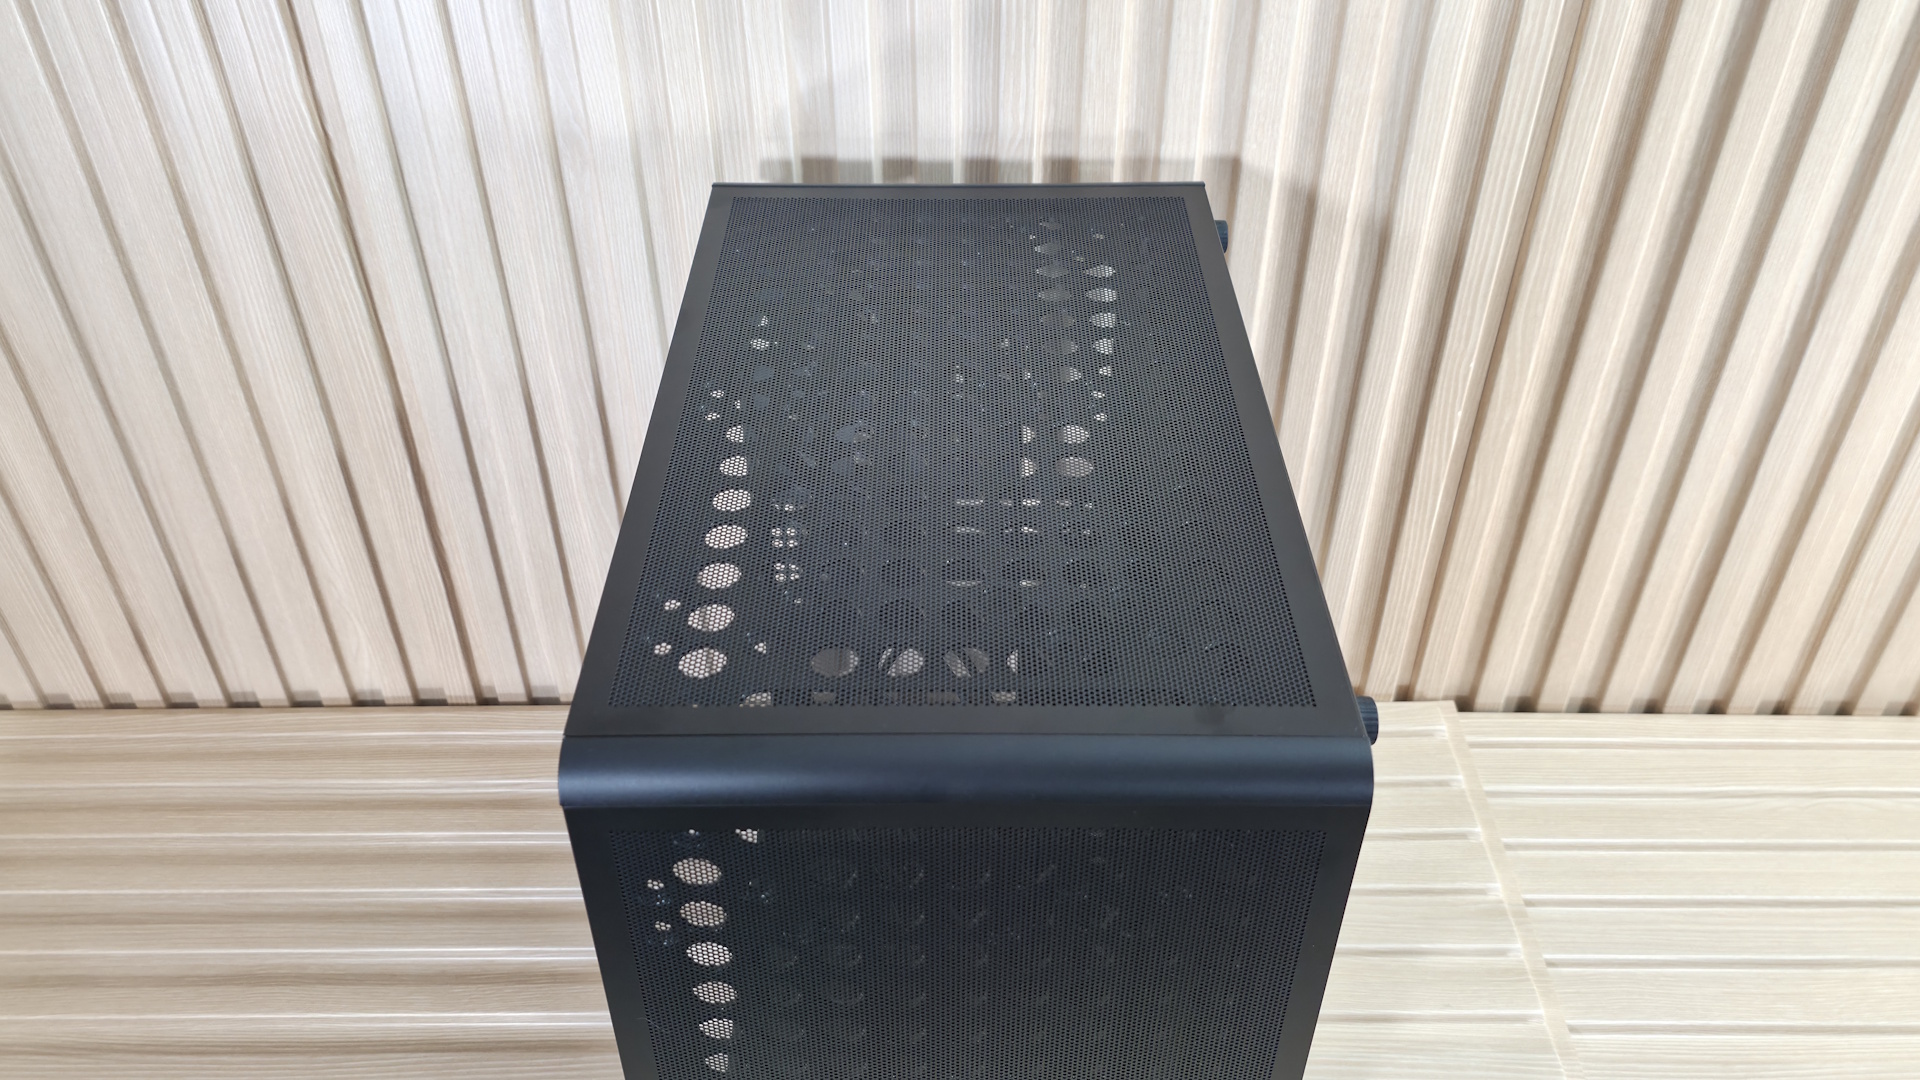
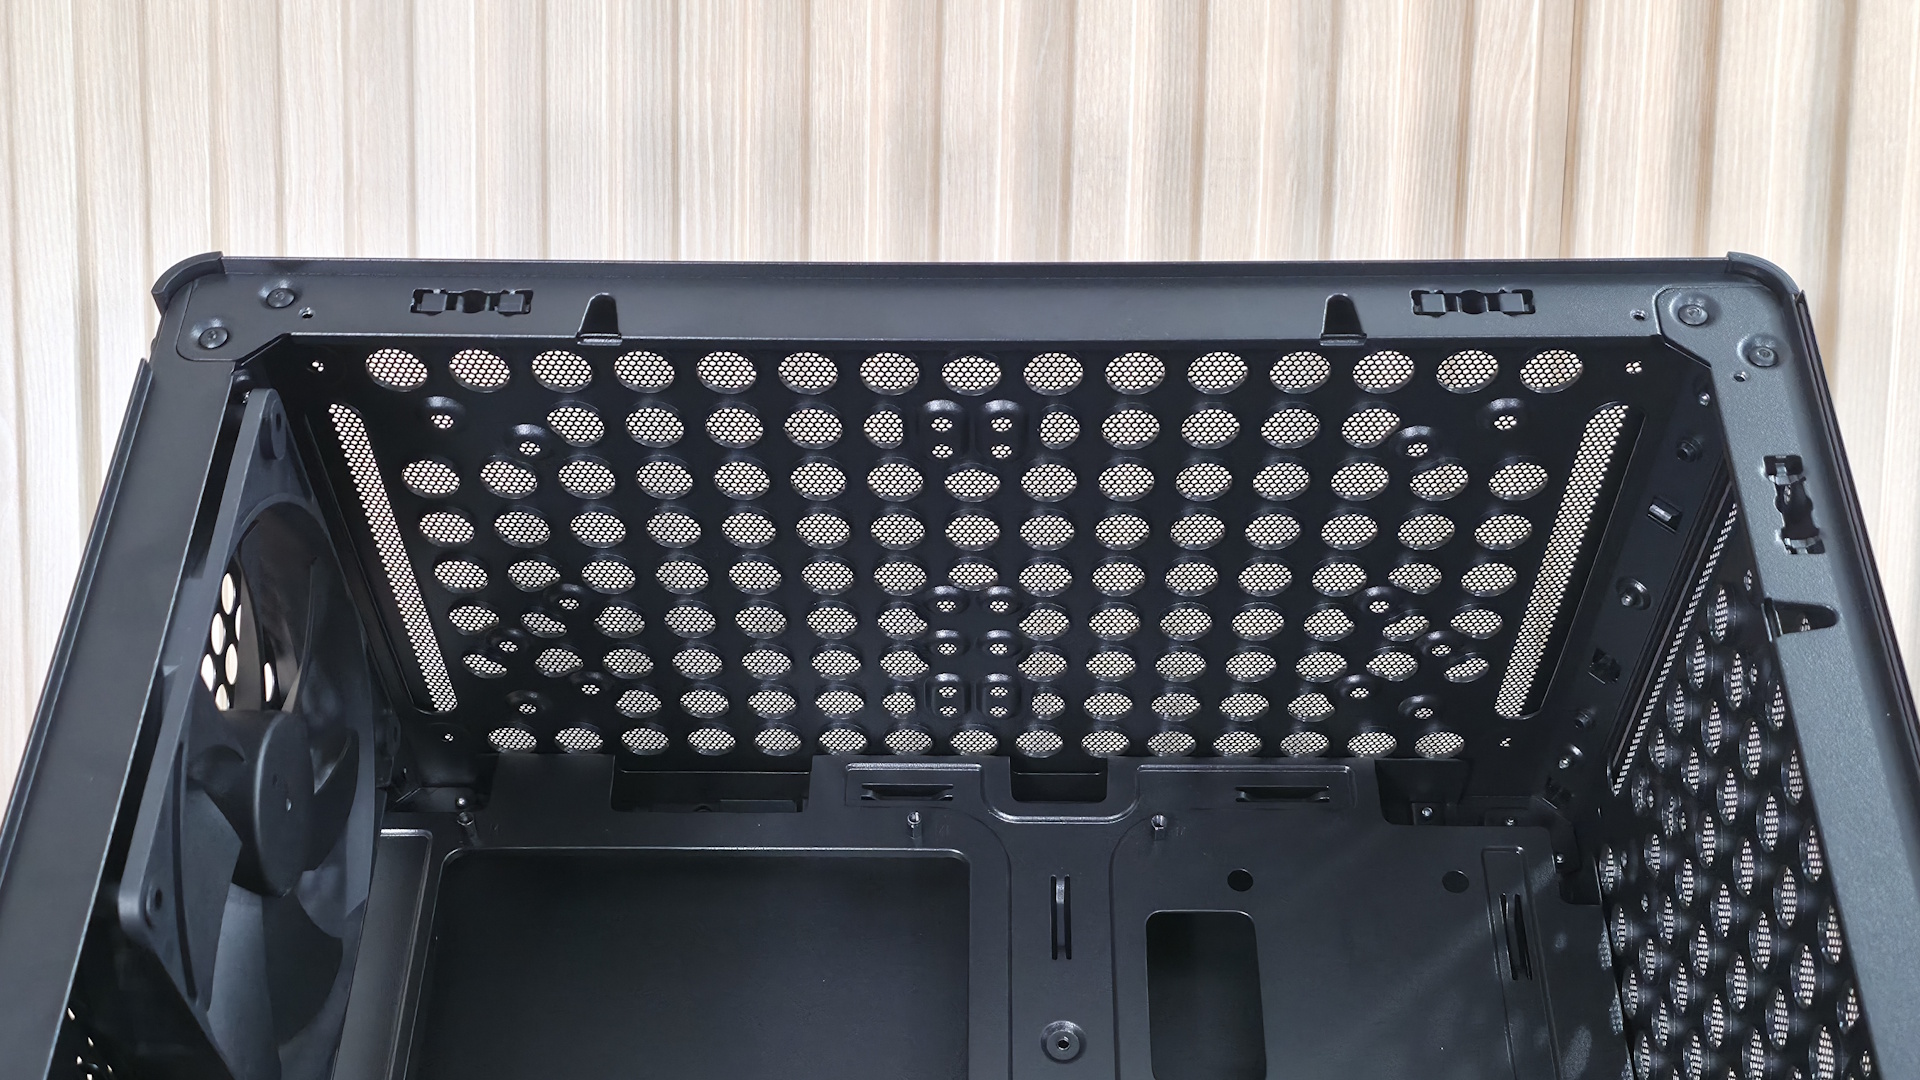
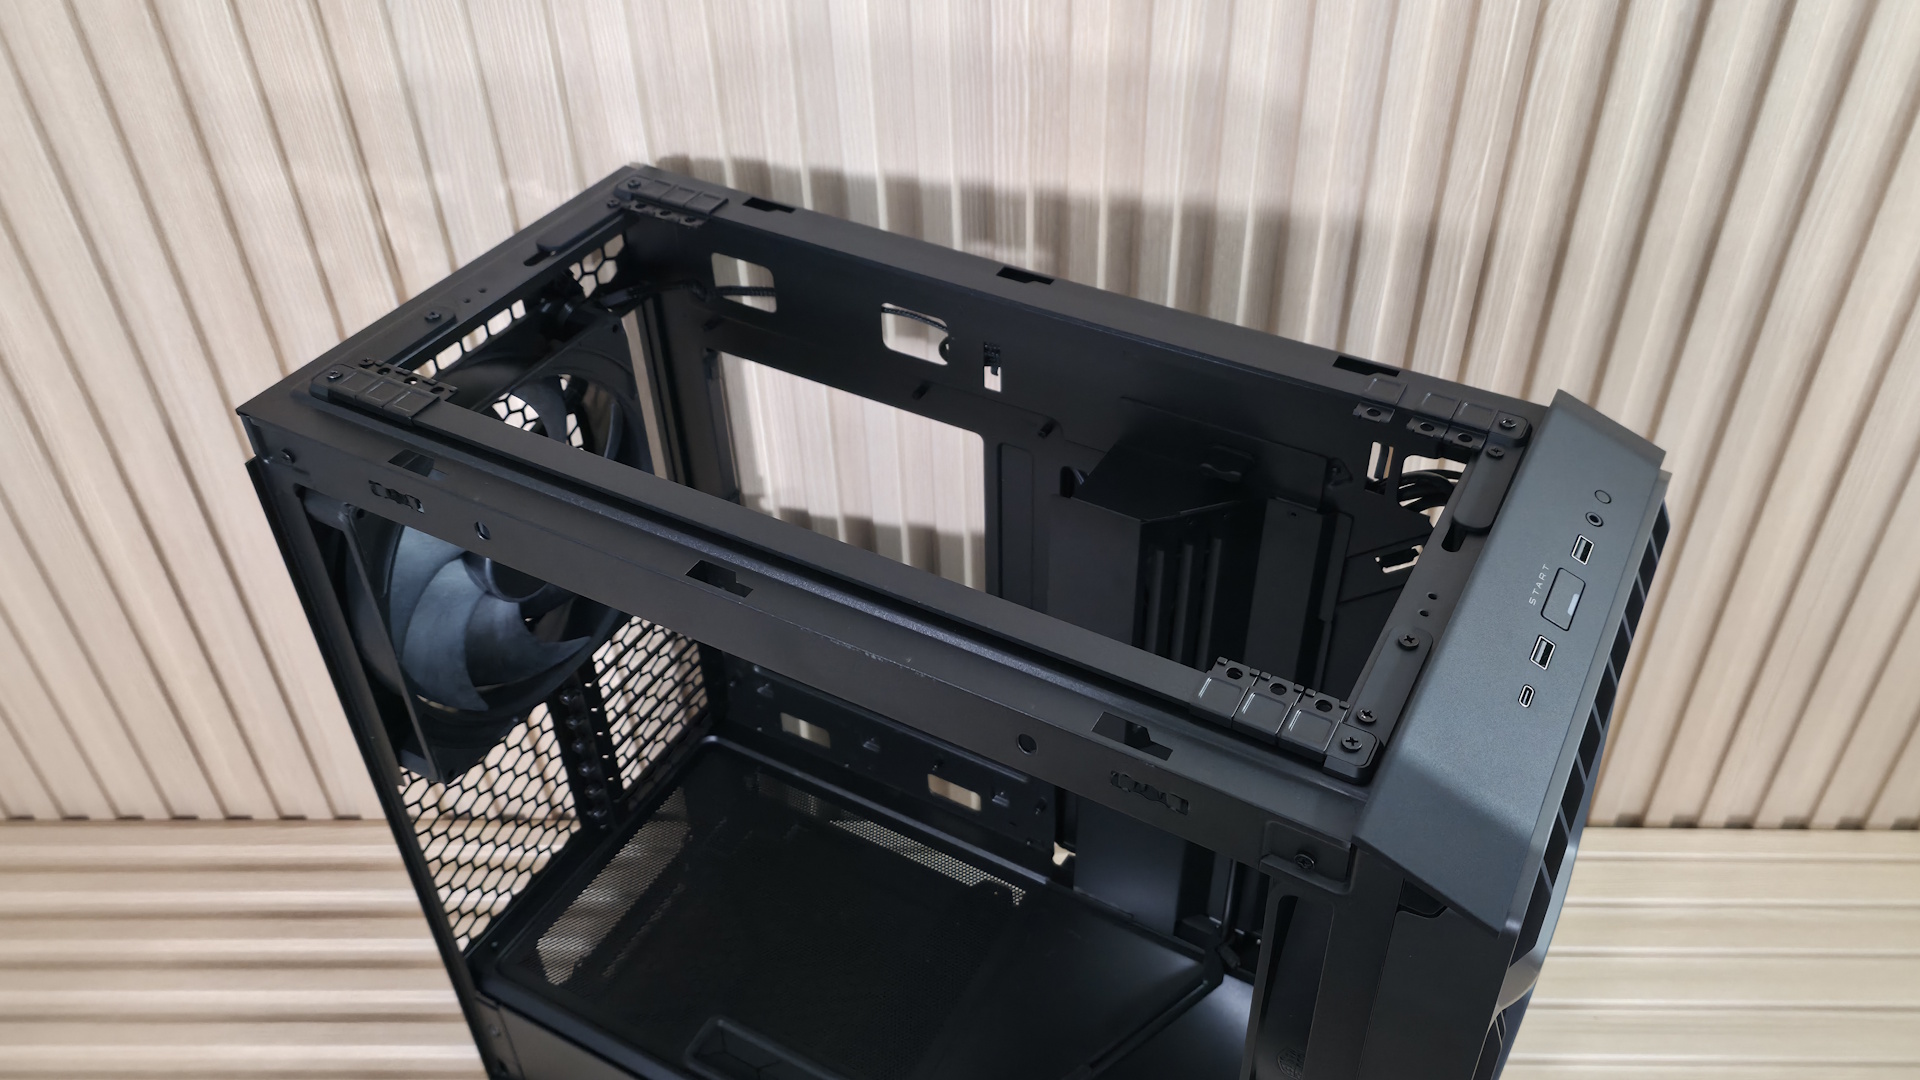
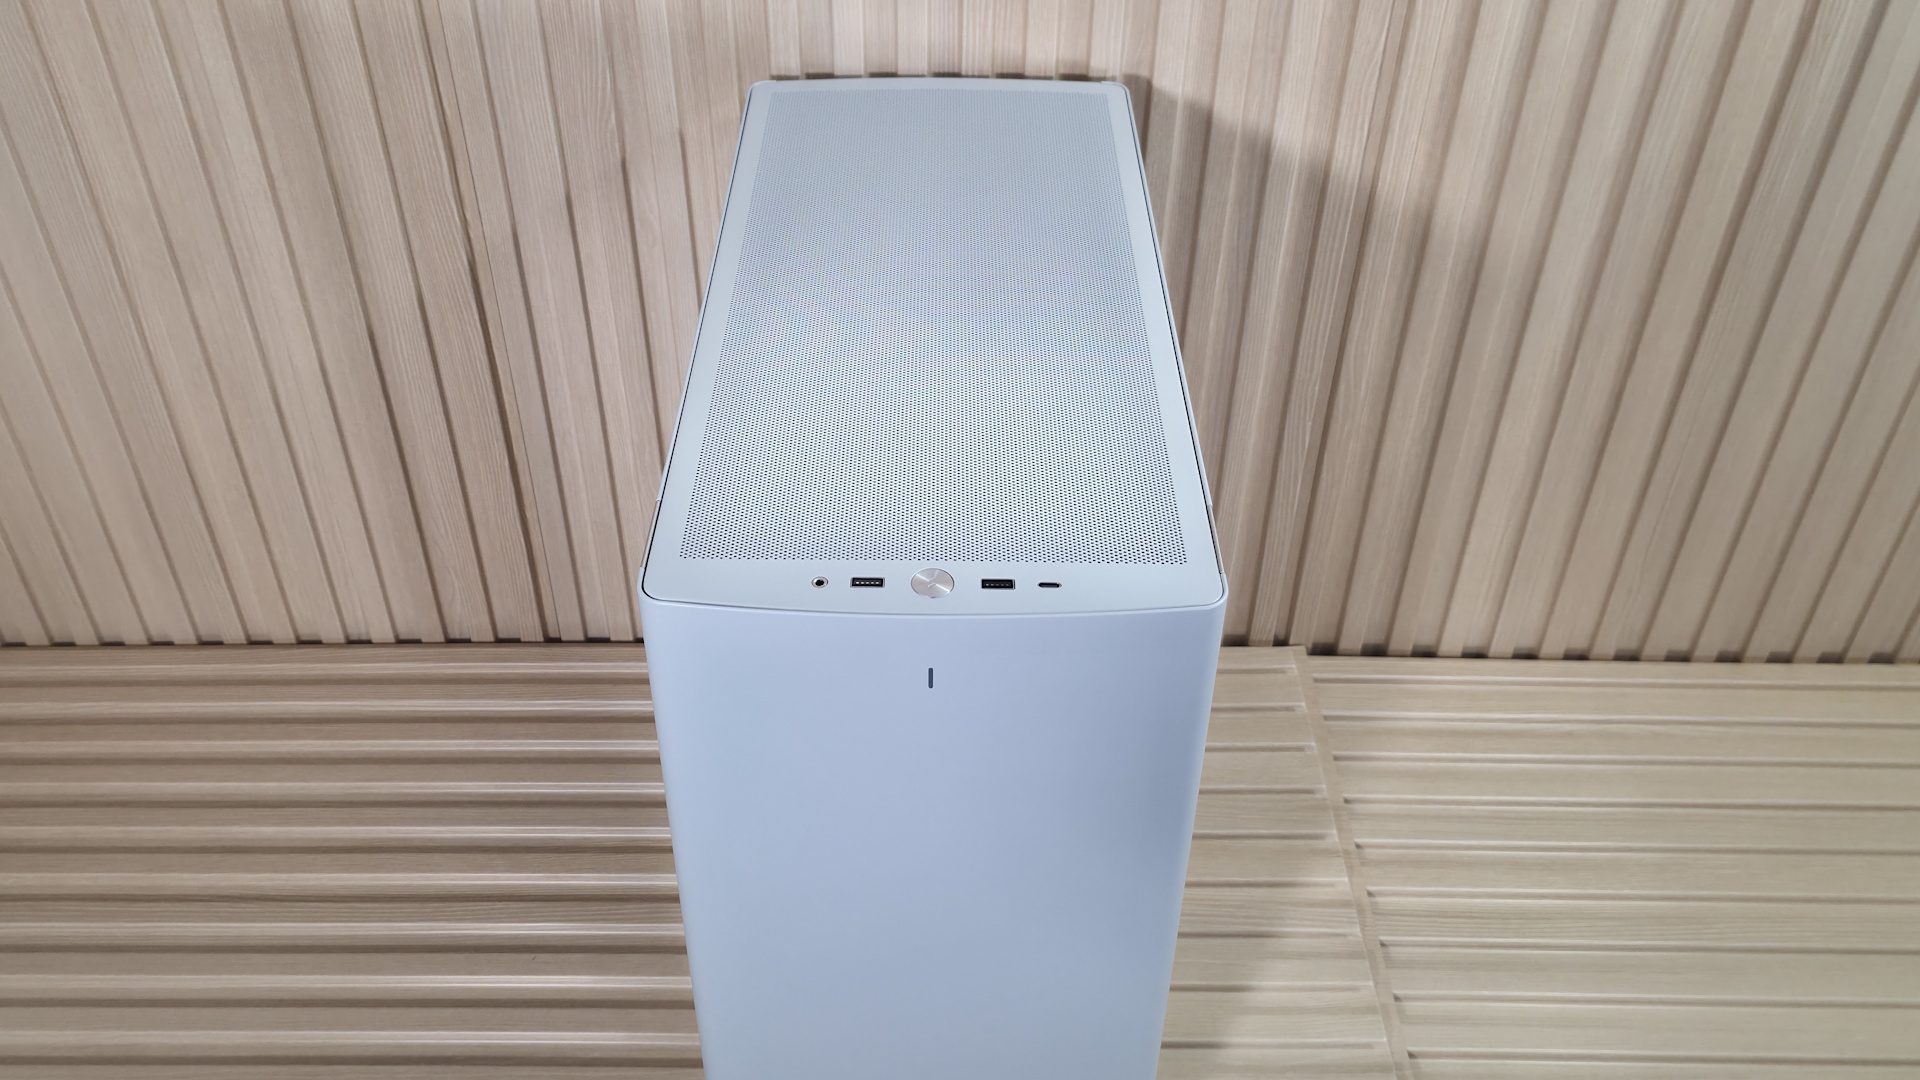
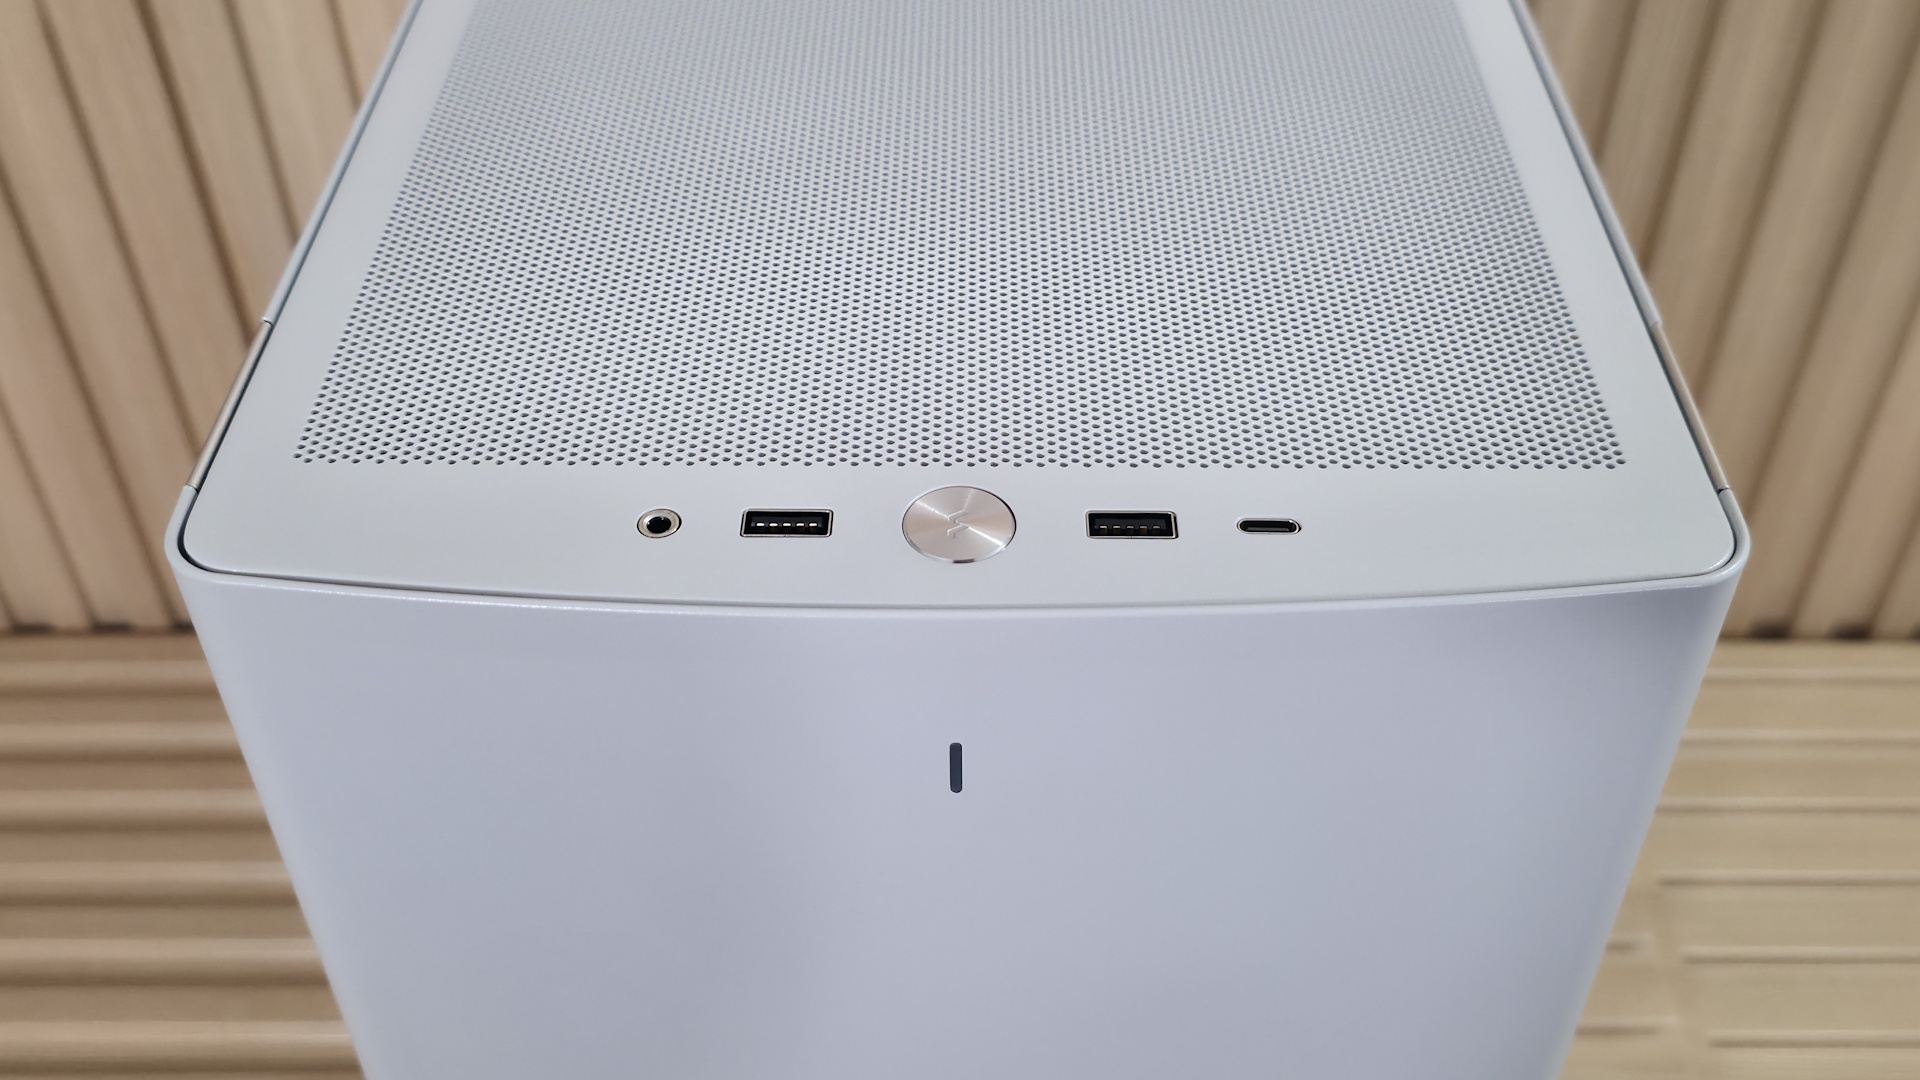
On top of the case, Fractal updated the design with a dense pattern of circular holes for air to pass through. This feels a bit more restrictive than the more open design on the Define 7, but still allowed air to escape even without fans on top in our testing. The good news, at least when this area is used as exhaust, is that there isn’t a mesh dust filter to thwart airflow further. The top panel also pops off easily (via more ball-and-socket retention clips) from the back, exposing the inner frame where you mount fans or a radiator.

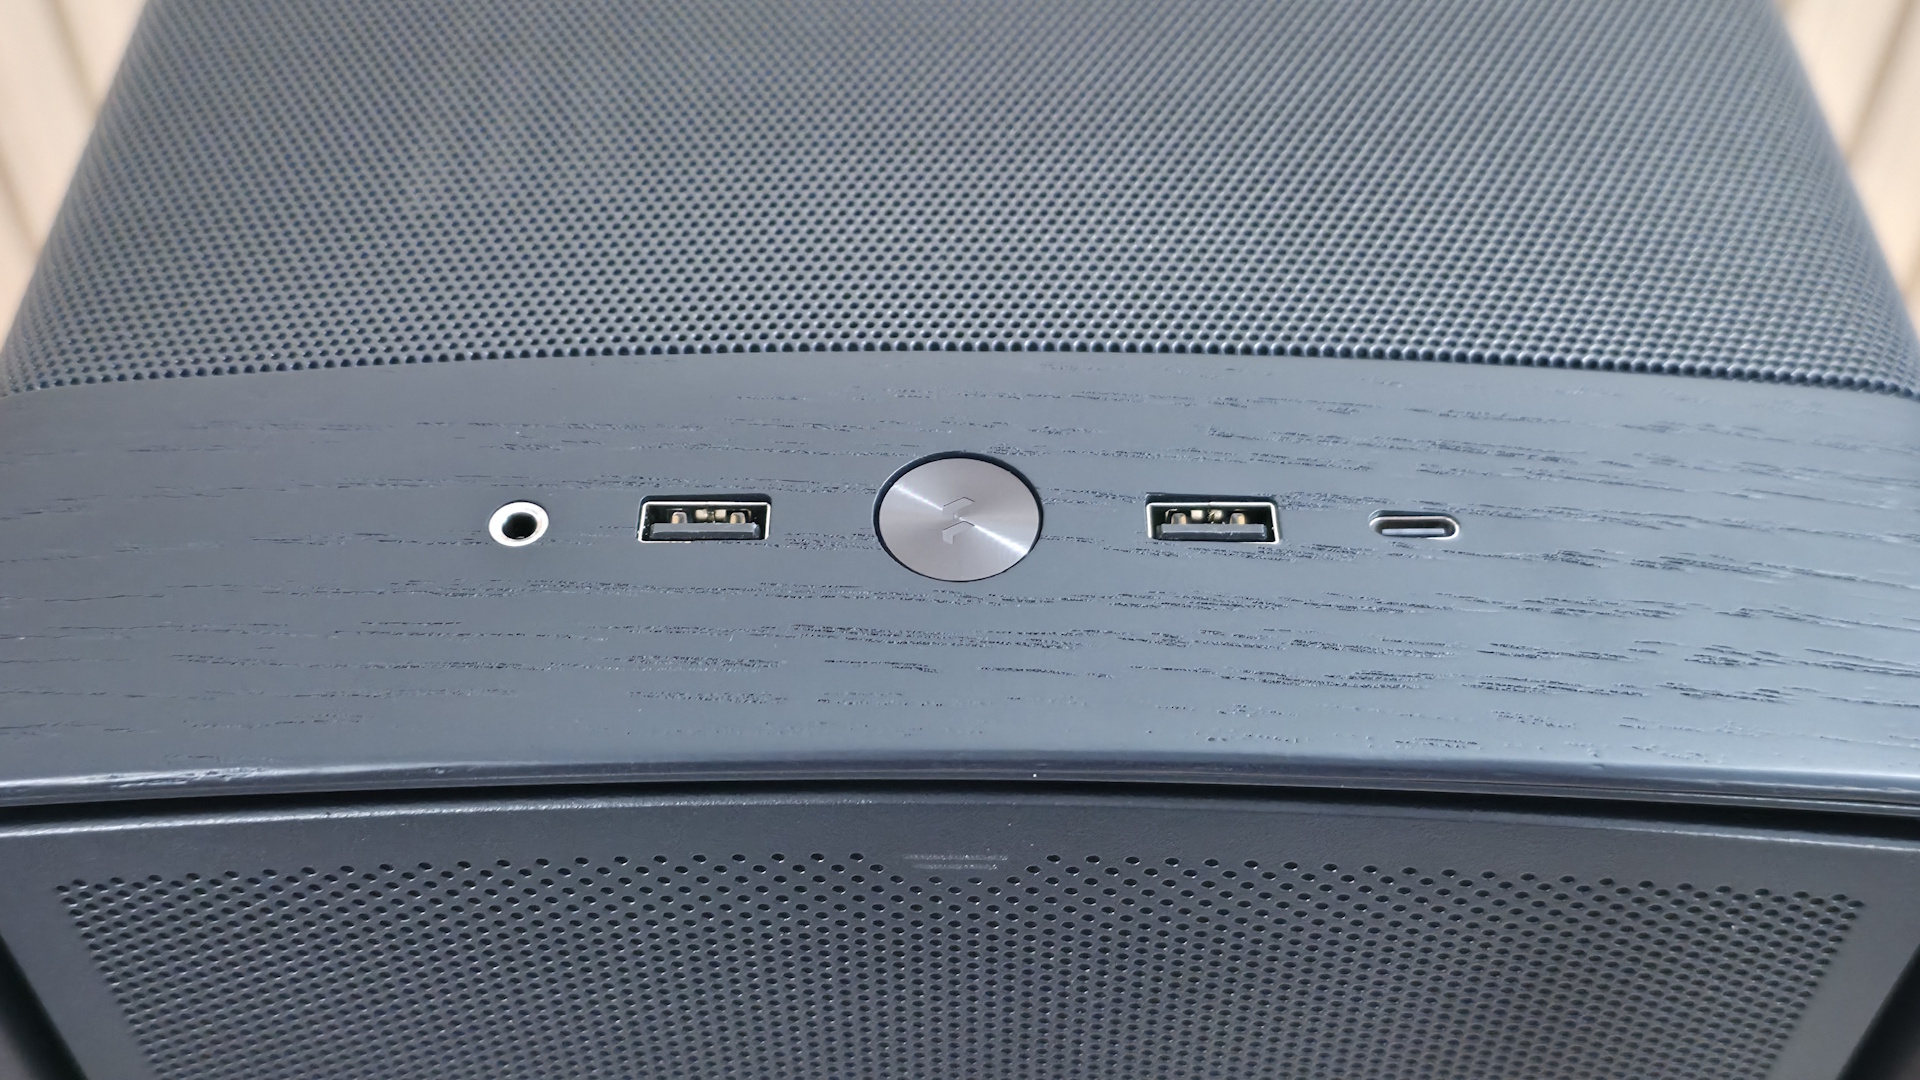
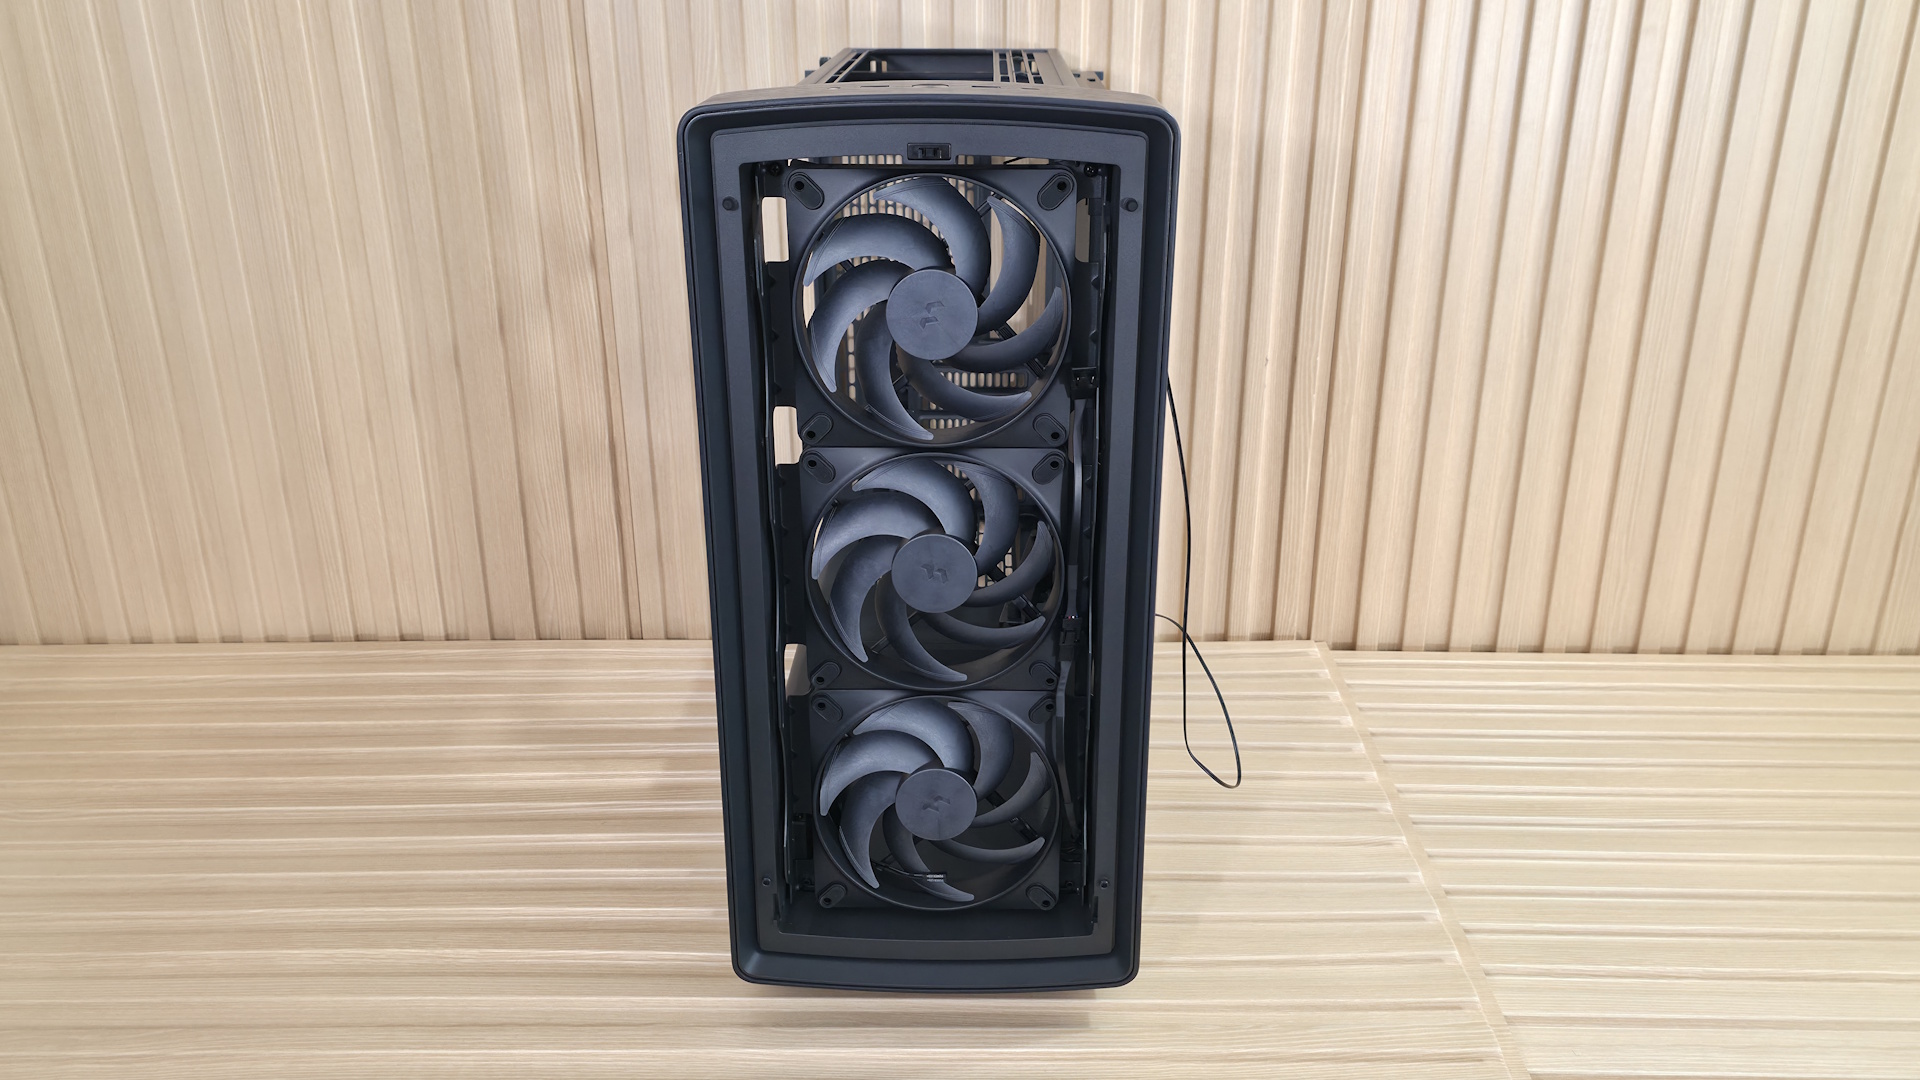
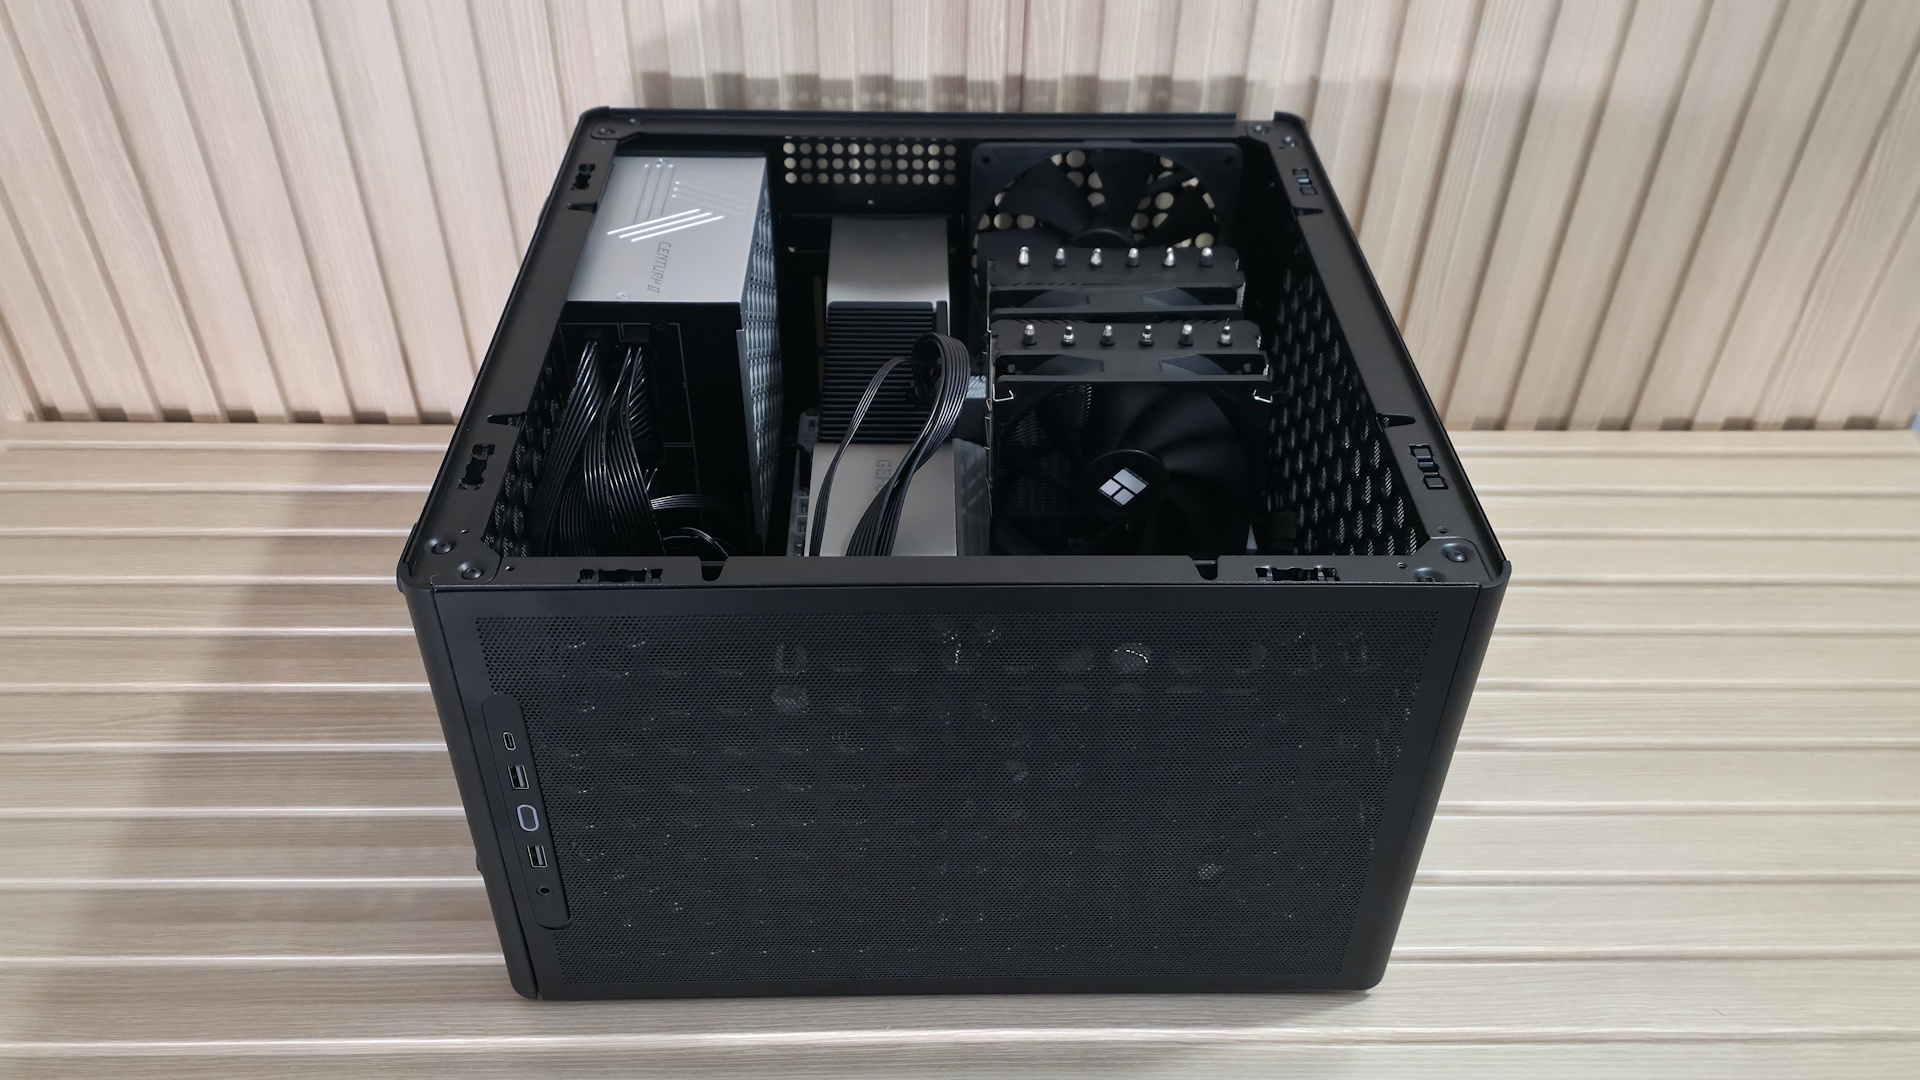
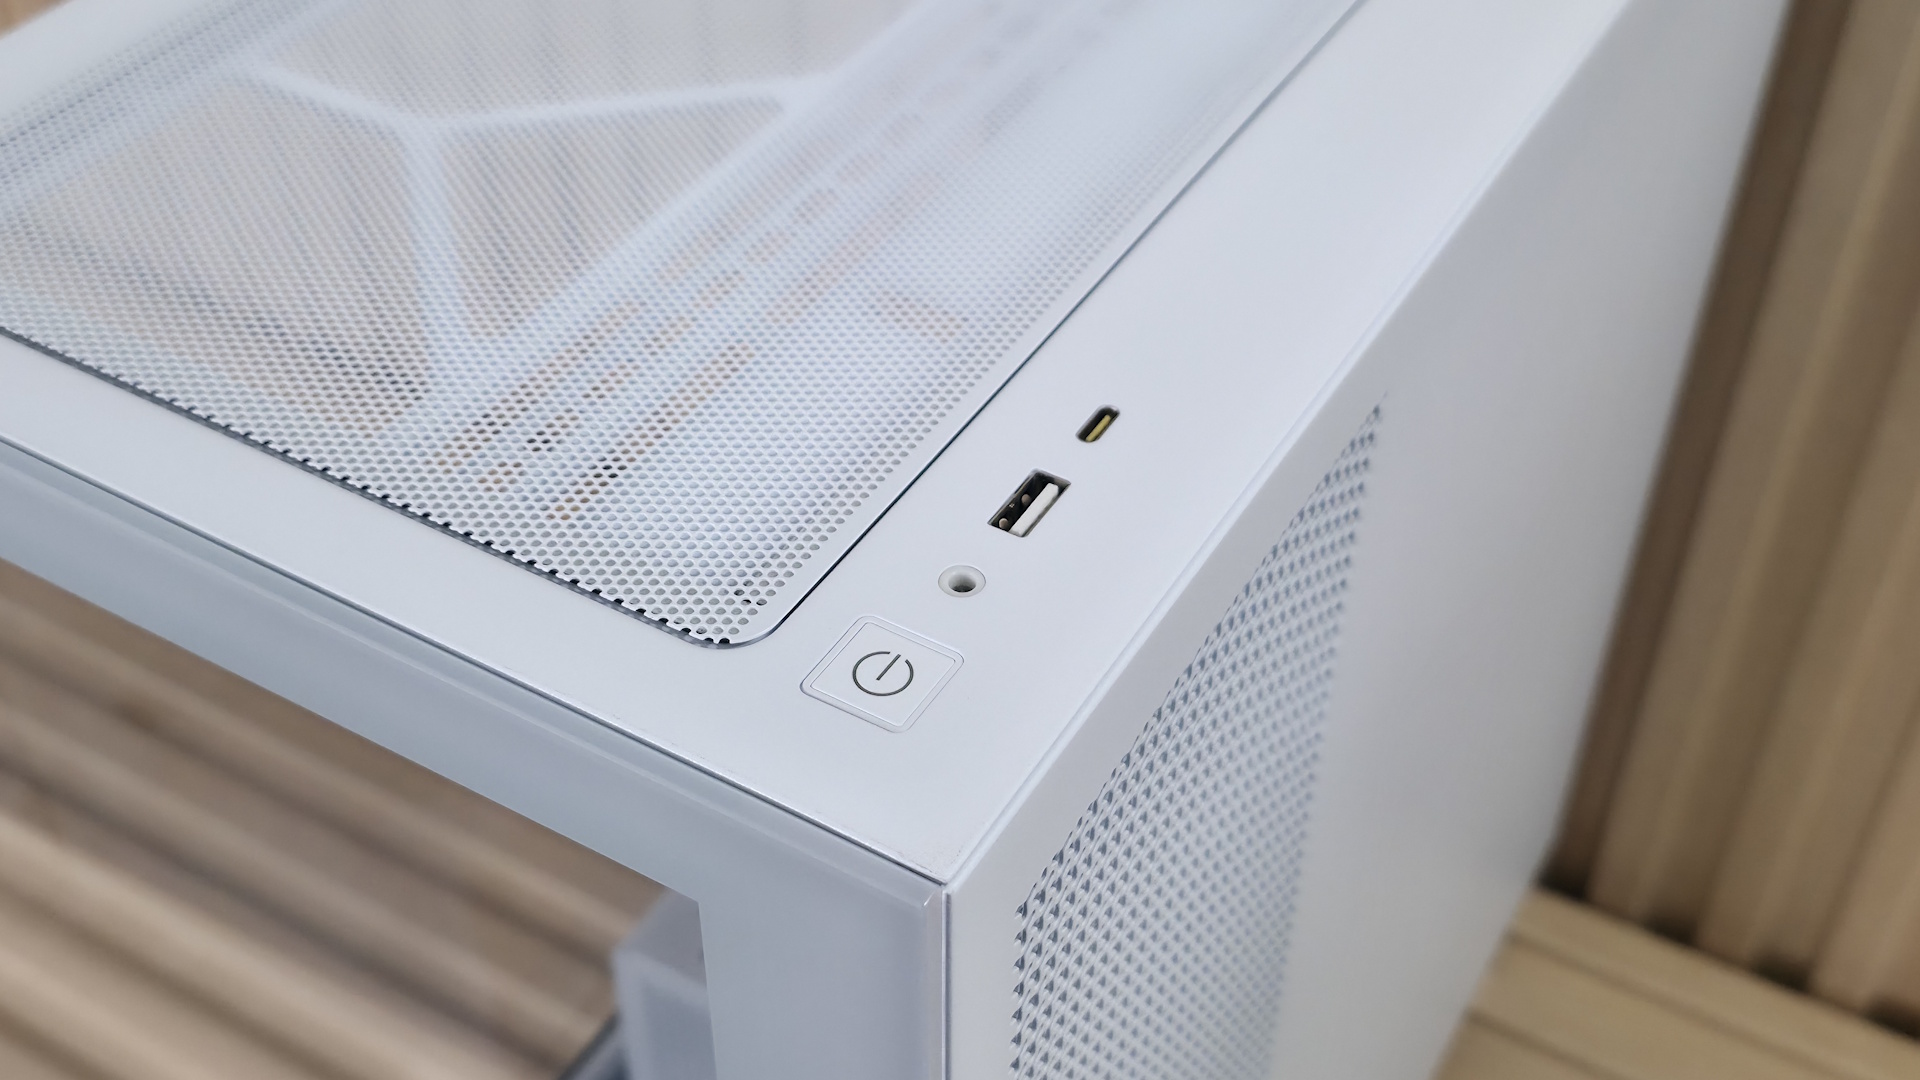
The IO panel sits at the front edge and offers your typical assortment of ports. You get three USB ports: one USB 3.2 Gen 2x2 20 Gbps Type-C, and two USB 3.1 Gen 1 (5 Gbps) Type-A ports. This is exactly what we want to see in a case of this caliber. There’s also a shiny power button with the Fractal symbol in the middle, a 3.5mm combo audio jack on the left, and finally a skinny LED light at the top. The front panel also comes off easily. Removing the top panel exposes two levers, so you can remove the front panel, access the front of the case, and reach those three 140mm Momentum 14 fans and dust filters.

▶️ Internal Features

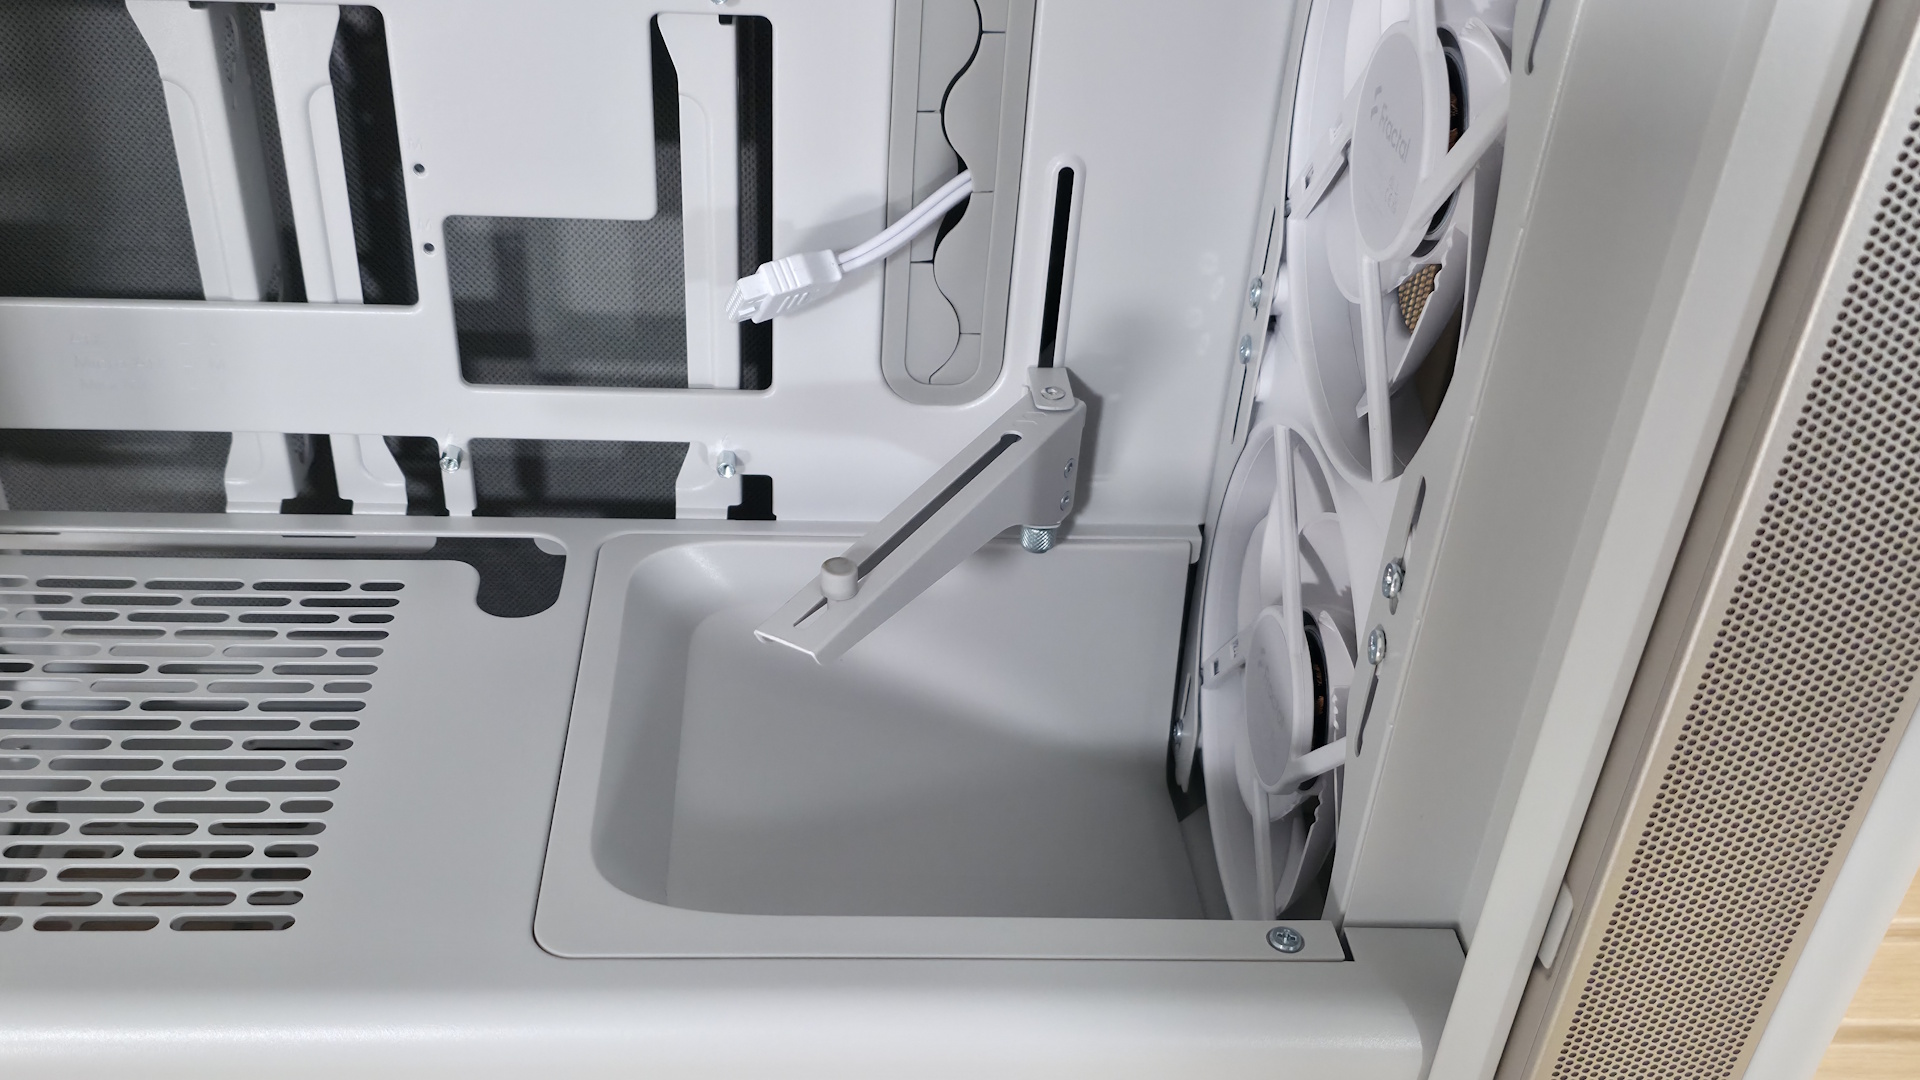
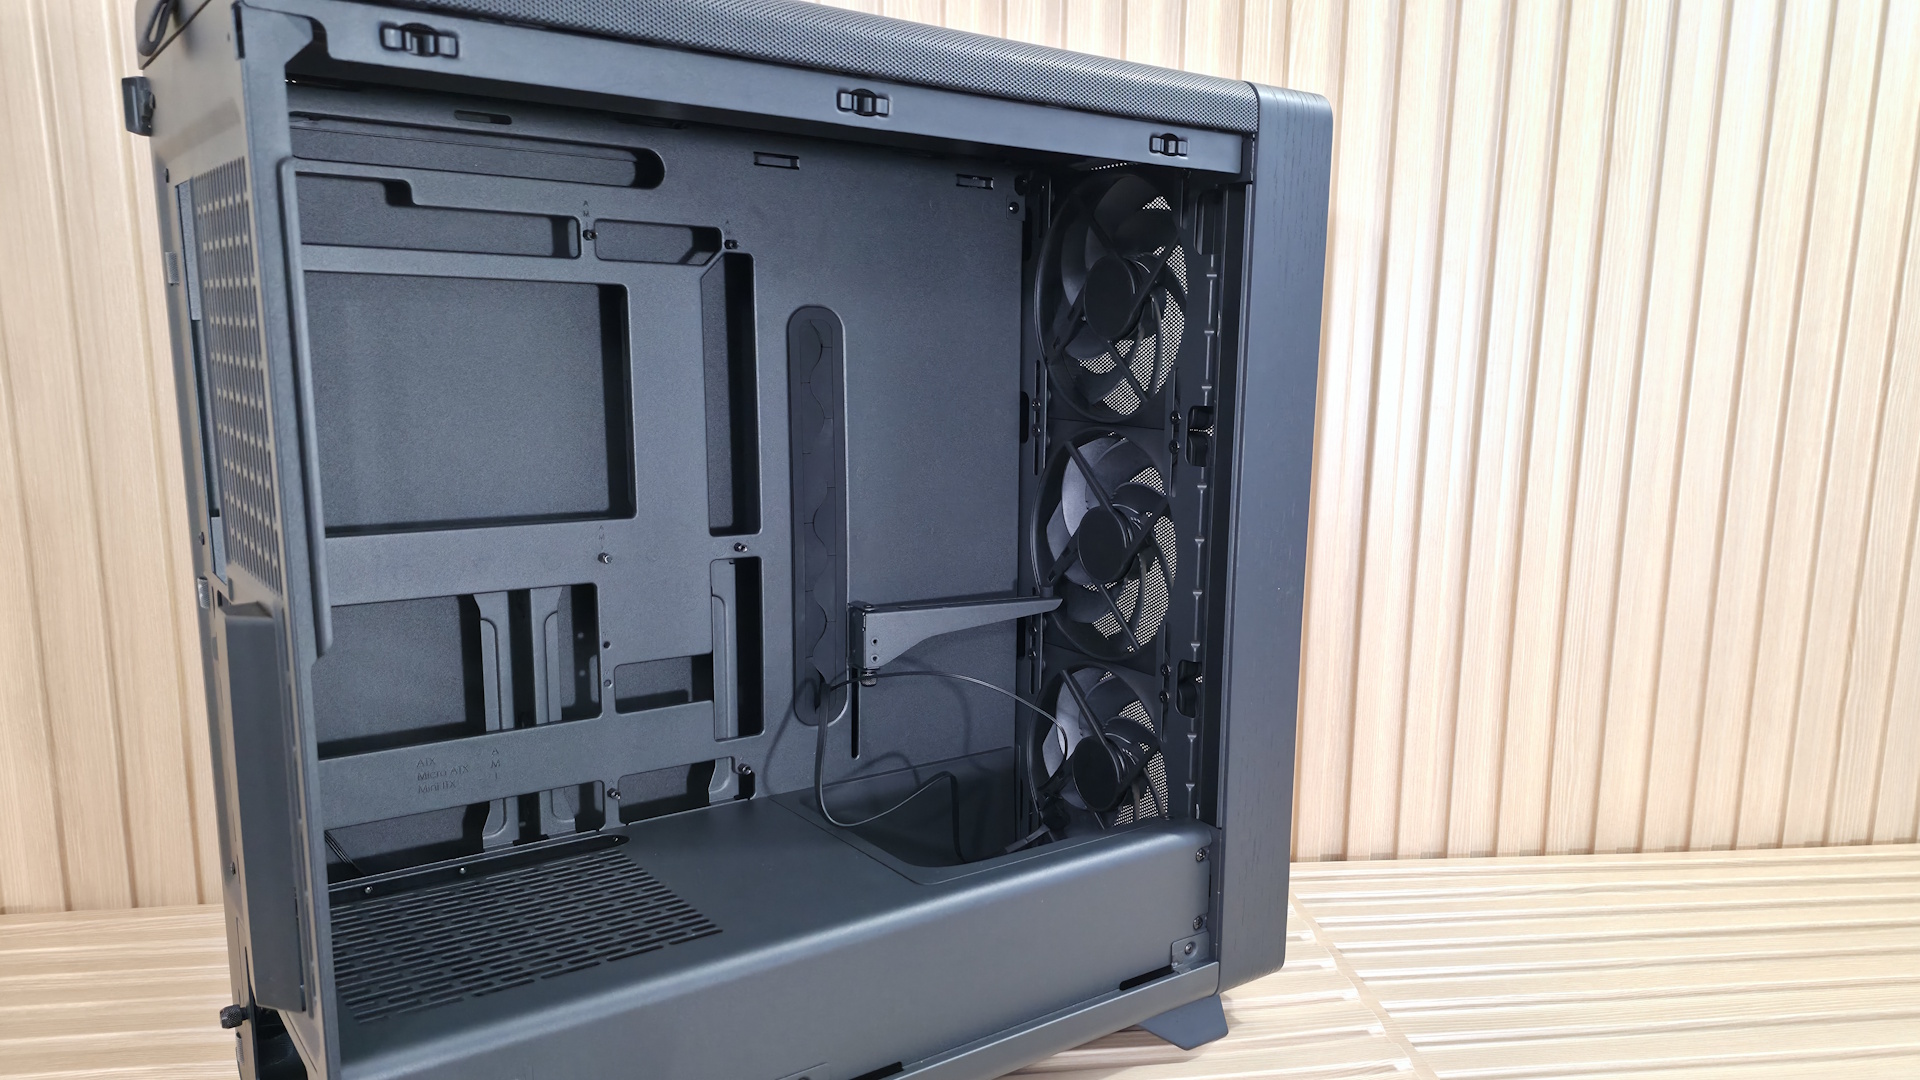
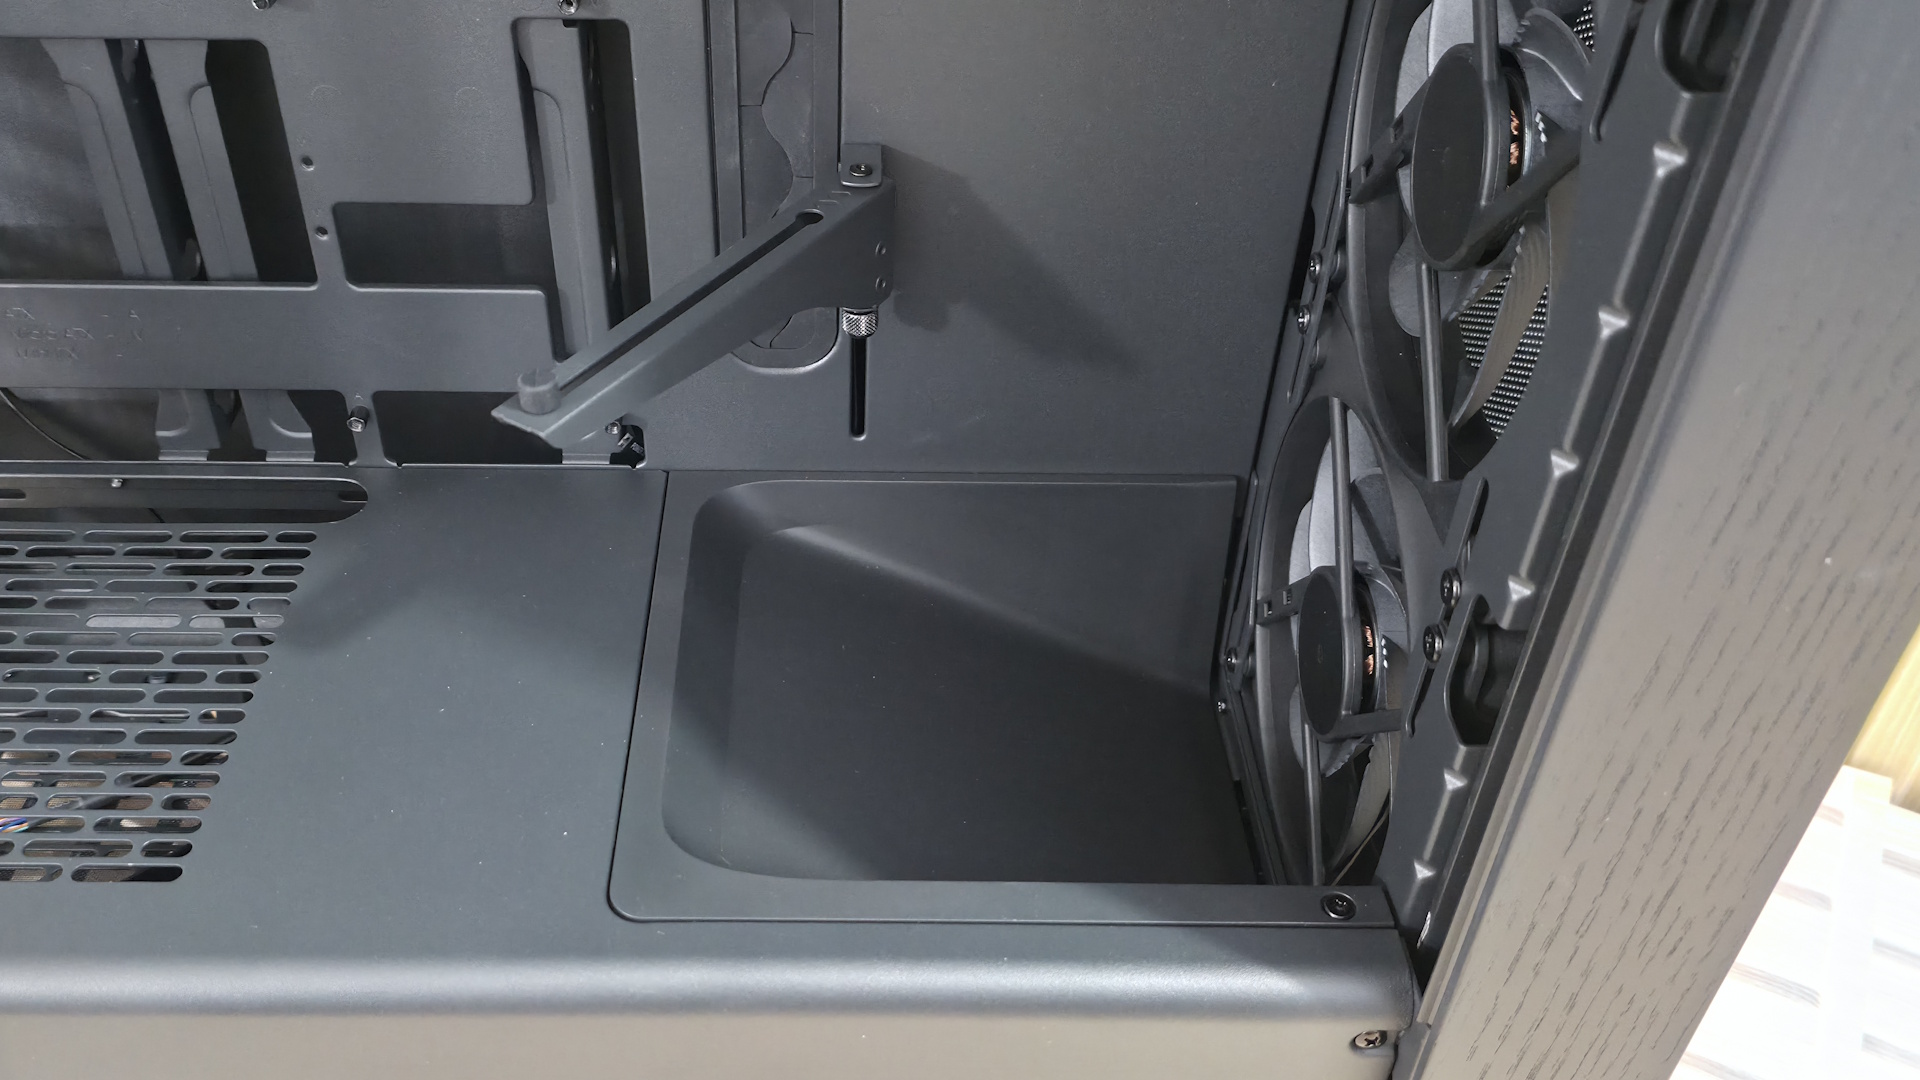
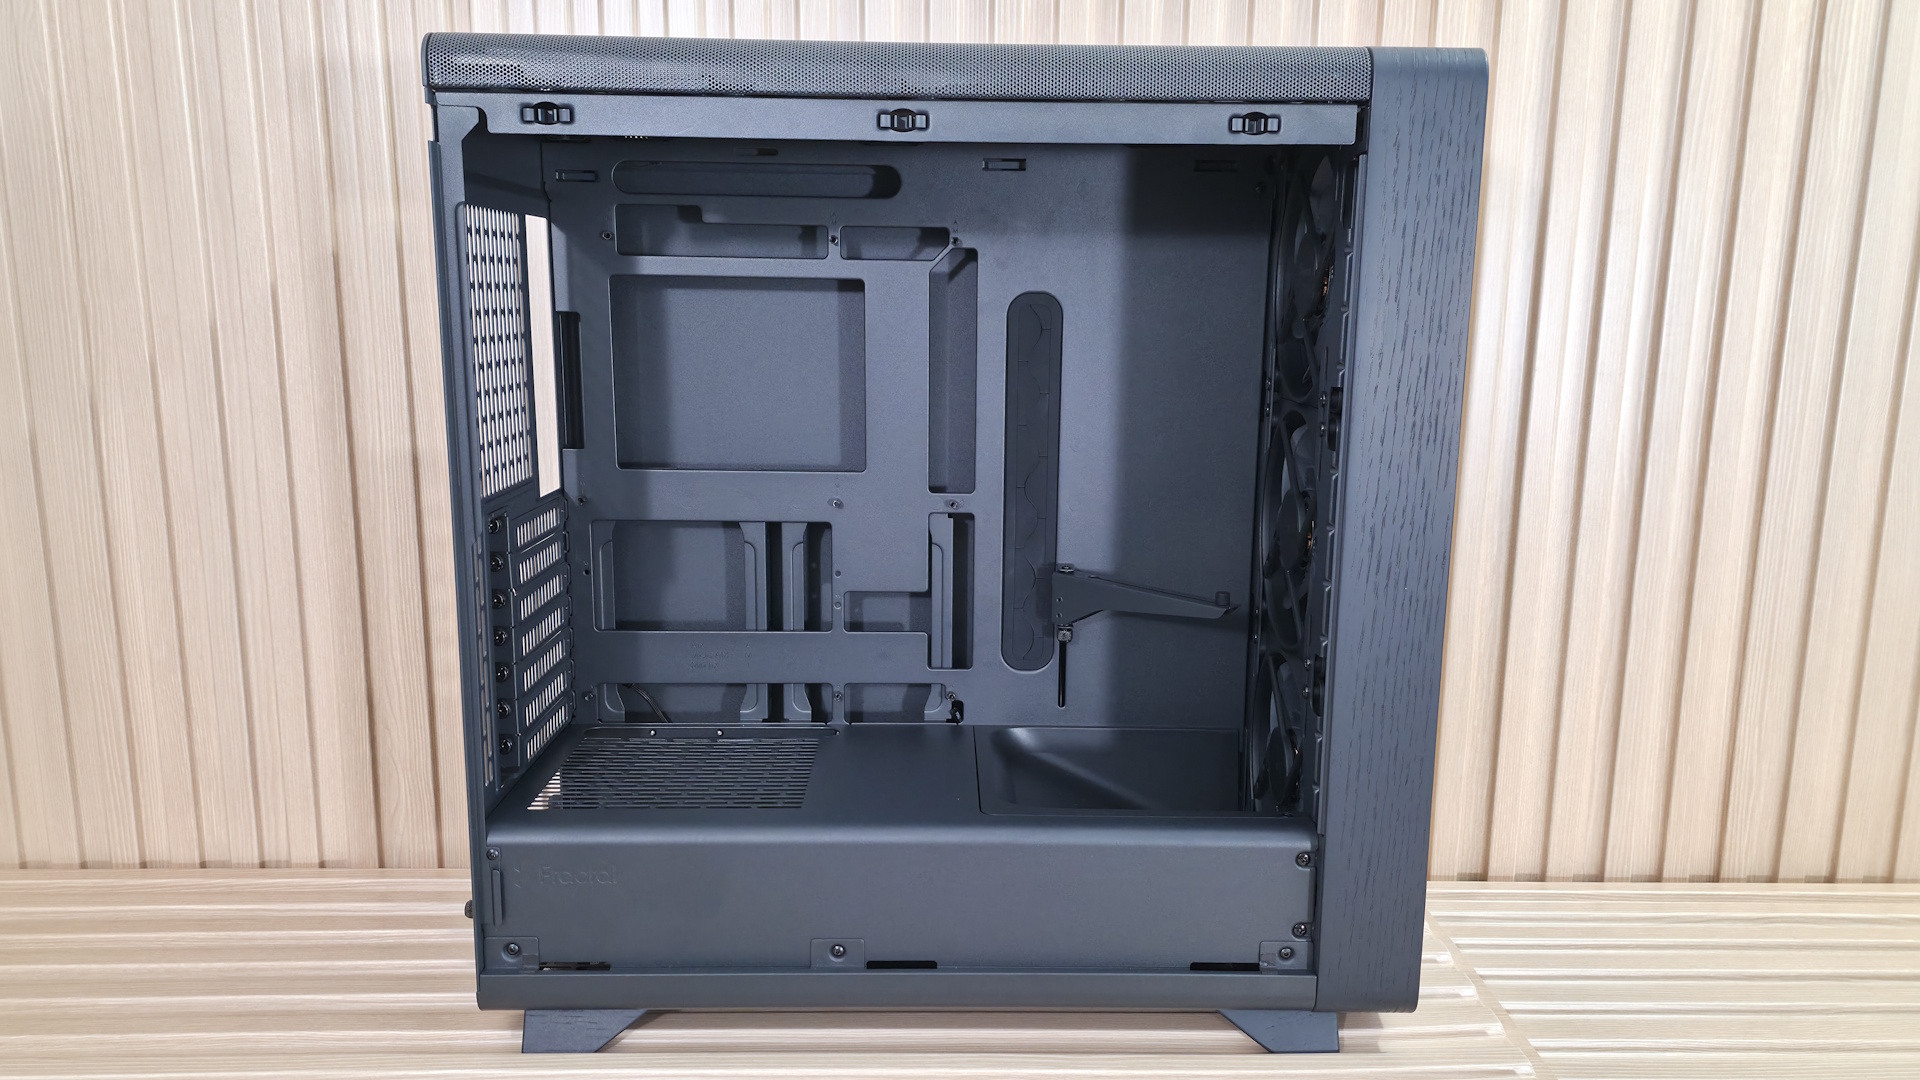
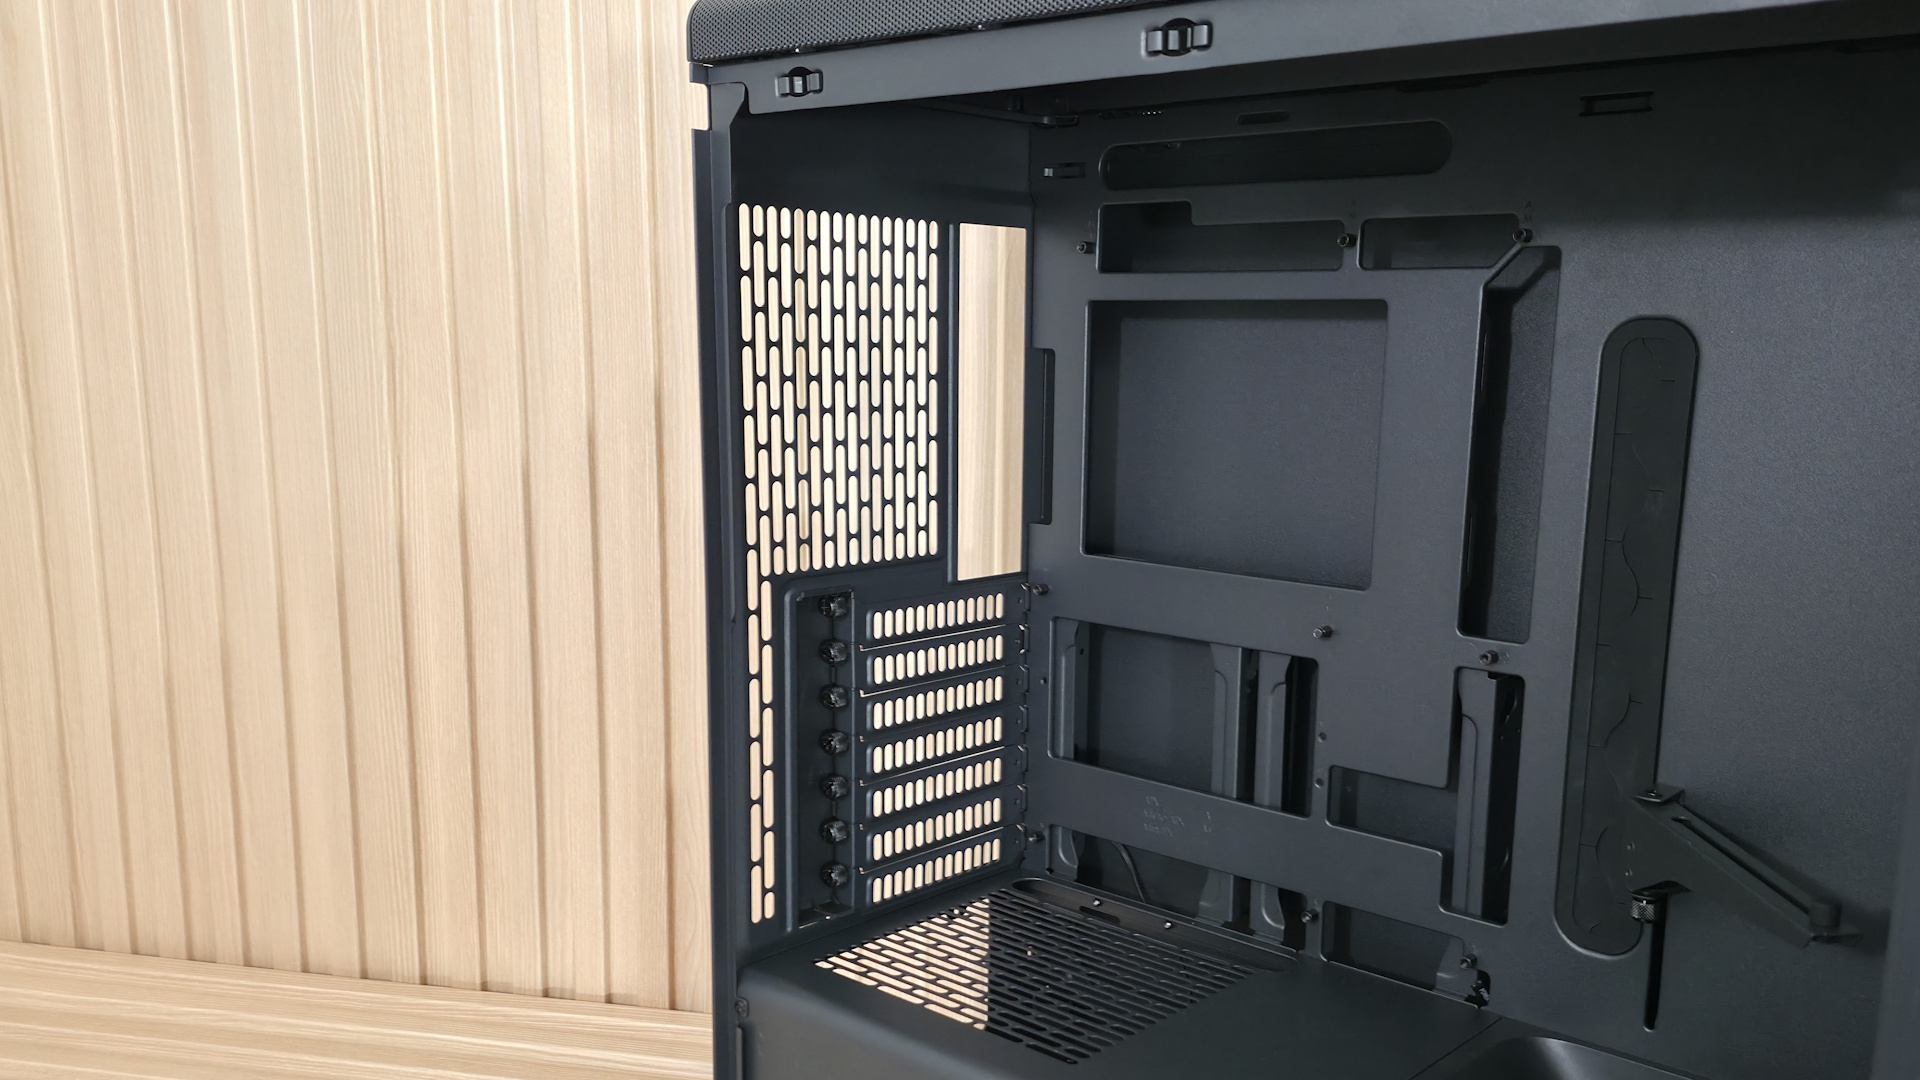
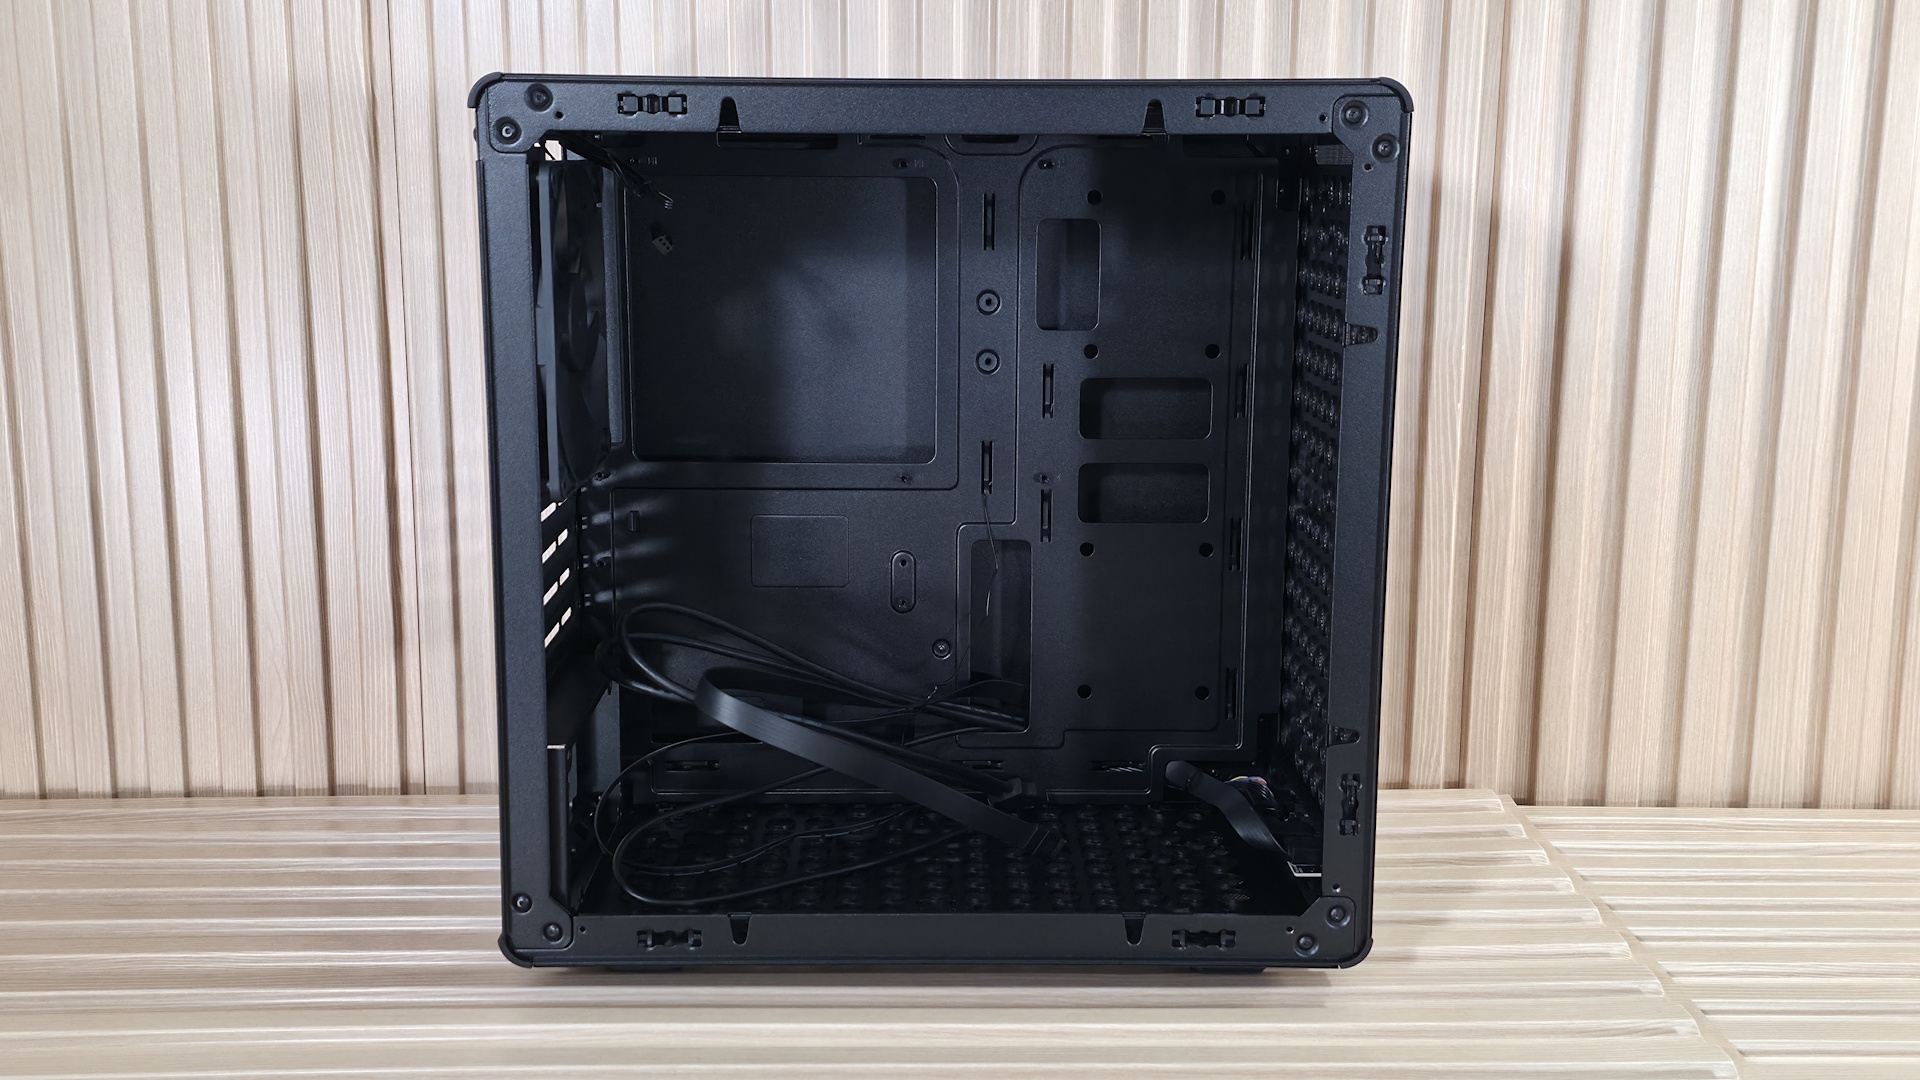
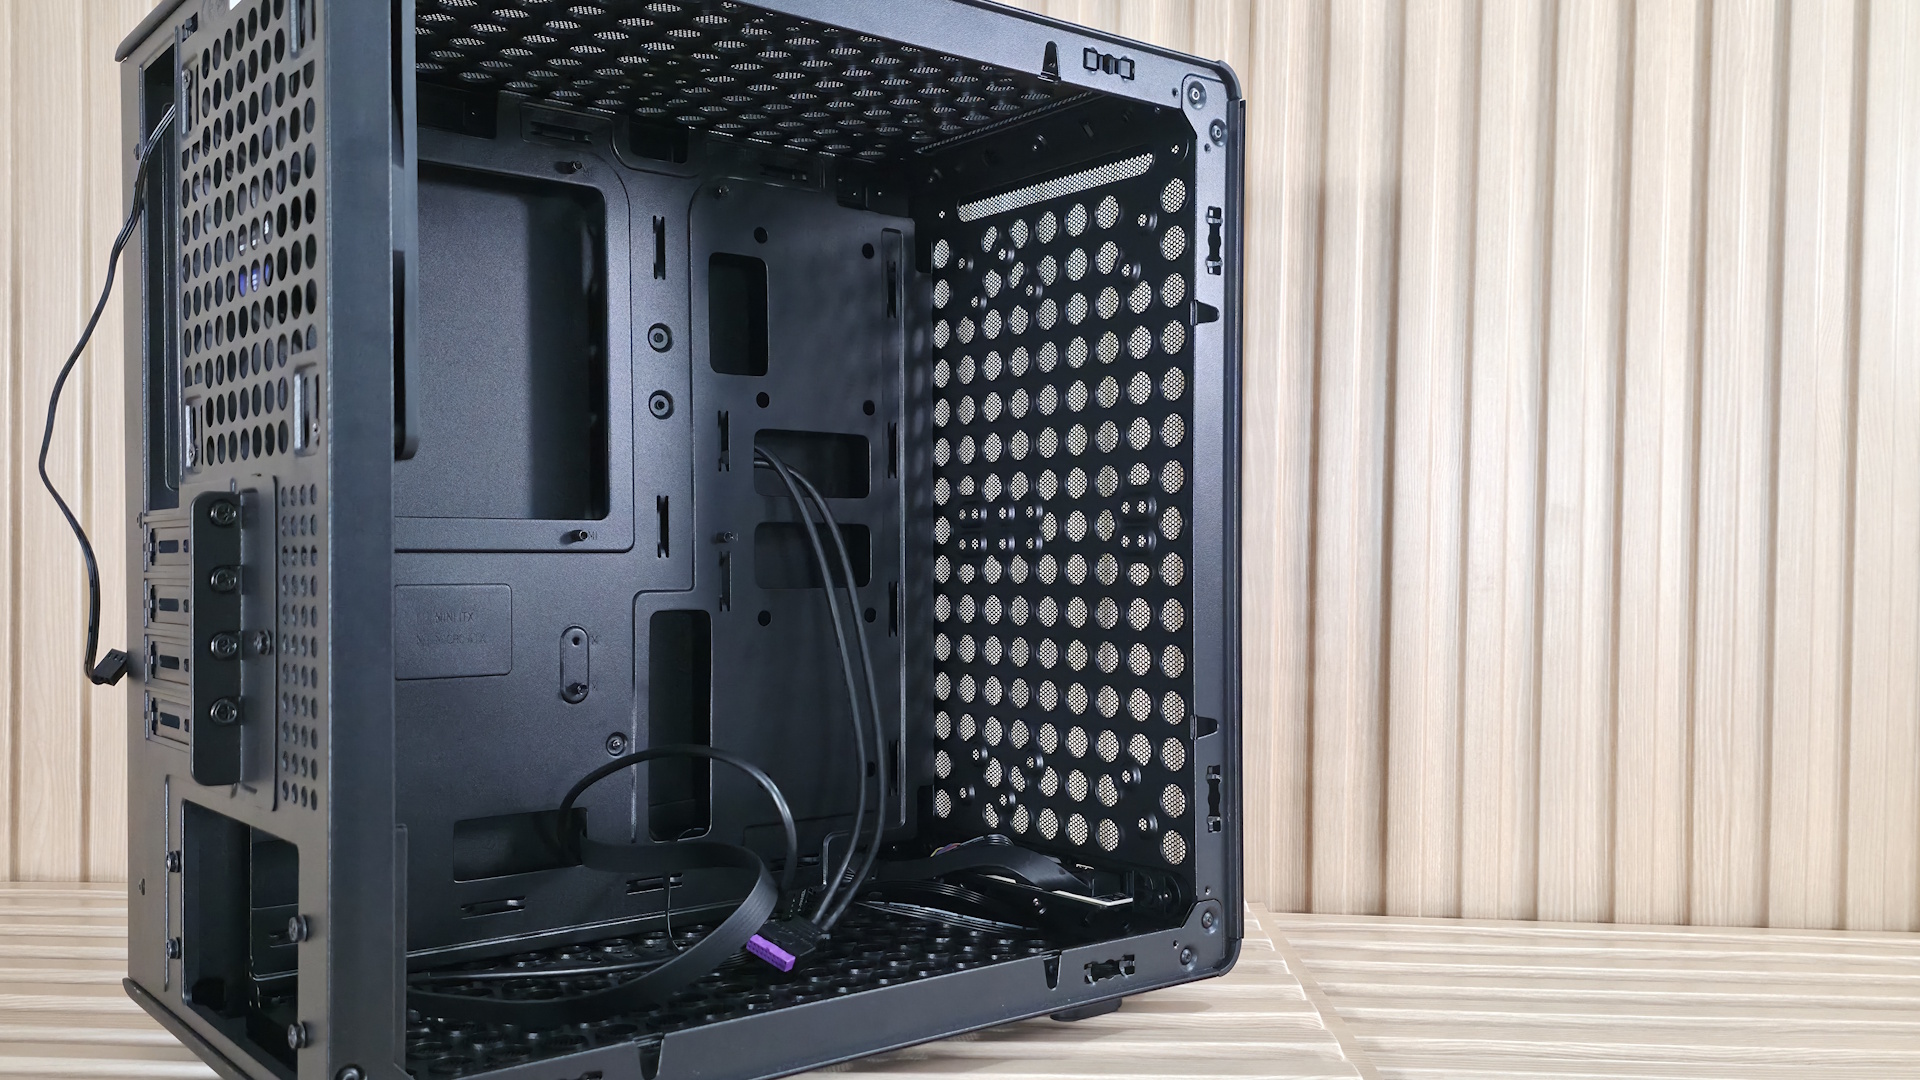
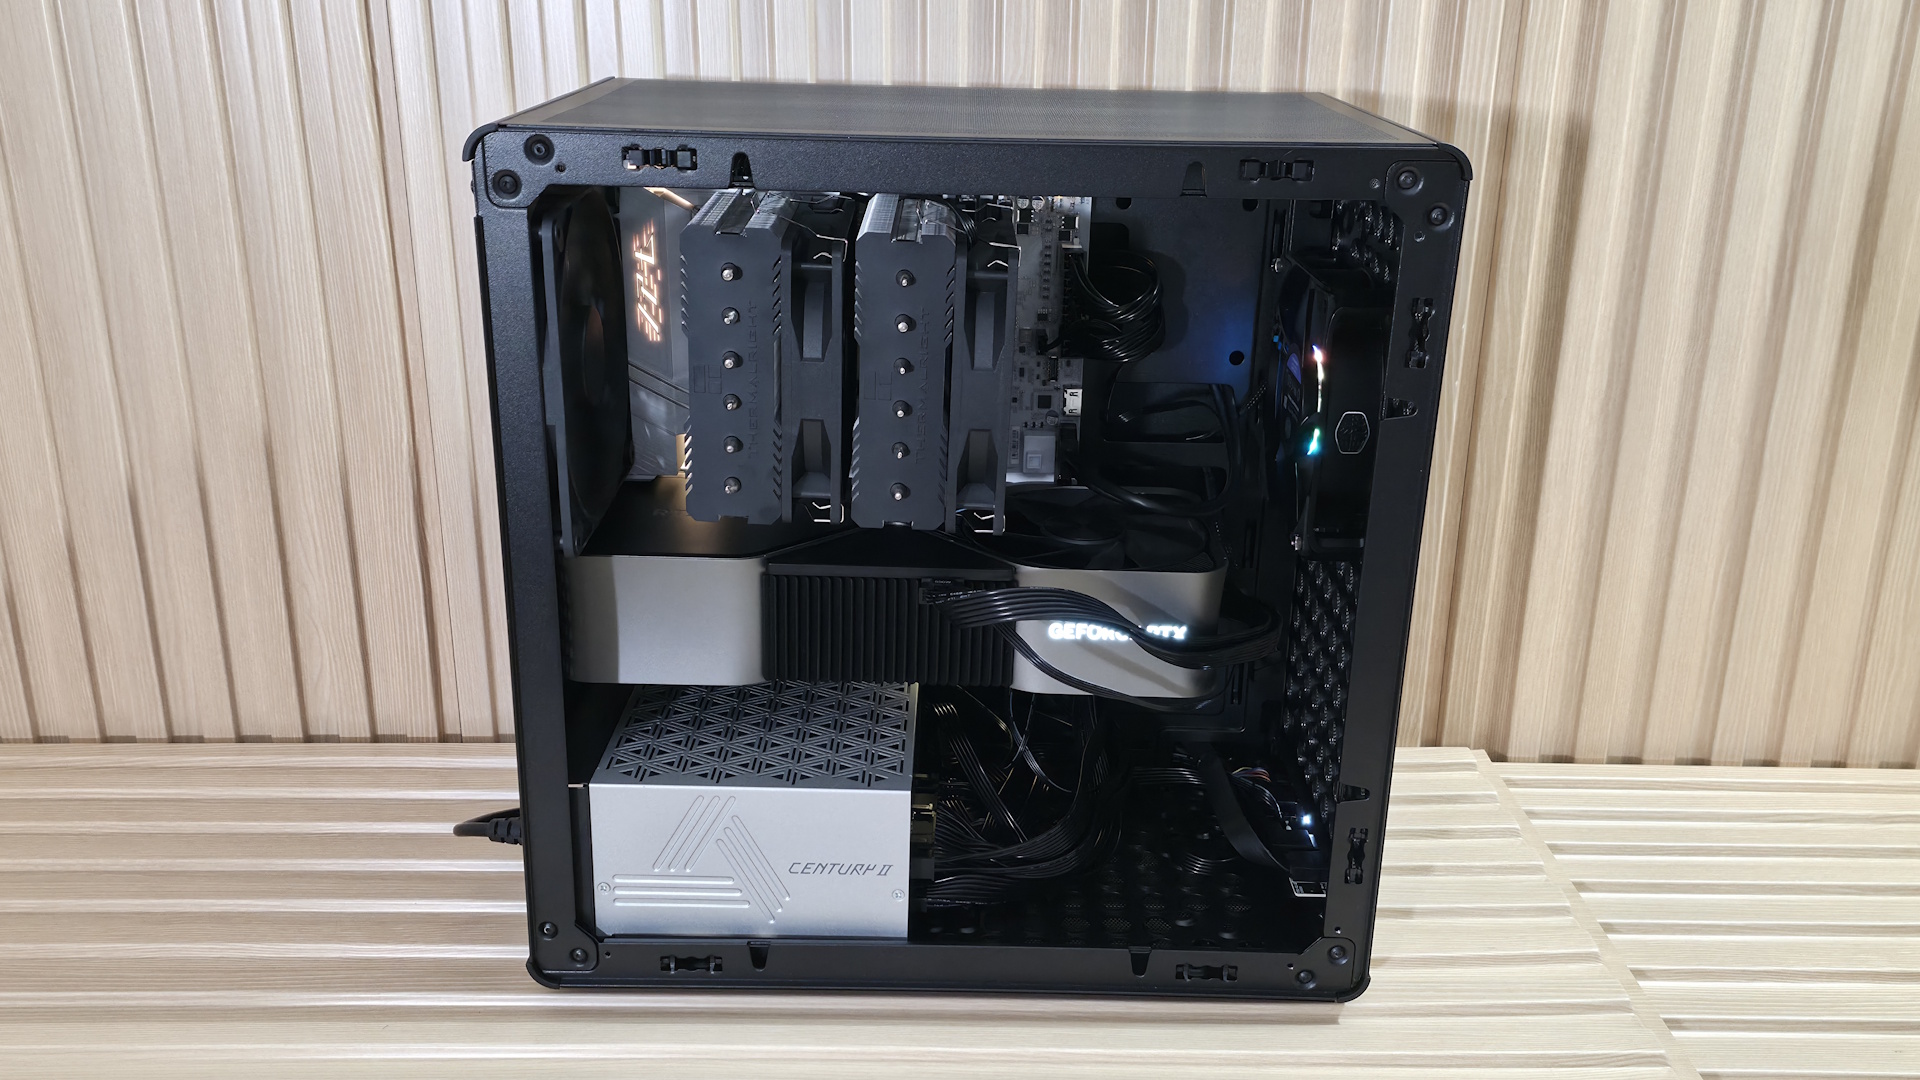
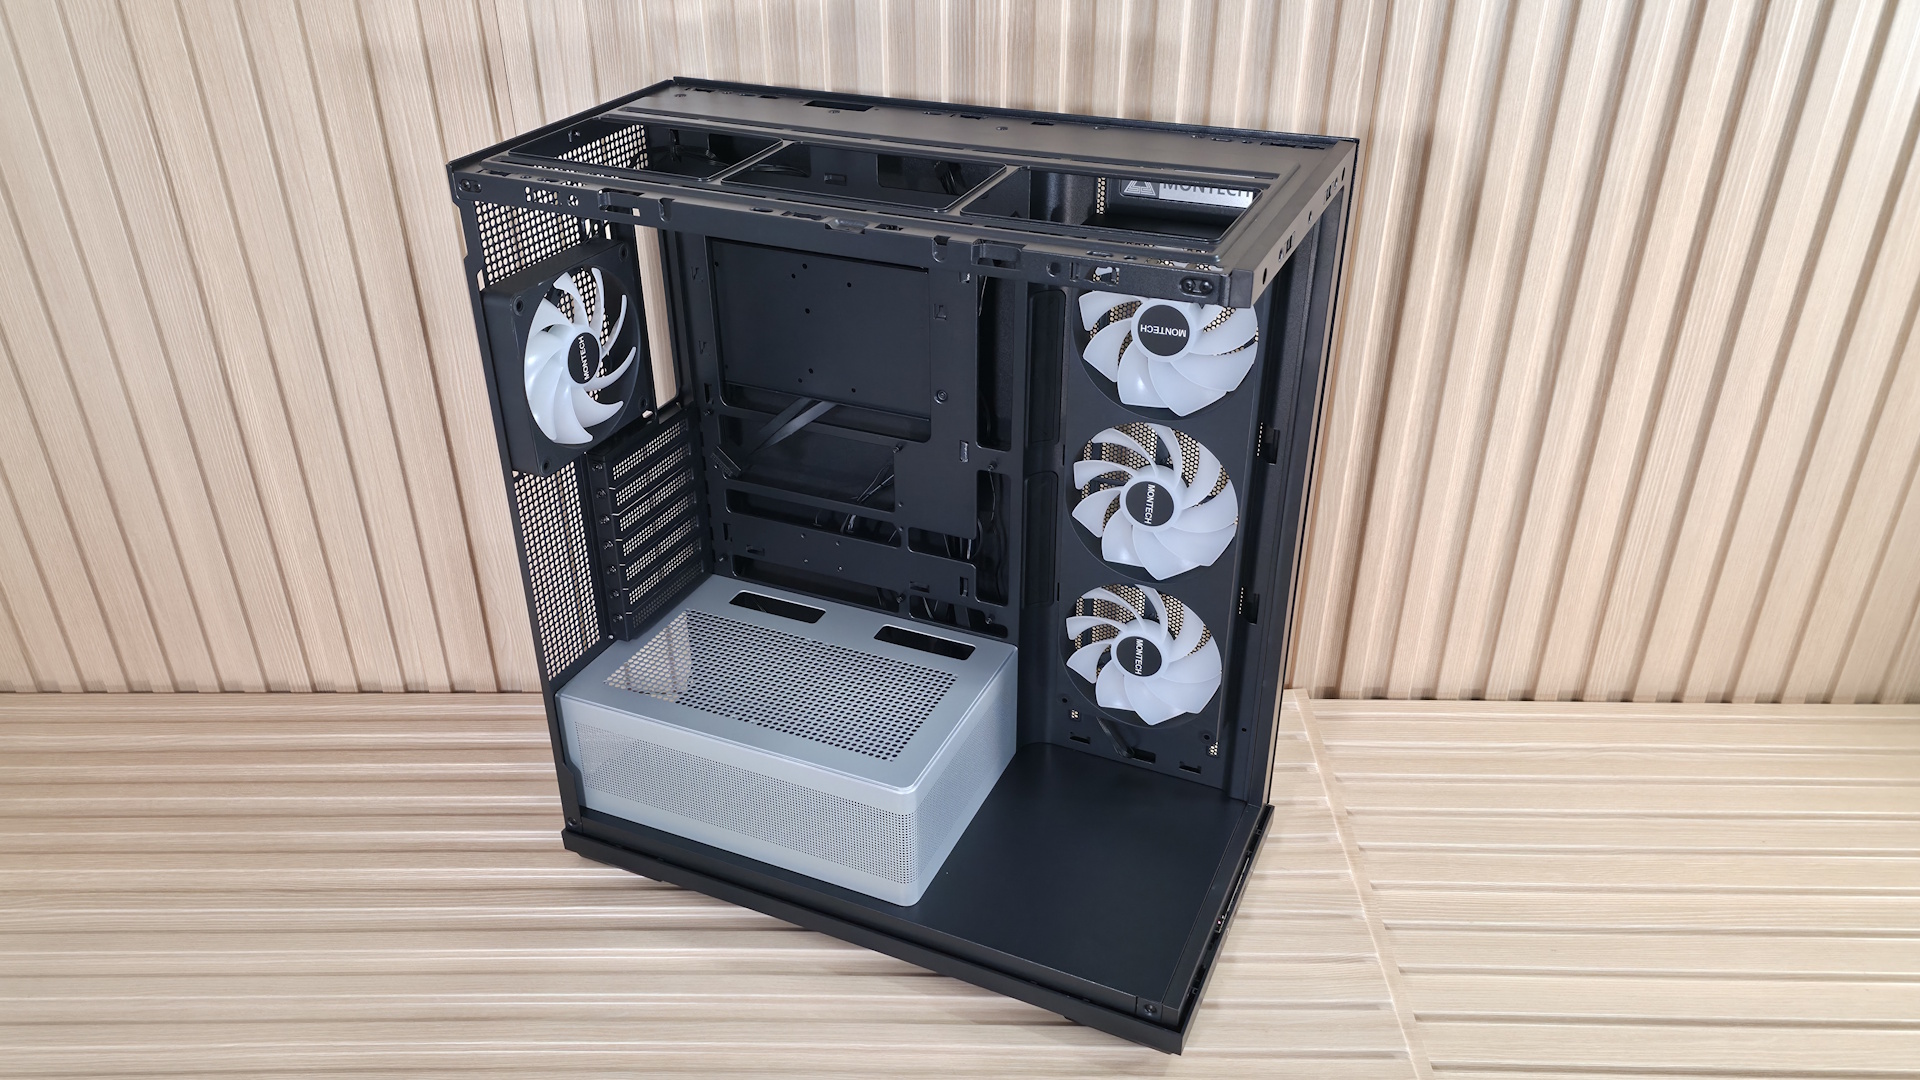
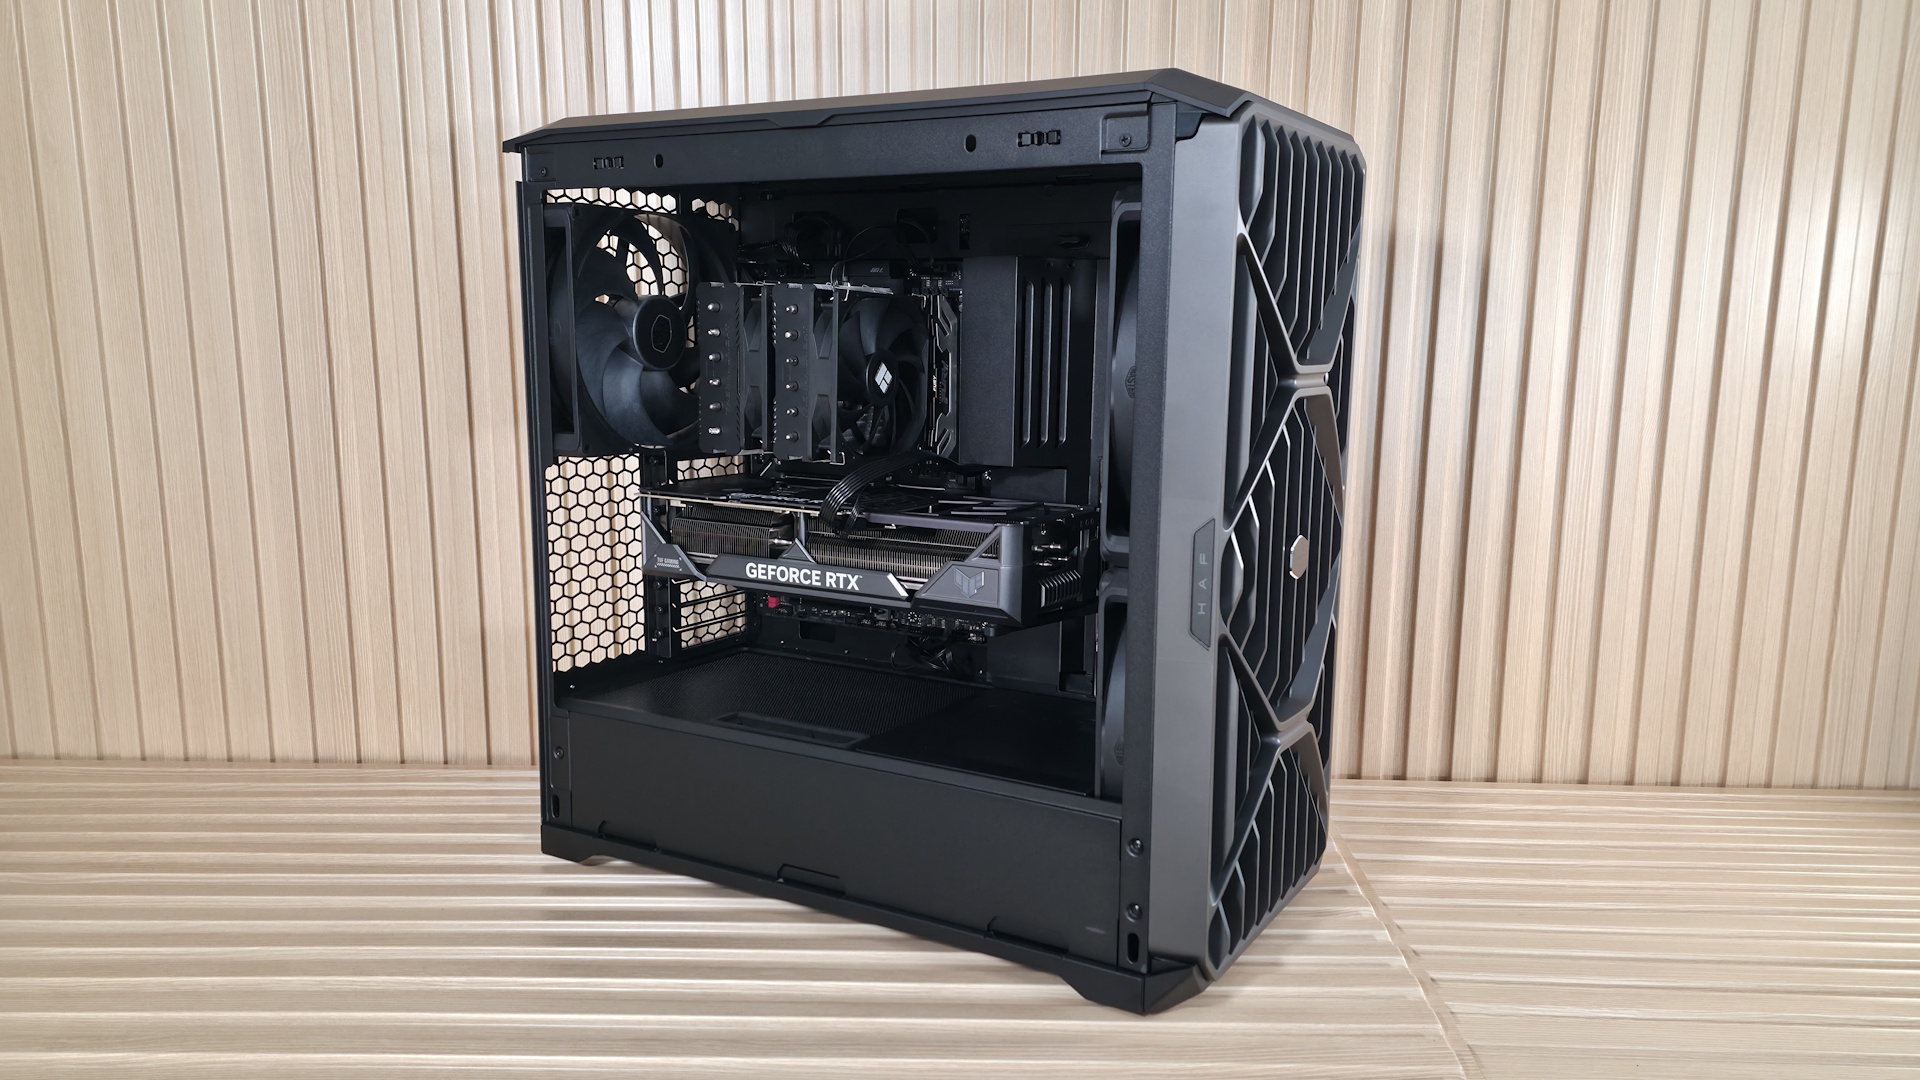
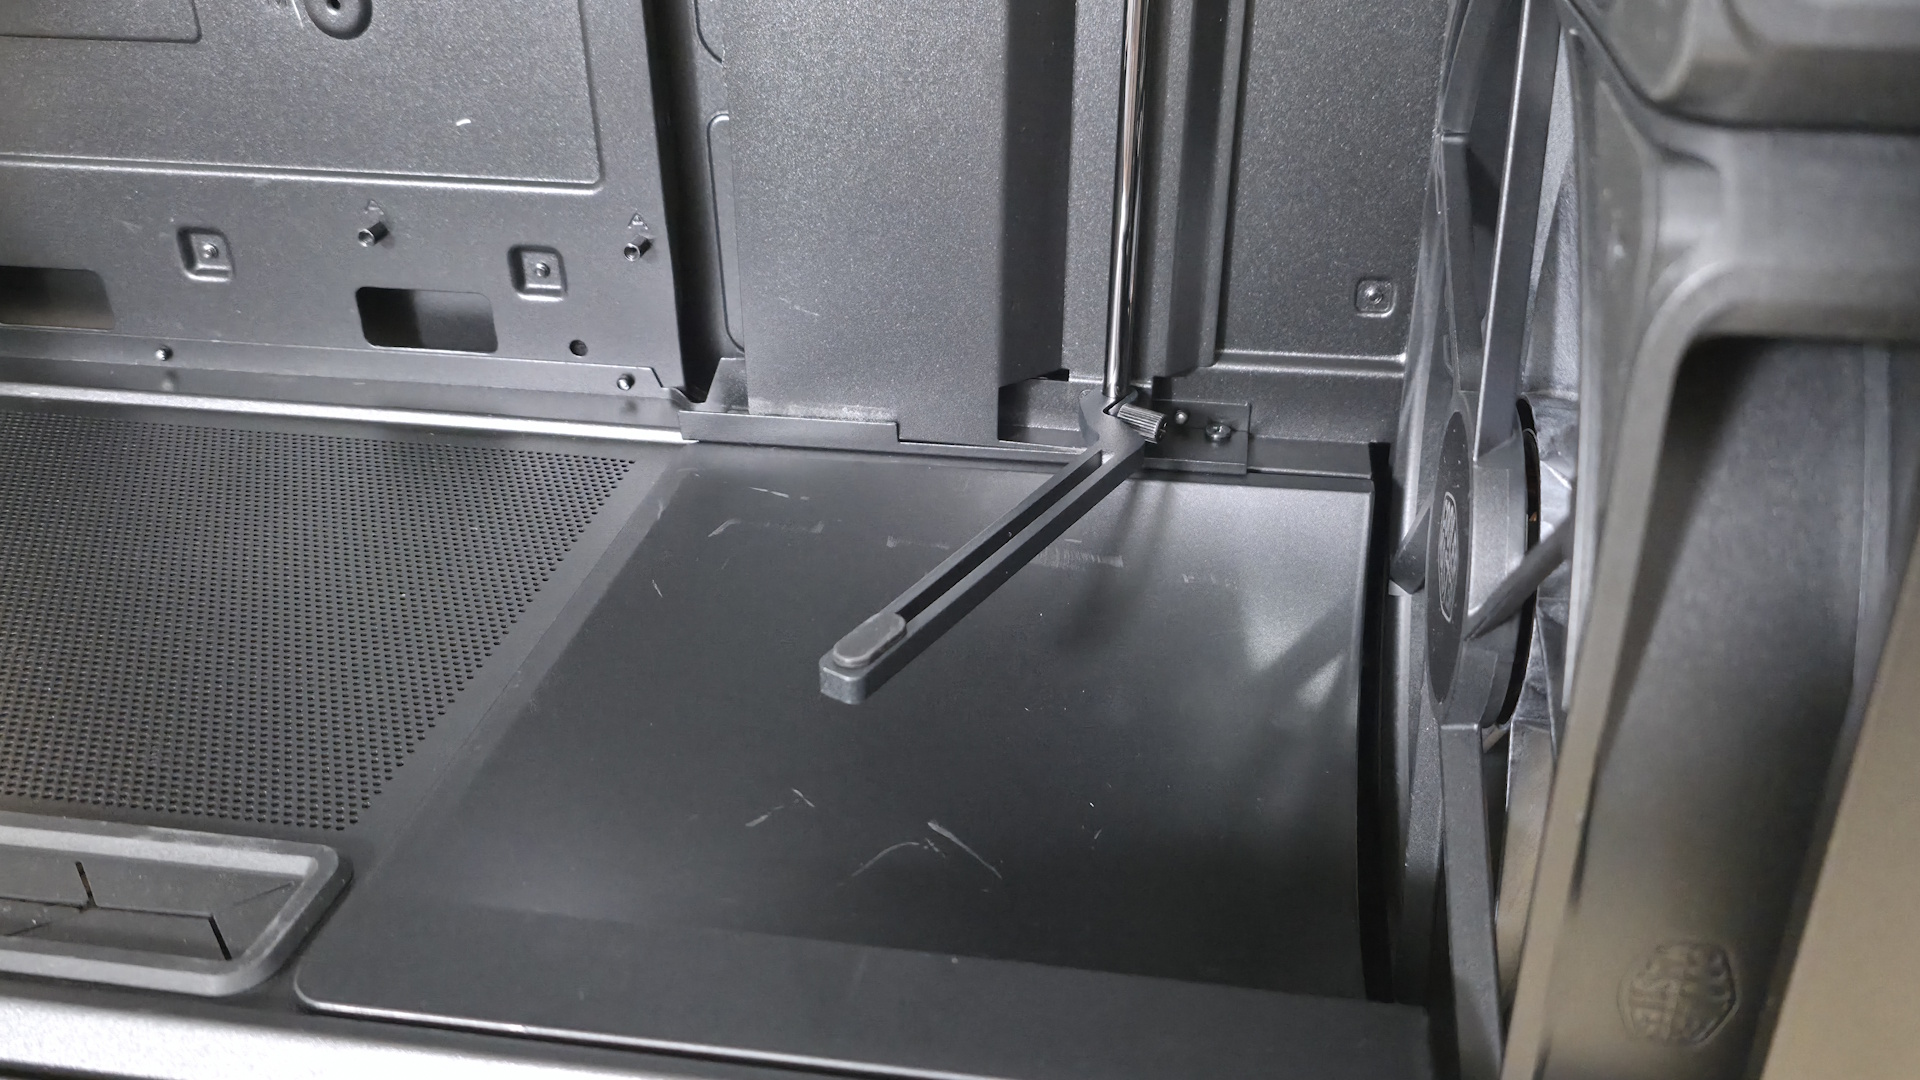
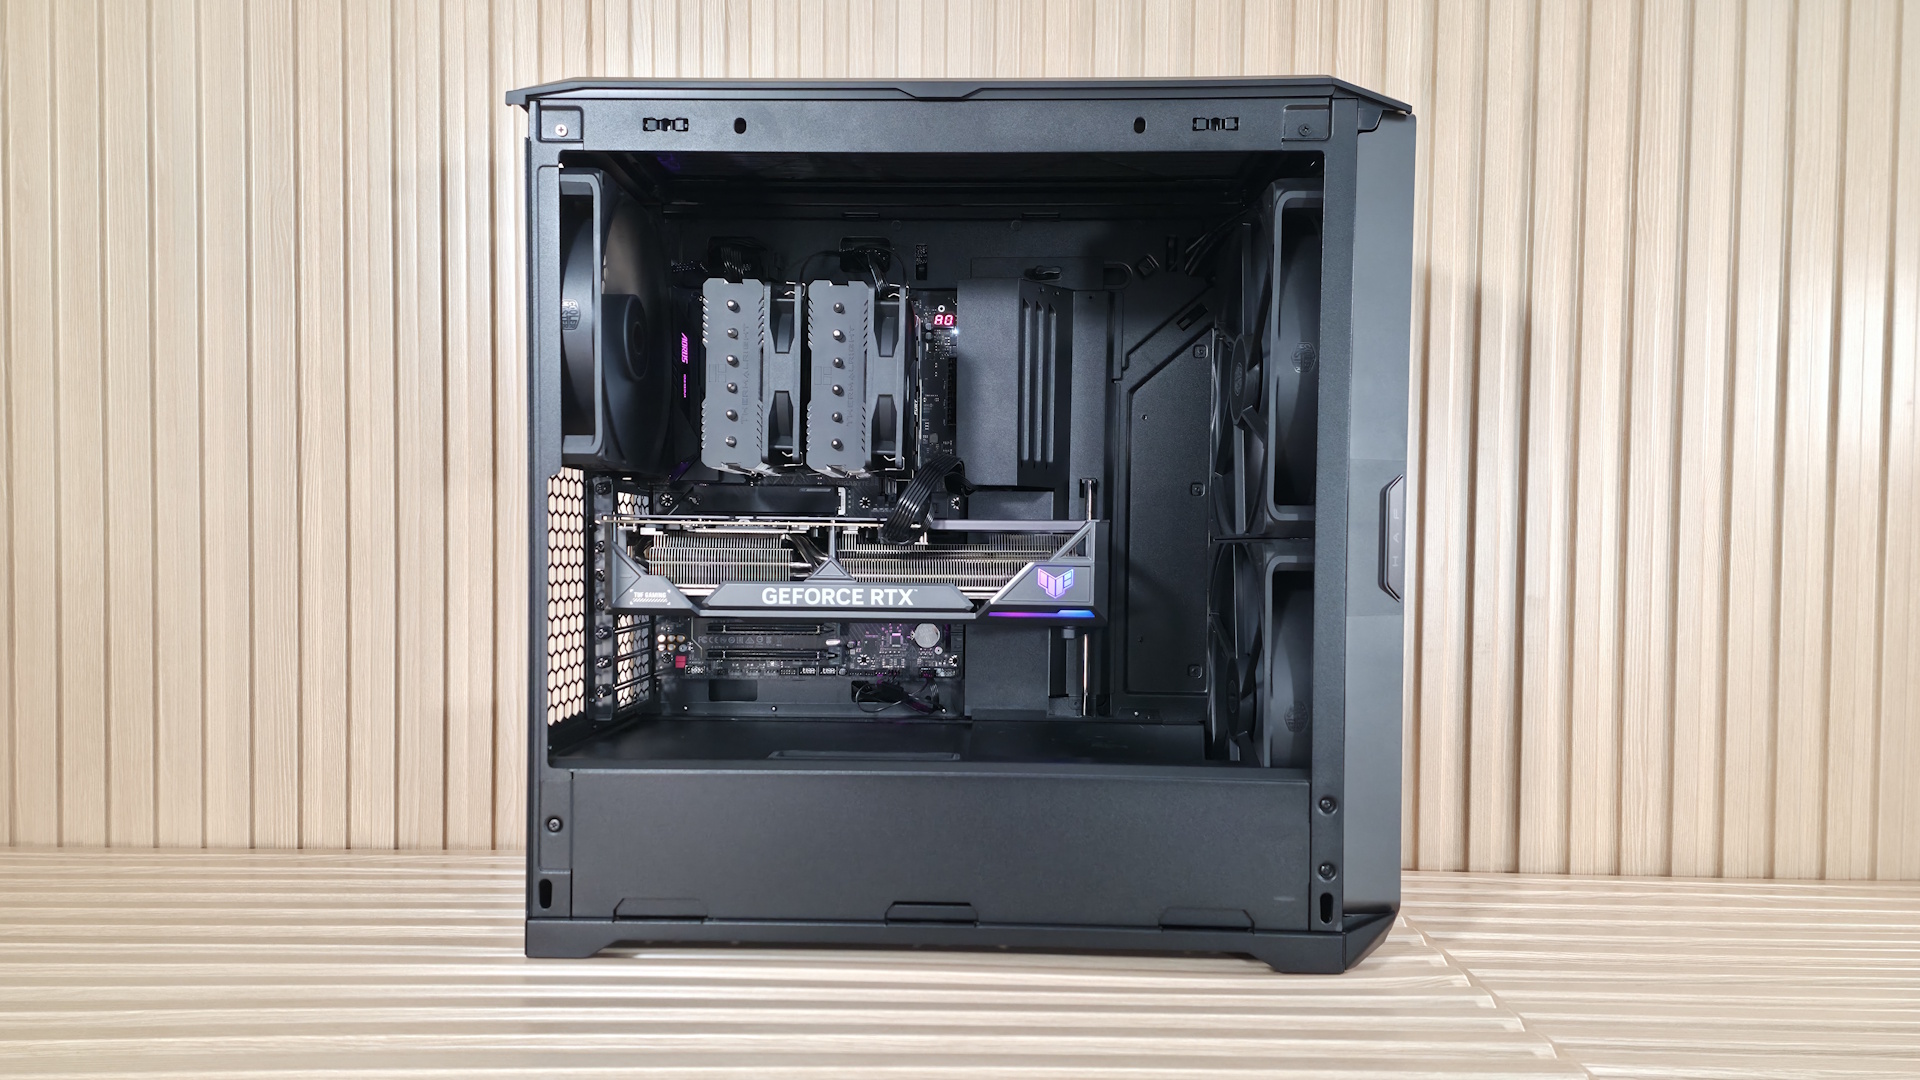
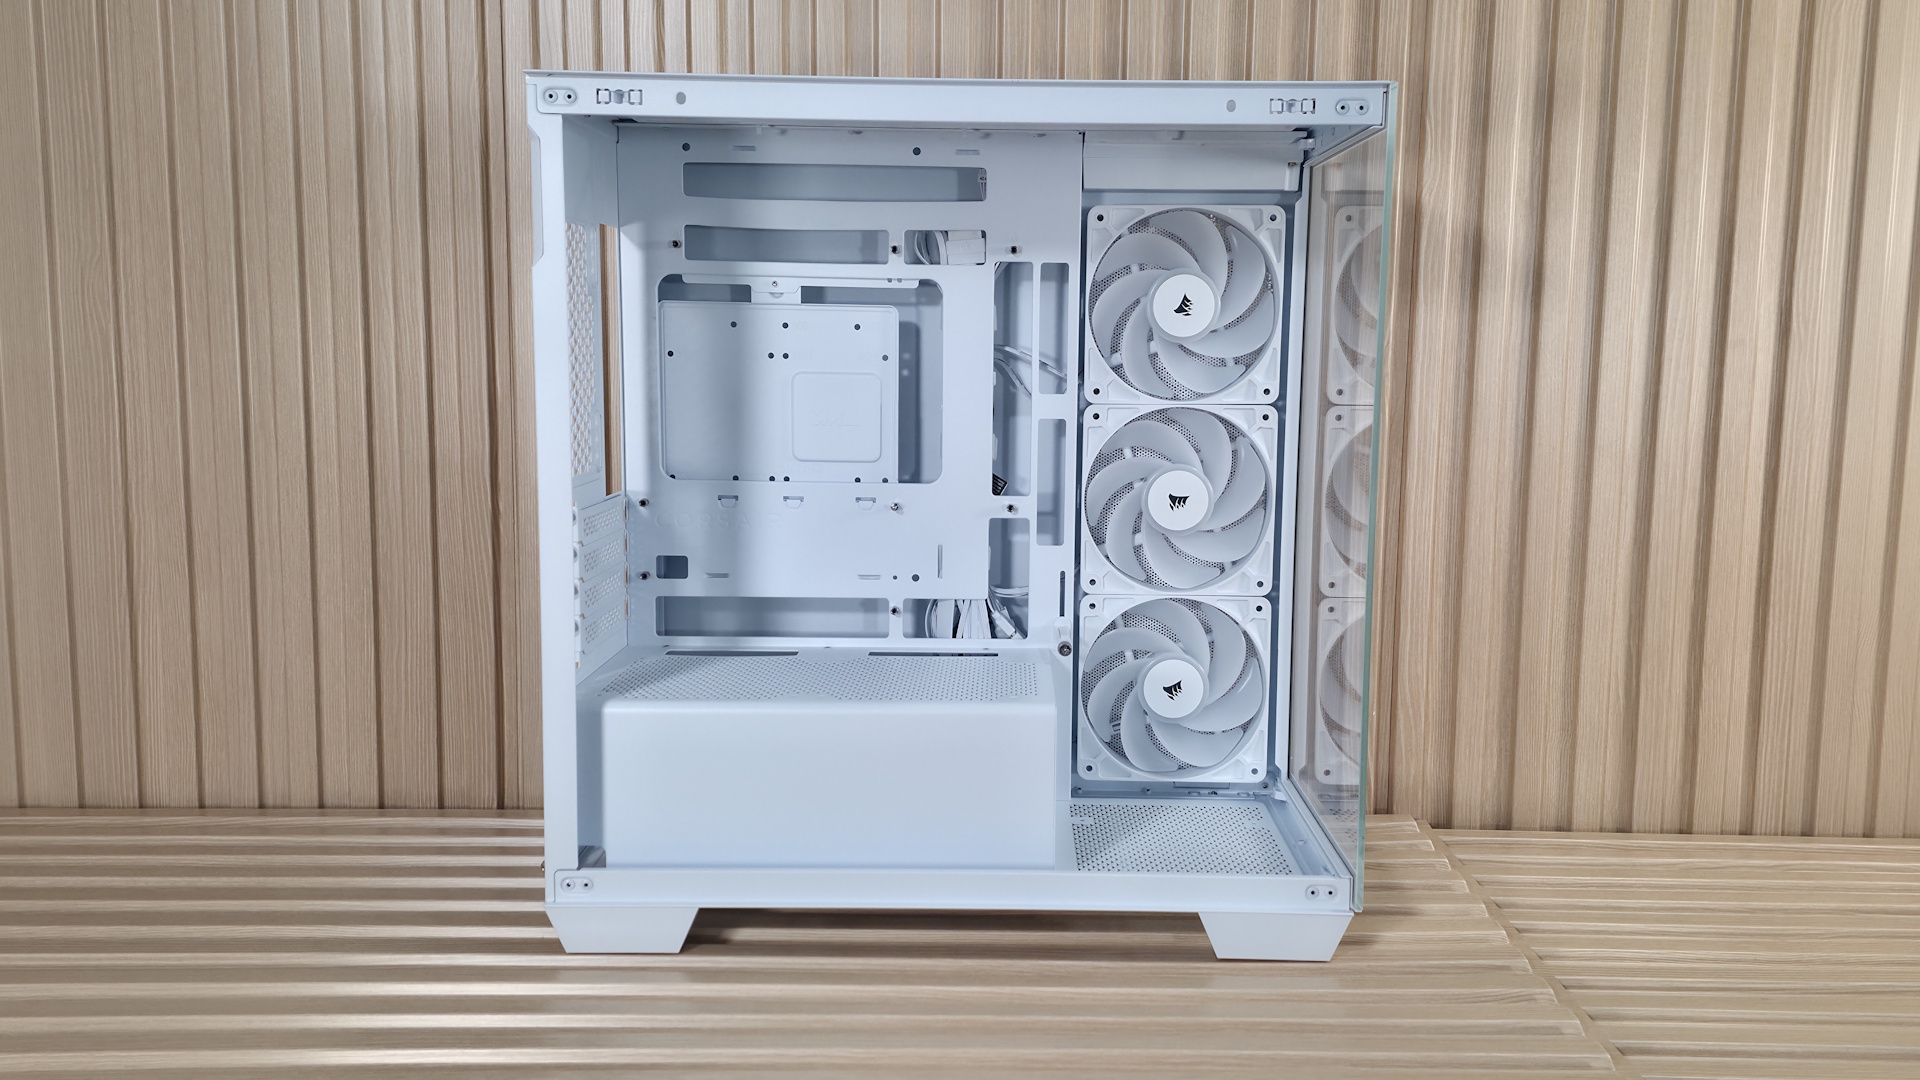
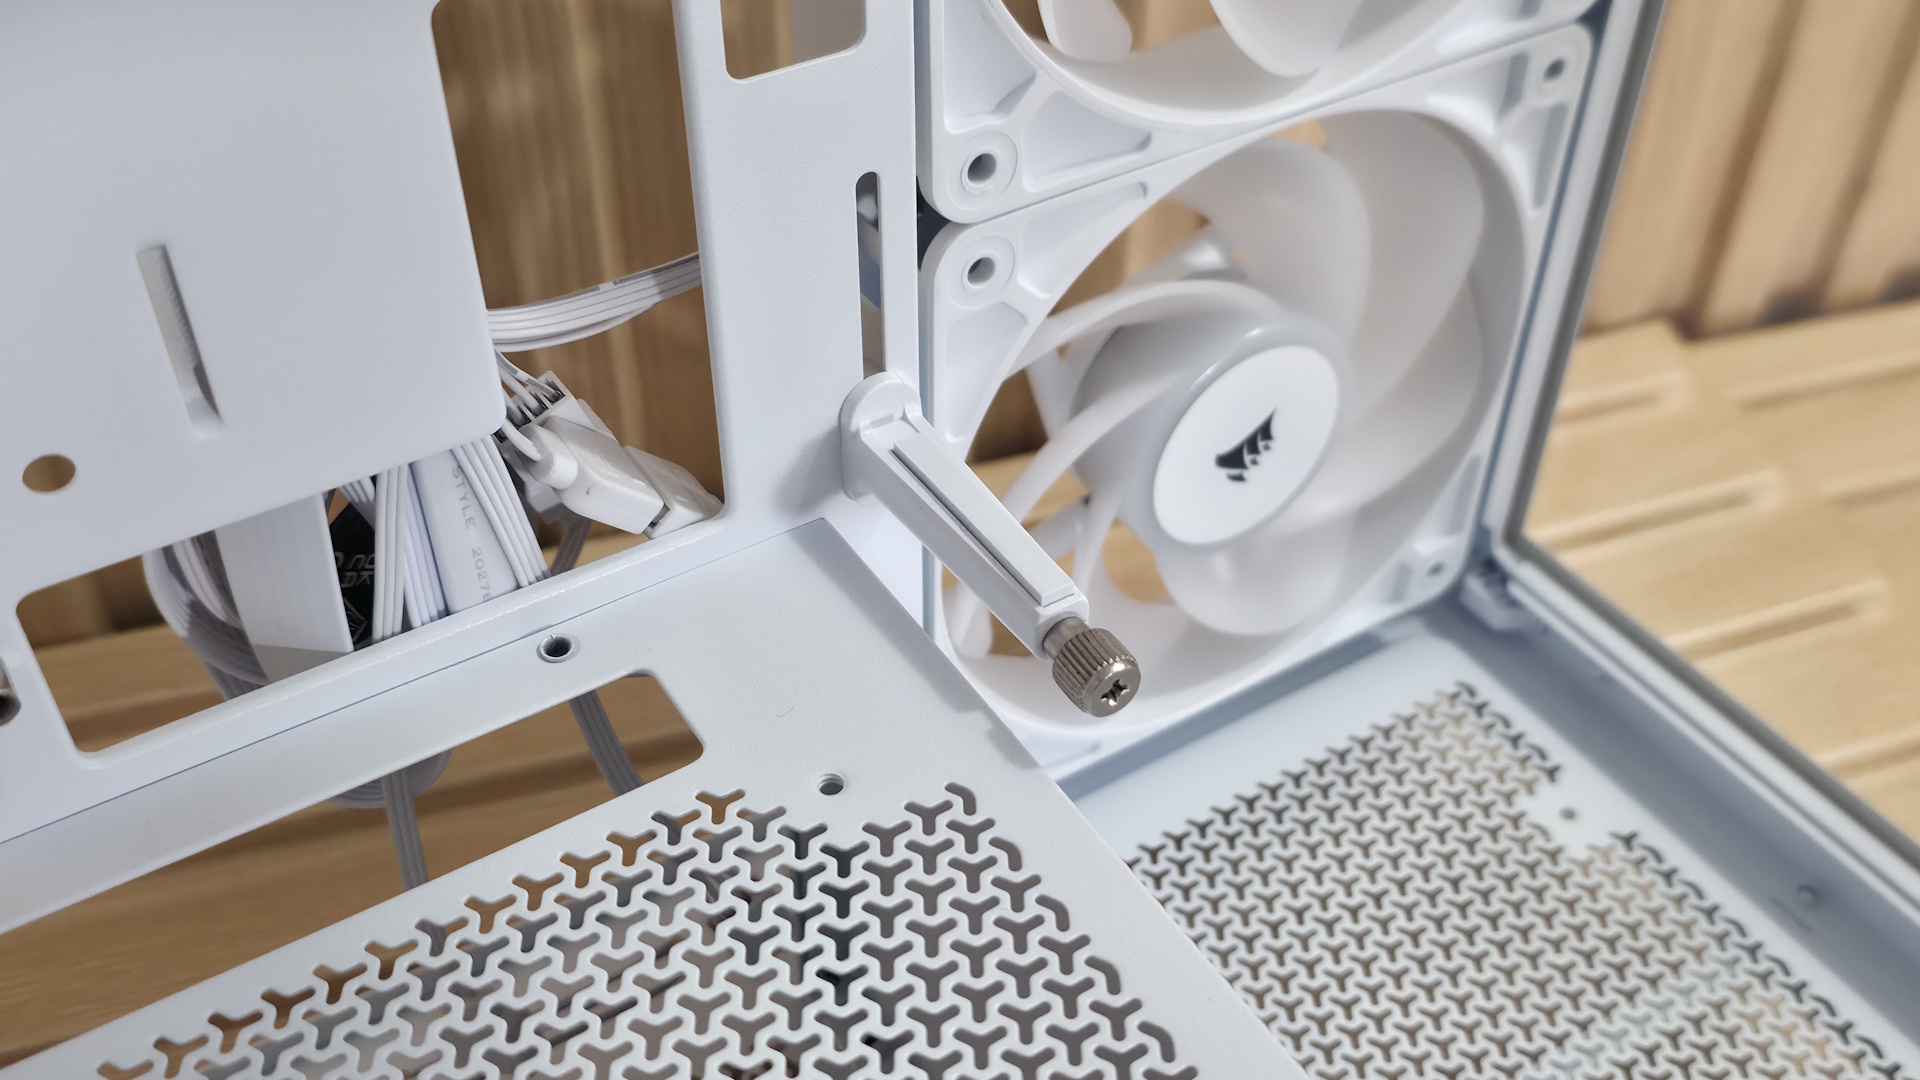
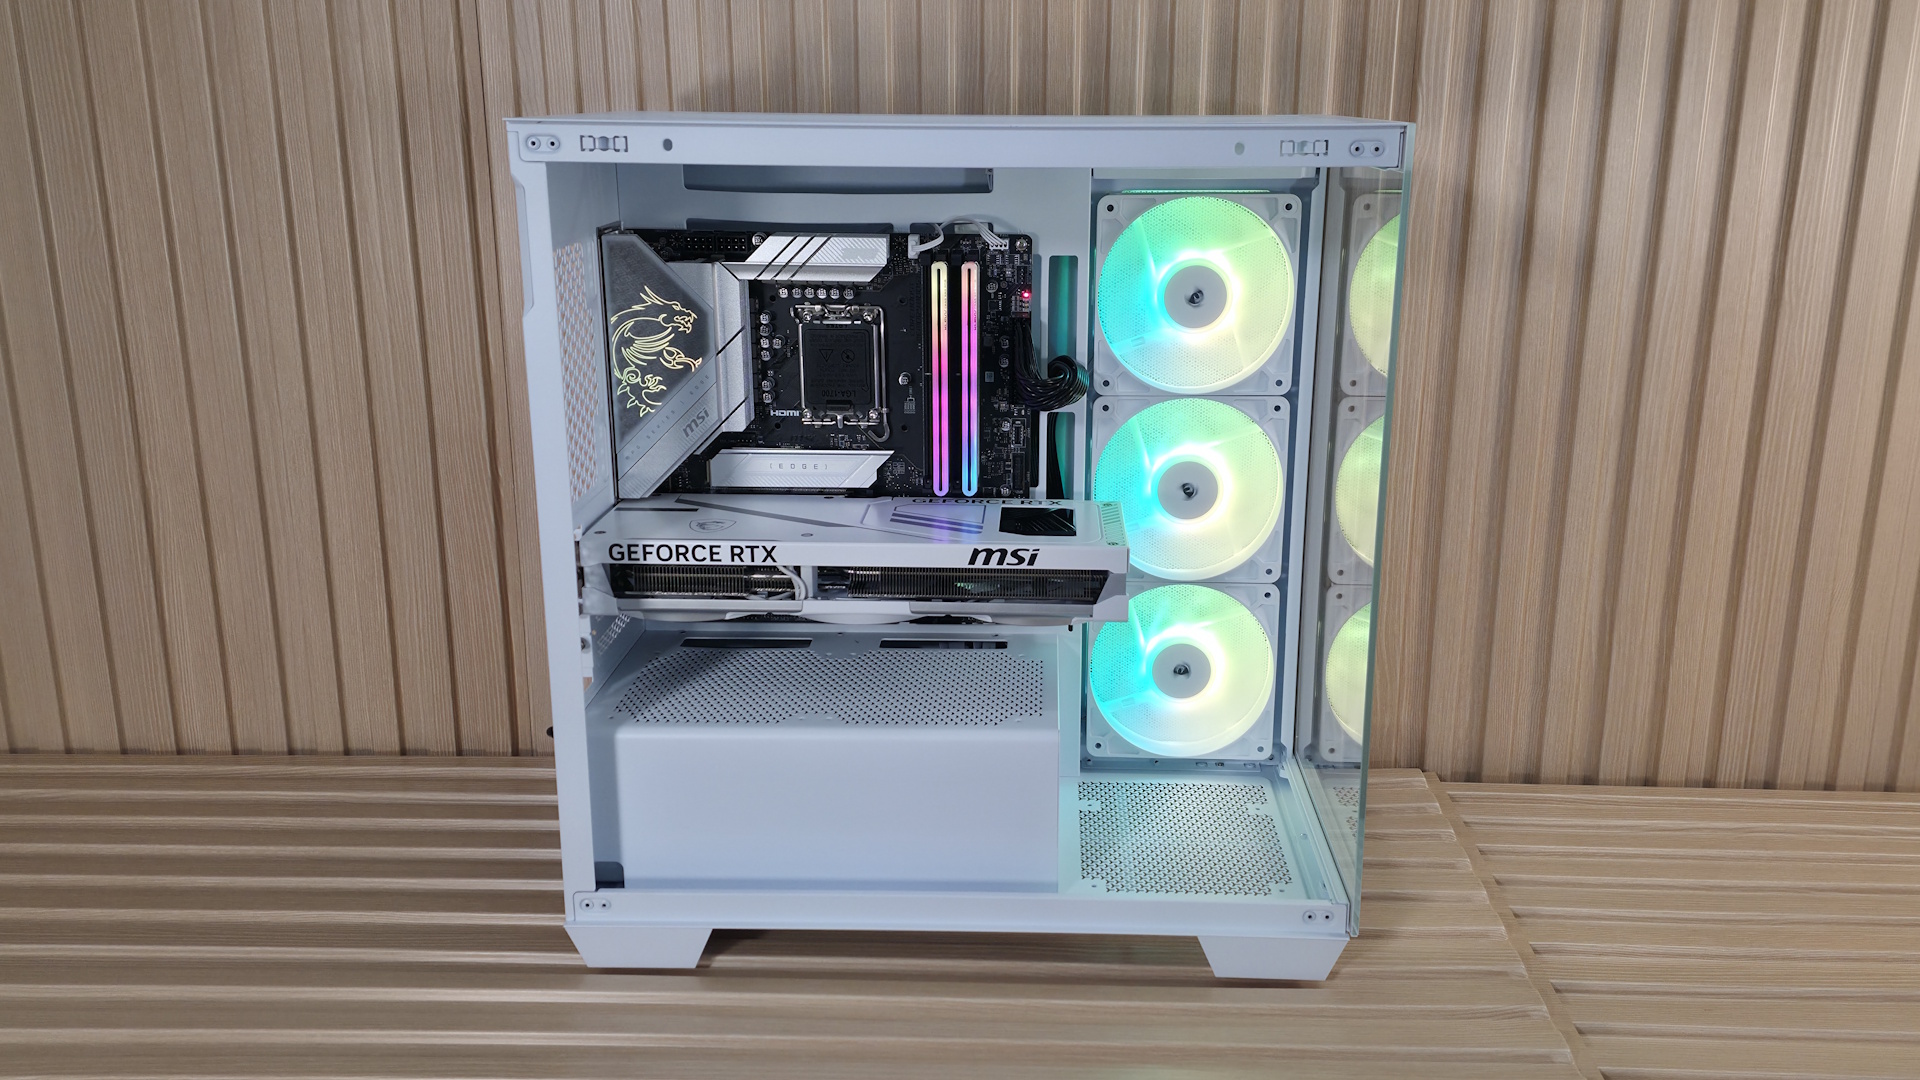
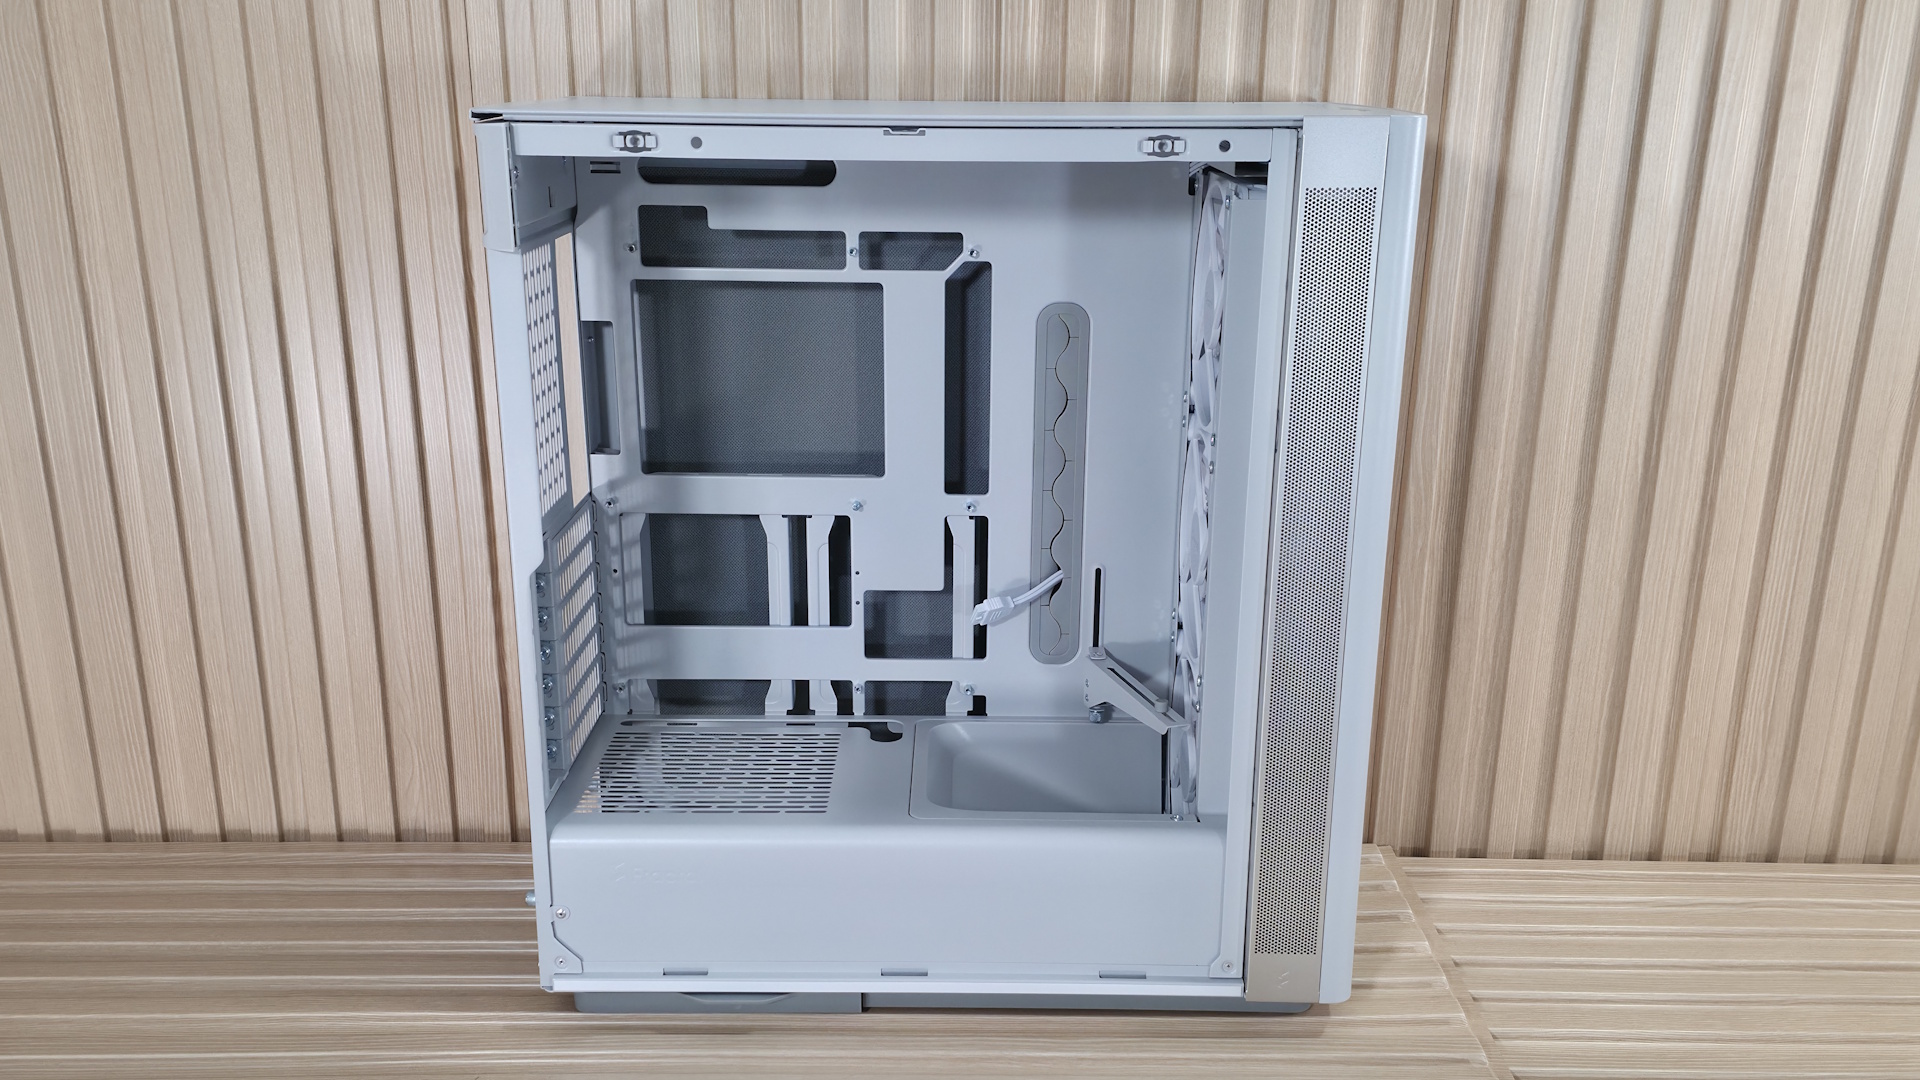
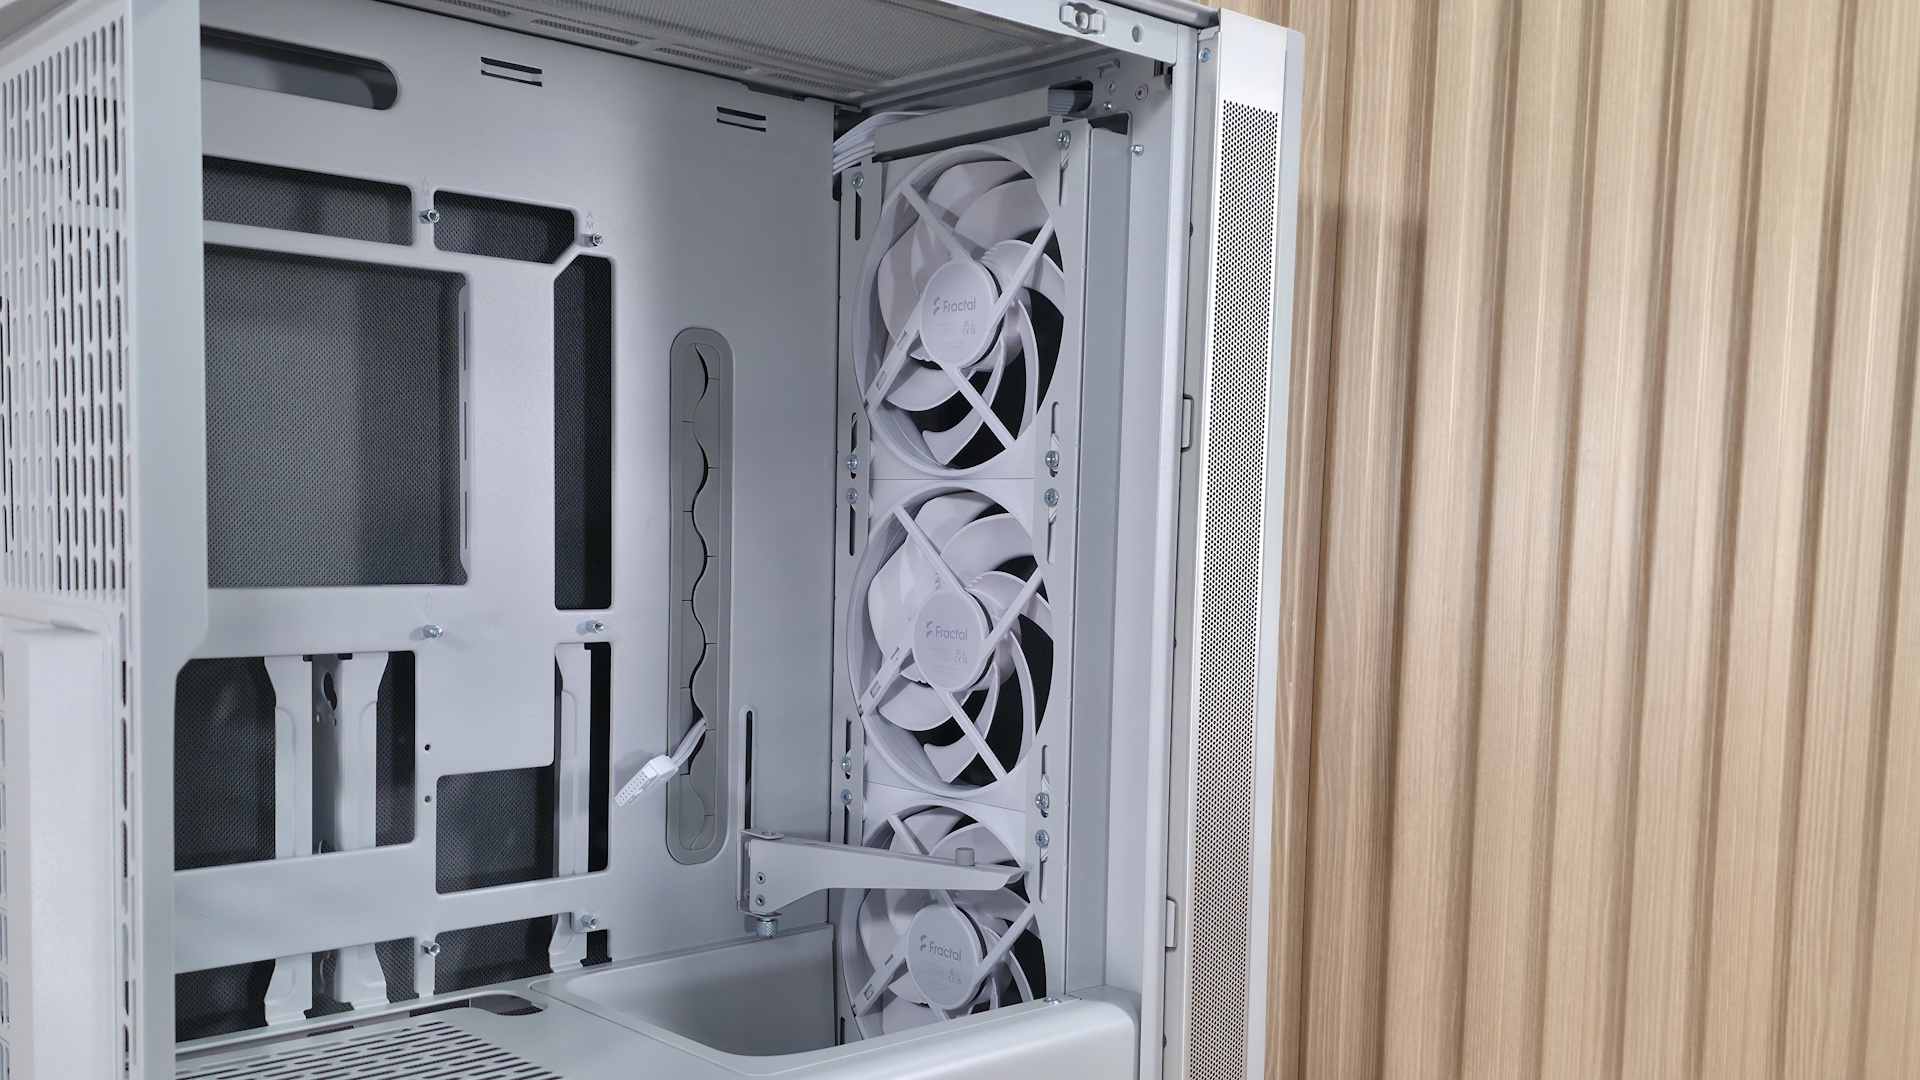
Inside the case, you have two separate chambers. One is for the power supply and cables, while the other is for the components. One of the first things that jumped out to me is the integrated front air guide, which helps direct airflow to the graphics card. I like this, as the front bottom fans' air isn’t wasted on the power supply and instead focuses on what is likely the hottest-running component. Just above that is the adjustable support bracket for the video card, mounted directly to the motherboard tray. Two screws let it move a couple of inches up or down, so it supports video cards of nearly any size.

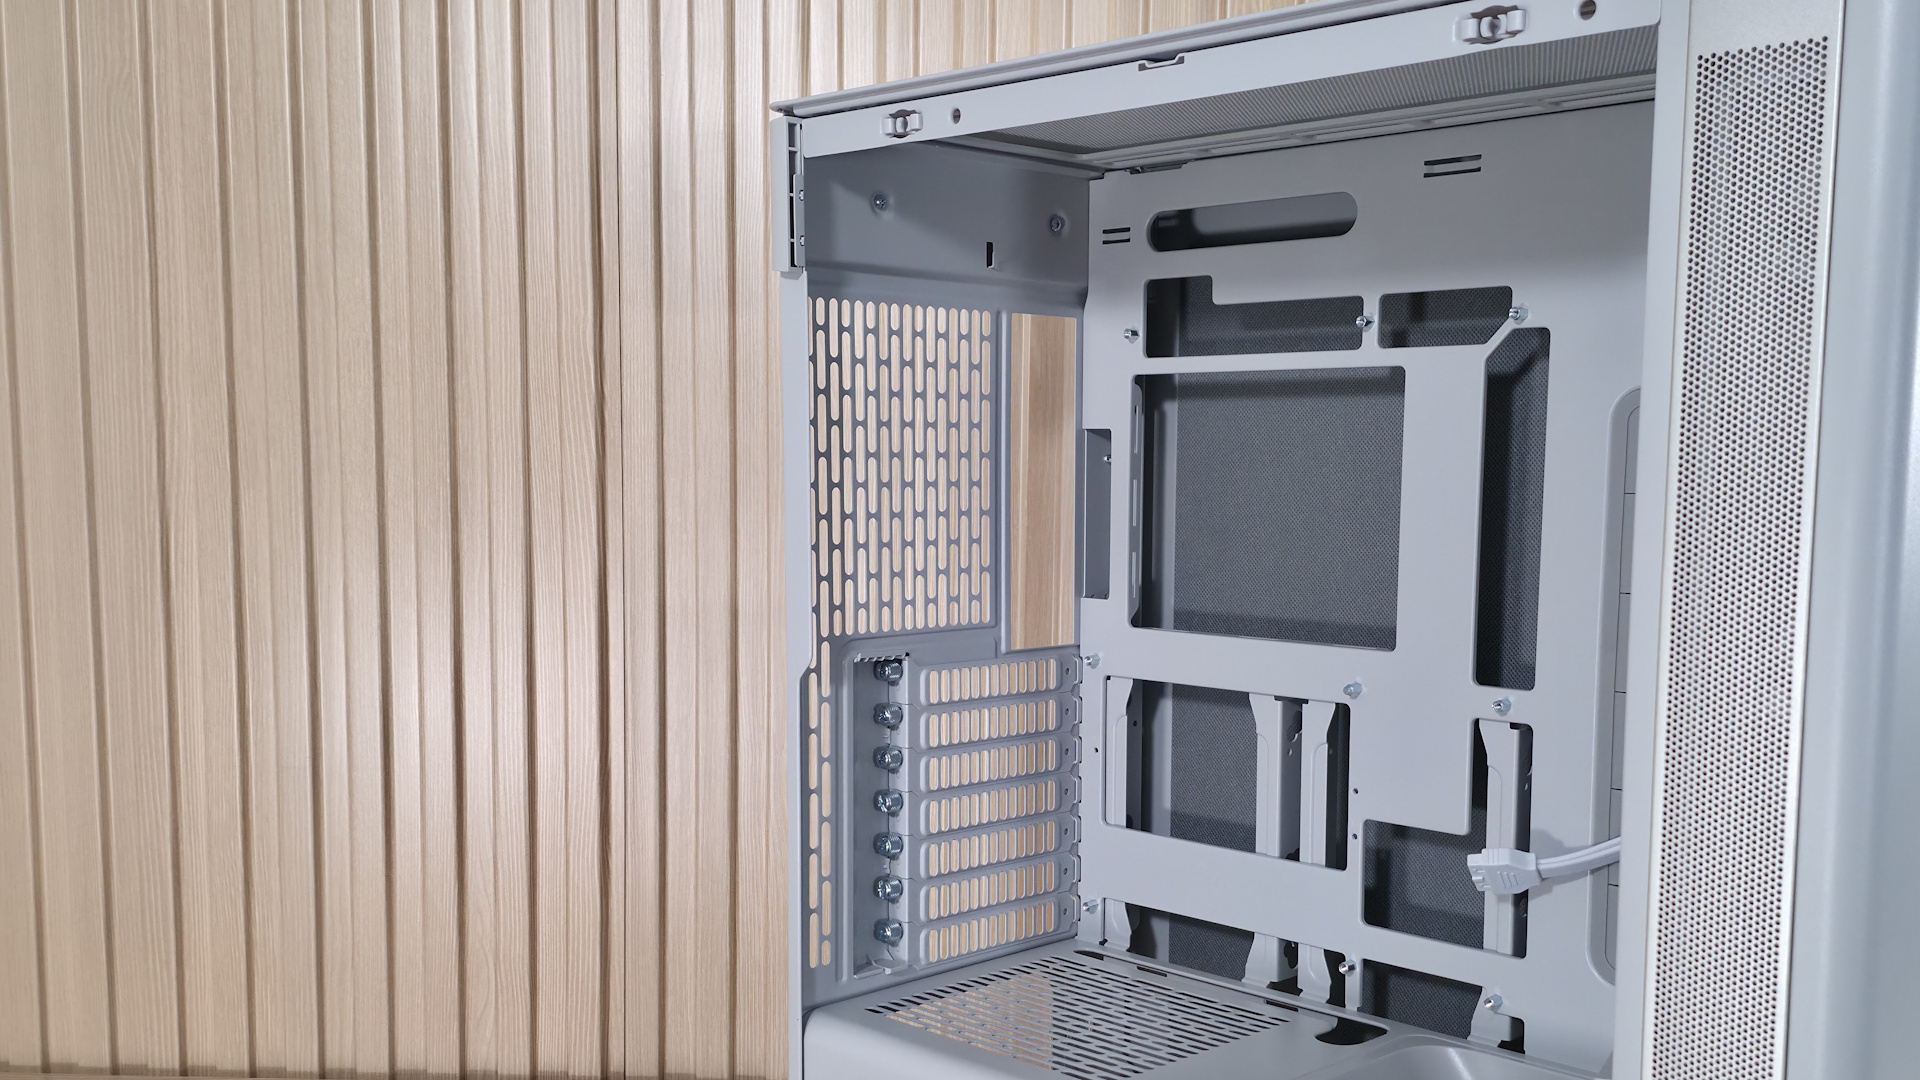
Next up is the motherboard tray, and it has plenty of cutouts. The largest one, behind the socket, is great for accessing the rear of the motherboard and mounting your cooling solution while the board is in the case. The rest are there for cable management (top or bottom) and to support rear-connect motherboards like Asus BTF, Gigabyte Stealth, and MSI Project Zero boards. A large gray grommet for hiding wires runs vertically to the right of the motherboard. This grommet satisfied a pet peeve of mine by not moving out of its spot easily, as some others do. In fact, in some cases I’ve owned, I’ve glued the grommets in because I was tired of them pulling out when building or changing parts.
Fractal Define One - Inside
Future
Fractal Define One - Inside
Future
Fractal Define One - Inside
Future
Fractal Define One - Inside
Future
Fractal Define One - Inside
Future
Fractal Define One - Inside
Future

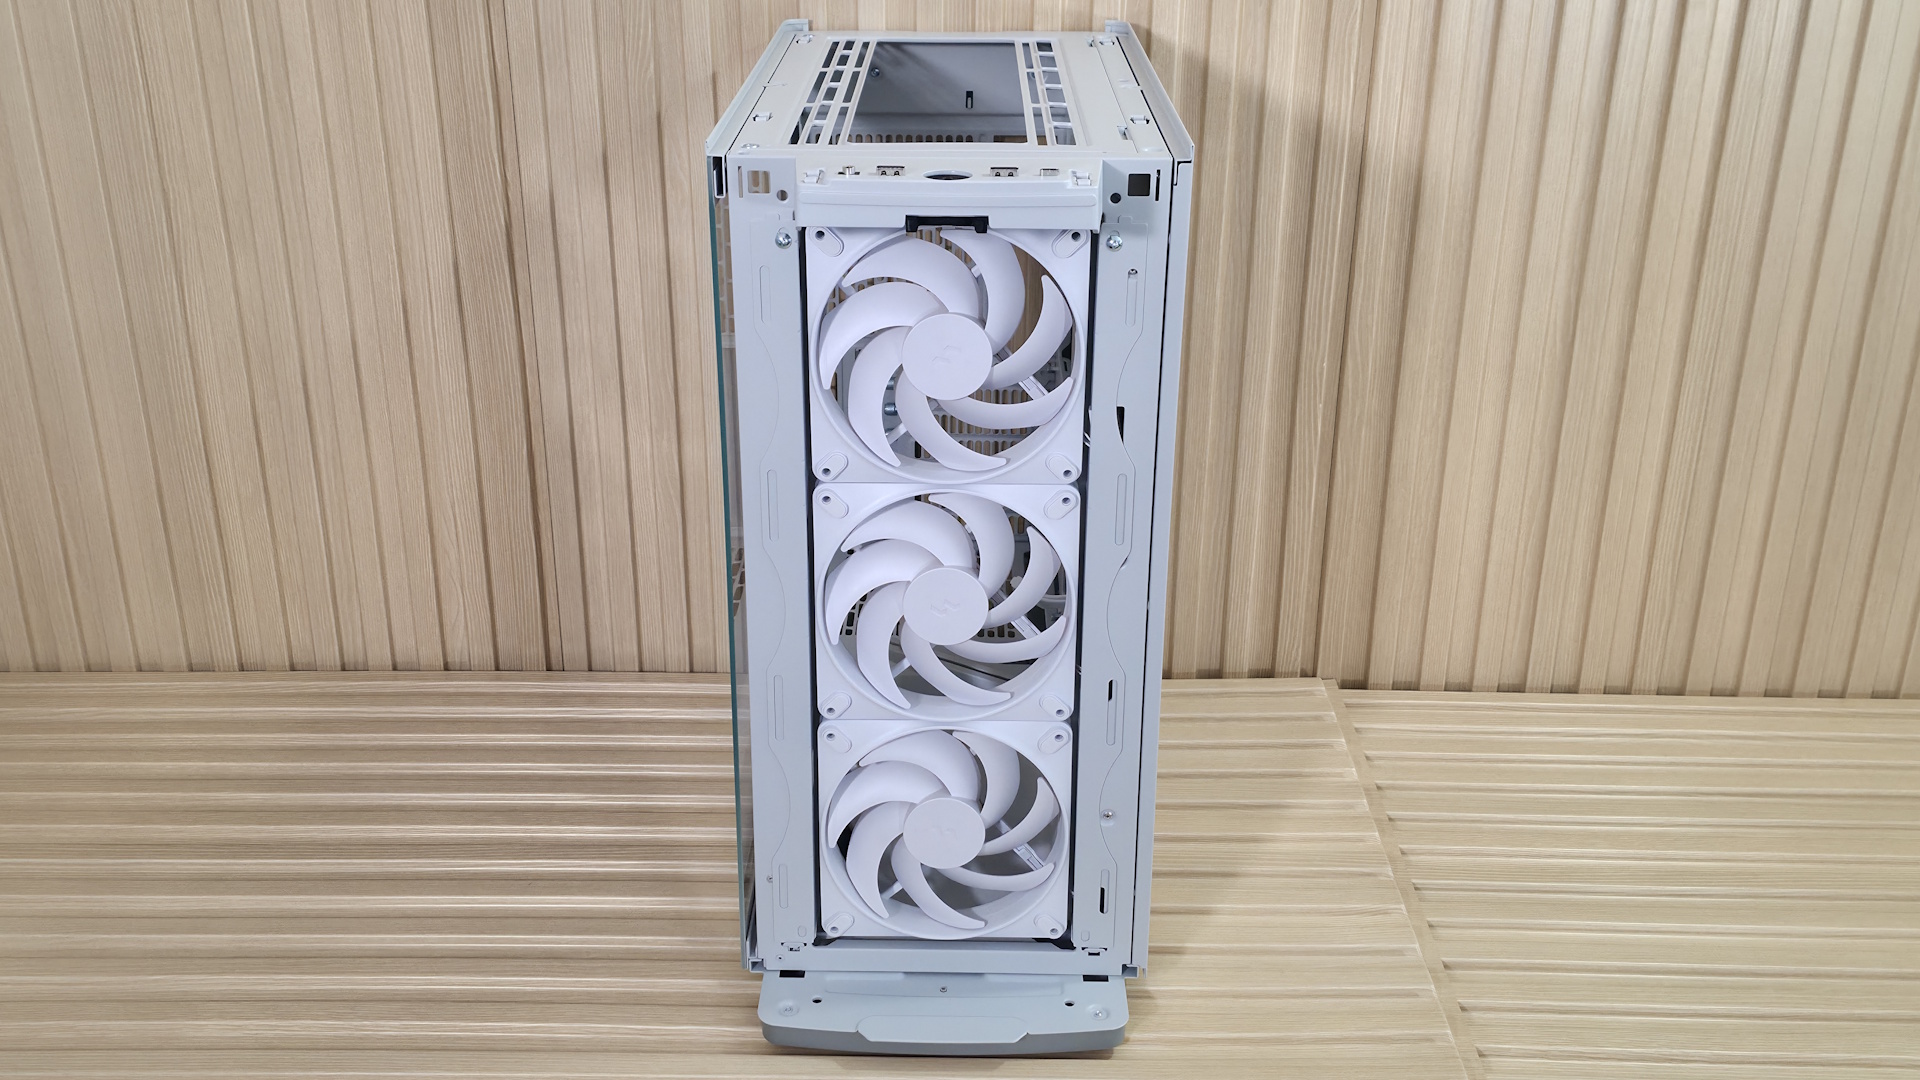
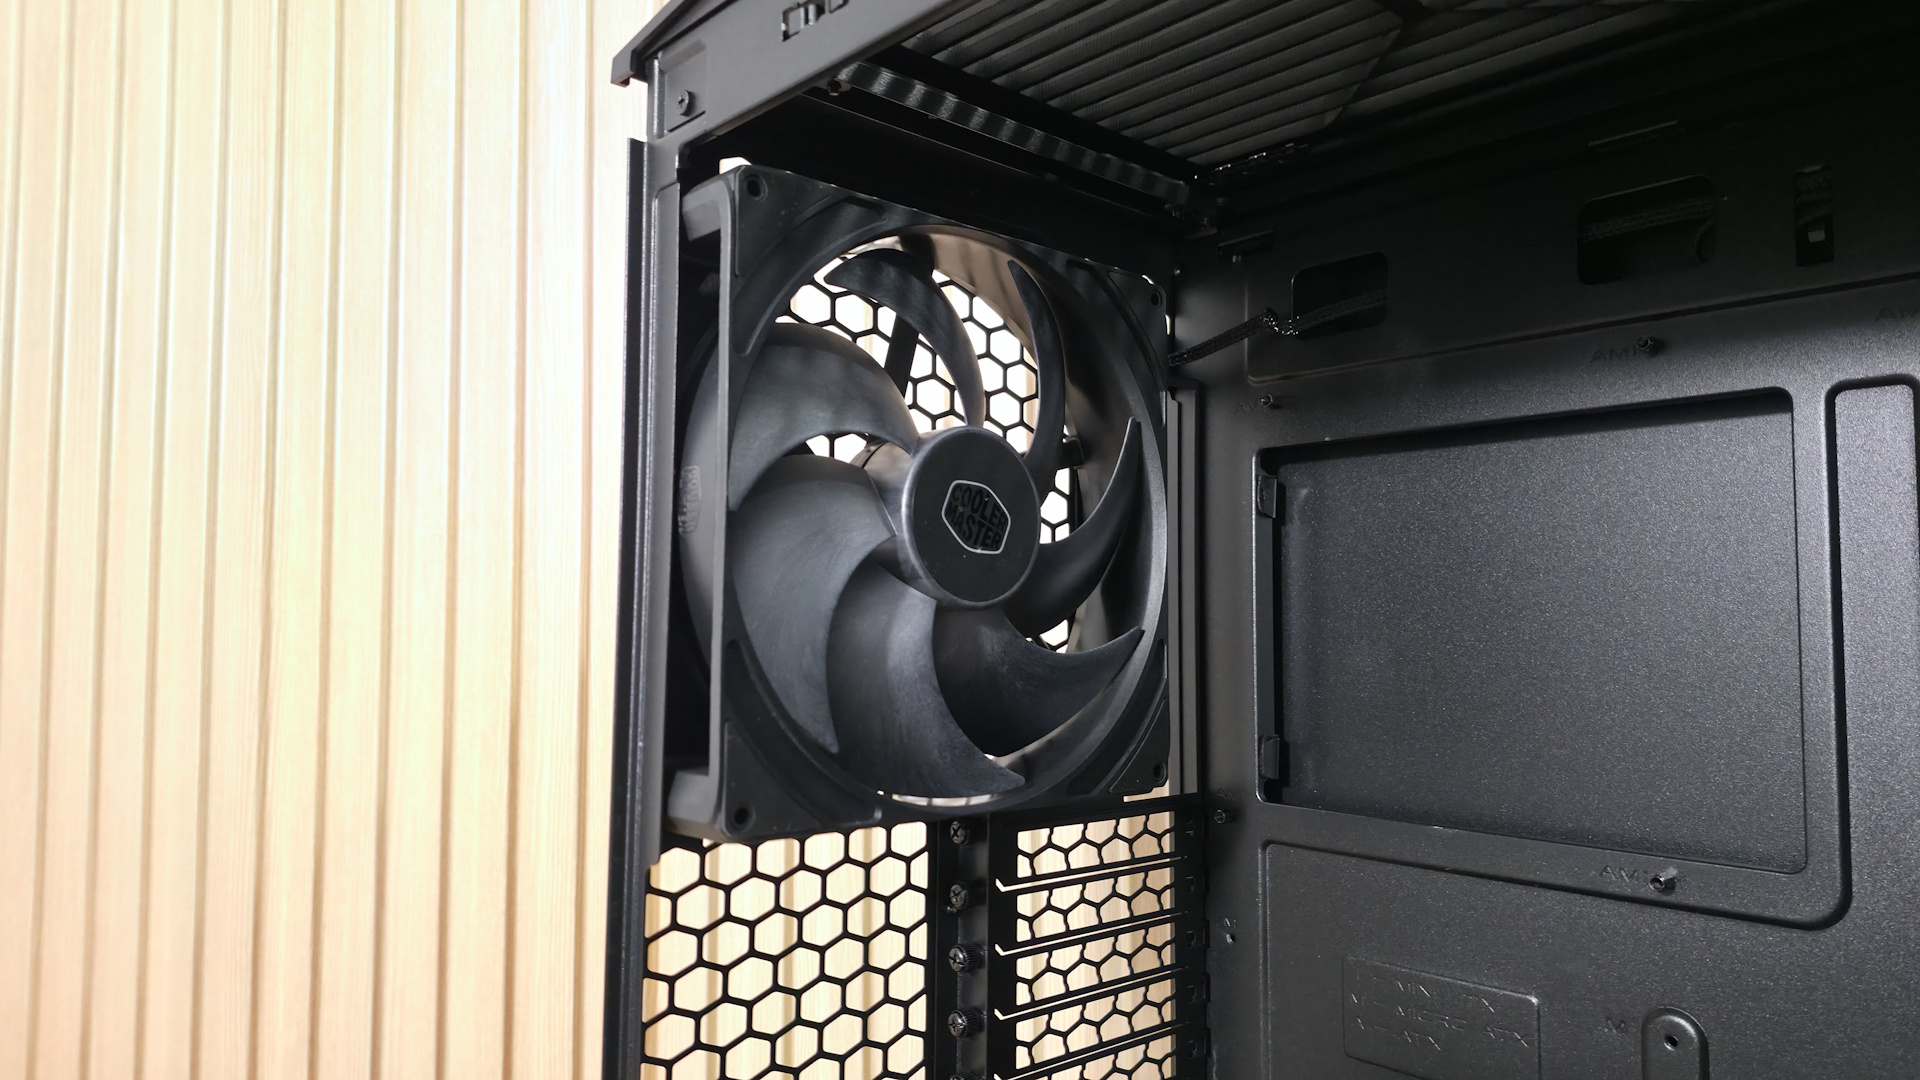
Looking at the front from the inside, we get a better view of the pre-installed Momentum 14 fans and the removable front fan brackets. You can mount a 3x120 mm radiator here, with a maximum length of 405 mm and 30 mm thick if you keep the air guide (435 mm and thicker radiators, up to 65 mm, if you remove it), or it fits 280/240/140/120mm radiators. There are plenty of options, but make sure you know your radiator size so you know what you need to remove, if anything.

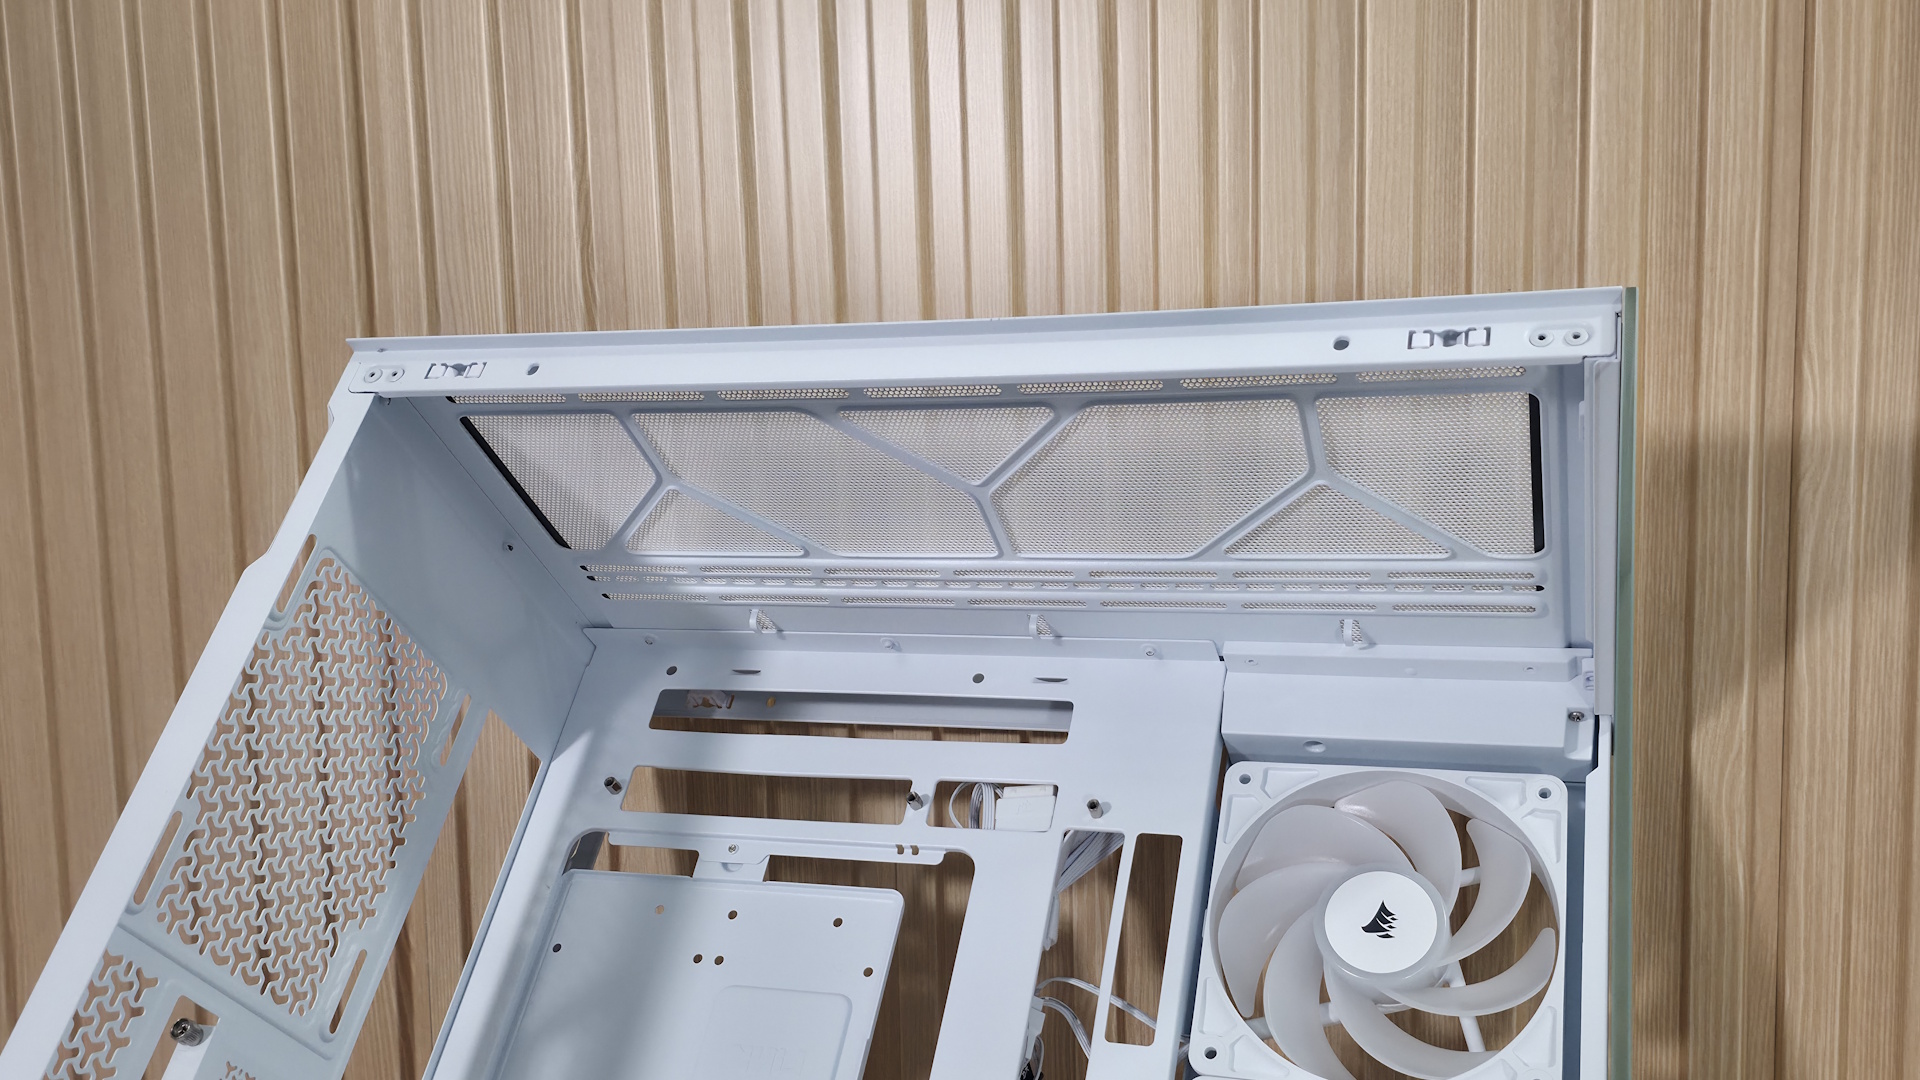
Looking at the ceiling of the case from the inside, we see the removable top bracket, held in by two screws. The top holds up to two 140mm fans or a 280mm radiator. You have around 60mm or so before the radiator/fan combo covers the top of the motherboard, so you don’t have to worry too much about fitment or covering the top of your motherboard if you choose to use a radiator in this space. At the rear of the case, we spy the 120mm fan mounting location and the seven available expansion slots.

On the bottom rear, we can see the power supply chamber, along with space to route cables for any headers located along the bottom of the motherboard. The bottom chamber is vented, but won’t radiate a ton of heat, as the power supply gets cool air from the filtered intake on the bottom.
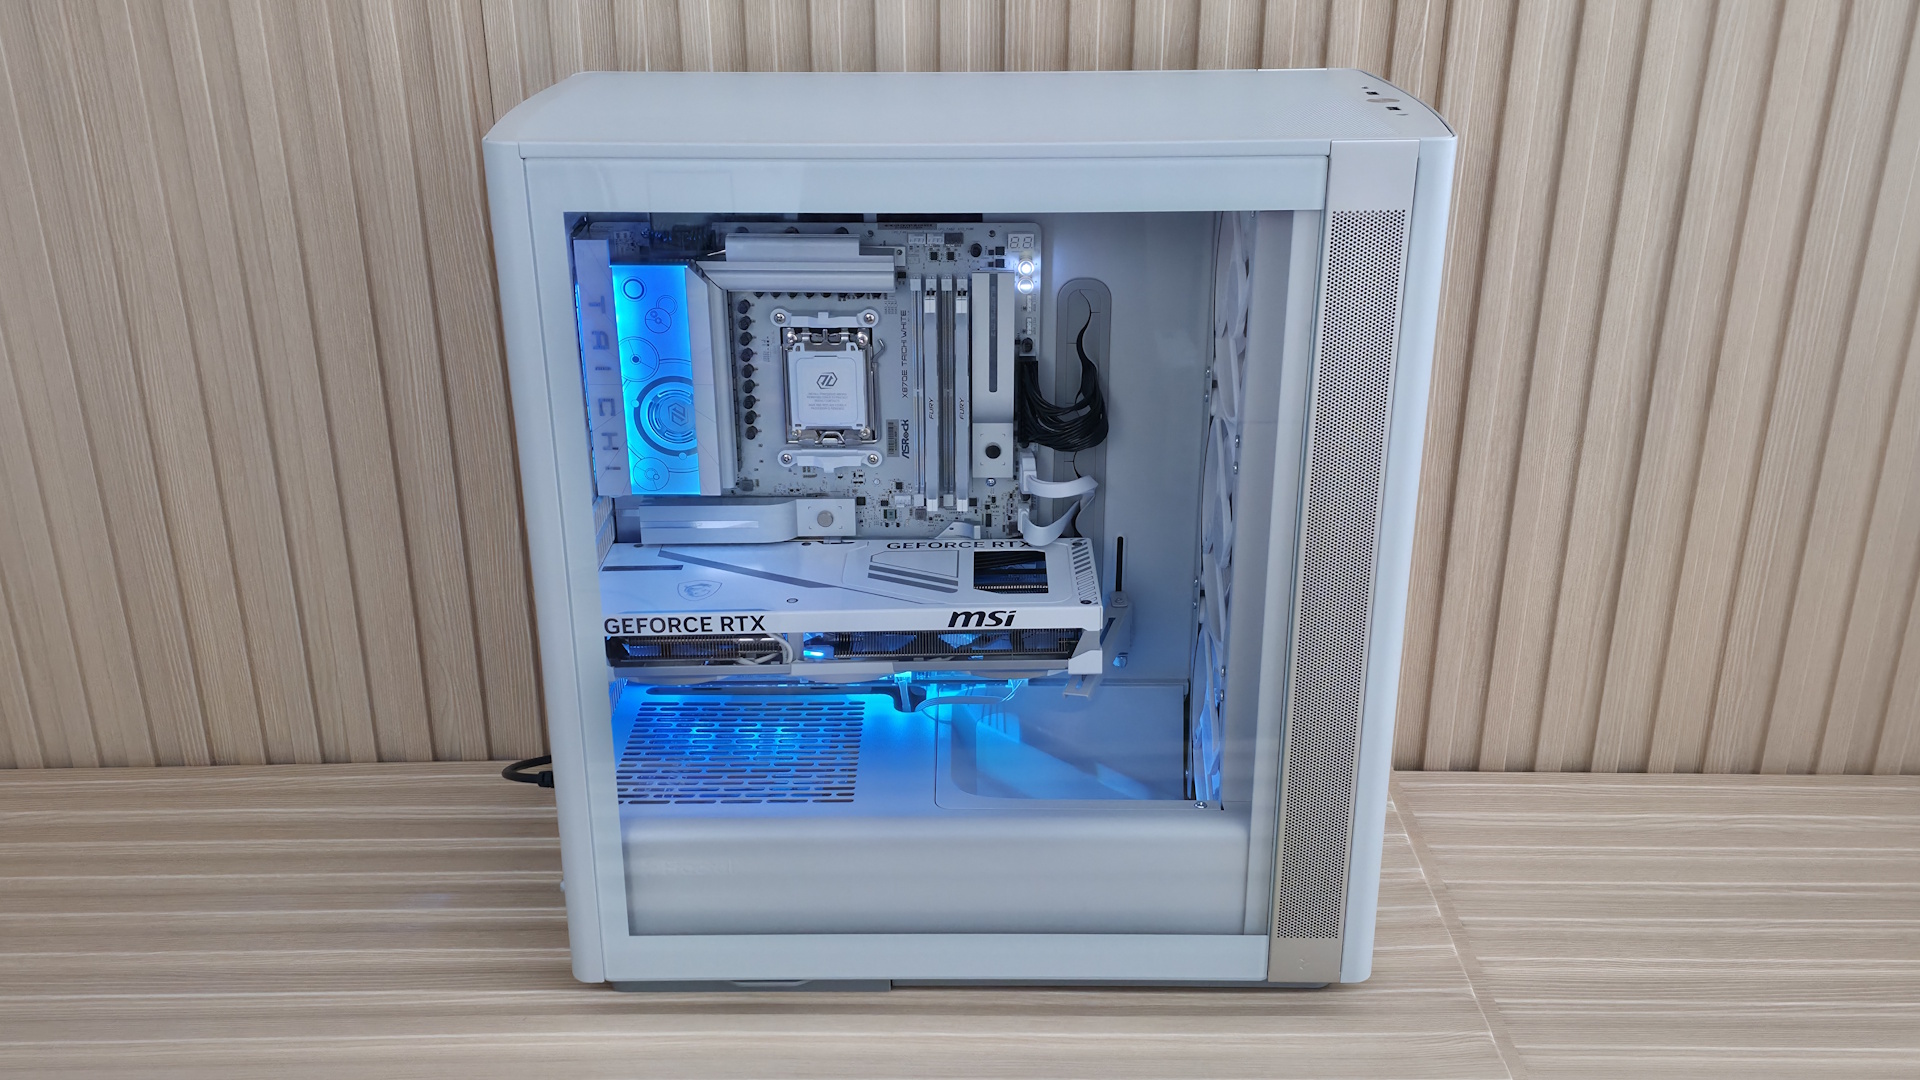
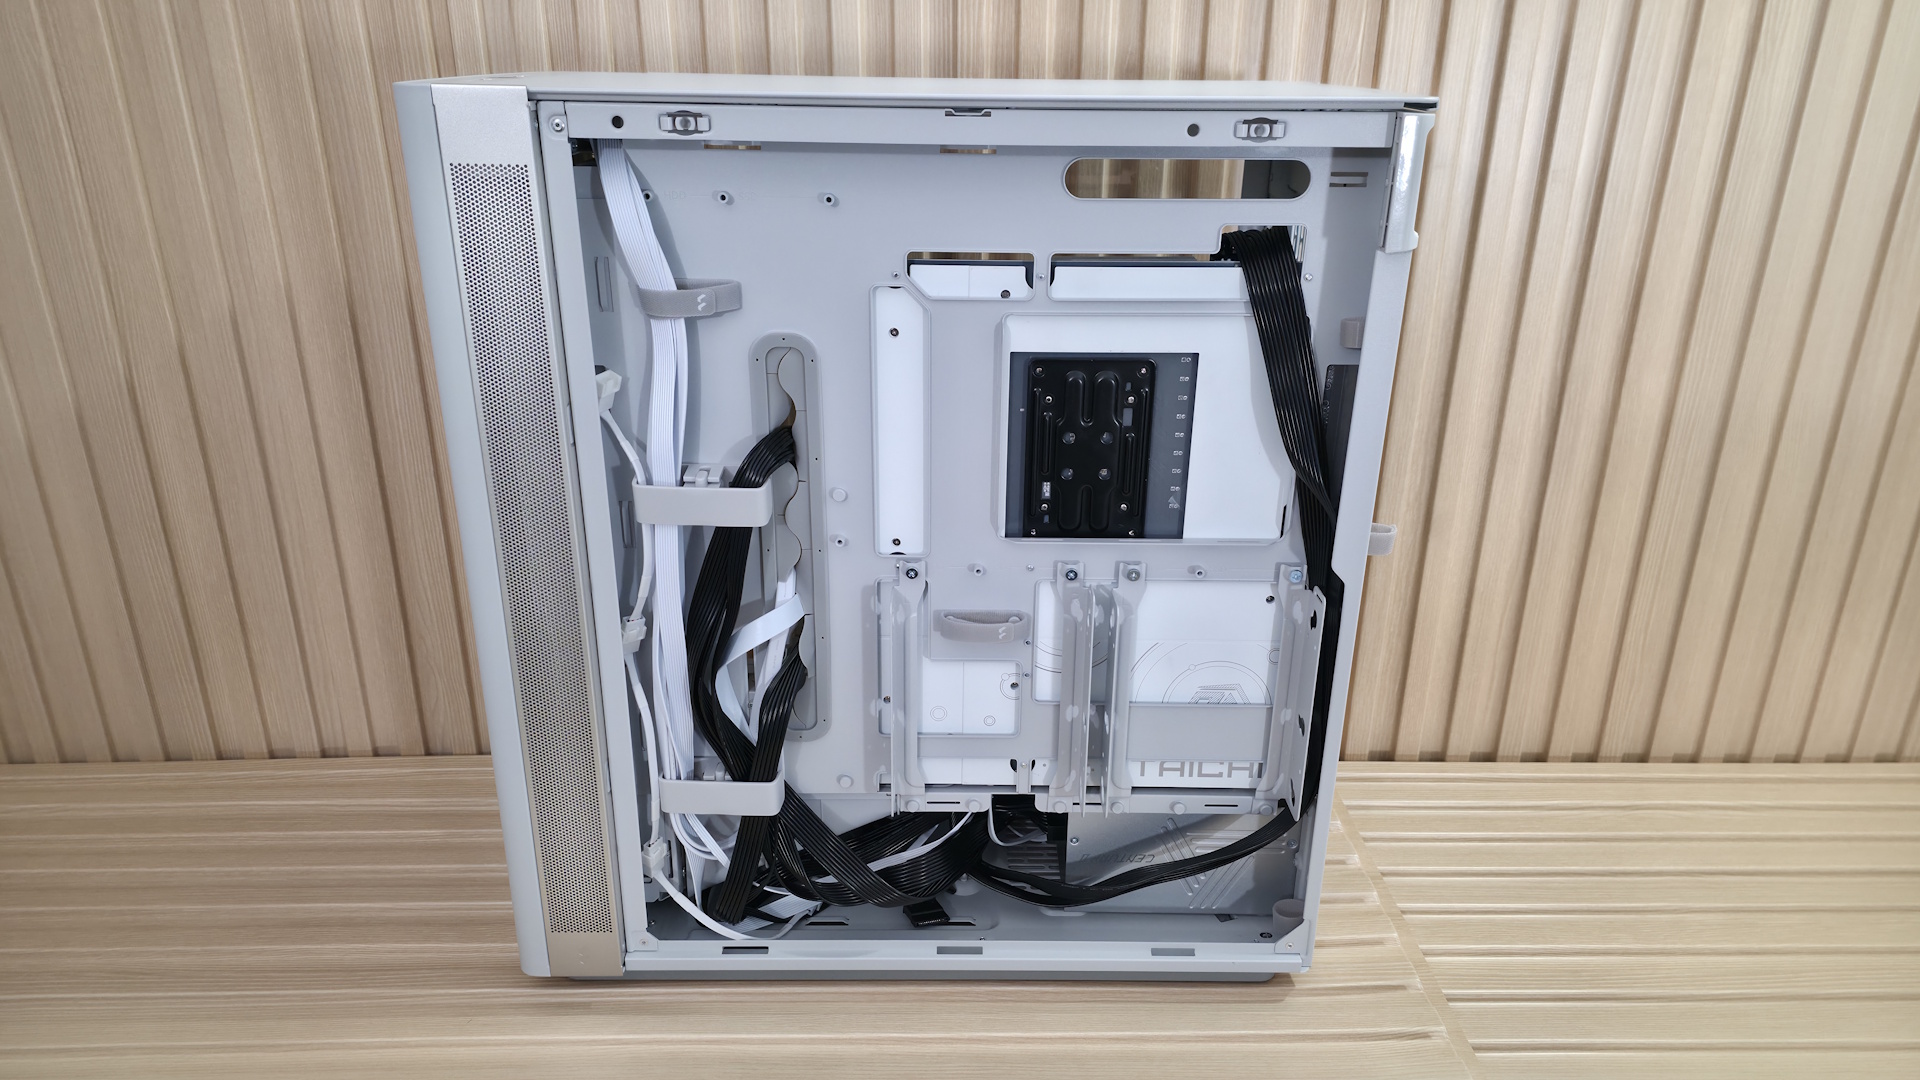
Fractal Define One - Behind the motherboard and mock build
Future
Fractal Define One - Behind the motherboard and mock build
Future
Fractal Define One - Behind the motherboard and mock build
Future

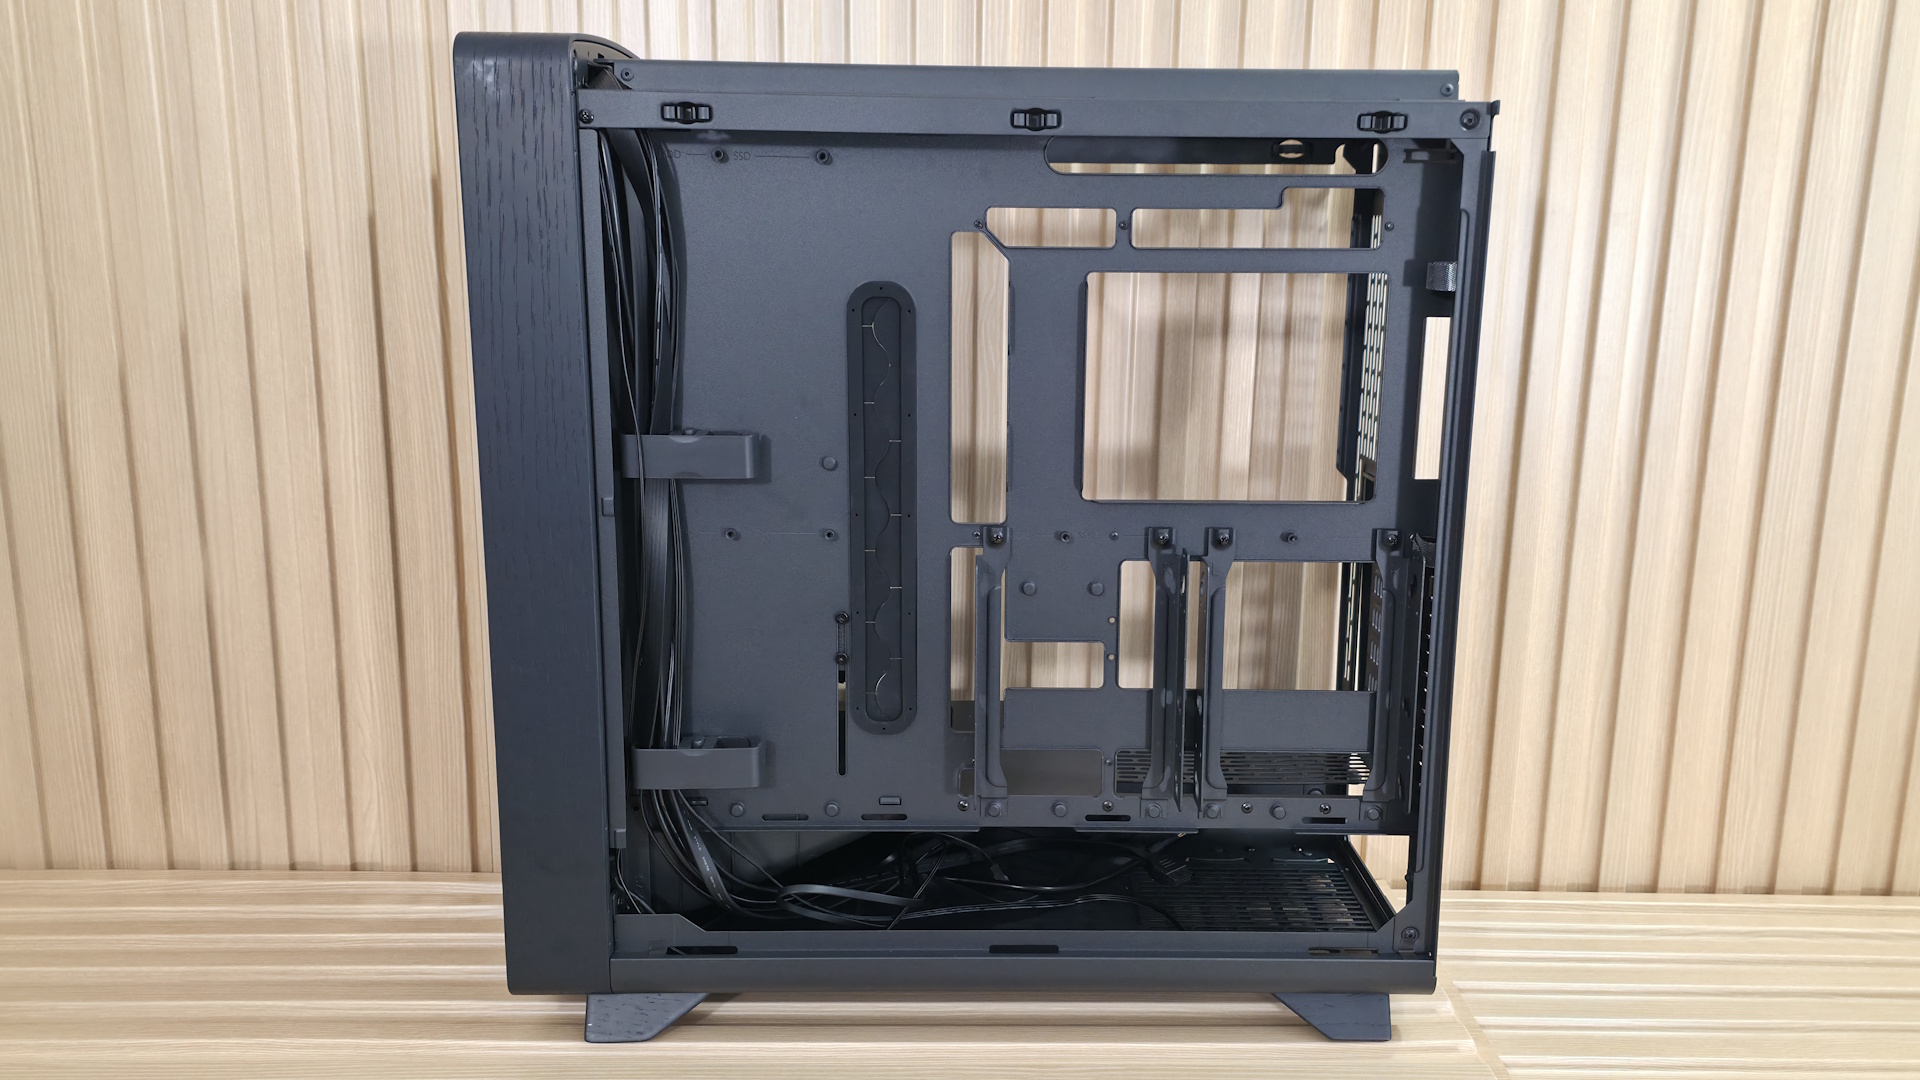
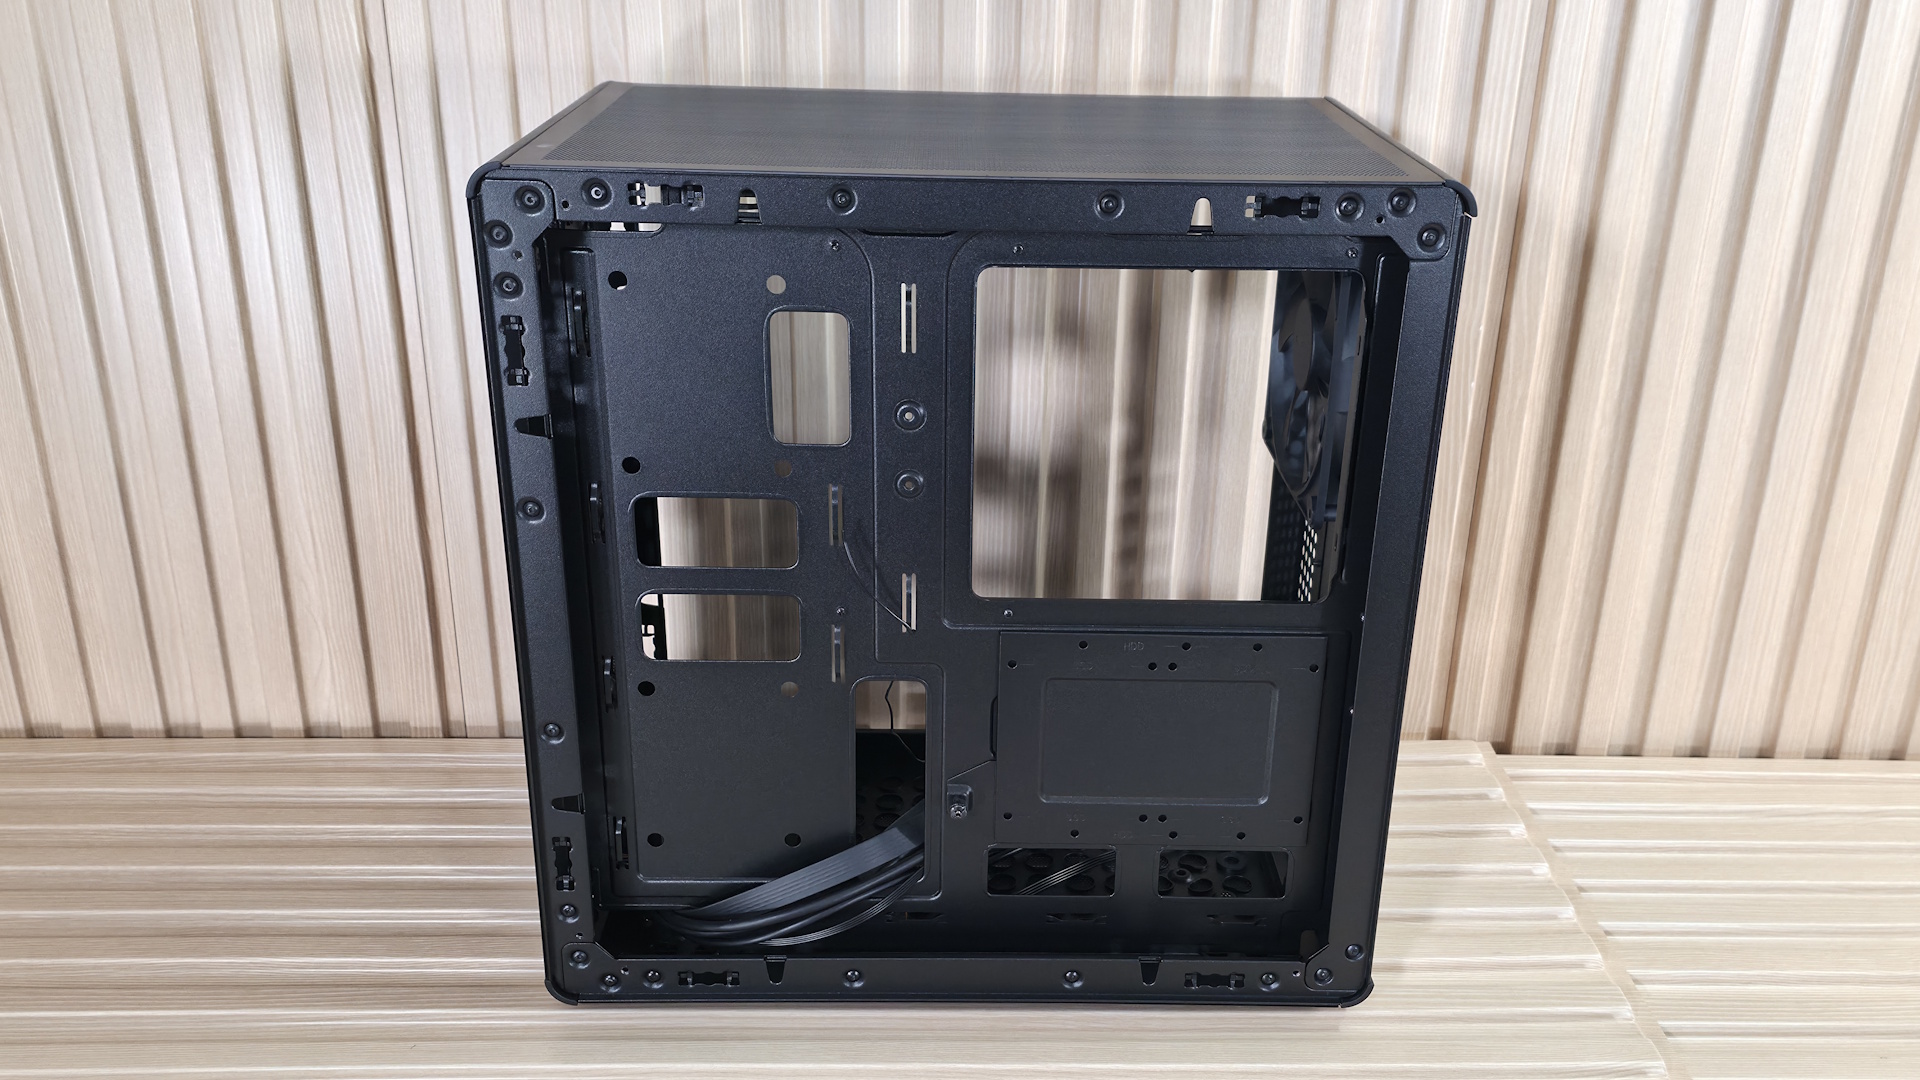
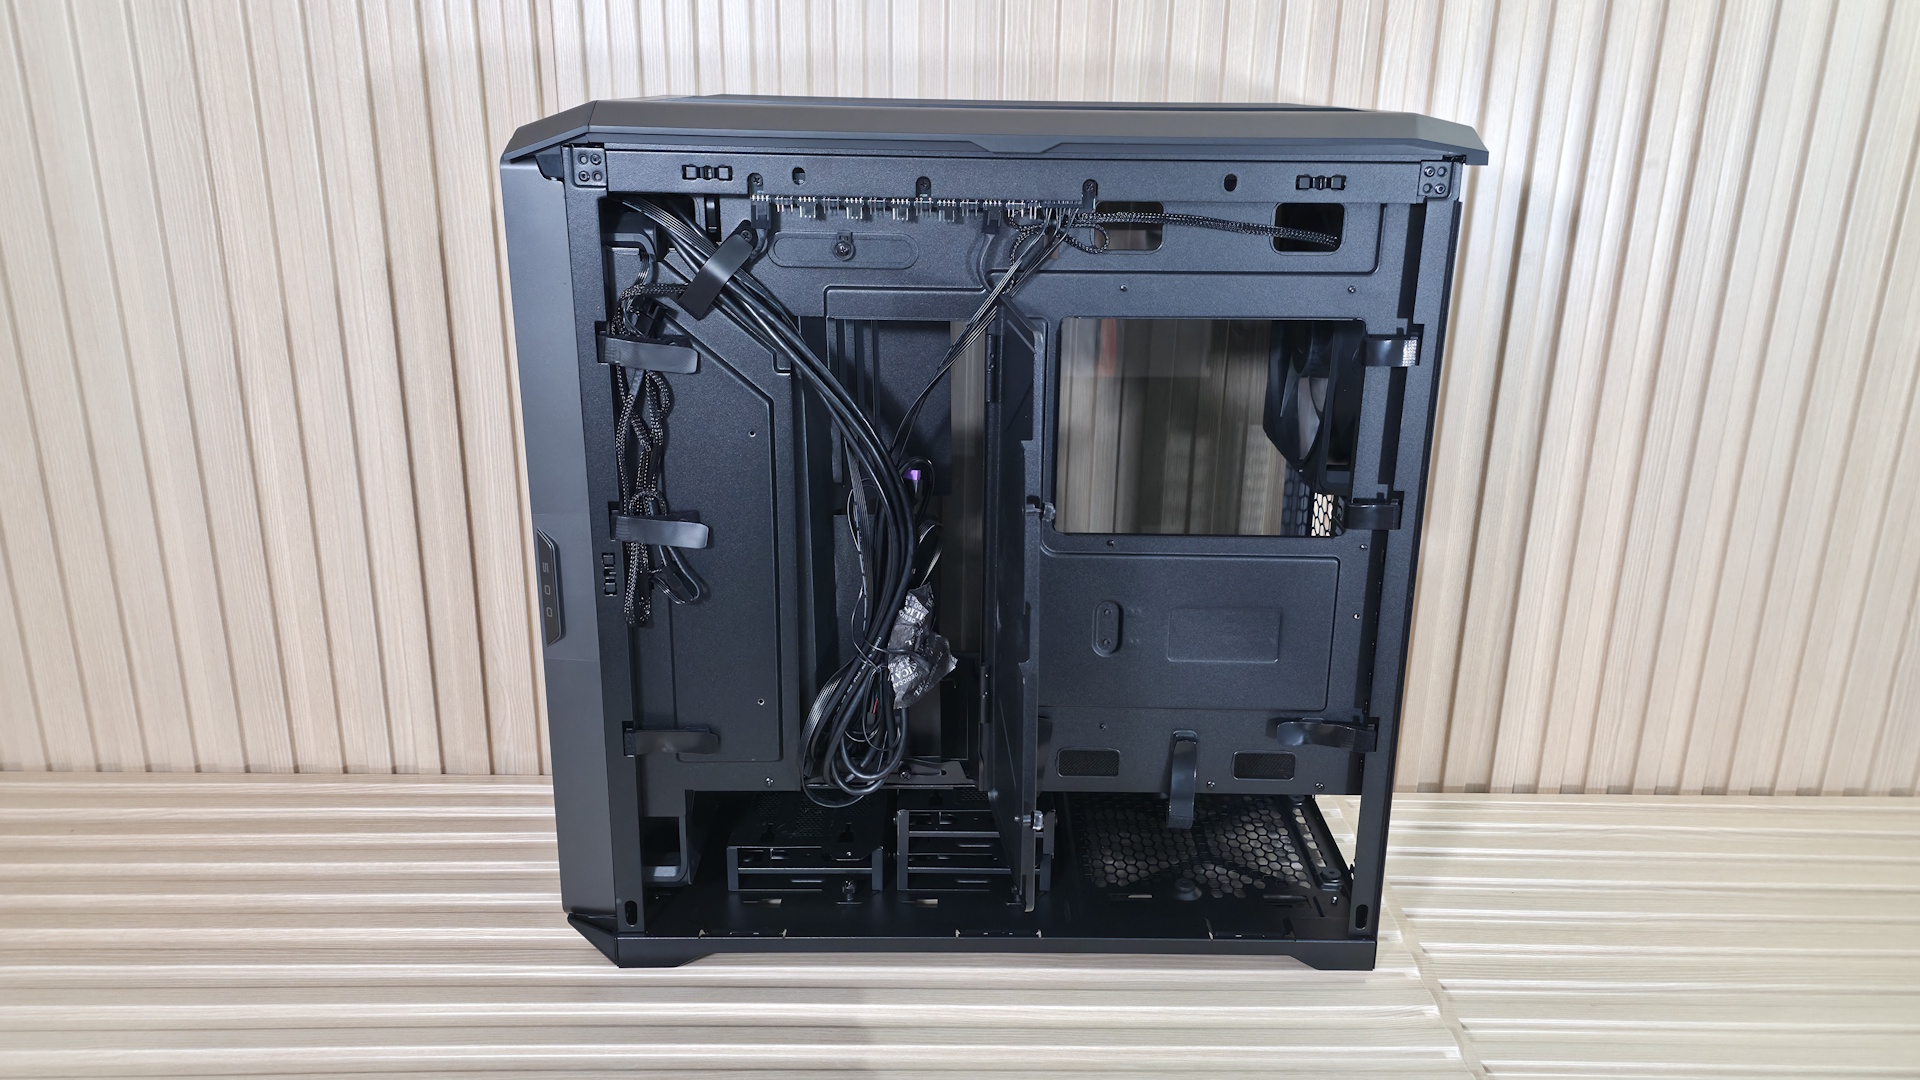
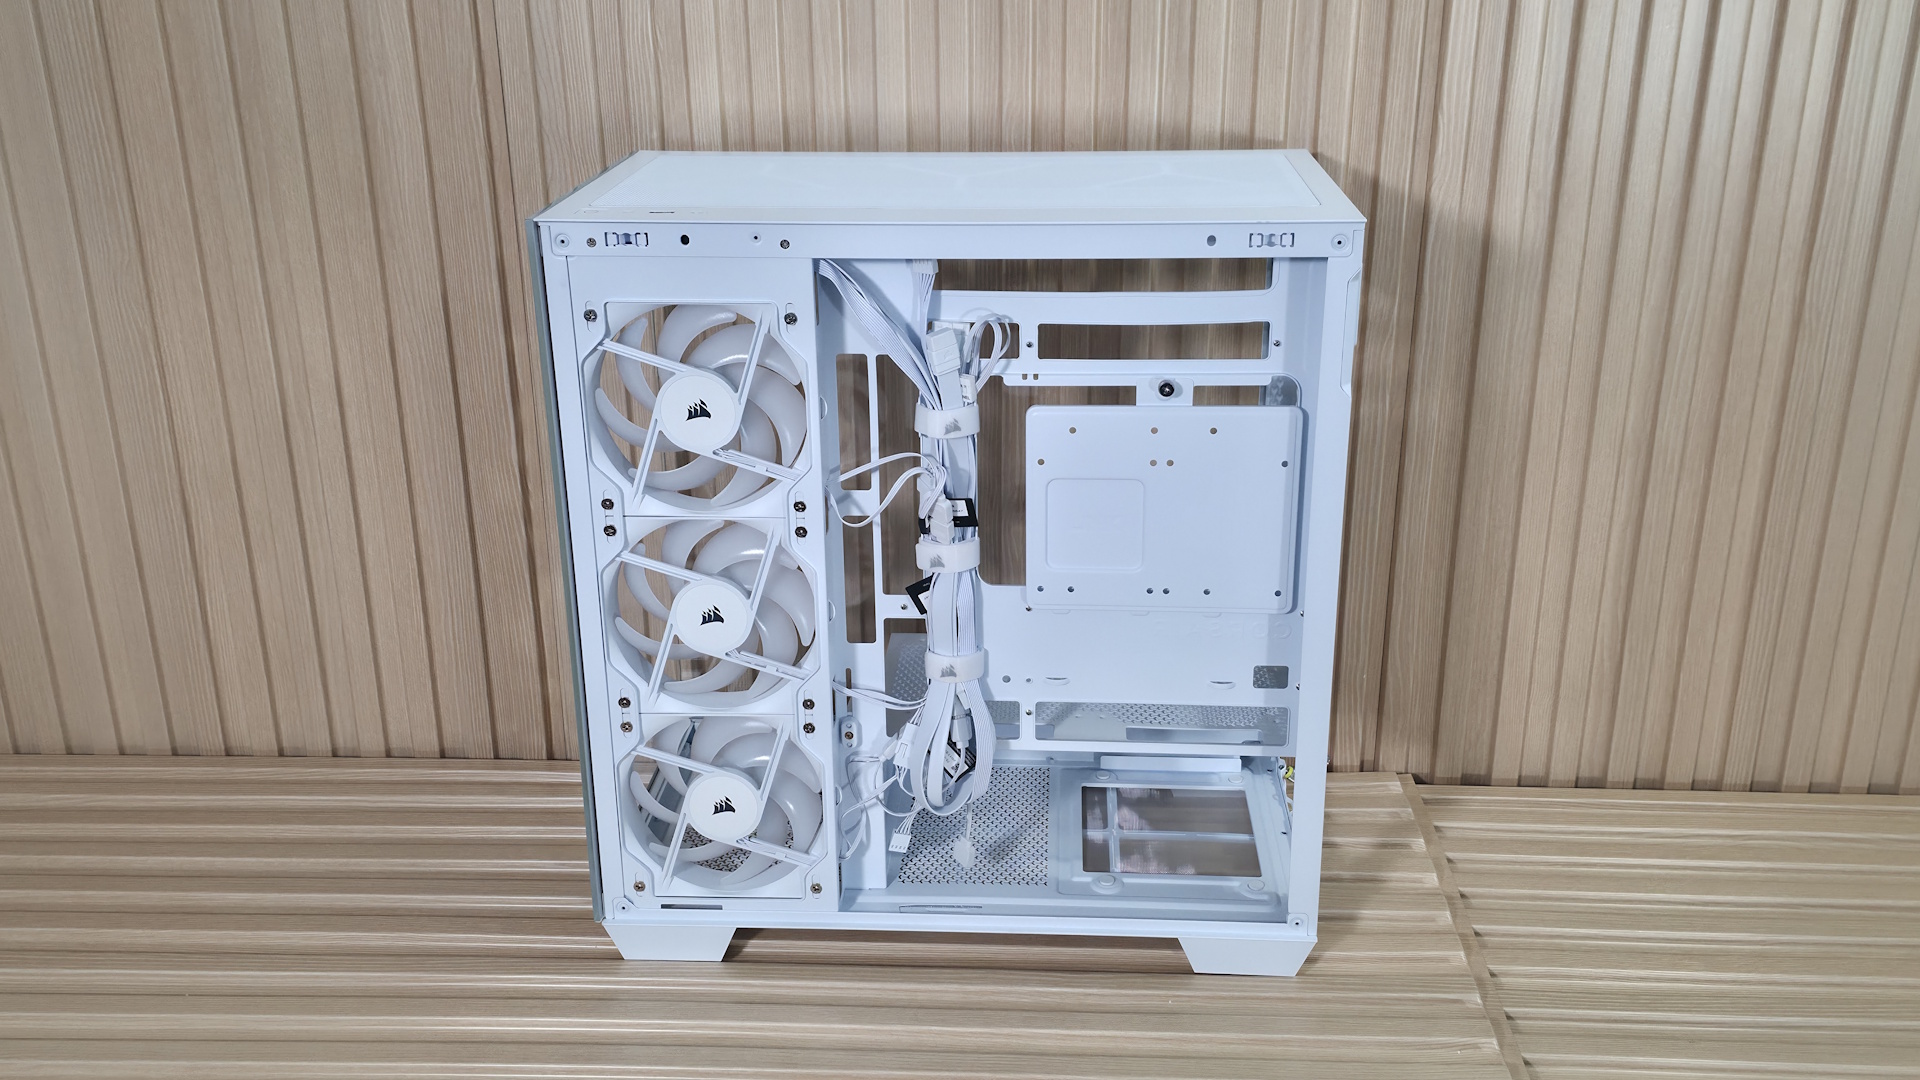
Let’s look behind the motherboard panel. Here, we see the difference between cheap cases that cut corners and one that doesn’t. First, there’s 37 mm (1.46 inches) between the motherboard tray and the back panel for cables. That’s plenty of space to haphazardly stuff your cables in without a bulging panel. Next, you’re likely to notice the cable management features. On the left are two plastic pieces and pre-installed Velcro. The plastic pieces slide in and out so you can more easily get the cables in the channel.

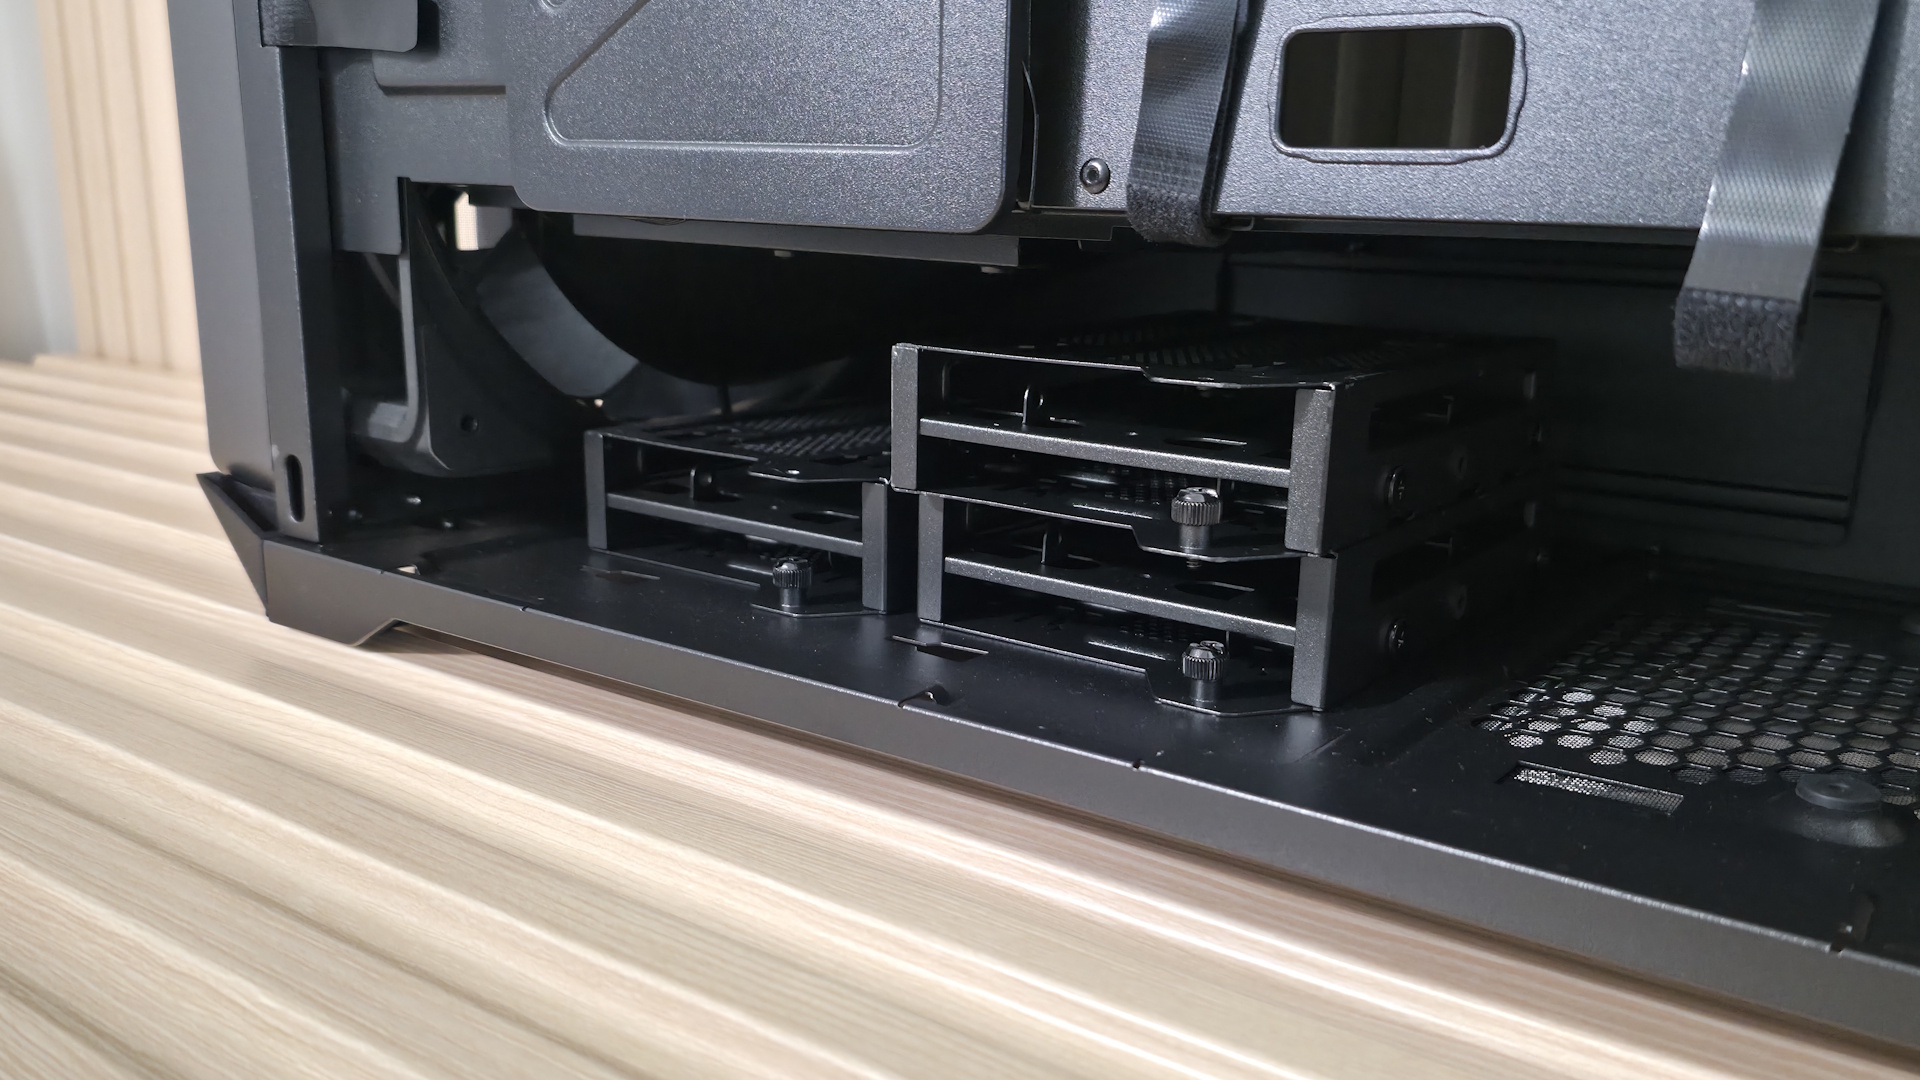
On the rear of the case are more Velcro straps to route cables, like your 8-pin EPS for the CPU, cleanly up the back. A keen eye also spots the two 2.5/3.5-inch drive mounts. You can fit two 3.5-inch drives (one in each mount location) or four 2.5-inch drives (two in each mounting location). The case fits six 2.5-inch drives total, with the other mounting areas hidden on the floor, under the front air guide.

Overall, the Define One is a good-looking case in the “Light” colorway. The contrasting aluminum intake area breaks up the monotony of an all-white chassis, giving it some visual life. From the way the panels come off to the internal features, it’s clear some thought went into making this an intuitive building experience.

Test equipment, method, and results

Our thermal tests are presented to give you more information about the product’s performance, but aren’t intended as the sole basis for judging the chassis. The style, price, features, and noise levels of a case should also be considered, and we all have different preferences. What I might like in a case, you might not, and that’s OK. Our goal with these reviews is to give everyone, regardless of their preferences, enough information to decide whether a case is right for them.

To get heat into the system, we stress the CPU with Cinebench R26 (multi-threaded test) and the video card with Furmark 2 (1080p). CPU and GPU tests run concurrently for 30 minutes, allowing the air-cooled system to reach saturation and stabilize over that period. We then let the system idle for 15 minutes, adjust the fans to 100%, and test again.

Noise-normalized (42dBA) Maximum thermal Performance

This set of tests is designed to appeal to those who love quiet PCs, with both system fans and the CPU fan noise normalized to 42 dBA. Consider this a measure of the case’s thermal efficiency when noise levels are set to run quietly. It is audible, but just (at least for my old ears).

Fractal Define One - Noise-normalized results
Future
Fractal Define One - Noise-normalized results
Future
Fractal Define One - Noise-normalized results
Future

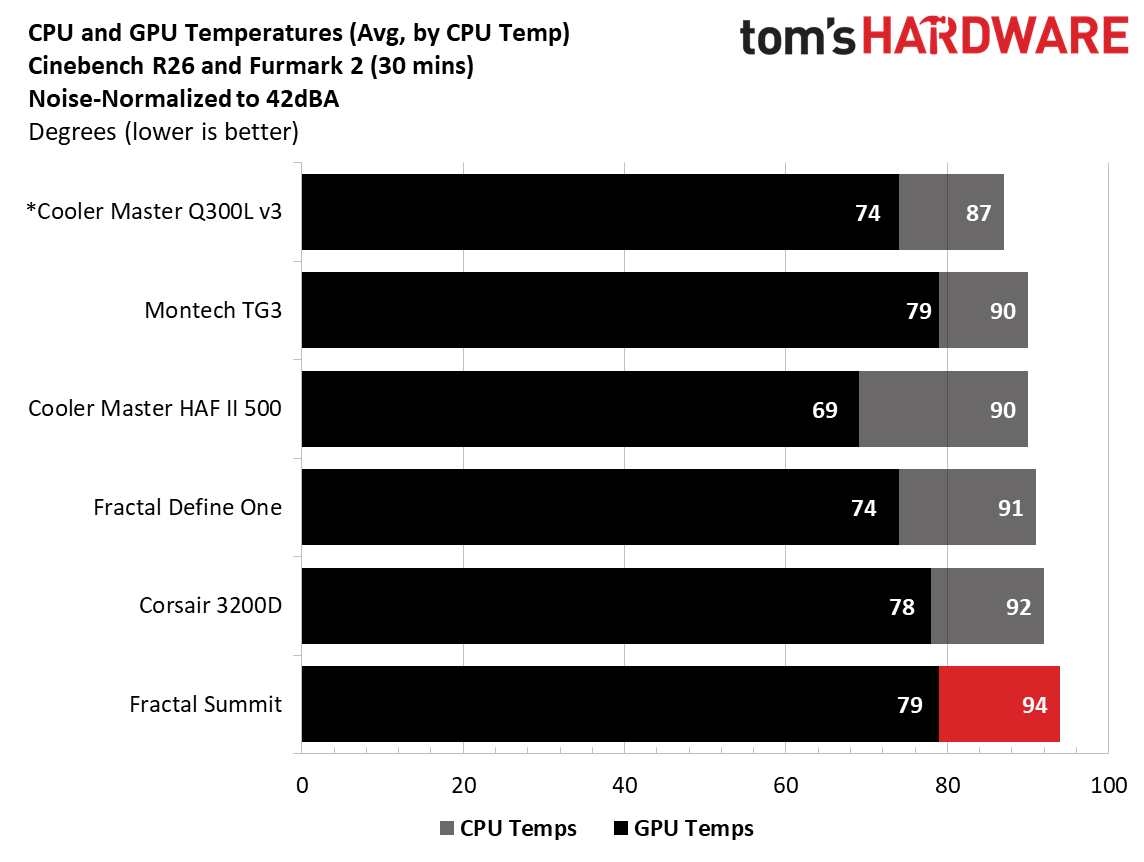
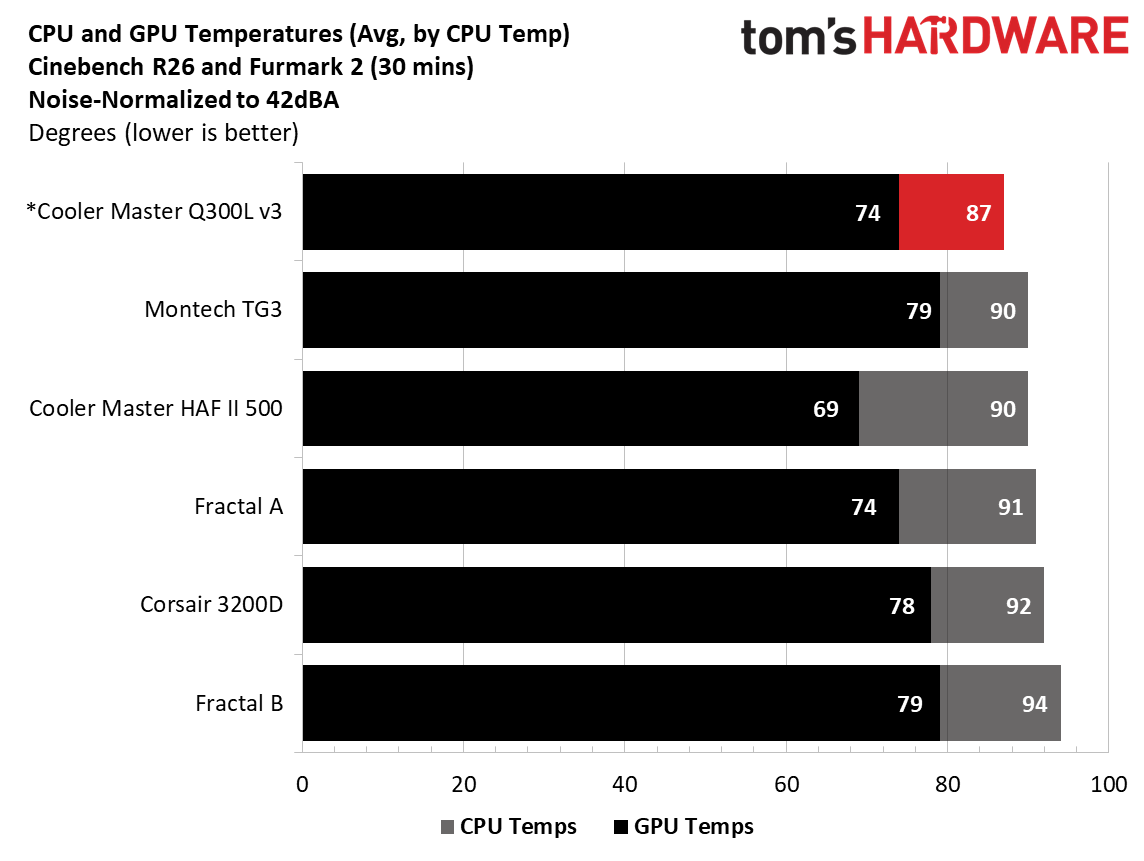
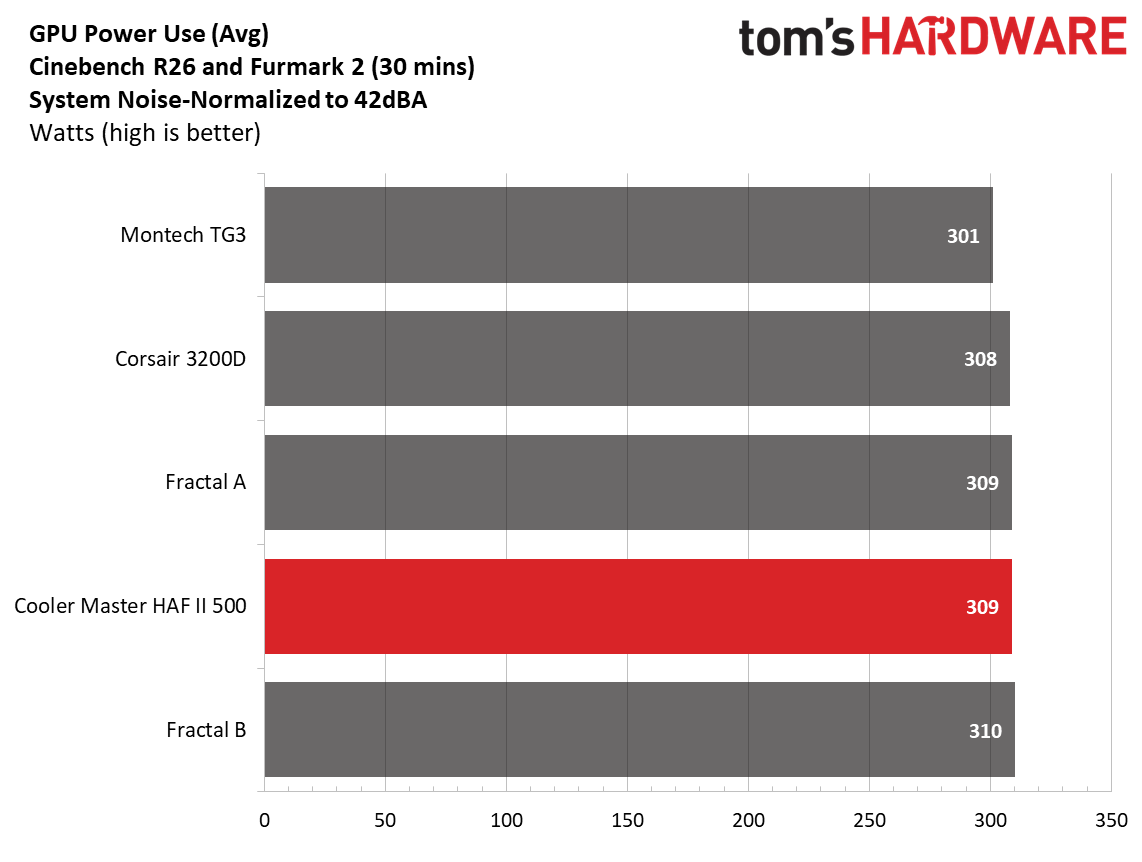
Noise-normalized performance landed in the middle of our CPU results, averaging 91 degrees Celsius in our testing. The video card, benefiting from the front air guide, was the second-coolest result so far with this testbed, matching the open-front Cooler Master Q300L V3 and only behind the Cooler Master HAF II 500 and its massive fans. That’s impressive for a case that’s meant to be quiet.

Maximum thermal performance - fans at full speed

Our noise-normalized results are designed for folks who prefer silence, but what if you don’t mind additional noise and just care about maximum performance, or maybe you have to run things at high settings to keep high-powered devices cool? This testing is for you. Obviously, when you add fans or an AIO up top, things will change a bit, but this gives you a great idea of ‘out-of-the-box’ performance, noise be damned.

Fractal Define One - Fans @ 100%
Future
Fractal Define One - Fans @ 100%
Future
Fractal Define One - Fans @ 100%
Future

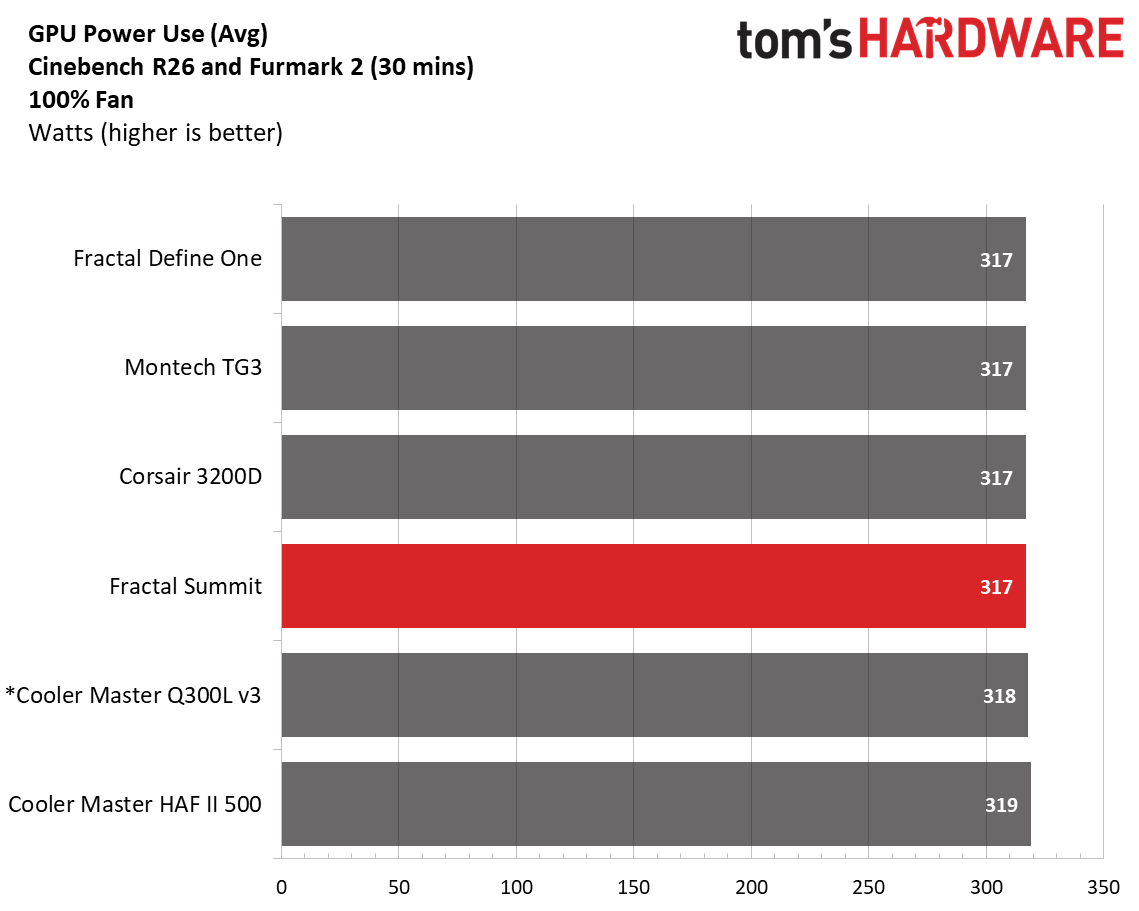
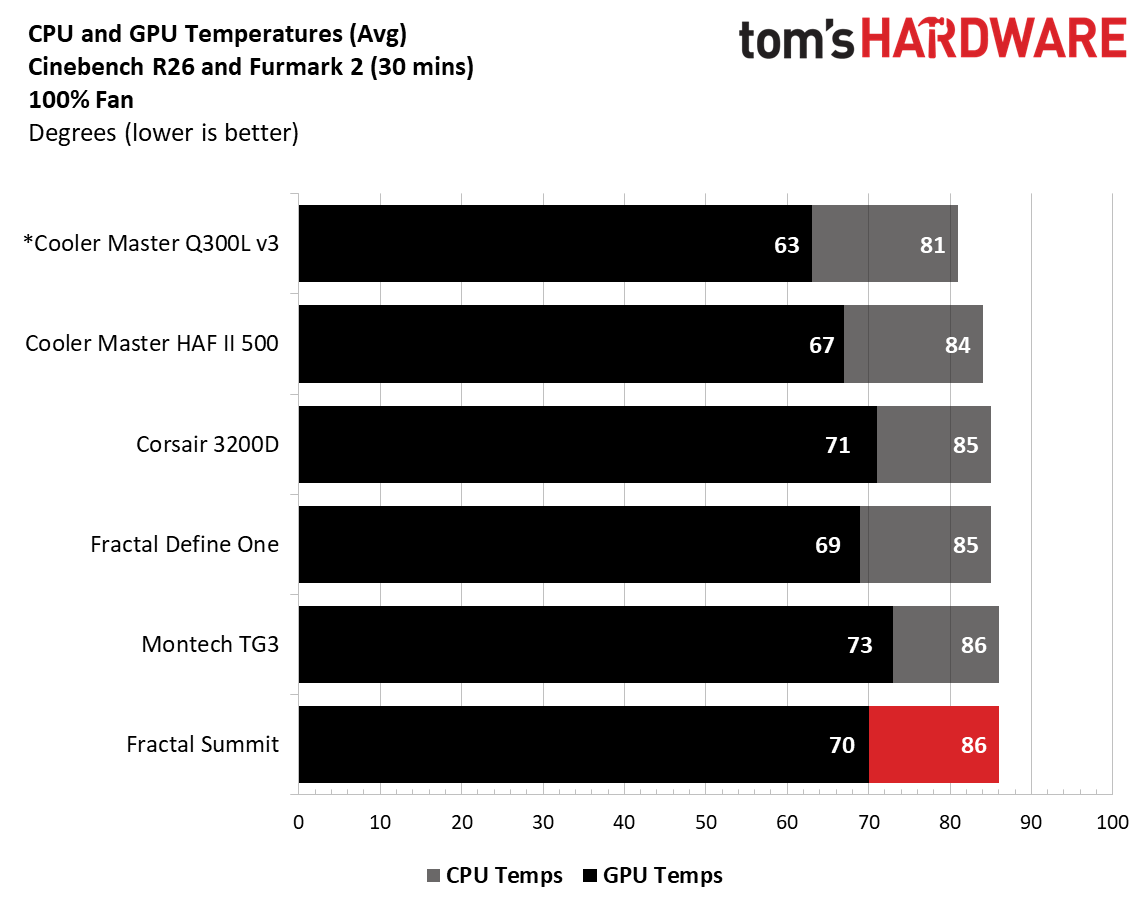
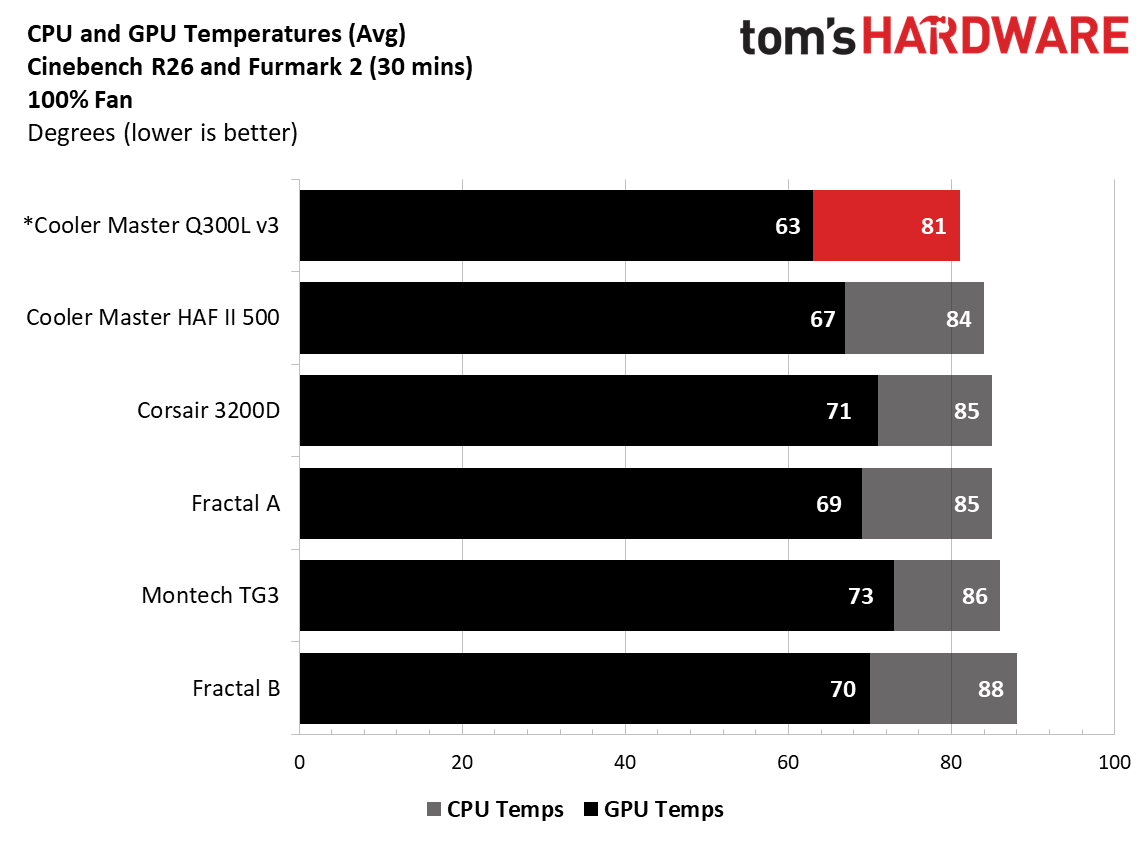
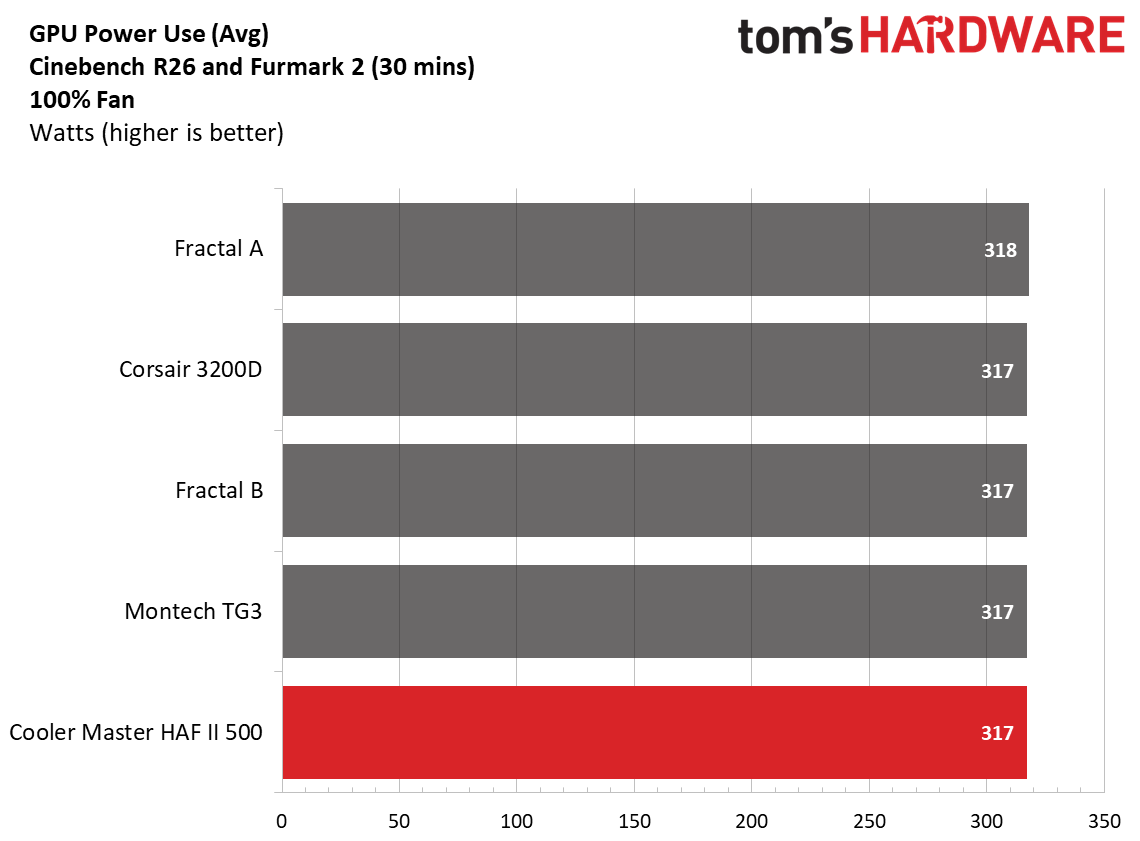
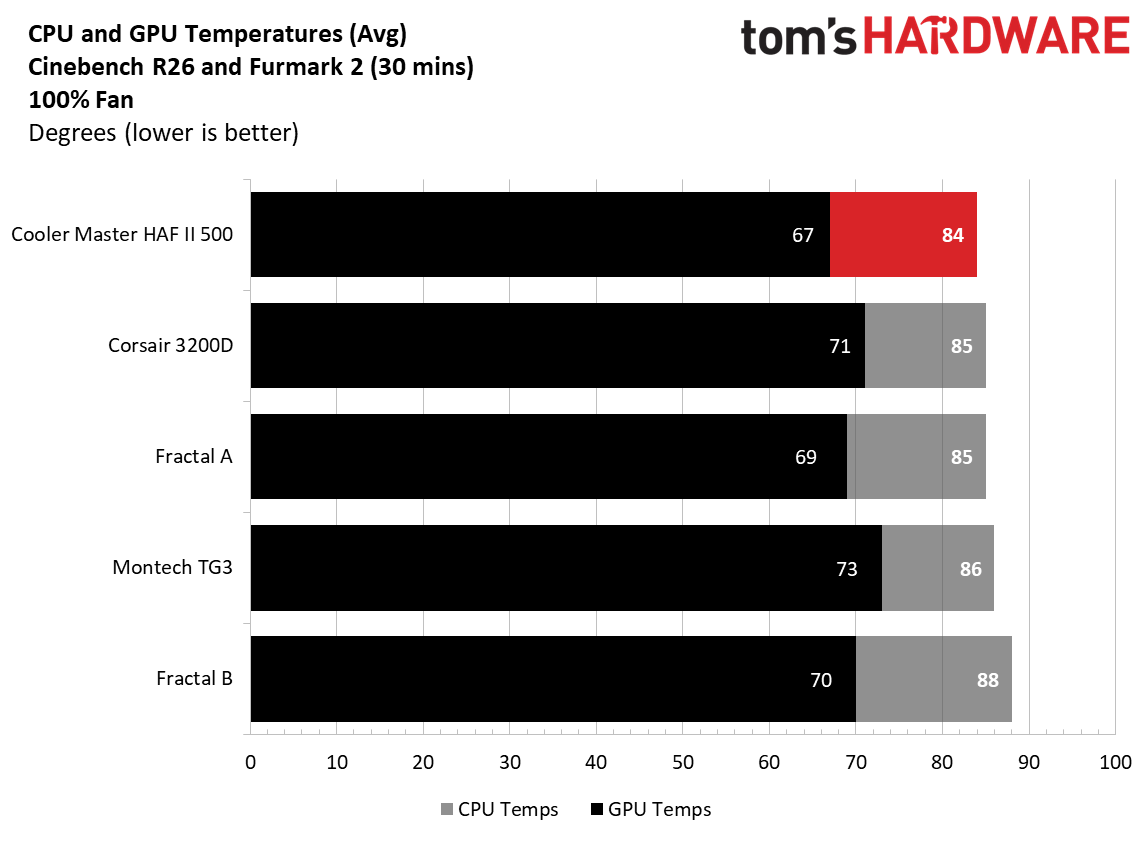
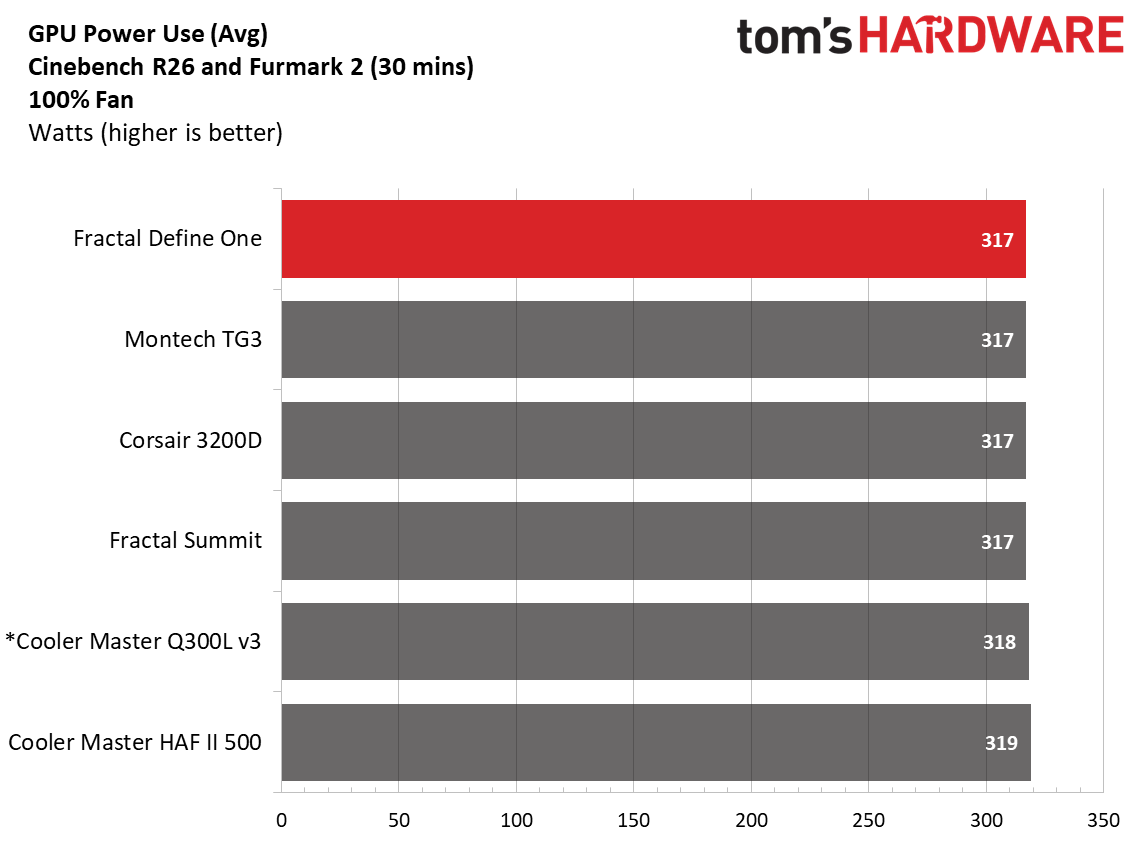
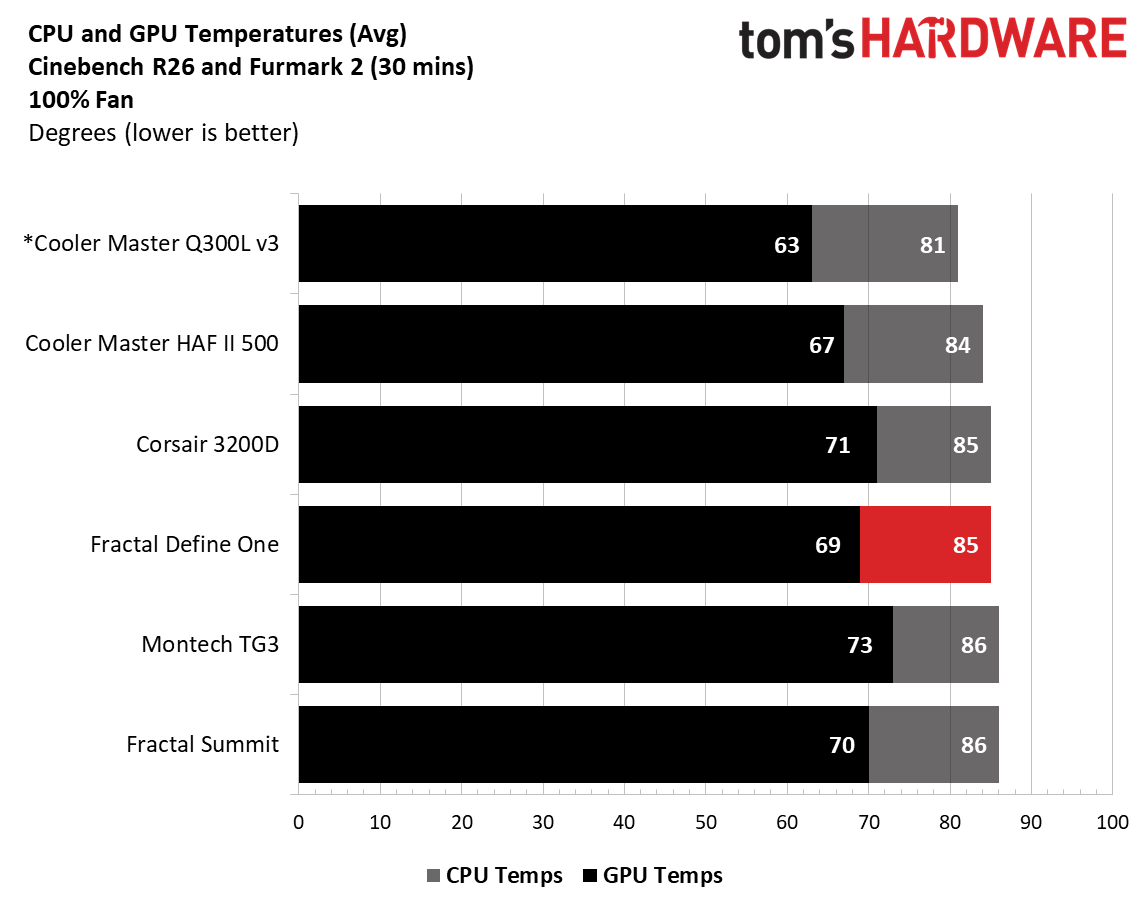
After cranking all the fans to 100%, temperatures dropped six degrees Celsius on the CPU and five on the video card, matching other cases’ drops and leaving the Define One in the same position cooling-wise behind the two Cooler Master entrants. Again, things will be even better (not that they are bad) if you populate the top space with fans.

Maximum Noise Levels

We measure the noise levels with a sound meter from one meter away from the computer case, with the pre-installed fans running at their maximum RPM. If a case does not have enough included fans for airflow (intake and exhaust) as configured, we add a Cooler Master M120 ARGB, since we expect most users will add at least one more fan in situations like these.

Fractal Define One - Noise

(Image credit: Future)

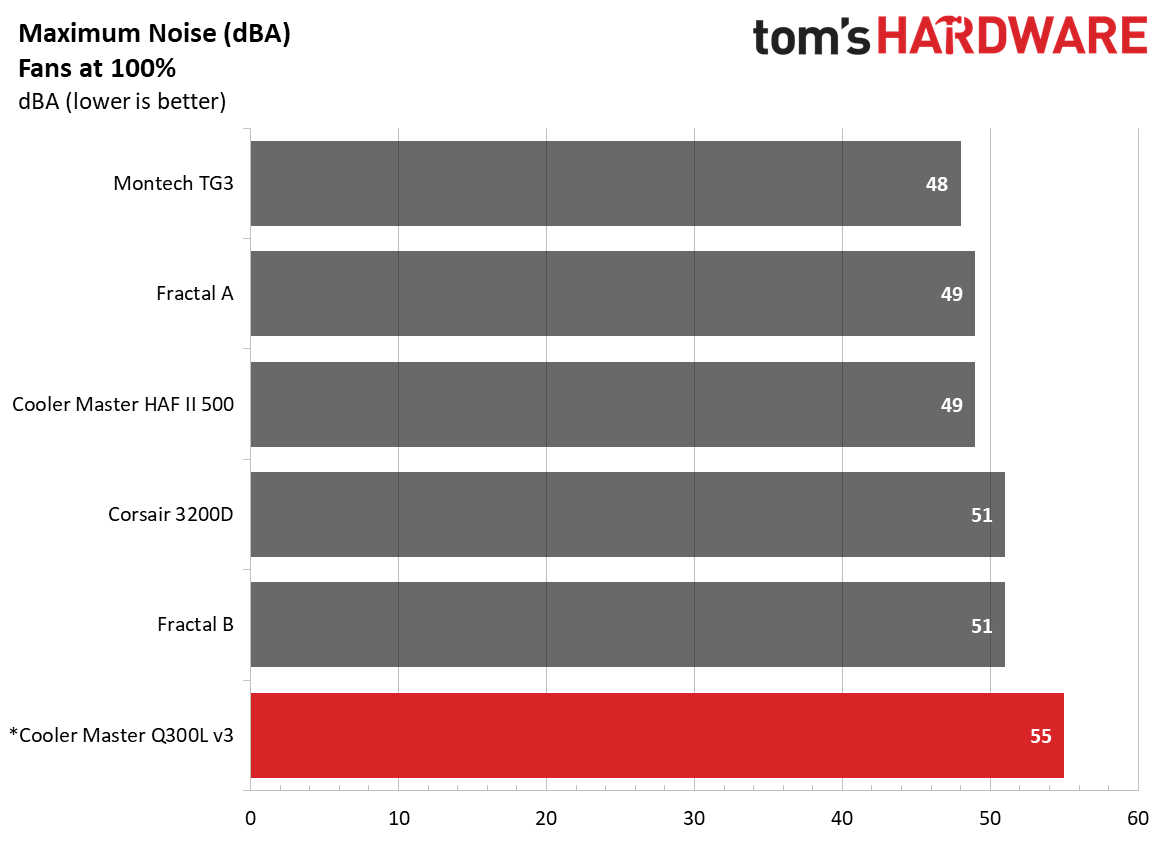
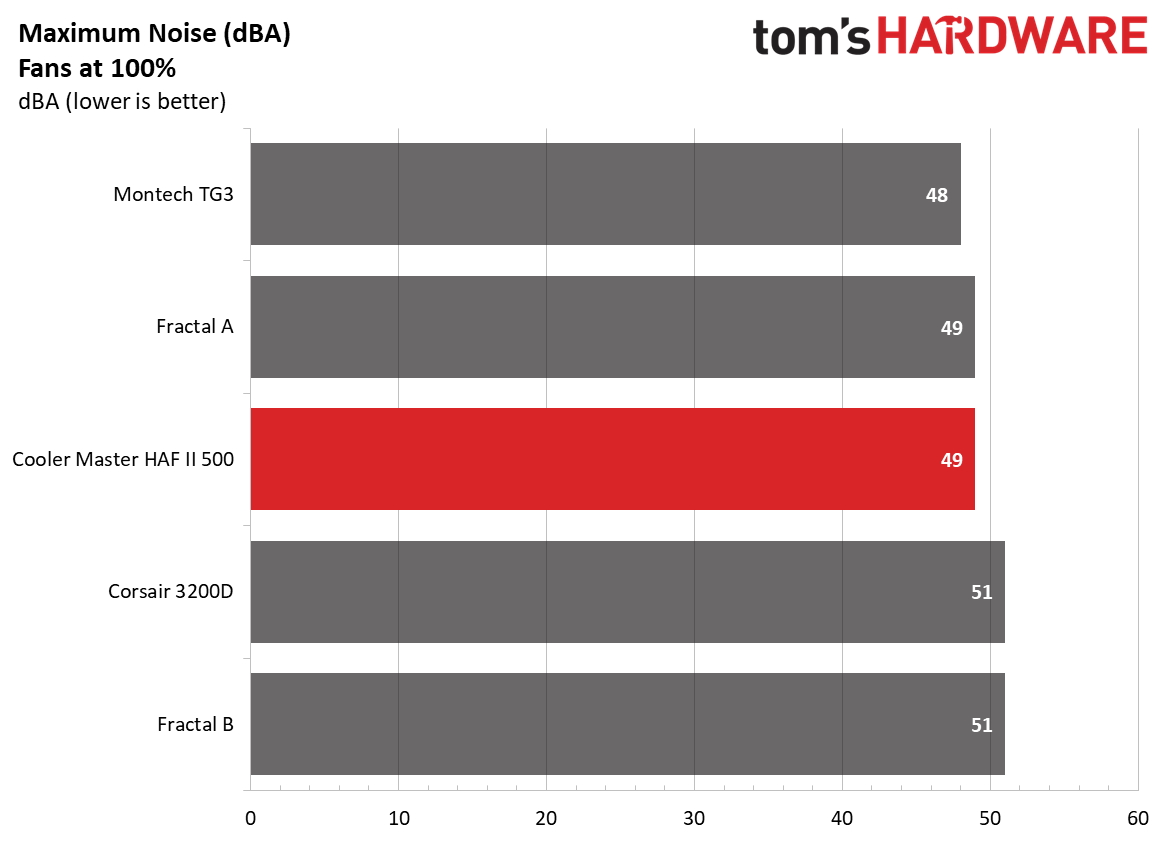
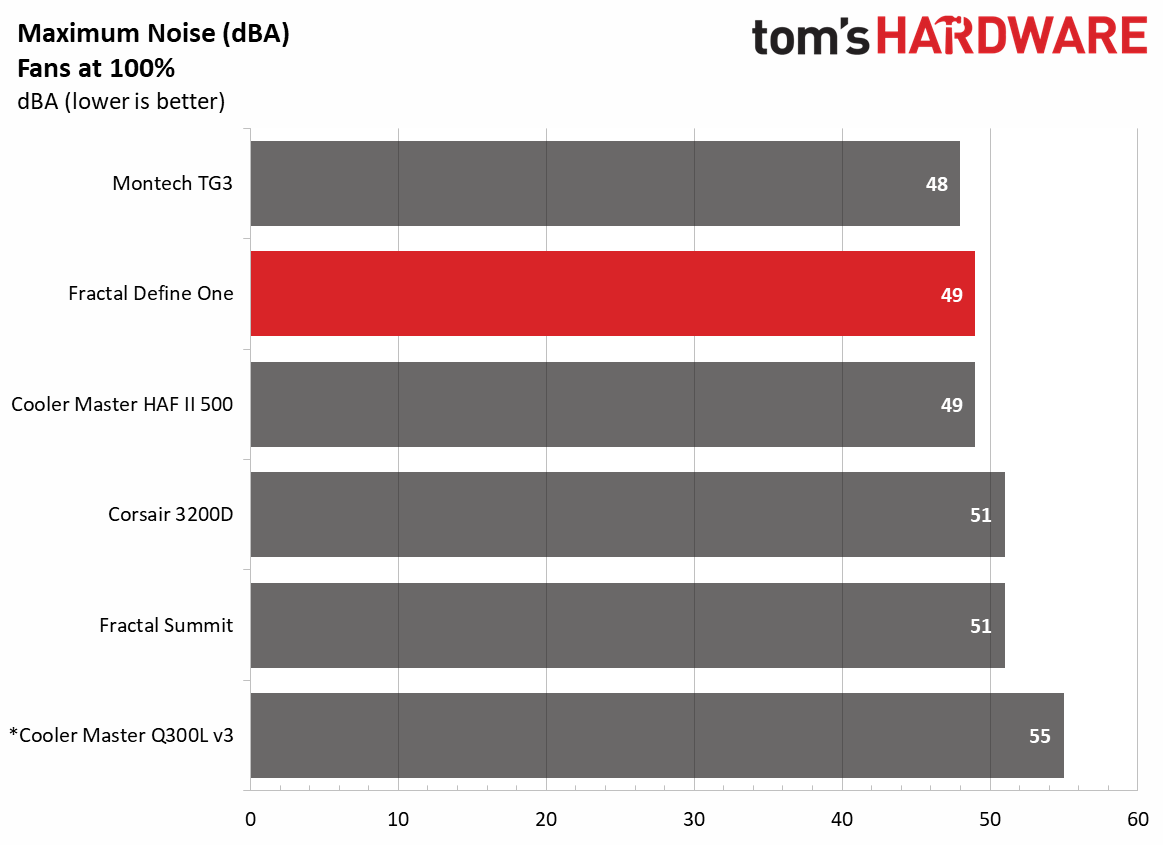
The loudest this case gets in our configuration was only 49 dBA, just 7 dBA above our baseline threshold, just behind the Montech TG3, in second place. The Momentum 14 fans didn’t generate any harsh tones or vibrations, which we expected, as Fractal designed it with vibration-dampening and silence in mind.

Conclusion

The Fractal Define One is a great mid-range chassis that balances thermal performance, noise, and a refined, premium aesthetic. With a price of ~$155 that includes three pre-installed 140mm Momentum 14 fans, it’s also not a bad deal, considering what you get for the money. With toolless access, removable panels, and thoughtful cable management, you get a case that’s easy to build in and look at. Little things like the bottom dust filter pulling out from the window side, the integrated front air guide to feed the GPU cool air, and a grommet that actually stays in place show Fractal put thought (and engineering) into the details.

Our thermal and noise testing backs up the company’s claims of ‘quiet performance’ too. Even without fans on top, the Define One kept pace with cases built for much higher airflow and didn’t get loud trying. If you’re after a reasonably priced case that looks premium, is easy to build in and doesn’t force you to choose between noise and good temperatures, the $150 Define One is well worth a look. And if this isn't the one for you, take a look at our curated list of best cases.

Fractal Summit case review: real wood accents scream premium, but it only stands out in white or black

作者 Joe Shields
2026年9月2日 21:00

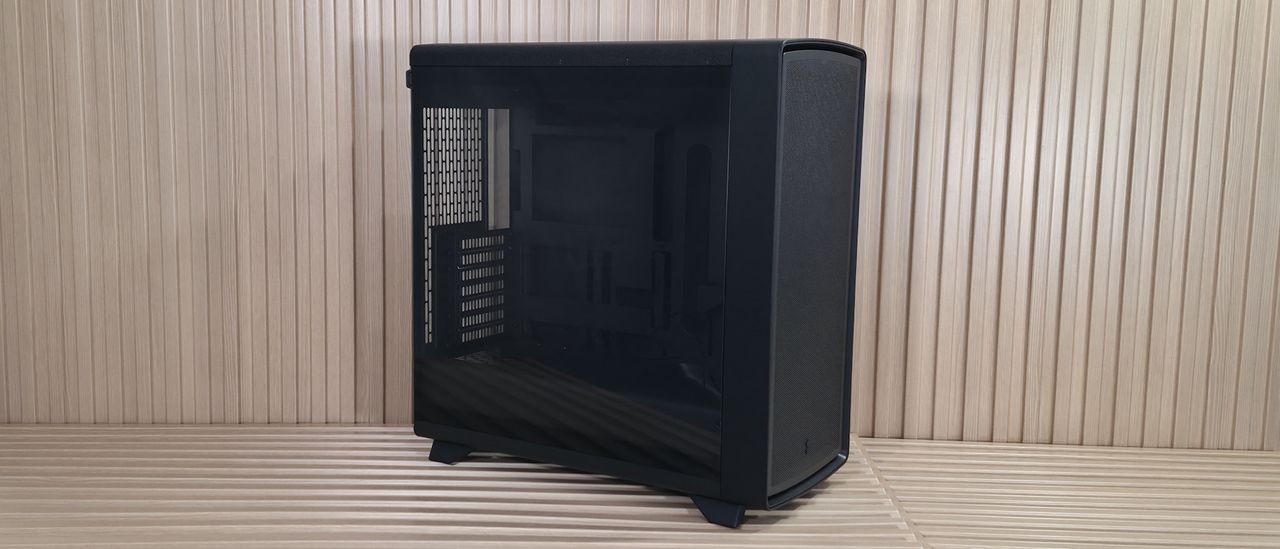
Fractal arguably kicked off the wood accent PC trend with the North line, and the company says its new Summit case is built for “...expressive, high-performance systems combining distinctive Scandinavian design and advanced cooling potential.” The chassis sports FSC-certified wood (timber verified to come from responsibly managed, socially beneficial, and economically viable forests) for details like the front surround and solid wood feet. There’s no doubt it’s a good-looking case, but if you want to show off the wood, you’ll want to stick to the Chalk White or Black versions, as it blends in with the Blackout SKU we tested.

Compared to the Define One that also announces today, the Summit, with its open-face design and three included Momentum 14 fans, provides plenty of airflow to a roomy internal space that can fit up to E-ATX motherboards (including rear-connect options), huge graphics cards, and dual 360mm radiators. It also offers tool-free access to the inside via removable top and front brackets for easy building. The top-mounted panel offers plenty of connectivity, with two USB Type-A ports and even 20 Gbps Type-C up top.

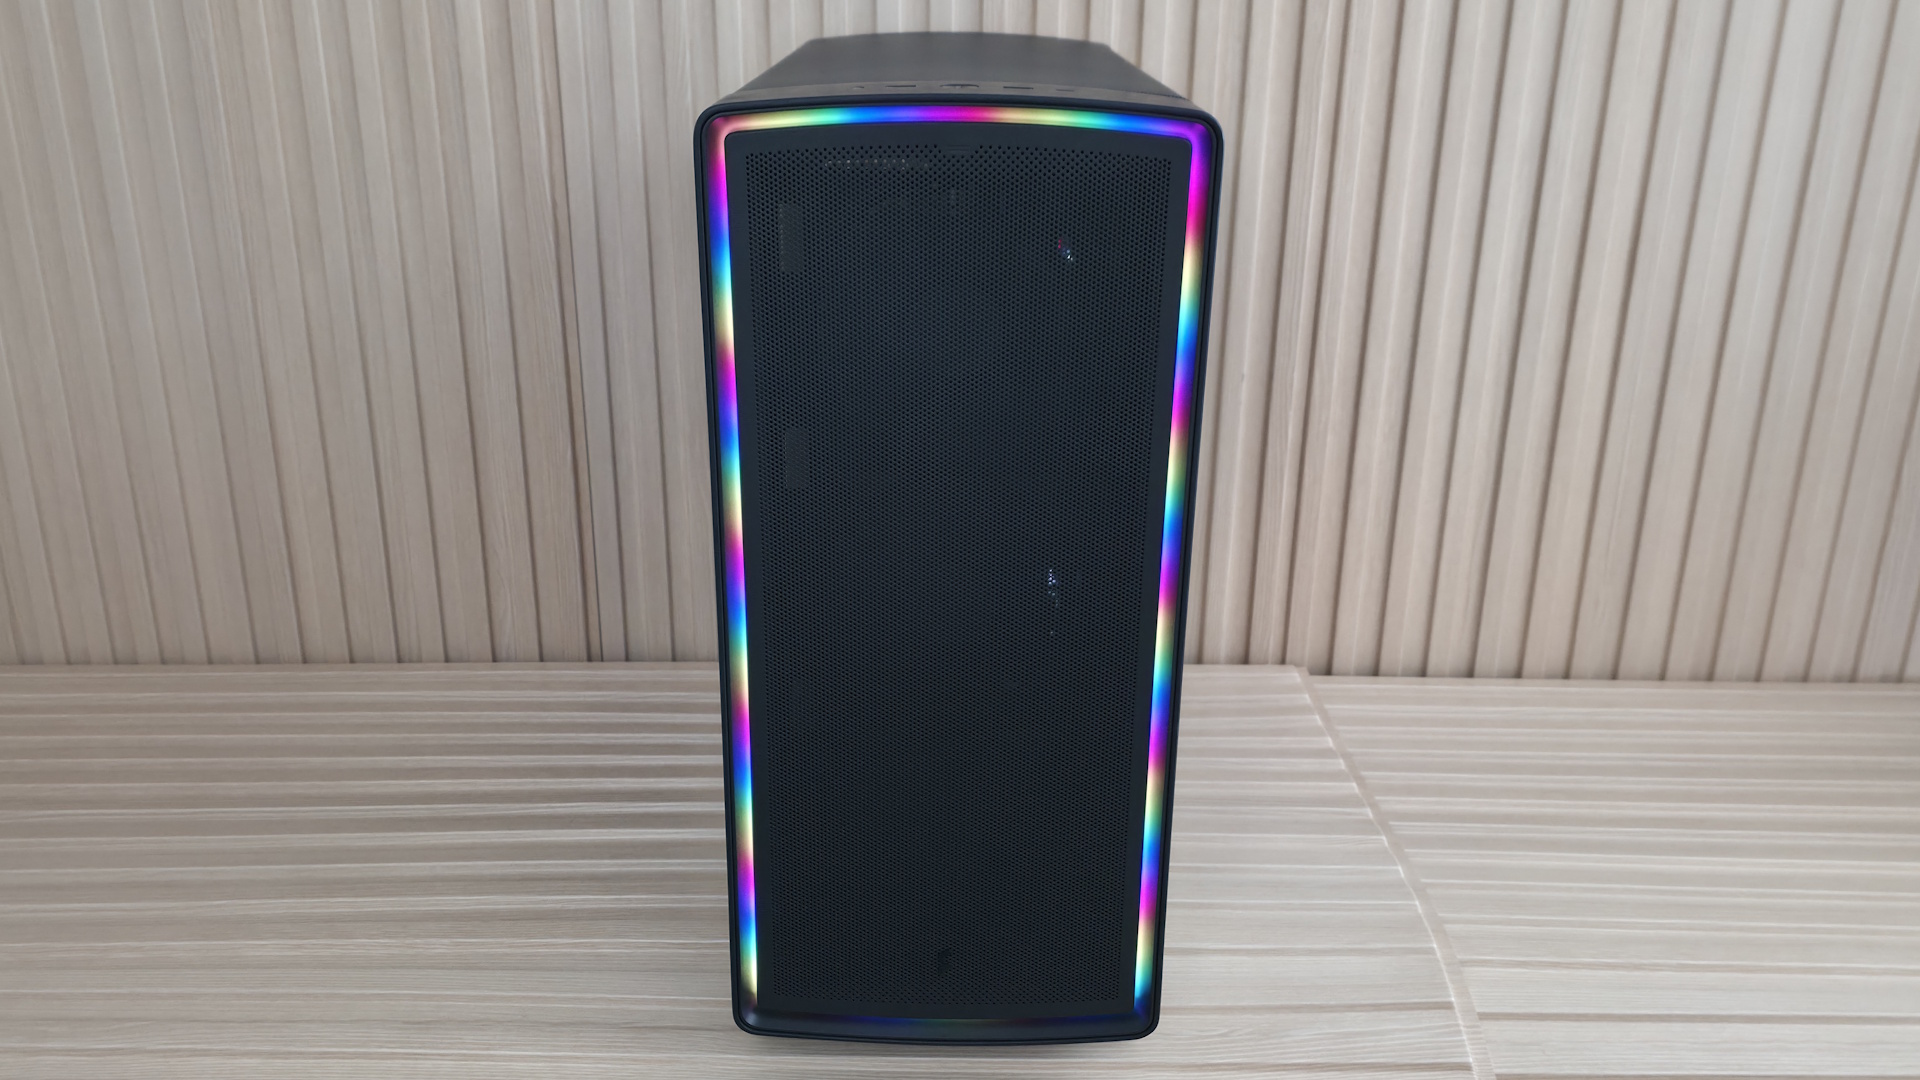
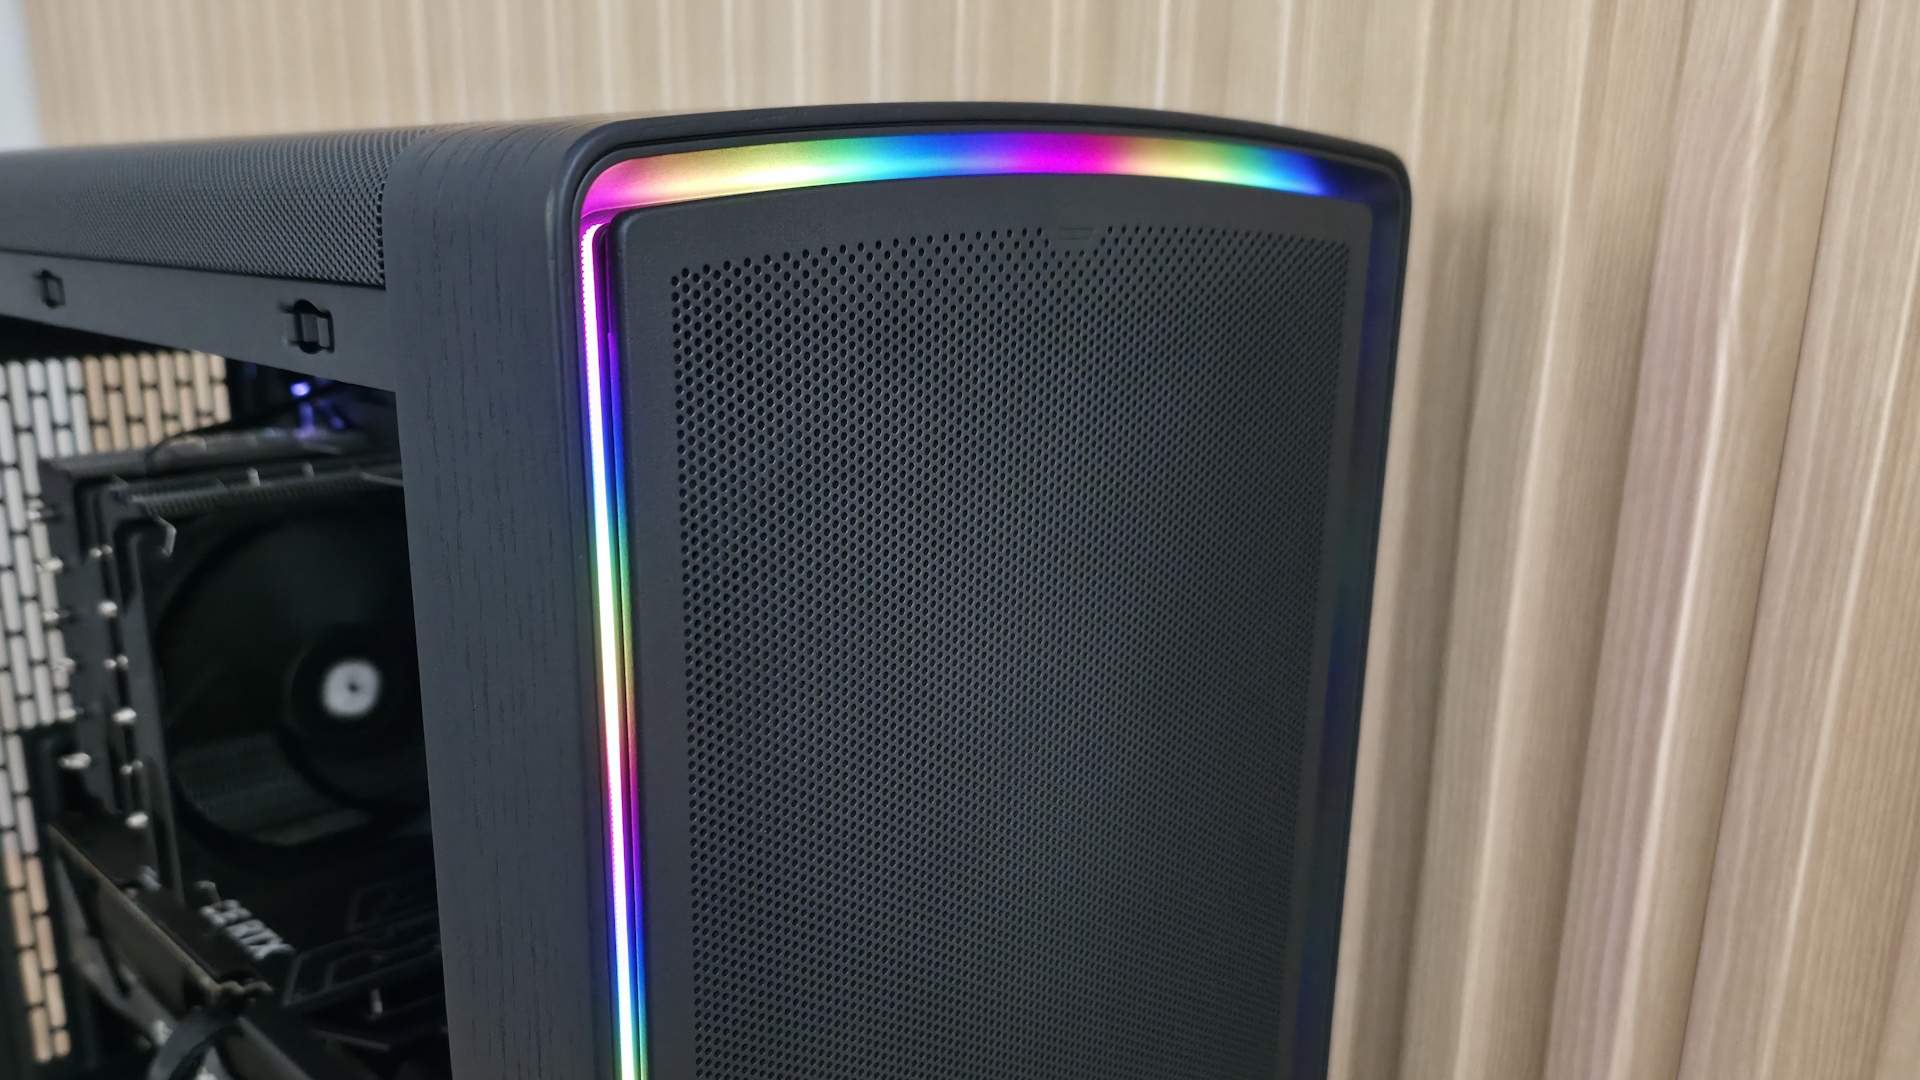
Finally, the Ambience Blackout version we’re testing has integrated, customizable ARGB ambient lighting that wraps around the front panel edge, hidden behind the removable front panel. The other versions forgo any ARGB lighting. Prices range from $169.99 for the non-ARGB versions (Chalk White Solid/Chalk White TG Clear and Black Solid/Black TG Light Tint) to $199.99 for the Ambience Blackout, which we have for review.

We'll cover many more details inside and outside the chassis, showcasing the features and any issues we may encounter during the build process. We'll also run the case through thermal and noise testing to show how it performs compared to others and whether it has a chance of making our best PC cases list. Below are the case's specifications from Fractal.

Fractal Summit Product Specifications

Type

Mid-Tower

Dimensions (H x L x W)

20.3 x 19.5 x 9-inches (515 x 495 x 229mm - with protrusions)

Motherboard Support

Mini-ITX, Micro ATX, ATX, E-ATX

Back-connect Motherboard Support

Yes

Color

Chalk White Solid
Chalk White TG Clear Tint
Black Solid

Black TG Light Tint
Blackout TG Light Tint
Ambience Blackout TG Light Tint

Storage Support

(2) 3.5-inch -or- (4) 2.5-inch
(Supports up to six 2.5-inch total)

PCIe Expansion Slots

7

Fan Support

Top - 3x120/140mm
Front - 3x120/140mm
Bottom - N/A
Rear - 1x120mm

Pre-installed fans

(3) 140mm LCP Blade Momentum 14 (Front)

Radiator Support

Front - Up to 360mm
Top - Up to 280mm
Rear - 1x120mm

CPU Cooler Clearance

173mm

GPU Clearance

425mm (w/ front fans installed)
393mm (w/ 30 thick front rad. installed)

Vertical GPU Support

Yes (requires adapter, $79.99)

PSU Length

253mm

Dust Filters

Front, Bottom

Other features

3x included 140mm fans, integrated GPU front air guide, real wood/woodgrain

MSRP

$169.99 (Chalk White, Black, and Blackout TG)
$199.99 (Ambience Blackout TG)

Warranty

2 Years

Features of the Summit

▶️ External Features

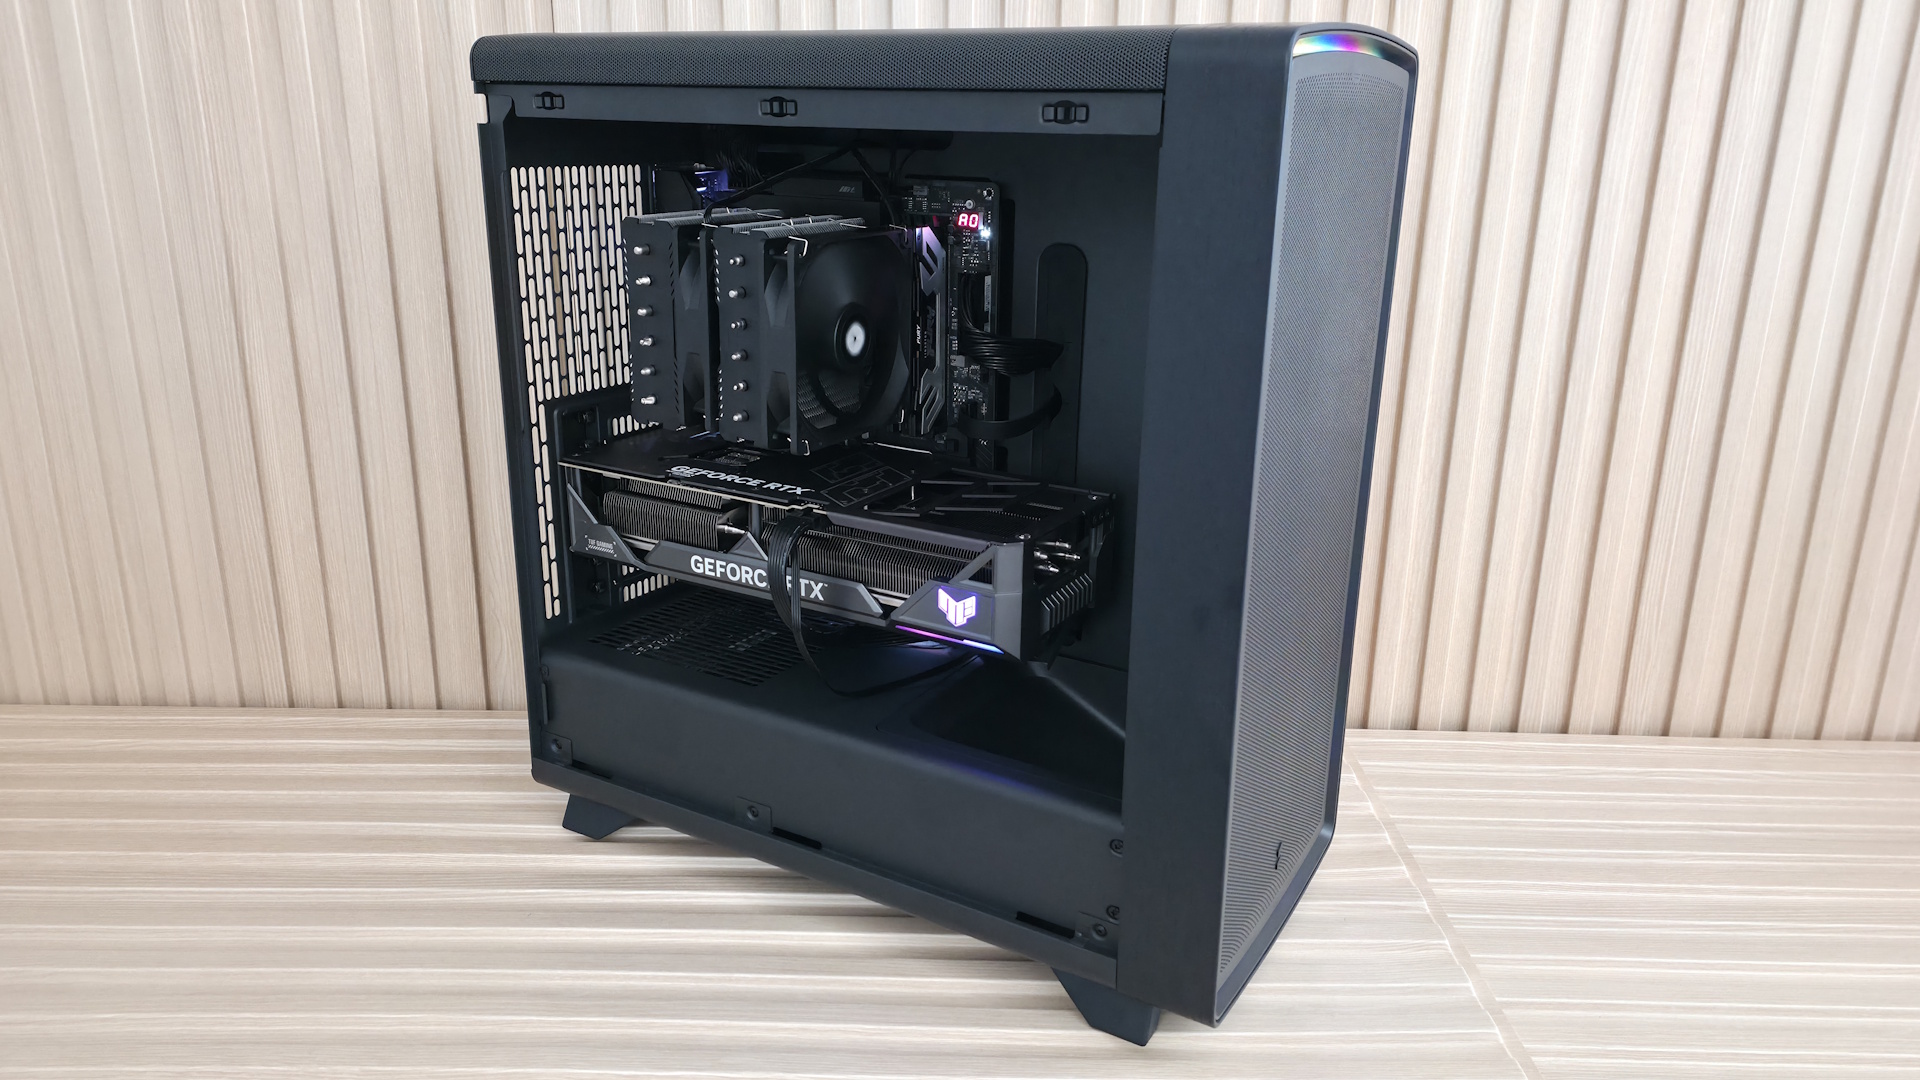
On the outside, our Ambience Blackout model looks similar to many other PC cases. It's black on black on black, with some ARGB flair – in this case, set behind the removable front panel. The rounded edges create a softer look, and if you look closely, you can see the wood panel around the front as well as the wooden feet it stands on. While I like the look of the all-black chassis and the ARGB feature in the Blackout models, the black wood doesn’t stand out as much as it does on the Black Solid’s dark walnut. The light oak wood on the Chalk White models shows it off better and gives off an even more refined appearance than any of the black versions.

Fractal Summit - Outside
Future
Fractal Summit - Outside
Future
Fractal Summit - Outside
Future
Fractal Summit - Outside
Future
Fractal Summit - Outside
Future

Our Ambience Blackout TG Light Tint, as the name suggests, features a lightly tinted tempered glass (TG) panel to showcase the internals. I prefer a light tint because it hides some of the less attractive details in dark corners. The glass panel is secured by multiple tabs at the bottom and held to the frame by two ball-and-socket latching mechanisms on top. Match the bottom tabs, then push until it clicks in. It also has pre-drilled holes on the back so you can use a captive thumbscrew to secure the panel (for example, when transporting the case). The other side attaches the same way but is a solid panel and, unlike the Define One, has no sound-dampening material. Plastic tabs on the top rear corner help you grab the panels for easy in-and-out access.

In this case, airflow enters through the removable mesh front panel with small holes and does not use a cloth dust filter to prevent fine particulates from entering. Overall, the results were middling, but the more surprising part was that the ‘balanced’ Define One, with its closed front intake, cooled slightly better in our testing (we had to run the fans here slower to reach the 42 dBA mark). Regardless, we are happy with the cooling performance (and that’s without top fans).

Turning the case around to the rear, we can see the seven expansion slots and the cover, which cleans up the look of the otherwise exposed screws. The rear fan area up top supports 120mm fans, and you have a small amount of vertical play in the mounting location. The power supply chamber is at the bottom and uses a baffle to mount your PSU to. Simply screw the baffle to the power supply with the included screws, then install it from the rear, securing it all to the case with two captive thumbscrews. On the left, you’ll also see the backs of a couple of pre-installed Velcro straps to help with internal wire management on the inside (or outside, too).

At the bottom of the case, we spy a dust filter for the power supply and a better look at the solid wood feet that raise it almost two inches off the bare floor. The dust filter is removable but pulls out from the back, which can be an inconvenience if you have to move your PC to do so. I like models with side-access filters, like the Define One, since you typically won’t have to move your heavy rig to clean them.

Fractal Summit - Top and IO
Future
Fractal Summit - Top and IO
Future

Looking at the slightly arched top of the case, we again see the same small circular perforations that let air in or out, across the entire panel. To remove it, simply pull on the small cloth tab on the back, which slides the whole panel off with ease. Again, there isn’t a cloth dust filter here, but it’s generally used for exhaust anyway, so we won’t hold that against Fractal.

Positioned along the top and front edges for easy reach, the Summit’s front panel offers a familiar but capable I/O area. It has three USB ports: a USB 3.2 Gen 2x2 (20 Gbps) Type-C port and a pair of 5 Gbps Type-A ports. Centered among them all is a black, dime-sized power button. On the left is your 3.5mm combo audio jack. I do like that it has a 20 Gbps Type-C port, but again, fairly standard front IO.

▶️ Internal Features

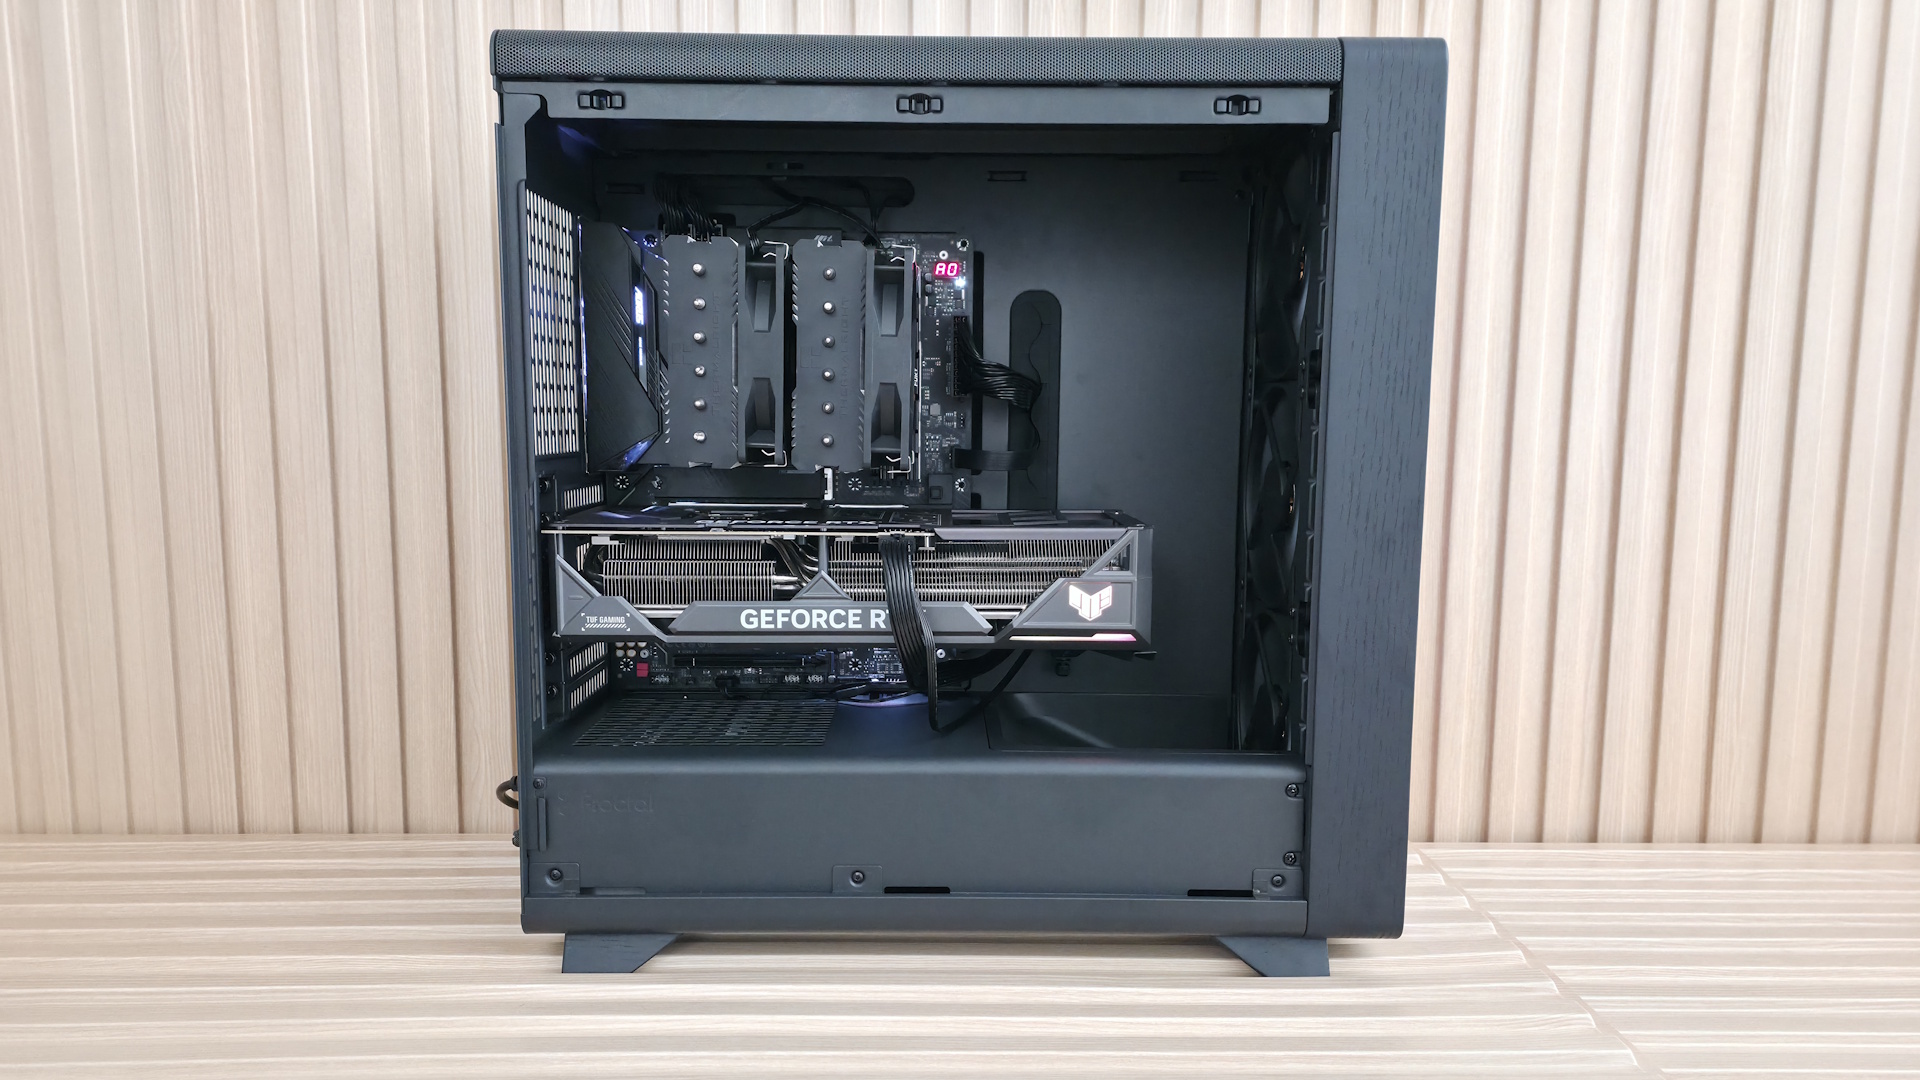
Inside the case are two separate chambers. One is for the power supply and cables; the other is for the major components. Also here is the front air guide that moves air directly towards the video card. Above that is another value-add feature: an integrated support bracket for the video card mounted to the motherboard tray. Two screws let it move a couple of inches up or down to support any installed graphics card. Unlike the Define One, the Summit’s rear wire management clips don’t get in the way of the screws for adjustments.

The motherboard tray itself has plenty of cutouts. The largest one behind the socket is great for accessing the rear of the motherboard and mounting your cooling solution while the board is in the case. The rest are there for cable management (top or bottom) and to support rear-connect motherboards like Asus BTF, Gigabyte Stealth, and MSI Project Zero boards. A large black grommet for hiding wires runs vertically to the right of the motherboard. This grommet pleasingly didn’t come out of its spot easily, as many others do.

Fractal Summit - Inside
Future
Fractal Summit - Inside
Future
Fractal Summit - Inside
Future
Fractal Summit - Inside
Future
Fractal Summit - Inside
Future
Fractal Summit - Inside
Future

Looking at the front from the inside, we get a better view of the pre-installed Momentum 14 fans and the removable front fan brackets. You can mount a 3x120 mm radiator here, with a maximum length of 405 mm and 30 mm thick if you keep the air guide (435 mm and thicker radiators, up to 65 mm, if you remove it), or it fits 280/240/140/120mm radiators. There are plenty of options, but make sure you know your radiator size so you know what you need to remove, if anything.

Looking at the ceiling of the case from the inside, we see the removable top bracket, held in by two screws. The top holds up to two 140mm fans or a 280mm radiator. You have around 60mm or so before the radiator/fan combo covers the top of the motherboard, so you don’t have to worry too much about fitment or covering the top of your motherboard if you choose to use a radiator in this space. At the rear of the case, we spy the 120mm fan mounting location and the seven available expansion slots.

On the bottom rear, we can see the power supply chamber, along with space to route cables for any headers located along the bottom of the motherboard. The bottom chamber is vented, but won’t radiate a ton of heat, as the power supply gets cool air from the filtered intake on the bottom.
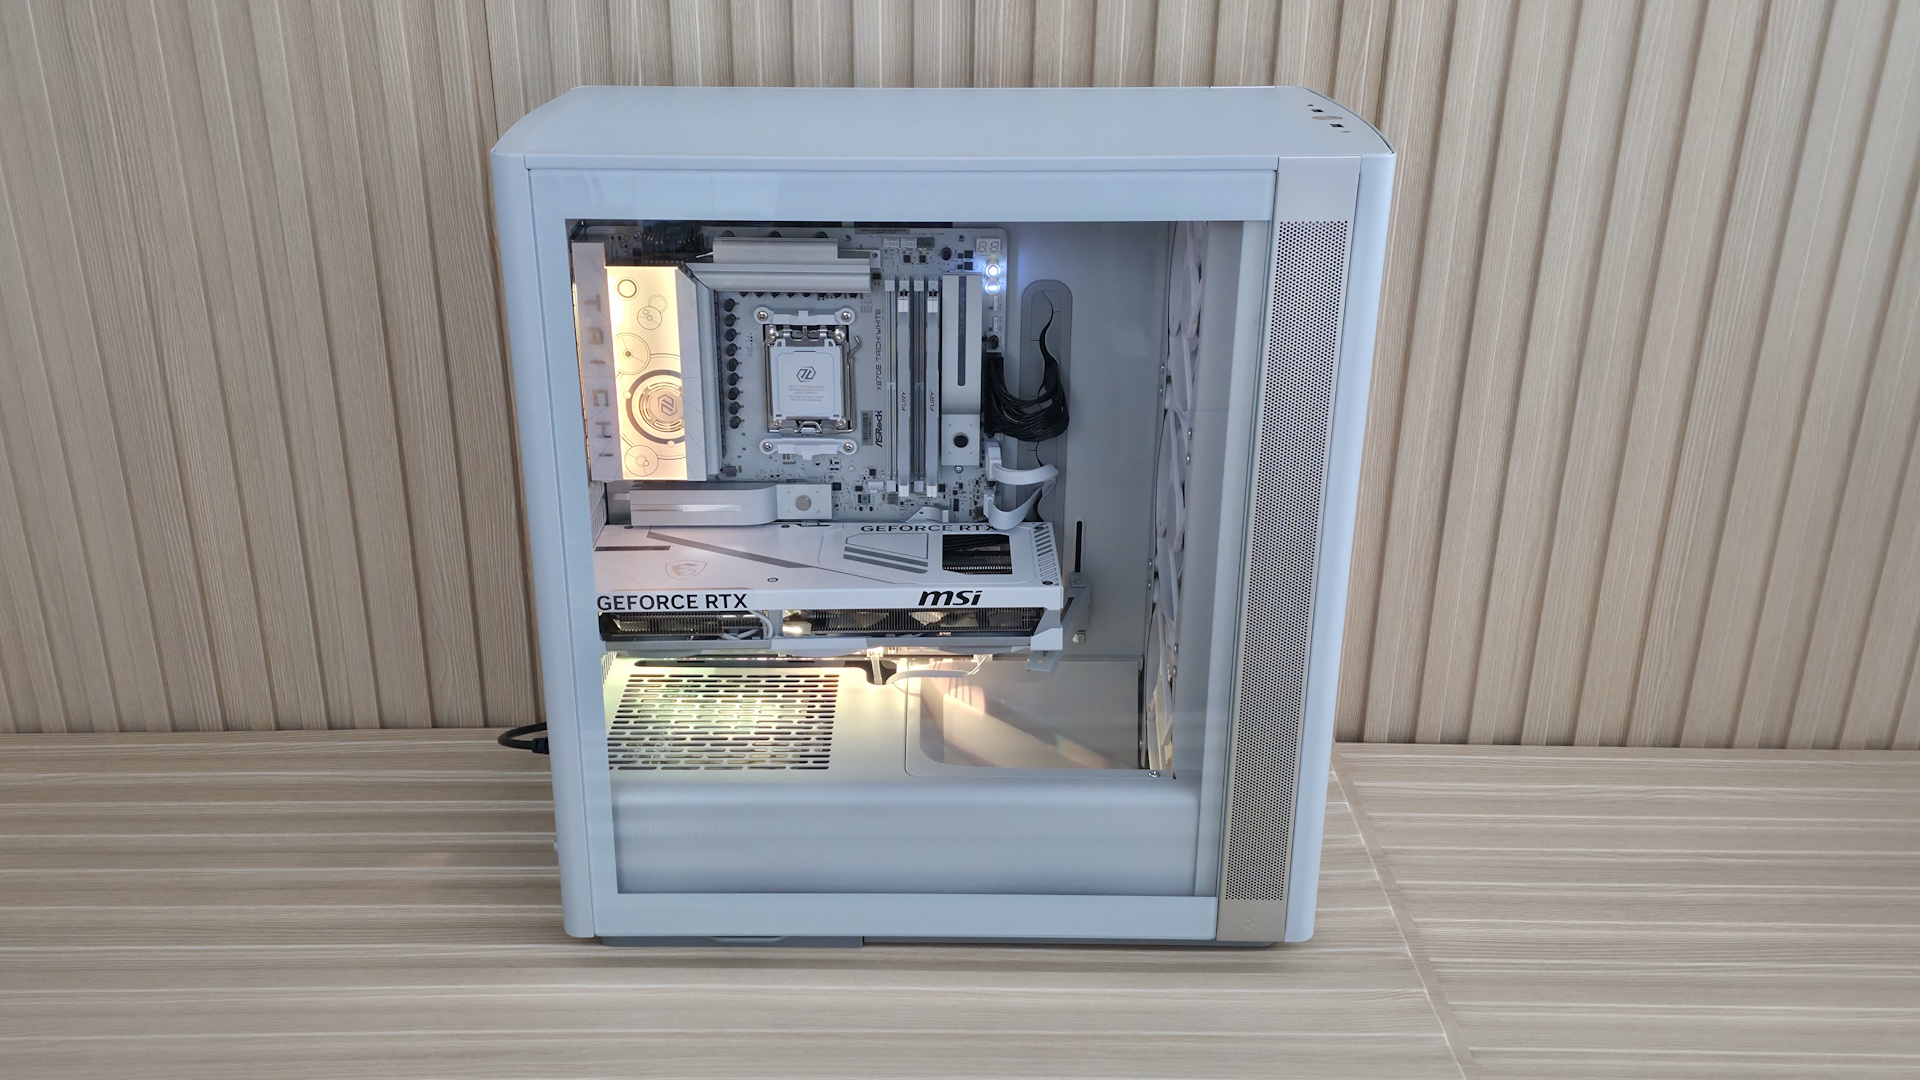
Fractal Summit - Inside and full
Future
Fractal Summit - Inside and full
Future
Fractal Summit - Inside and full
Future
Fractal Summit - Inside and full
Future
Fractal Summit - Inside and full
Future

Looking behind the motherboard panel, here again we see the difference between cheap cases that cut corners and one that doesn’t. First, there’s 34mm between the motherboard tray and the back panel for cables – plenty of space to aimlessly pack your cables in, like me, without a bulging panel. Also here are the cable management features. On the left are two plastic clamps that extend out and click back in, along with pre-installed Velcro in the suggested channels.

On the rear of the case are more Velcro straps to route cables, like your 8-pin EPS for the CPU, cleanly up the back. A keen eye also spots the two 2.5/3.5-inch drive mounts behind the motherboard. You can fit two 3.5-inch drives, one in each mount location, or four 2.5-inch drives (two in each mounting location). The case fits six 2.5-inch drives total, with the other mounting areas hidden on the floor, under the front air guide.

The Fractal Summit is a good-looking chassis. The Blackout Ambience colorway we have for review doesn’t stand out among others except for the front RGB feature, but the others that show off the wood do and really do scream premium, if only for the real wood aesthetic. From how the panels pop off to the internal layout, it’s obvious some thought went into making the Summit a build-friendly experience, not just a collection of specs to tick on a sheet.

Test equipment, method, and results

Our thermal tests are presented to give you more information about the product’s performance, but aren’t intended as the sole basis for judging the chassis. The style, price, features, and noise levels of a case should also be considered, and we all have different preferences. What I might like in a case, you might not, and that’s OK. Our goal with these reviews is to give everyone, regardless of their preferences, enough information to decide whether a case is right for them.

To get heat into the system, we stress the CPU with Cinebench R26 (multi-threaded test) and the video card with Furmark 2 (1080p). CPU and GPU tests run concurrently for 30 minutes, allowing the air-cooled system to reach saturation and stabilize over that period. We then let the system idle for 15 minutes, adjust the fans to 100%, and test again.

Noise-normalized (42dBA) Maximum thermal Performance

This set of tests is designed to appeal to those who love quiet PCs, with both system fans and the CPU fan noise normalized to 42 dBA. Consider this a measure of the case’s thermal efficiency when noise levels are set to run quietly. It is audible, but just (at least for my old ears).
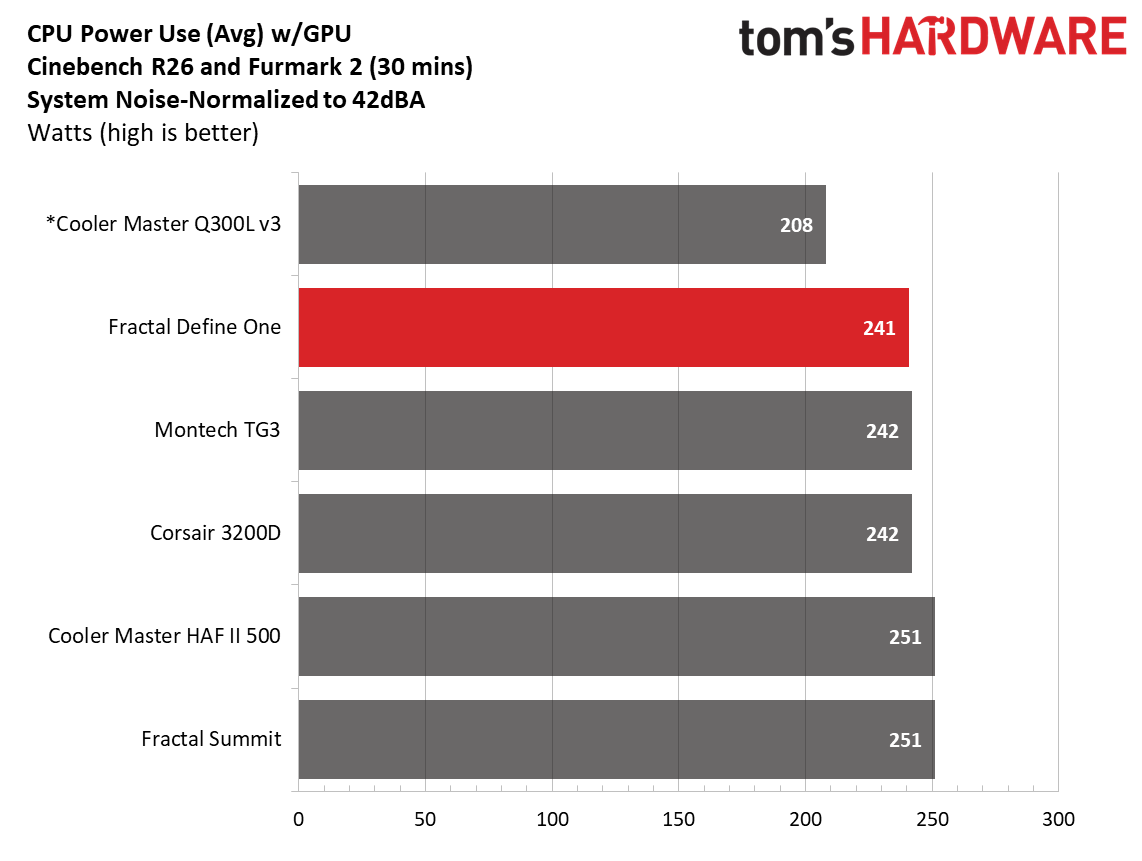
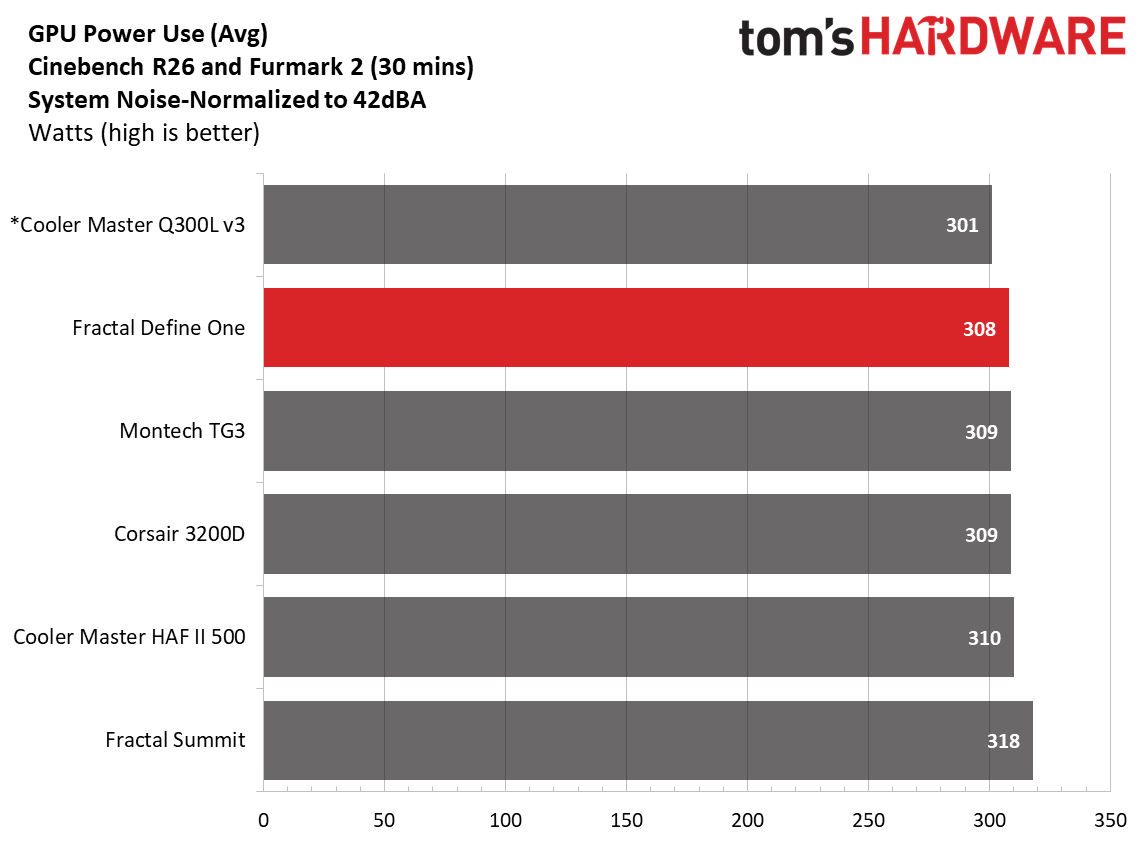
Fractal Summit - Noise normalized charts
Future
Fractal Summit - Noise normalized charts
Future
Fractal Summit - Noise normalized charts
Future

Noise-normalized performance landed in the middle of our CPU results, averaging 94 degrees Celsius in our testing. Surprisingly, it was the hottest of our tested cases in this set of results. The video card, even with the front air guide, was also the warmest in our noise-normalized data sets. All because we lowered the fan speeds a bit to reach 42 dBA.

Maximum thermal performance - fans at full speed

Our noise-normalized results are designed for folks who prefer silence, but what if you don’t mind additional noise and just care about maximum performance, or maybe you have to run things at high settings to keep high-powered devices cool? This testing is for you. Obviously, when you add fans or an AIO up top, things will change a bit, but this gives you a great idea of ‘out-of-the-box’ performance, noise be damned.

Fractal Summit - 100% fans
Future
Fractal Summit - 100% fans
Future
Fractal Summit - 100% fans
Future

After cranking all the fans to 100%, temperatures dropped five degrees Celsius on the CPU and a notable nine on the video card, showing the benefits of the air guide. Once you populate the top of the chassis with fans or an AIO to get more air out, results will improve. That said, these aren’t poor results, as the case keeps our high-end processor and video card running below their throttling temperatures in a worst-case scenario.

Maximum Noise Levels

We measure the noise levels with a sound meter from one meter away from the computer case, with the pre-installed fans running at their maximum RPM. If a case does not have enough included fans for airflow (intake and exhaust) as configured, we add a Cooler Master M120 ARGB, since we expect most users will add at least one more fan in situations like these.

Fractal Summit - Maximum Noise

(Image credit: Future)

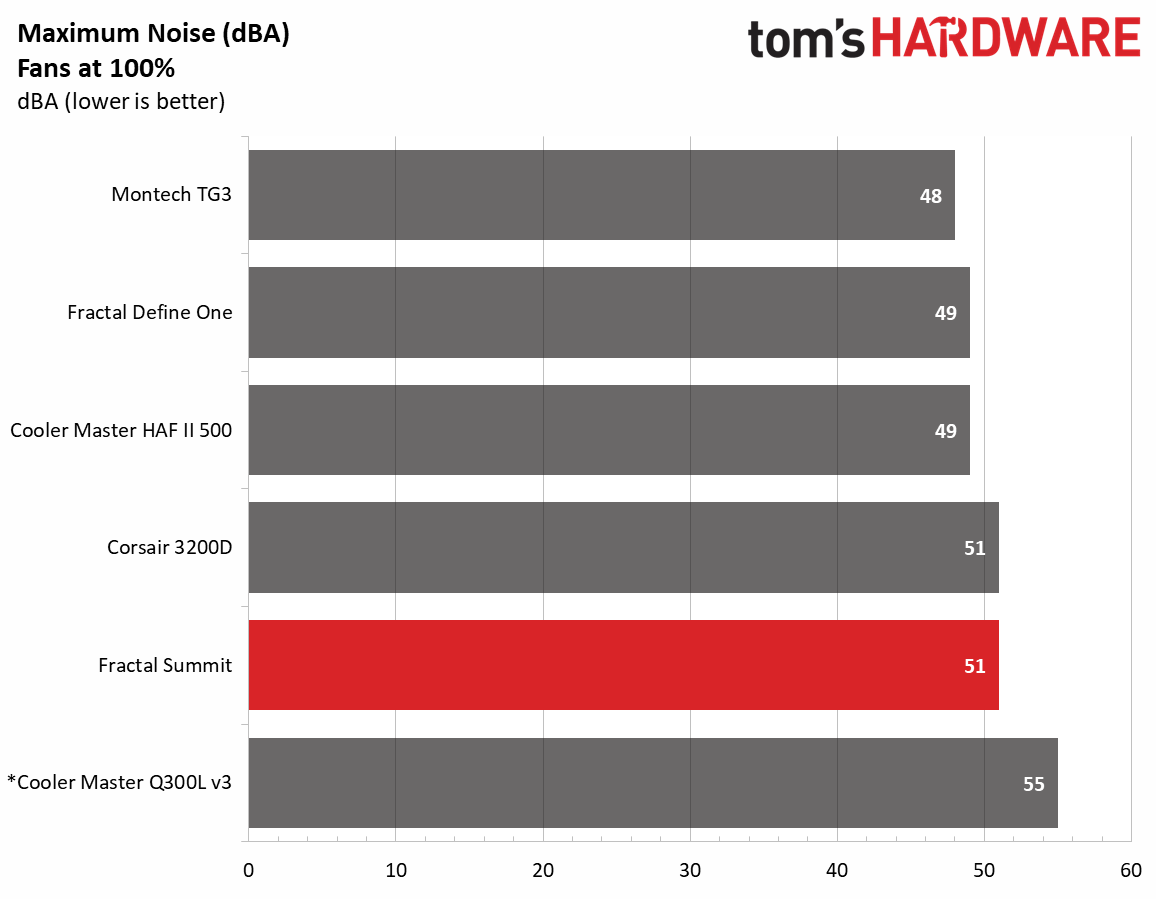
The loudest this case gets in our configuration was only 51 dBA, just 9 dBA above our baseline threshold, and a middling result among our current data points. The Momentum 14 fans didn’t generate any harsh tones or vibrations, even though Fractal didn’t mention vibration-dampening. With the open front and lack of sound-dampening materials, the case ran a bit louder than the Define One, but not enough to be worrisome.

Conclusion

The Fractal Summit is a good-looking chassis, no matter which colorway you choose. The Blackout Ambience colorway we tested doesn’t stand out much looks-wise, outside of the cool front RGB feature. However, the Chalk White and Black versions that do show off the wood really give off premium case vibes that will fit in with your office decor. Like the Define One, Fractal put some real thought into making this an easy case to build in, too.

Thermally, the Summit was a bit of a mixed bag. You’d think the open-face design would improve upon the more closed-off Define One, but it ran warmer in our noise-normalized testing, as we needed to slow the fans down slightly to meet our 42 dBA threshold. It did close the gap when we increased the fan speed, though. I have no worries the Summit can handle the most powerful of components when fully populated, but it's worth knowing if thermals are a priority.

Priced at $169.99 for the non-ARGB versions and $199.99 for the Ambience Blackout, the Summit is priced fairly for what you get. It doesn’t earn a place on our best cases list, but on looks, build quality, and everyday usability, the Summit is well worth considering if you're after a premium mid-tower chassis.

Hands-on with Hyte’s Y50 RGB case: Premium looks at an affordable price

2026年8月26日 01:00

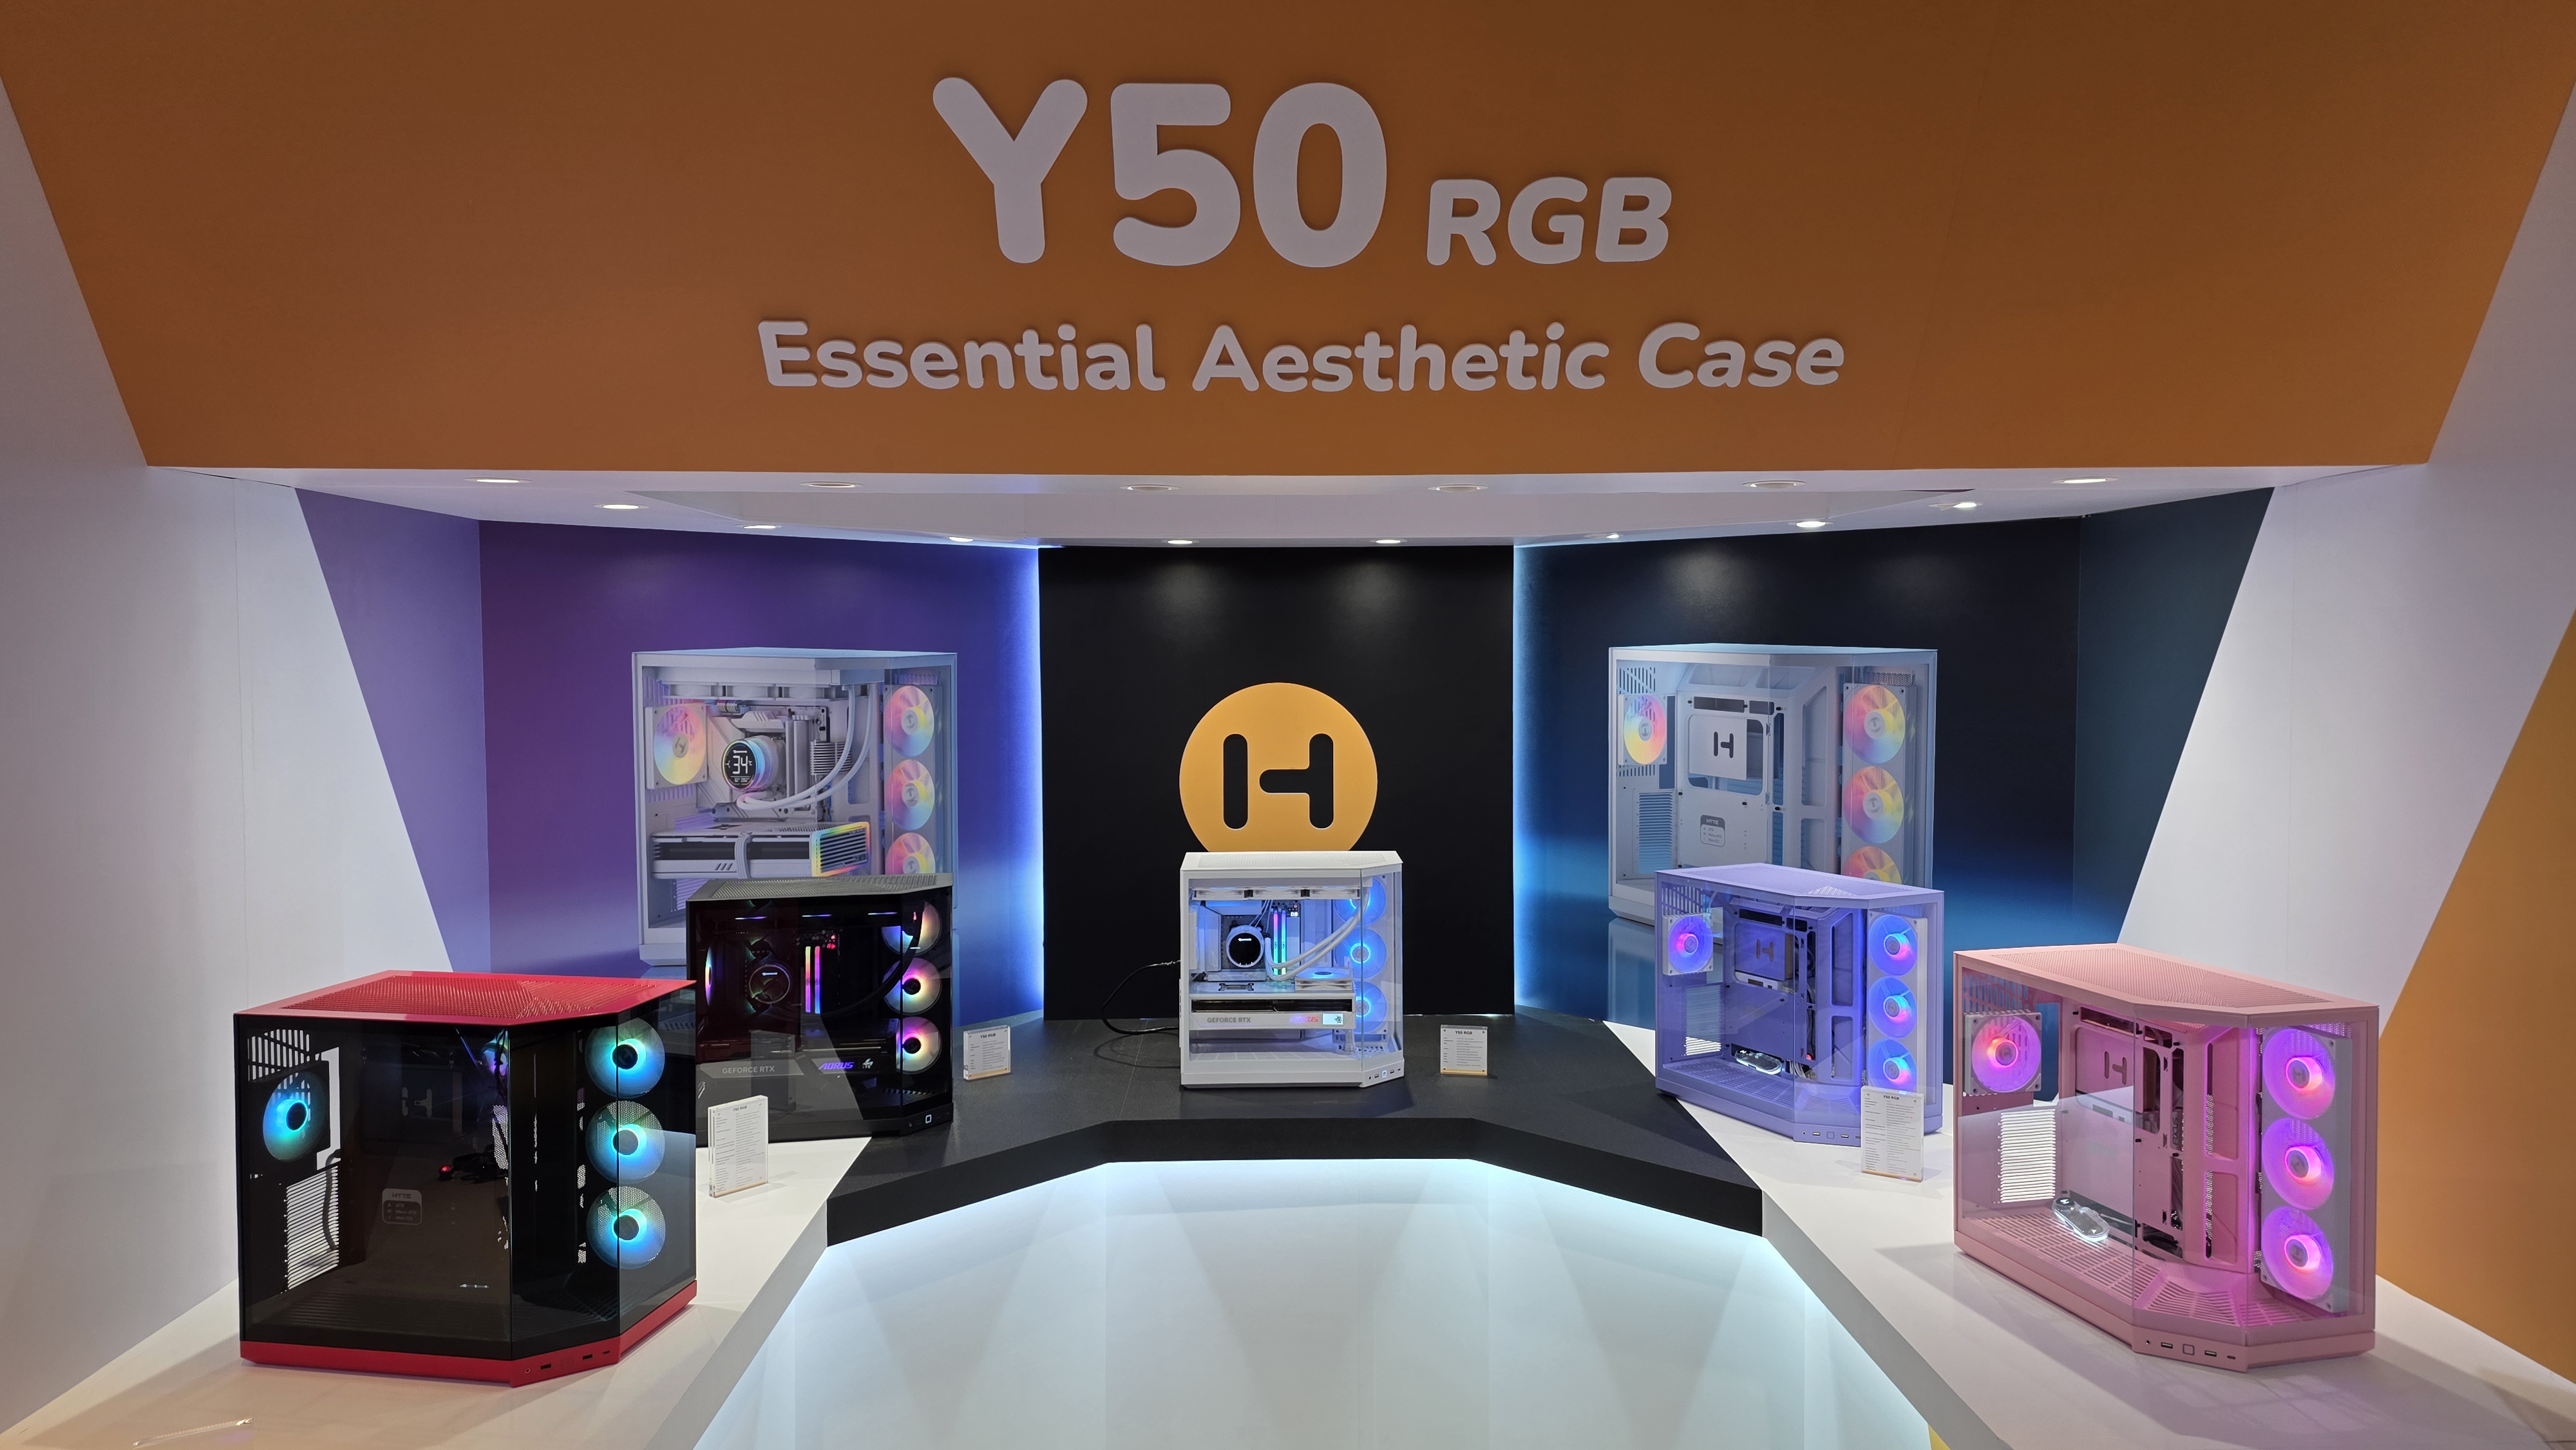
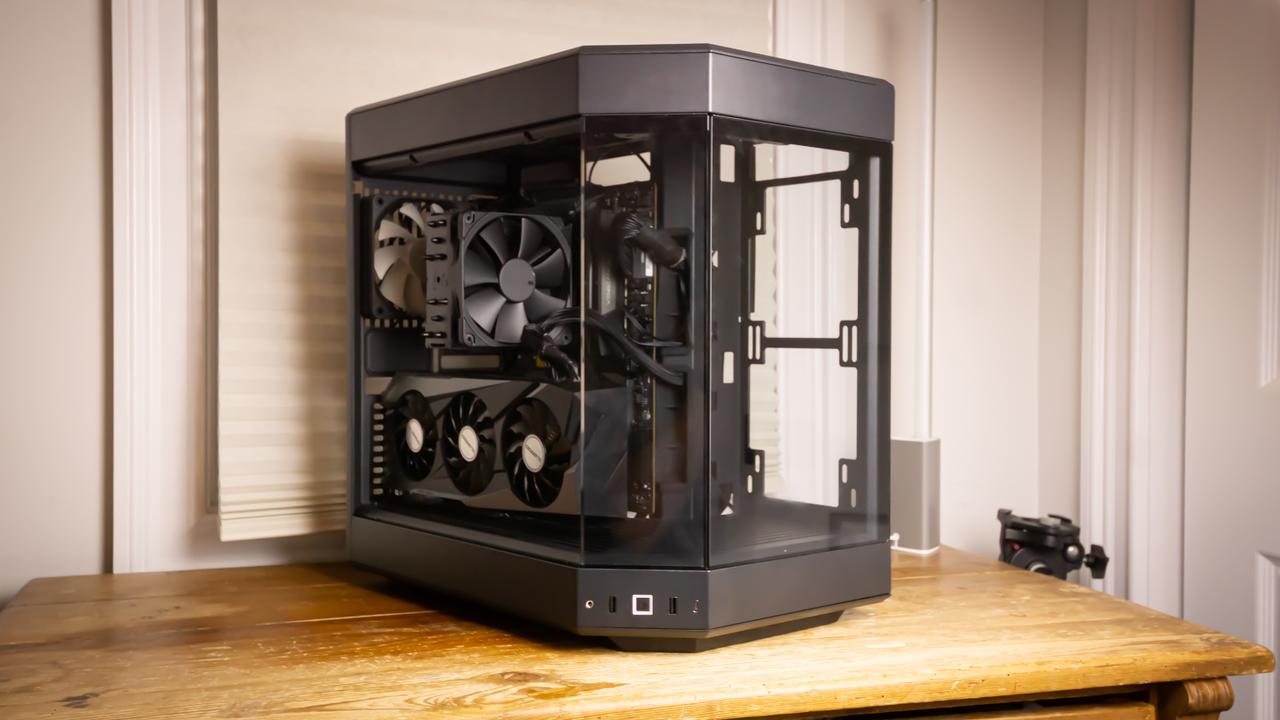
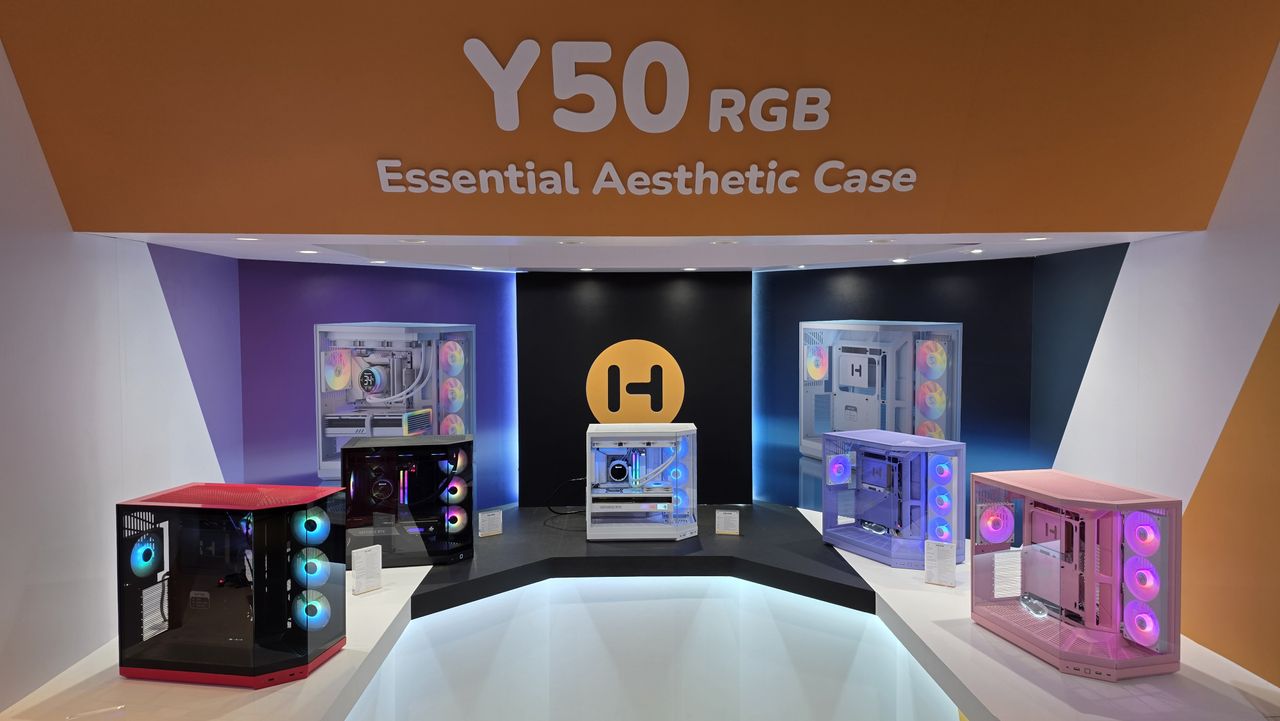
PC case makers are often chasing trends. One moment, it’s all about RGB, then multiple glass side panels, then wood. Today, it’s all about glass and affordability with the new Hyte Y50 RGB, a panoramic iteration of the company’s iconic Y60 that ditches the vertical GPU riser, adds four RGB fans, and sees its MSRP slashed to just $99.99.

Hyte made its first big splash with the Y60, a unique take on the ever-popular O-11 Dynamic from Lian Li, but with a panoramic design, which allows for even more visibility of your components. The following year saw the launch of the Y70, which featured a 4k touch screen display in place of one of the glass side panels. The Y70 is fun, but expensive at $370.

Hyte Computex

(Image credit: Tom's Hardware)

But enough of those cases, because we’re talking about the Y50 RGB, which comes in four colors (snow white, pitch black, black cherry, strawberry milk and taro milk), and is a more budget-friendly solution, priced at $99. In addition to the fun colors, the chassis includes four interesting aRGB fans, which we’ll delve into in detail later on. That’s enough backstory; it’s time to explore the Hyte Y50 RGB and find out if it earns a spot on our Best PC cases list.

Building in the Hyte Y50 RGB

The Hyte Y50 RGB was an absolute pleasure to build in. There was a fair amount of clearance between the motherboard tray and cable cut-outs, so I didn’t have to perform any wizardry to route a specific cable. This is in large part due to the size of the Y50 – it has enough space to accommodate some larger E-ATX motherboards, as well as standard ATX and smaller form factors.

Hyte Y50 RGB

(Image credit: Tom's Hardware)

For perspective, the Hyte Y50 RGB can house GPUs up to 14 inches (360 mm), AIOs up to 360 mm, and CPU tower coolers up to 6.2 inches (160 mm). It's also a dual-chamber design, so there’s even more room behind the motherboard tray for the bulky 24-pin ATX cable. So, go ahead and install that MSI RTX 5090 Suprim! I would mention a giant CPU tower cooler here, like the Scythe Magoroku we reviewed, but the best move with a case like this would be to install an AIO liquid cooler such as the ASRock Phantom Gaming or any from our best AIO coolers list.

The rear of the case has plenty of space to install sleeved PSU cable extensions, or an extra string of SATA or even Molex power cables since it’s a dual-chamber design. If you’re unfamiliar with the term “dual-chamber,” it just means that the case is split, which allows for more room behind the motherboard tray (where the PSU lives) for cables. However, this usually results in a boxier/stout silhouette.

My favorite part of building in the Hyte Y50 RGB was when I discovered that the front-panel IO cable was bridged into one block. Ask anyone who’s built a PC, and they’ll tell you that one of the worst parts is connecting the front IO cables, because they’re tiny, and the text on the board that attempts to explain the correct orientation is even smaller. So, Hyte saves a lot of frustration by combining the headers into a single block that only fits one way.

Features

After I finished building, I realized how many quality-of-life changes Hyte made to the existing design of the Y-series. For example, there’s no longer a giant forehead or chin. In other words, the dead space above and below the glass you see in the Y60/Y70 is effectively gone in the smaller Y50.

Hyte Y50 RGB
Tom's Hardware
Hyte Y50 RGB
Tom's Hardware

While that’s not a drastic change, it’s cool to see the evolution of a design over years and mullitple iterations.

The fans on the side aren’t individual spinners. Instead, they are one piece, which makes for a much easier install and frees up a couple of your motherboard’s fan connectors. Another neat feature is the reverse fan blade orientation, which lets you intake cool air without flipping the fans around just to see the ugly support brace. Hyte didn’t cheap out on the fans' design either: They can spin up to 1,500 RPM, which is respectable for stock case fans. Would I slap these fans onto a radiator? No, but the company does offer the “THICC FR12 RGB” series, which sports the same unibody body design, brighter RGBs, and far-better static pressure if that’s what you are looking to do..

Quite a few glass cases are heavily tinted, preventing you from getting a clear view of your fancy build. But with the Hyte Y50, the glass is as clear as day. That’s good, but it does mean you’ll want to do as good a job as possible organizing and hiding any cables in your build, as well as opting for attractive components. This design is obviously all about showing off.

Hyte Y50 RGB

(Image credit: Tom's Hardware)

Despite M.2 drives having long-since overtaken SATA in popularity, Hyte hasn’t forgotten about SATA; sleds are included that can hold a very respectable 6x 2.5-inch or 2x 3.5-inch drives. So, if you’re looking to add lots of storage, you can use more than your motherboard’s M.2 ports.

Hyte Y50 RGB

(Image credit: Tom's Hardware)

From the back of the case, you can see the mounting holes for adjusting the height of 120 mm exhaust fan, as well as where the SATA storage sleds slot in, above the horizontal power supply mounting location.

Hyte Y50 RGB

(Image credit: Tom's Hardware)

The front IO is the typical pair of USB Type-A (5 Gbps) and a single Type-C (10 Gbps) connector, along with an audio/mic combo jack. I wish Hyte included an RGB control button, but the company, of course, wants you to use its robust Nexus software suite for lighting control.

Hyte Y50 RGB

(Image credit: Tom's Hardware)

Obviously, with a case like the Hyte Y50 RGB, support for water cooling has to be abundant, and it is. The top of the case allows for radiators as big as 410 mm long and 46 mm thick. The side can accommodate up to 360 mm, and the rear supports 120 mm, where the included exhaust fan lives.

Hyte Y50 RGB

(Image credit: Tom's Hardware)

Since this is a dual-chamber case, you get a ton of room for cables around the back, without having to worry about your side panel bulging outward. While I only installed the minimum amount of hardware here, I could have loaded this case up with storage, expansion cards, and more and still closed the side panel with ease.

Bottom Line

Hyte has made a name for itself in the PC building space as a brand that prioritizes aesthetics first – and usually that means most of its products have landed on the more expensive side of the spectrum. But the rising cost of RAM, storage, and GPUs means enthusiasts are looking for a bargain anywhere they can find one. And for $99.99 with three glass panels and four RGB fans, plus space for high-end components, there’s a lot of value here for those who want to show off their increasingly expensive PC parts.

Cooler Master Q300L v3 MicroATX case review: Sub-$45 MSRP offers incredible value for MicroATX chassis with included fans

2026年8月25日 01:07

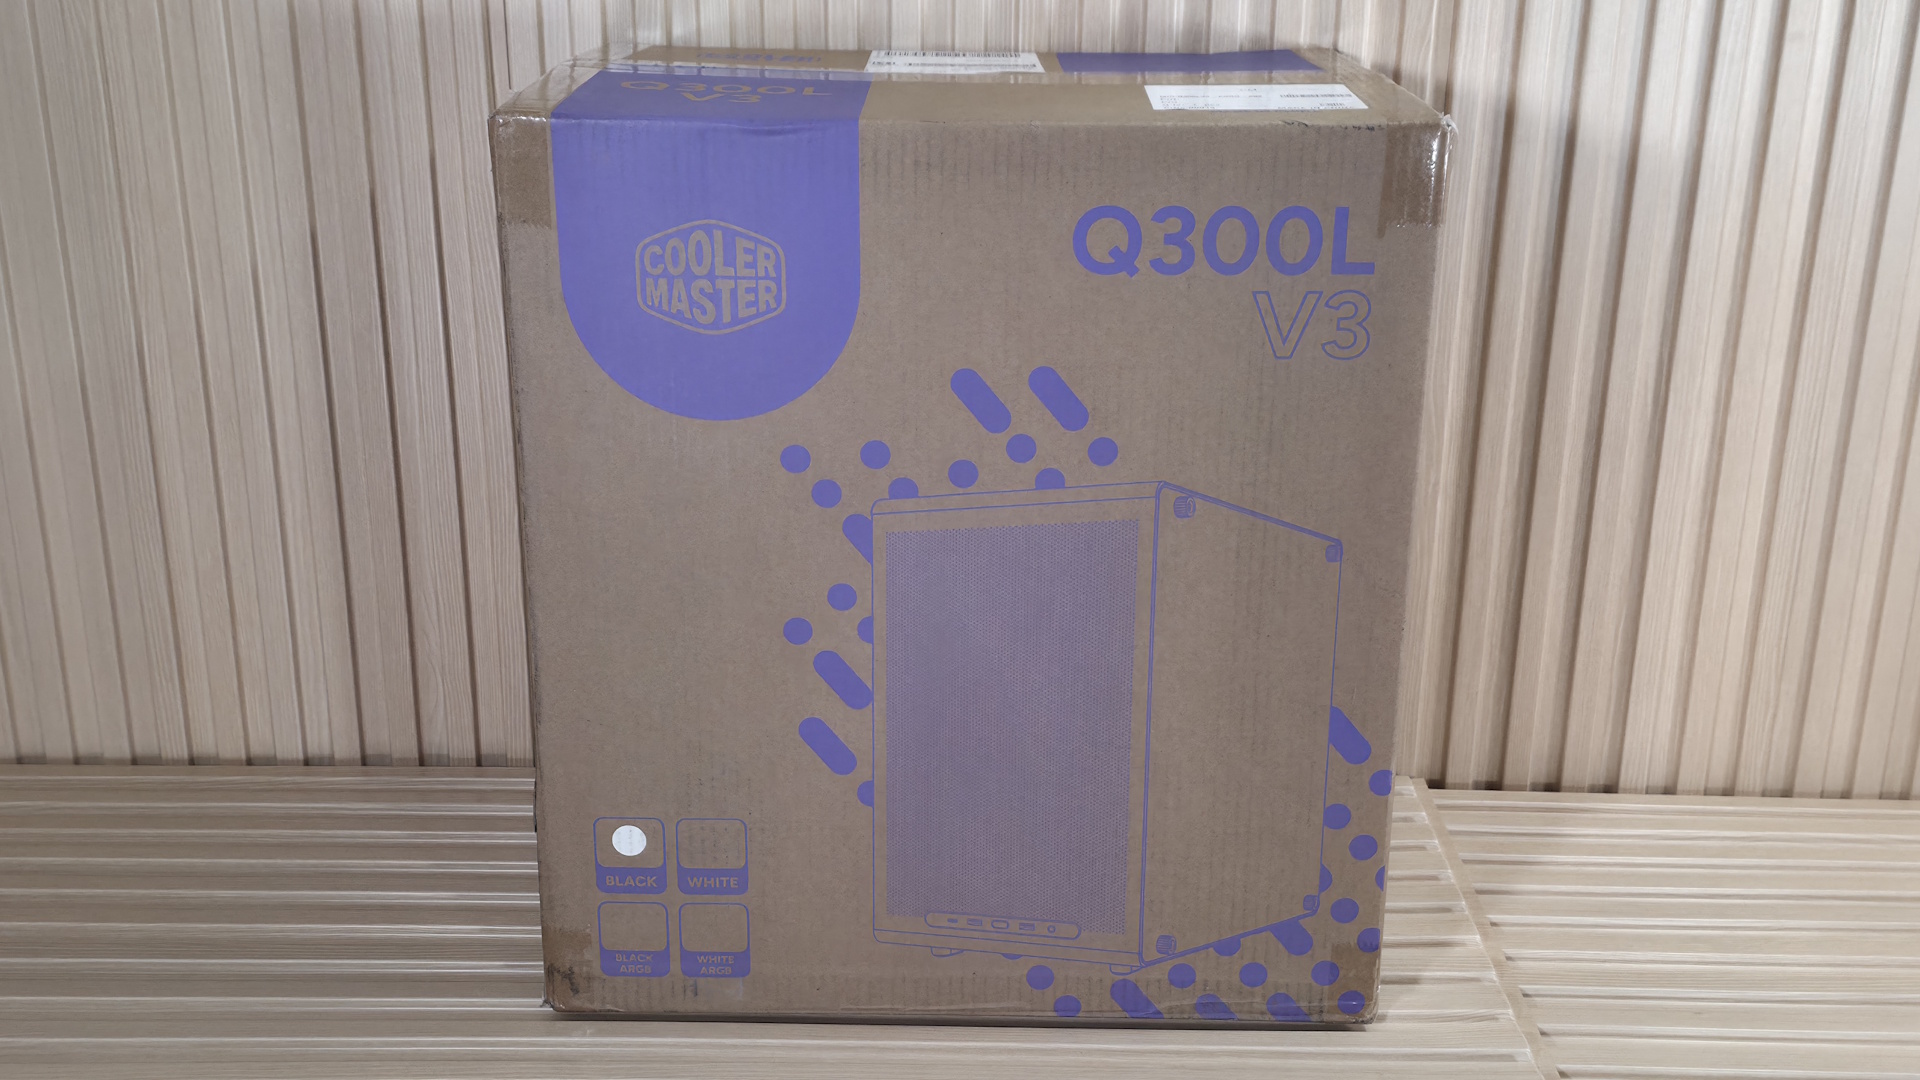
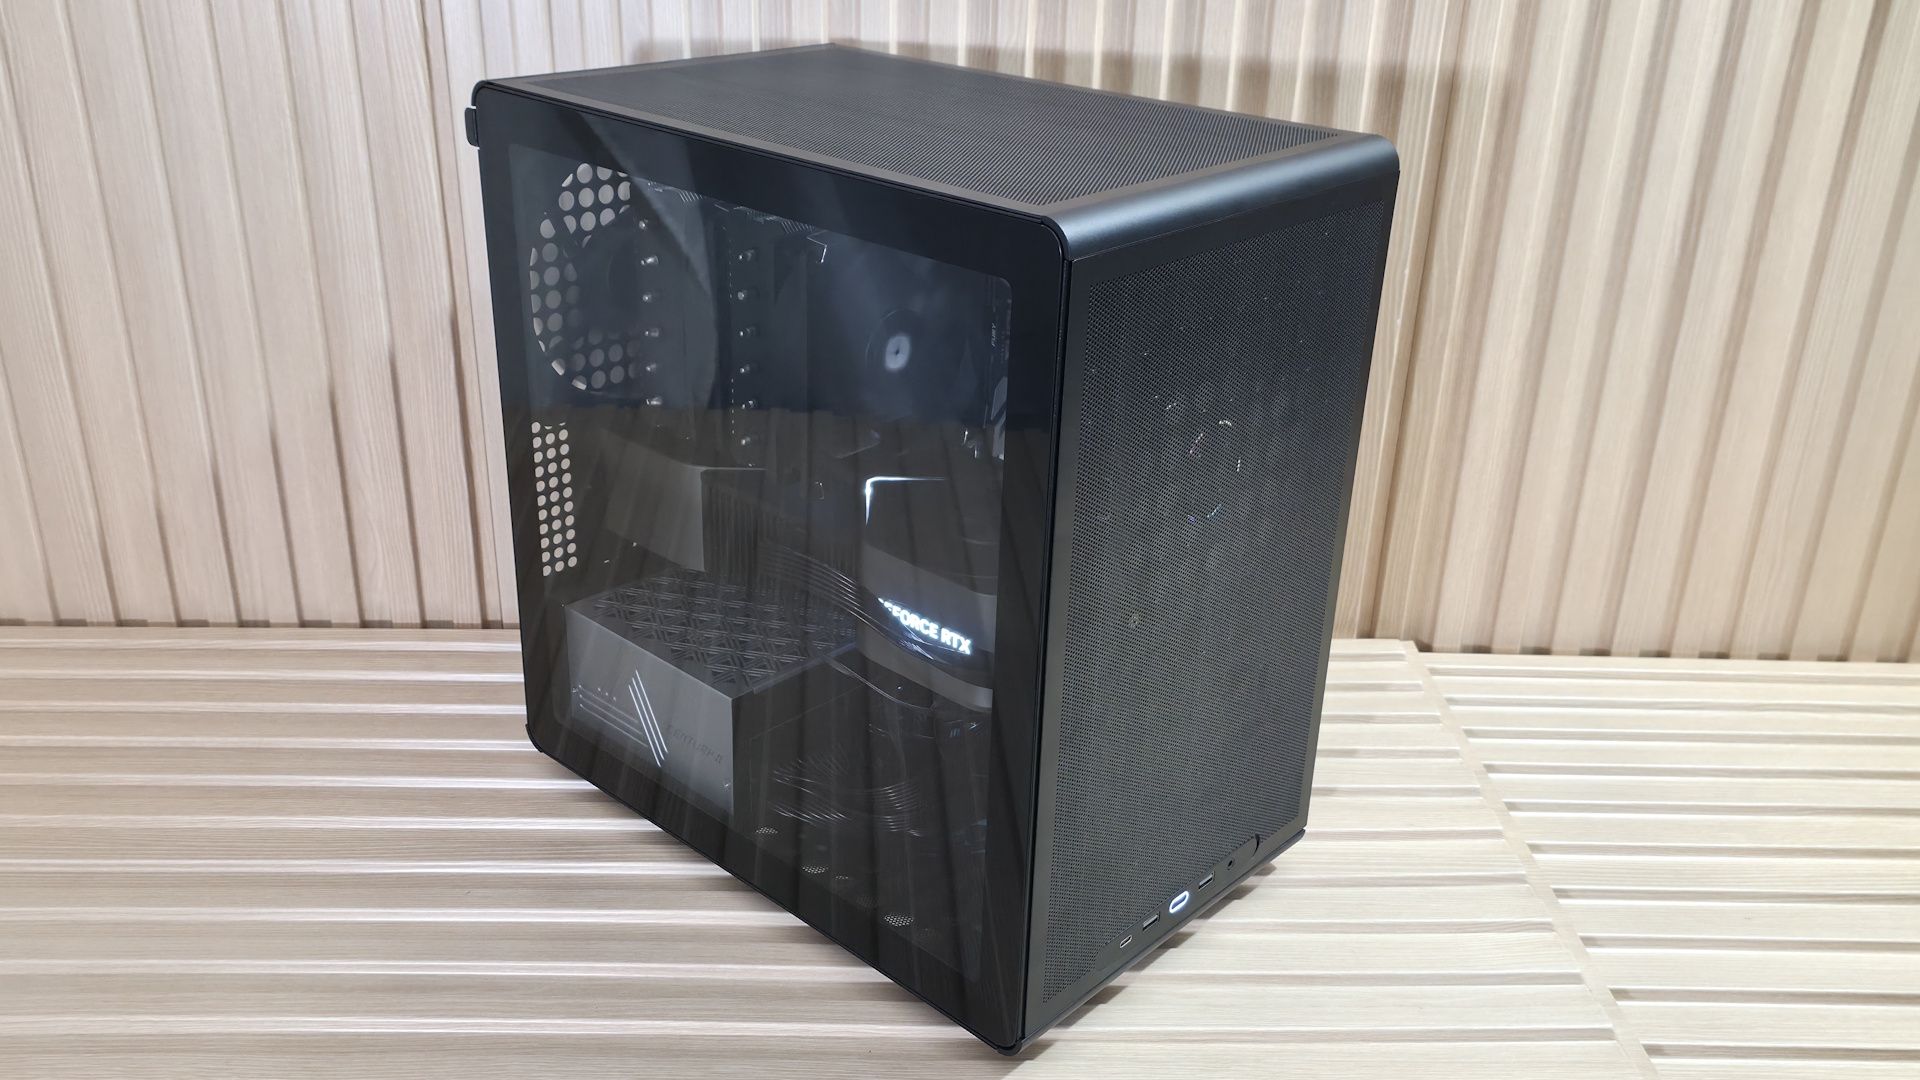
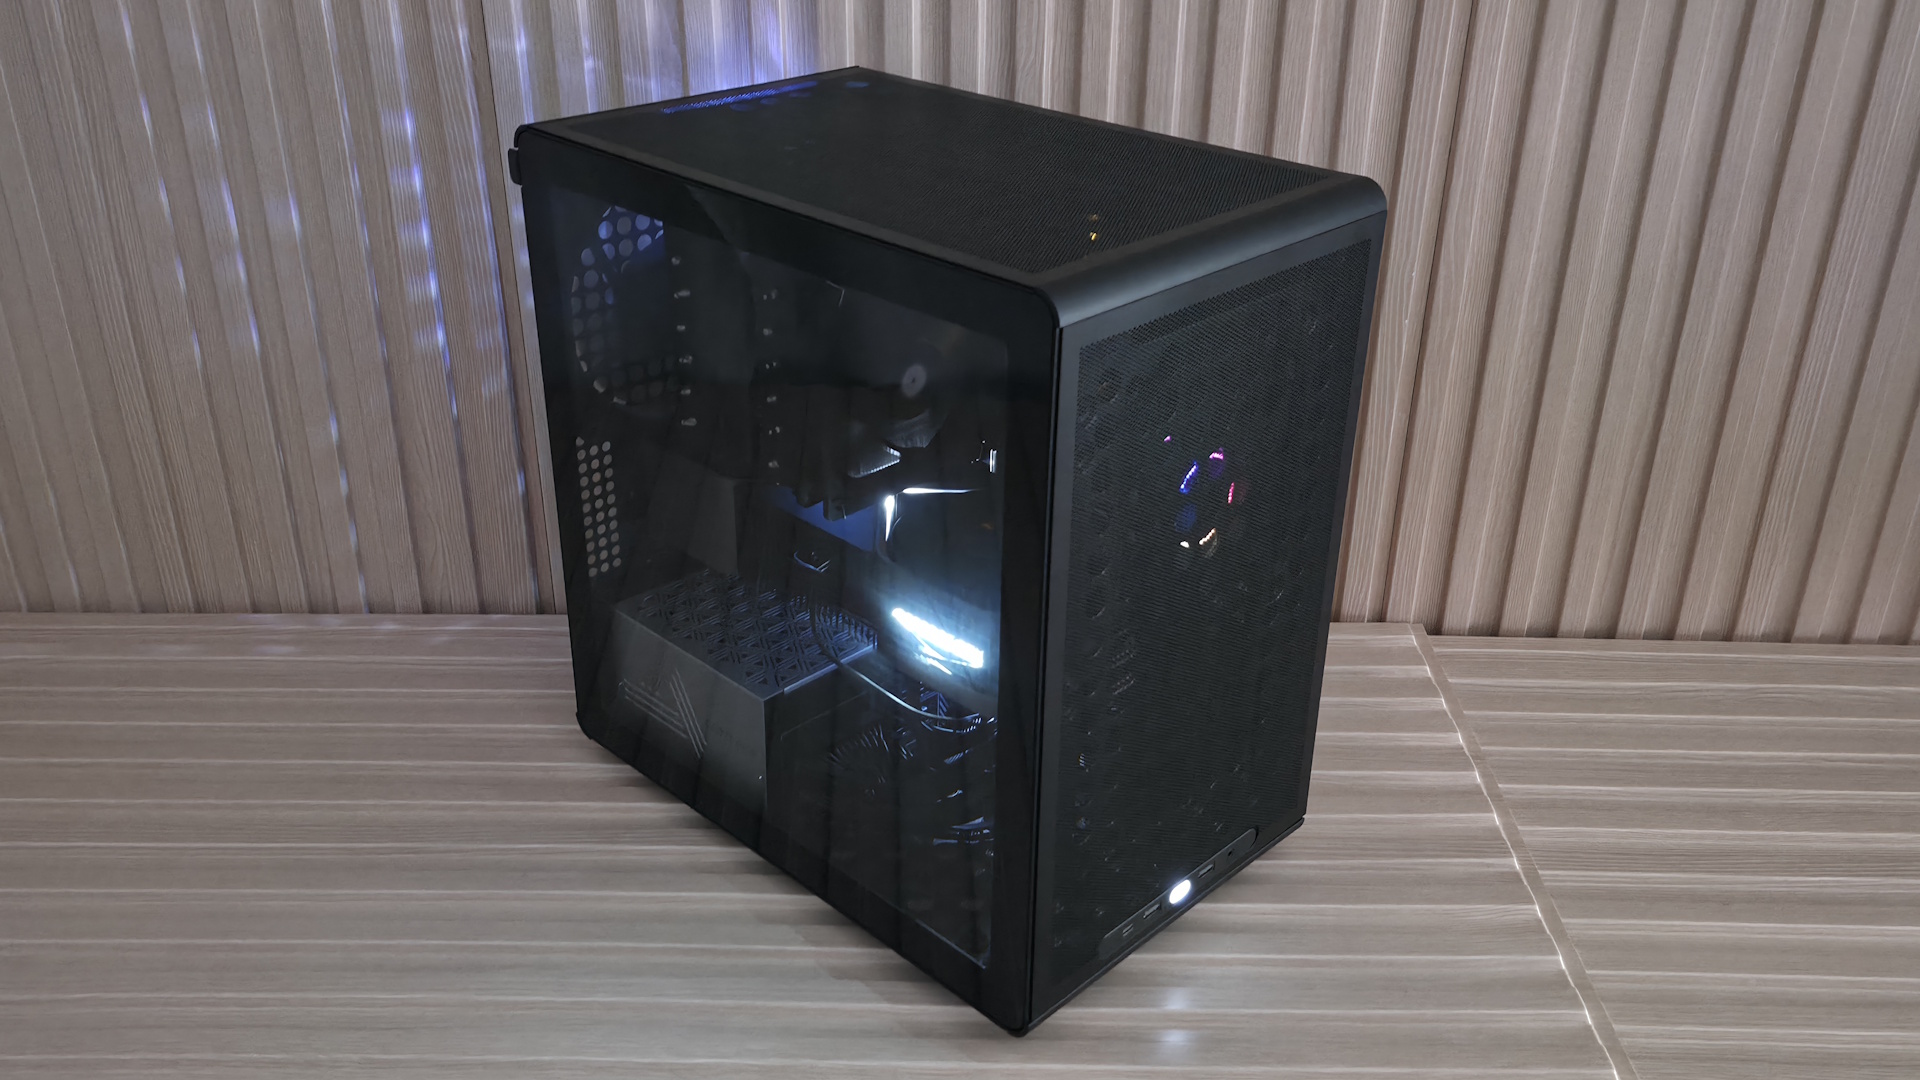
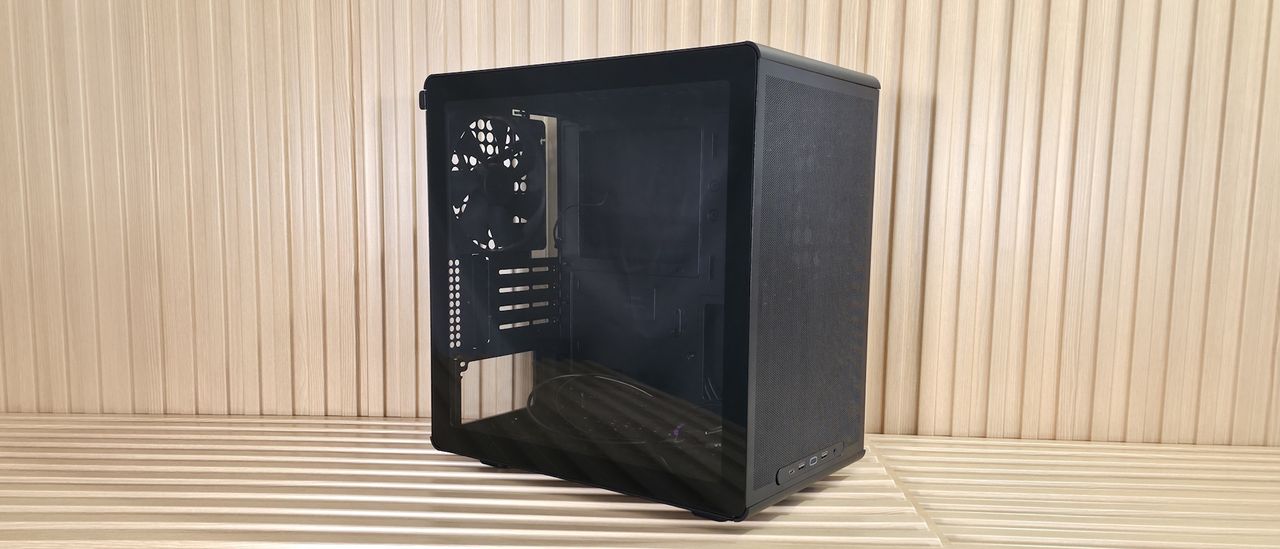
Cooler Master’s Q300 series of budget-friendly, compact Micro ATX/Mini-ITX cases started in 2018 and aimed at first-time builders on a budget. It came in multiple flavors, such as the Q300L (with distinctive patterned dust filters) and the Q300P, which added extra panels, RGB lighting, and handles. In 2023, the Q300L V2 was released, swapping out the acrylic panel for glass and adding a fast 20 Gbps USB Type-C port among other things. Fast forward to today: the company recently released the Q300L V3, with a bigger overhaul than the first versions, increasing its size slightly, enlarging the panel perforations, reinforcing the structure, and adding flexible front IO placement.

Even with all the new features, the Q300L V3 is the ‘Lite’ version of the Qube 340 (which includes handles - $54.99) and remains very affordable, with an MSRP of $44.90. However, you can currently find it on Amazon for even less, under $40, at the time of publishing. The updated Q300L and its slightly larger frame aim to offer increased airflow through enlarged panel perforations, more space for the CPU and graphics card, and continued vertical or horizontal orientation options so you can tailor the build to fit any space. It also includes one 140mm fan. As far as looks go, not a lot has changed, but for a sub-$45 chassis with tempered glass, you won’t mind showing it off.

We'll cover many more details inside and outside the case, showcasing the features and any issues we may encounter during the build process. We'll also run the case through thermal and noise testing to show how it performs compared to other cases and whether it has a chance of making our best PC cases list. Below are the case's specifications from Cooler Master.

Q300L V3 Product Specifications

Type

Micro ATX

Dimensions (H x L x W)

15.3 x 15.2 x 9-inches (388 x 386 x 230mm)

Motherboard Support

Mini-ITX, Micro ATX

Back-connect Motherboard Support

No

Color

Black, White

Storage Support

(1) 3.5-inch -or- (2) 2.5-inch

PCIe Expansion Slots

4

Fan Support

Top - 2x120/140mm
Front - 2x120/140mm
Bottom - 1x120/140mm
Rear - 1x120/140mm

Pre-installed fans

(1) 140mm DF1402512RFLN (Rear)

Radiator Support

Front - 120/240mm
Rear - 1x120mm

CPU Cooler Clearance

178mm

GPU Clearance

366mm (w/o fan installed)
~341mm (with 25mm fan installed)

Vertical GPU Support

No

PSU Length

200mm (w/o bottom fan)
140mm (with bottom fan)

Dust Filters

Top, Front, Bottom

Other features

1x included fan

MSRP

$44.90

Warranty

2 Years

Features of the TG3

▶️ External Features

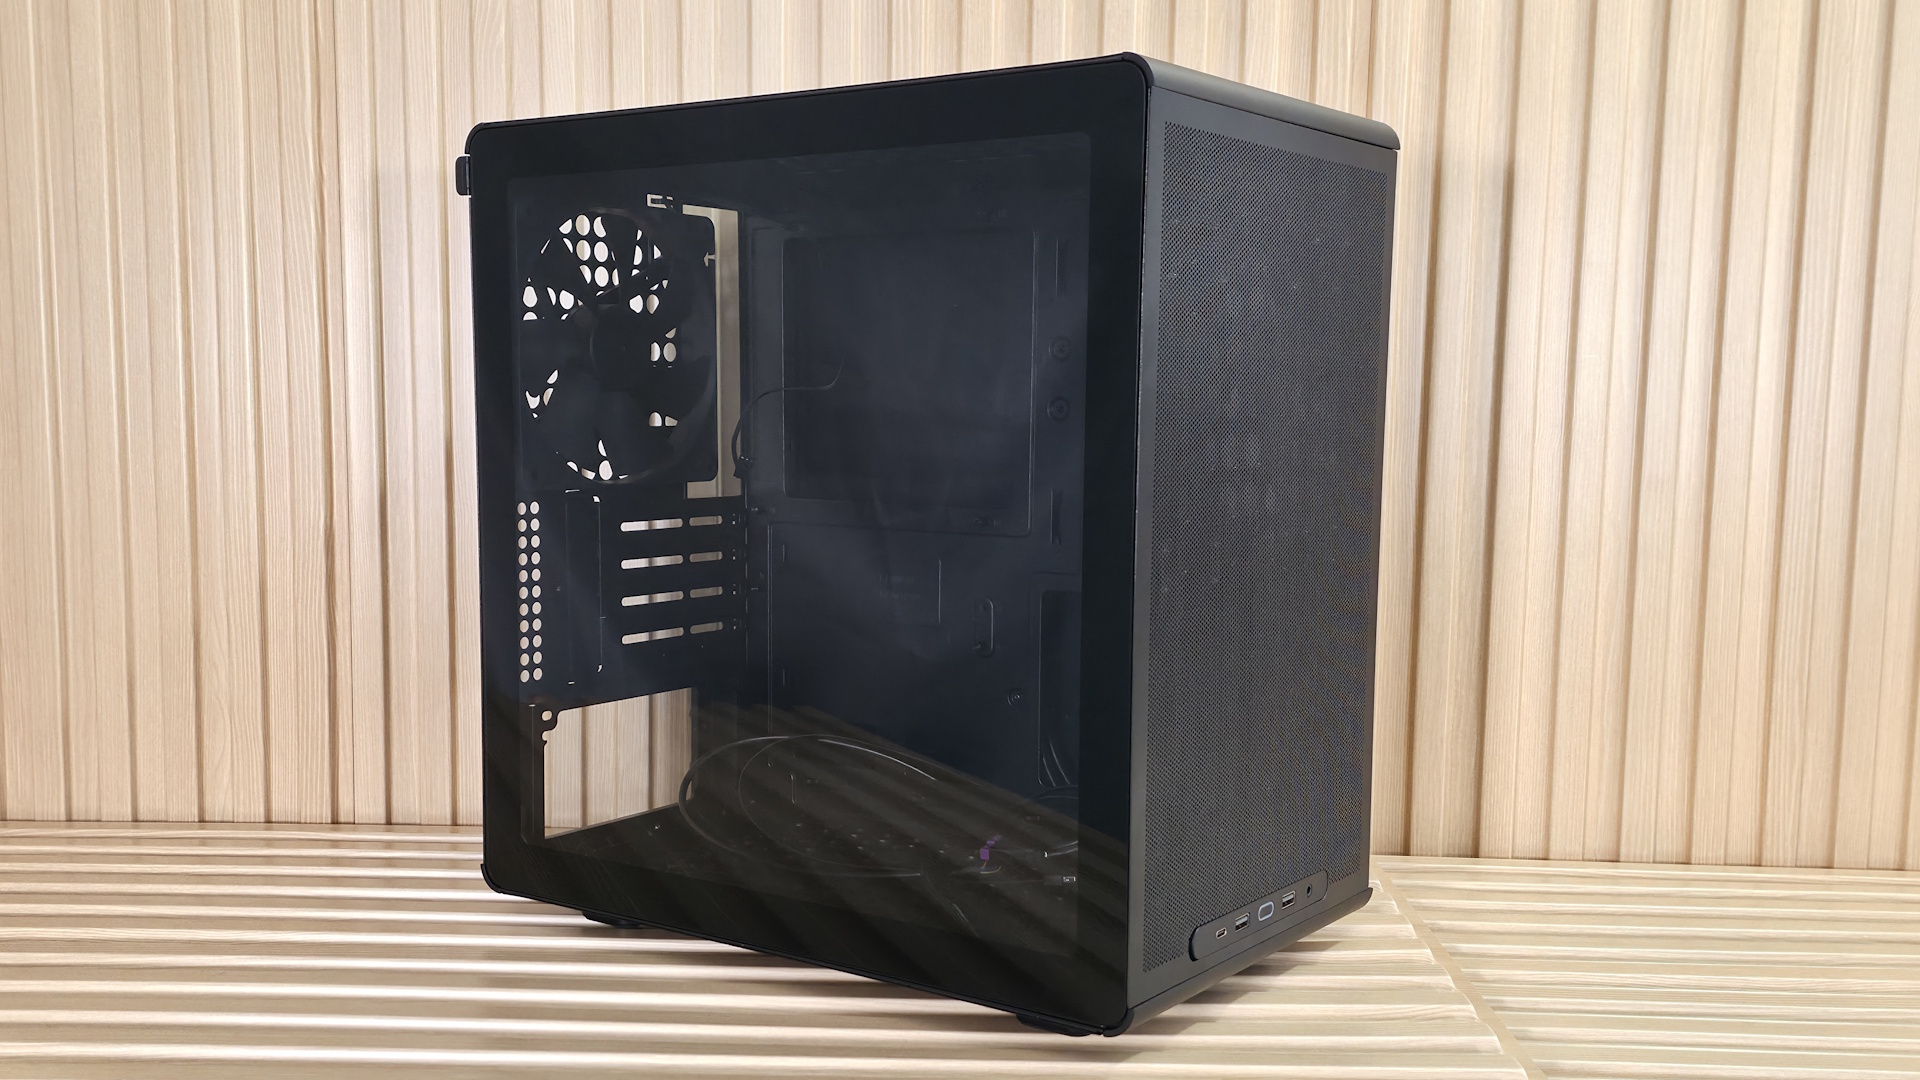
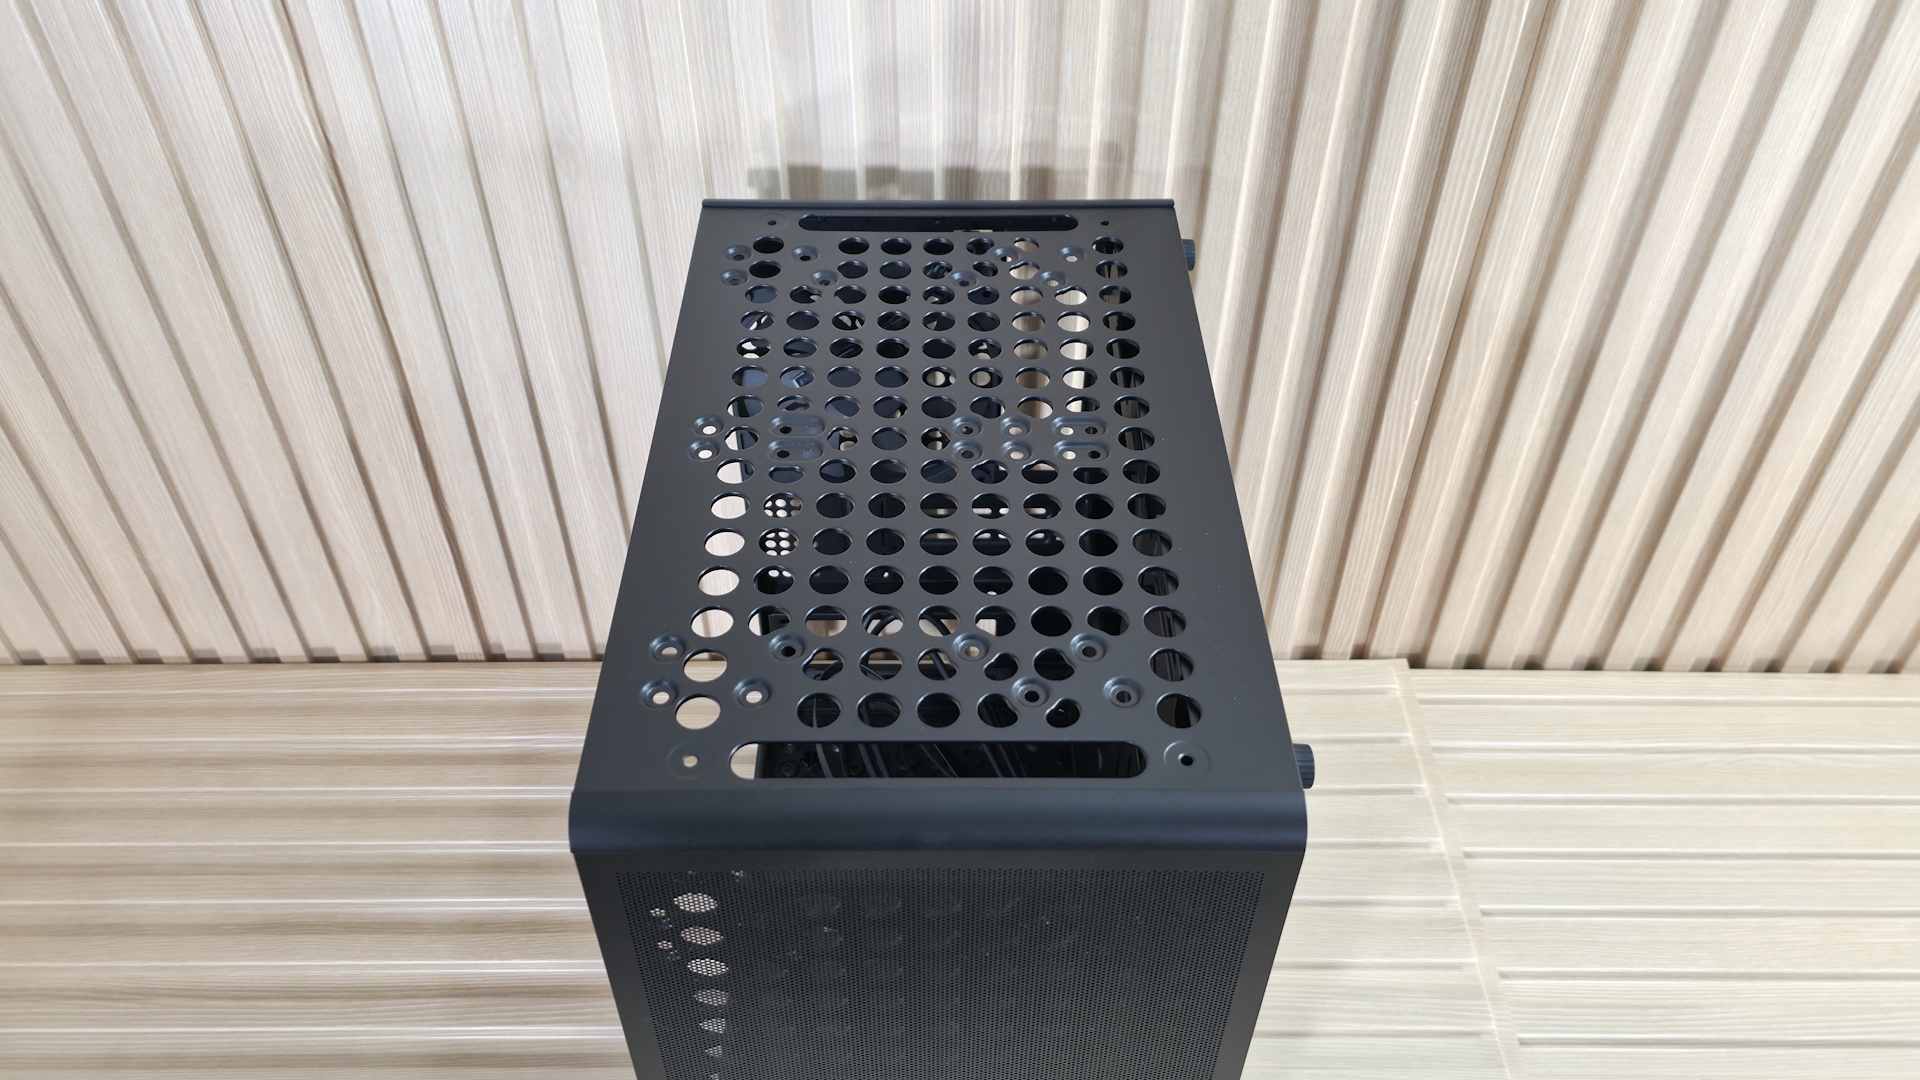
The Q300L V3 looks remarkably similar to the V2. The updated V3 offers similar dimensions, just a few millimeters larger all around, and keeps its flexible design, allowing vertical or horizontal orientation options. The edges of the small-form-factor chassis are now rounded instead of angled and flat like on the V2. They also moved the IO panel from the top to the bottom by default, but you can move it back to the top if you choose. Outside of that, there are hardly any noticeable changes to the appearance. But that’s not necessarily a bad thing, as it’s a good-looking, basic chassis for the price.

Cooler Master Q300L V3 - Case outside
Future
Cooler Master Q300L V3 - Case outside
Future
Cooler Master Q300L V3 - Case outside
Future
Cooler Master Q300L V3 - Case outside
Future
Cooler Master Q300L V3 - Case outside
Future
Cooler Master Q300L V3 - Case outside
Future
Cooler Master Q300L V3 - Case outside
Future
Cooler Master Q300L V3 - Case outside
Future
Cooler Master Q300L V3 - Case outside
Future

The side uses a clear tempered glass panel that slots in at the bottom and is secured on top with ball-and-socket latching mechanisms, holding it tight. Simply slot the glass in, and push on the top to secure. I like this cleaner implementation versus V2, which used four screws in the corners to hold the panel on. The other side panel is held on by four captive thumb screws in the corners, each with rubber pads to support a horizontal (window panel up) configuration.

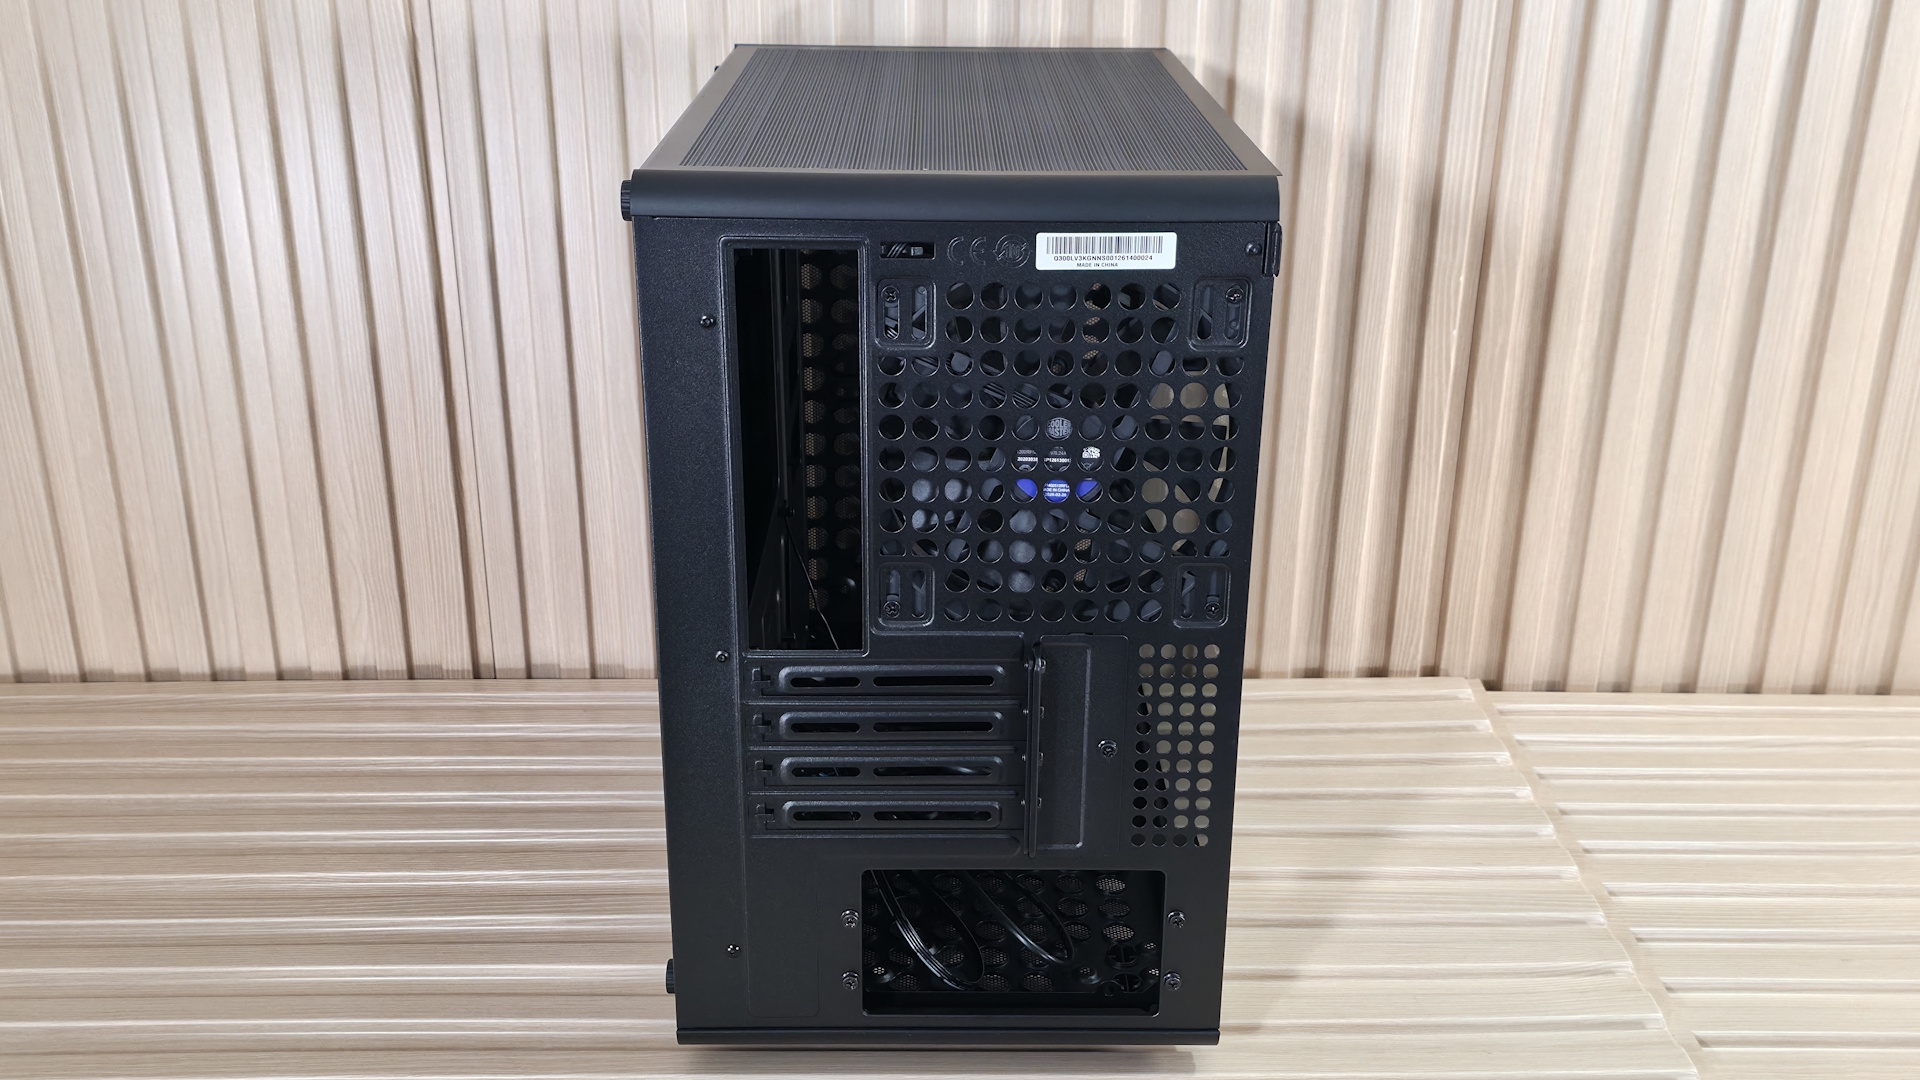
Flipping the chassis around to the rear, you get a better look at the fan location, which supports 120mm and 140mm air movers (comes with one 140mm). Below that are the four PCIe expansion slots, which can support up to 3.5-slot video cards and still give them some air to breathe. At the bottom is space for the power supply. You mount the power supply to a ‘box’ offset about an inch or so inside the case, which hides the connector portion of the power plug for a cleaner look from the (generally hidden) backside of the case. You can see it better in the internal photos below.

The top, front, and bottom of the case all use magnetic dust filters to keep tiny particulates out as best they can. It’s easy to clean this way, but they – specifically the top and front – can move slightly, requiring (for OCD people like me anyway) adjustments if you touch them. Cooler Master enlarged the holes on the SGCC (low-carbon steel with a protective zinc layer via a hot-dip process) frame on top and front to allow additional airflow and, in theory, better cooling performance. We don’t have the V2 to test and compare, but the new model did a good job keeping our Ryzen 9 9900X and RTX 4080 running cool.

Cooler Master Q300L V3 - IO Panel

(Image credit: Future)

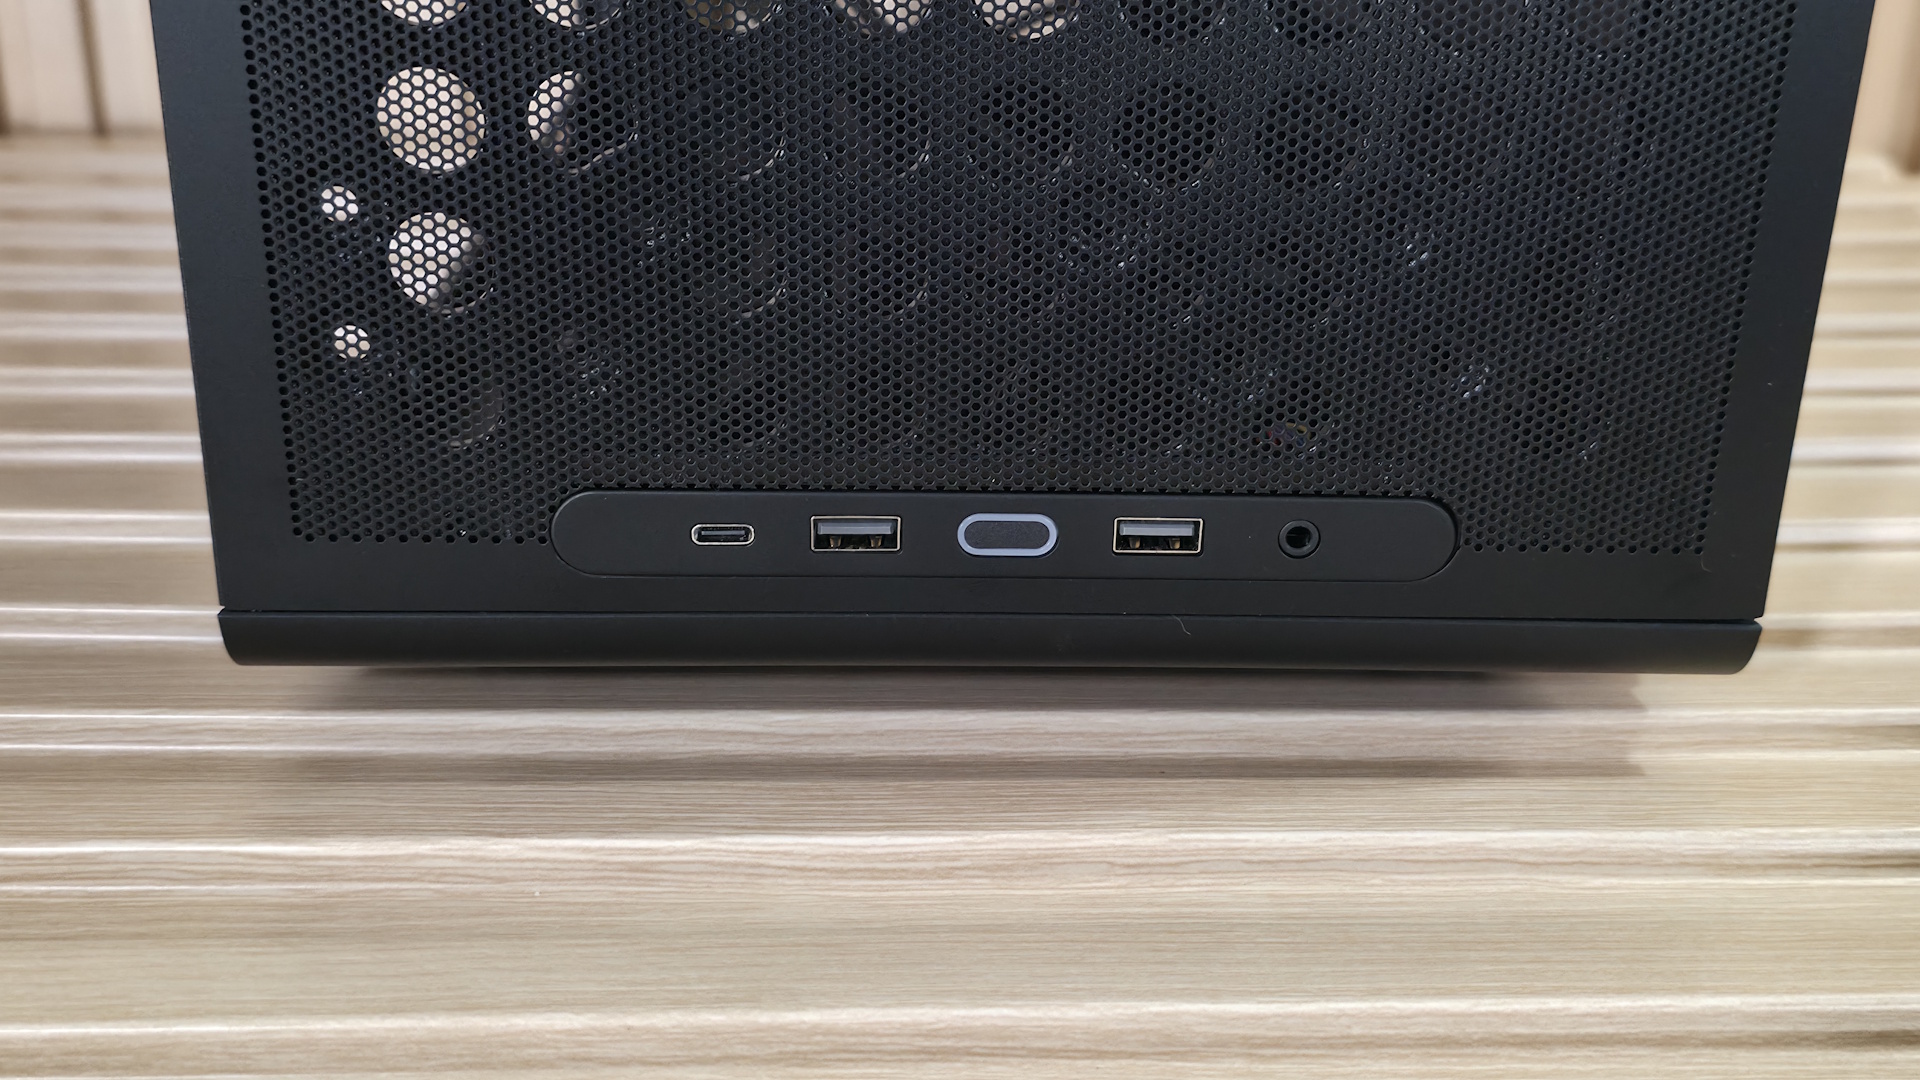
Last but certainly not least, the outside features the front IO panel on the bottom with your typical selection of ports. Starting on the left is a fast USB 3.2 Gen 2x2 (20 Gbps) Type-C port. Next are two USB 3.2 Gen 1 (5 Gbps) Type-A ports that flank the LED-lit power button. On the right is a single 3.5mm mic/audio combo jack. It’s rare to see a 20 Gbps USB port on such an inexpensive case. And if you don’t like the IO panel on the bottom (or the left when laying horizontal), you can move it to the top (or right in horizontal orientation).

▶️ Internal Features

Inside the case, there’s a fair amount of space to work in, and nothing like power supply shrouds or other cable-routing doors to get in the way. You can see a large cutout on the motherboard tray for easy access from the back; however, it doesn't support rear-connect (think Asus BTF, Gigabyte Stealth, MSI Project Zero) boards, and it only supports Mini-ITX and Micro ATX form factors. ATX motherboards need not apply. There are plenty of rectangular, round-cornered cutouts for cable management, though none have any grommets; I wouldn’t expect that at this price, either.

Cooler Master Q300L V3 - Case inside
Future
Cooler Master Q300L V3 - Case inside
Future
Cooler Master Q300L V3 - Case inside
Future
Cooler Master Q300L V3 - Case inside
Future
Cooler Master Q300L V3 - Case inside
Future

At the front we spy the enlarged holes for airflow, and you can see the mounting location for 2x120/140mm fans/radiators. GPU clearance is 366mm without any fans. This fits an RTX 4080 FE, but our RTX 4080 TUF was too long. If you add fans, or fans and a radiator, that number shrinks, so be careful when choosing what you’re going to put up front versus the length of your video card.

On top, we again get a good look at the airflow holes and the mounting locations for the 2x120/140mm fans/radiator that fit here. There’s very little space above the motherboard, and a fan/radiator combination easily overhangs the motherboard/top VRM heatsink. So, to fit fans and a radiator, Cooler Master offset the mounts away from the motherboard and closer to the tempered glass window side. A fan and radiator combination will absolutely overhang the top edge of the motherboard and top VRM heatsink.

On the back rear, we see the pre-installed Cooler Master 140mm (DF1402512RFLN) fan. The OEM fan spins from 650 to 1,400 RPM, using up to 0.24A (~3 W). I can’t find any dBA ratings for it, but I can tell you it does a good job cooling in our noise-normalized testing. That said, it does get louder than other cases I’ve tested at 100%, even with the additional MasterFan M120. Below that are the four PCIe expansion slots, secured by screws and a ‘cap’ that goes on top.

On the bottom, we get a better look at the ‘box’ the power supply mounts to, as well as the enlarged airflow holes. Just be aware that the power supply isn’t in its own chamber or hidden under a shroud. Once you install it and connect everything, you will see the initial few inches of cables coming out of the PSU, though you can hide the rest nicely in the space behind the motherboard baffle between the other side (or bottom) panel.

Cooler Master Q300L V3 - Inside
Future
Cooler Master Q300L V3 - Inside
Future
Cooler Master Q300L V3 - Inside
Future
Cooler Master Q300L V3 - Inside
Future
Cooler Master Q300L V3 - Inside
Future

Flipping the case around to expose the other side, we see ample room to store cables (30 mm) and the drive mounting locations. The Q300L V3 also has multiple tie-down locations and includes a few zip ties to help tidy the wires. At the bottom right, above the two holes for cable routing, you can mount a single 3.5-inch HDD or two 2.5-inch HDDs/SSDs.

You can easily see your components inside through the non-tinted tempered glass window. Once we put our PC together, it looked fairly clean, even though we could see the cables coming out of the power supply. A tinted glass panel would look better and hide some of the inevitable visible wires for this class chassis. But for a case with an MSRP under $45, you can’t expect to hide everything.

Test equipment, method, and results

Our thermal tests are presented to give you more information about the product’s performance, but aren’t intended as the sole basis for judging the chassis. The style, price, features, and noise levels of a case should also be considered, and we all have different preferences. What I might like in a case, you might not, and that’s OK. Our goal with these reviews is to give everyone, regardless of their preferences, enough information to decide whether a case is right for them.

To get heat into the system, we stress the CPU with Cinebench R26 (multi-threaded test) and the video card with Furmark 2 (1080p). CPU and GPU tests run concurrently for 30 minutes, allowing the air-cooled system to reach saturation and stabilize over that period. We then let the system idle for 15 minutes, adjust the fans to 100%, and test again.

Noise-normalized (42dBA) Maximum thermal Performance

This set of tests is designed to appeal to those who love quiet PCs, with both system fans and the CPU fan noise normalized to 42 dBA. Consider this a measure of the case’s thermal efficiency when noise levels are set to run quietly. It is audible, but just (at least for my old ears).
Cooler Master Q300L V3 - Noise-normalized results
Future
Cooler Master Q300L V3 - Noise-normalized results
Future
Cooler Master Q300L V3 - Noise-normalized results
Future

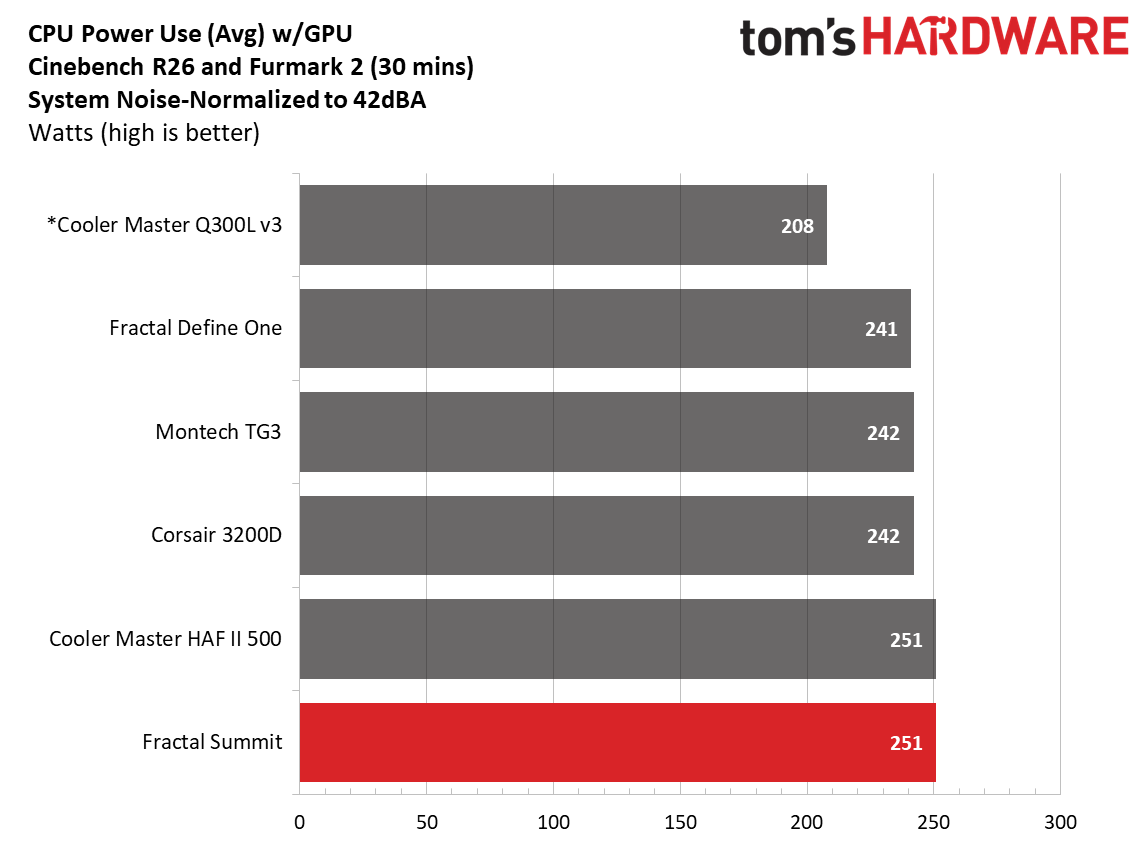
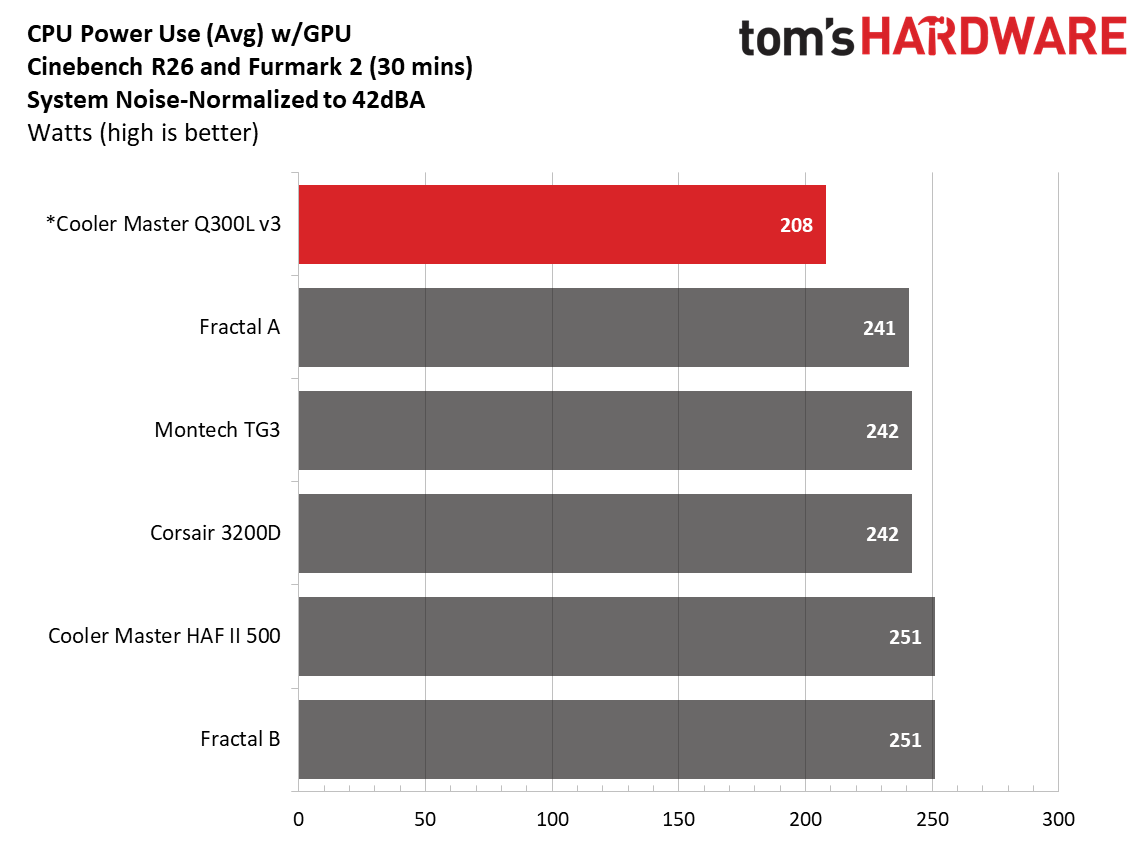
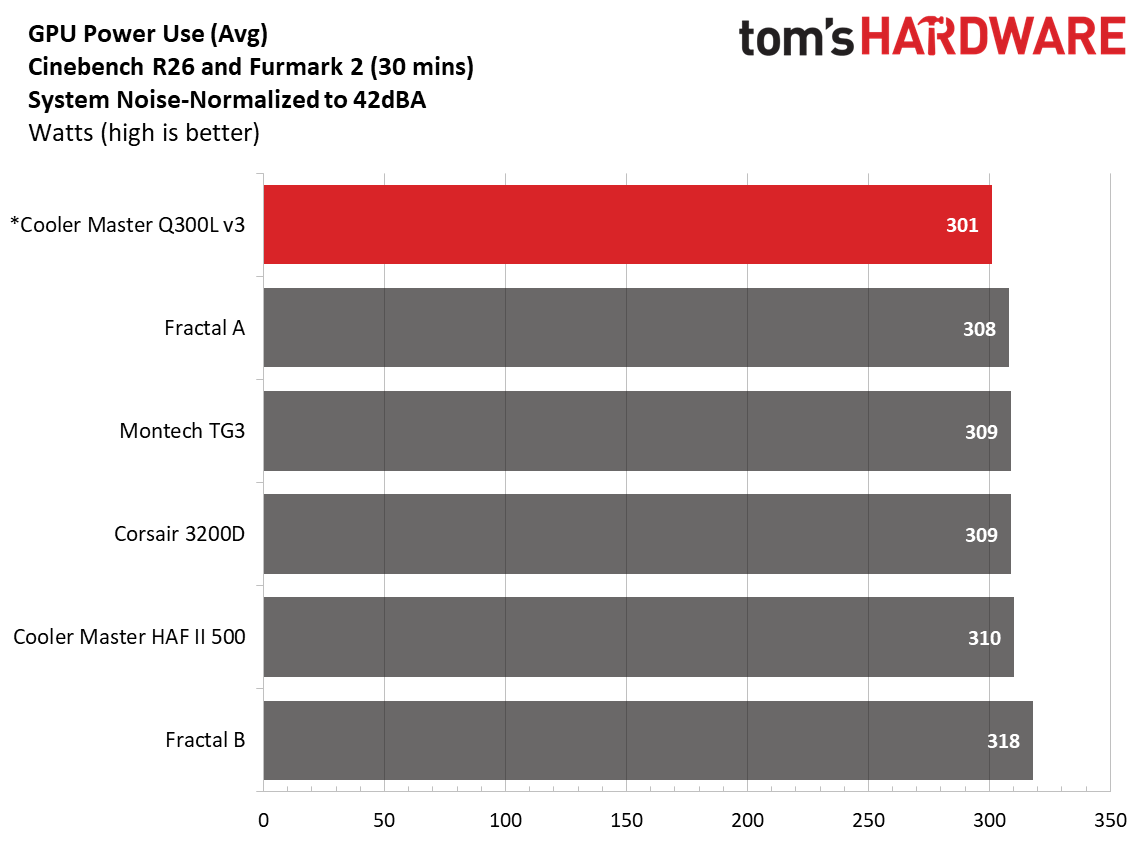
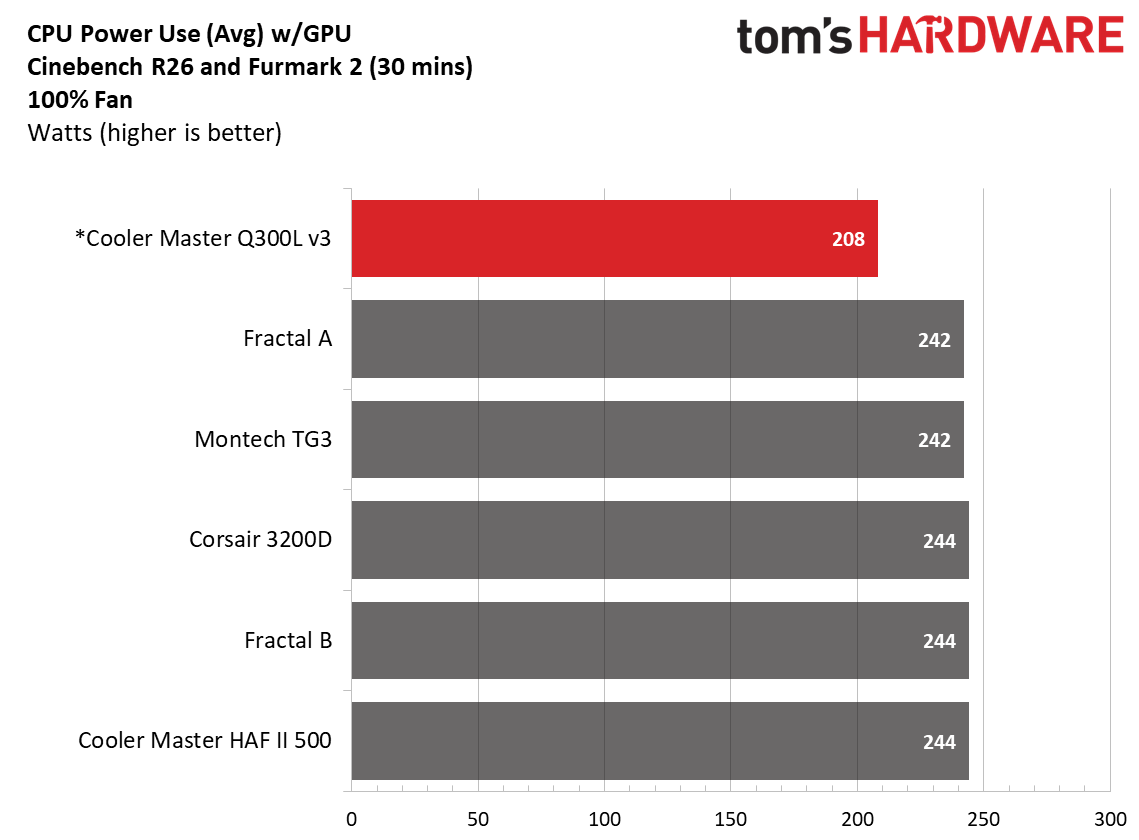
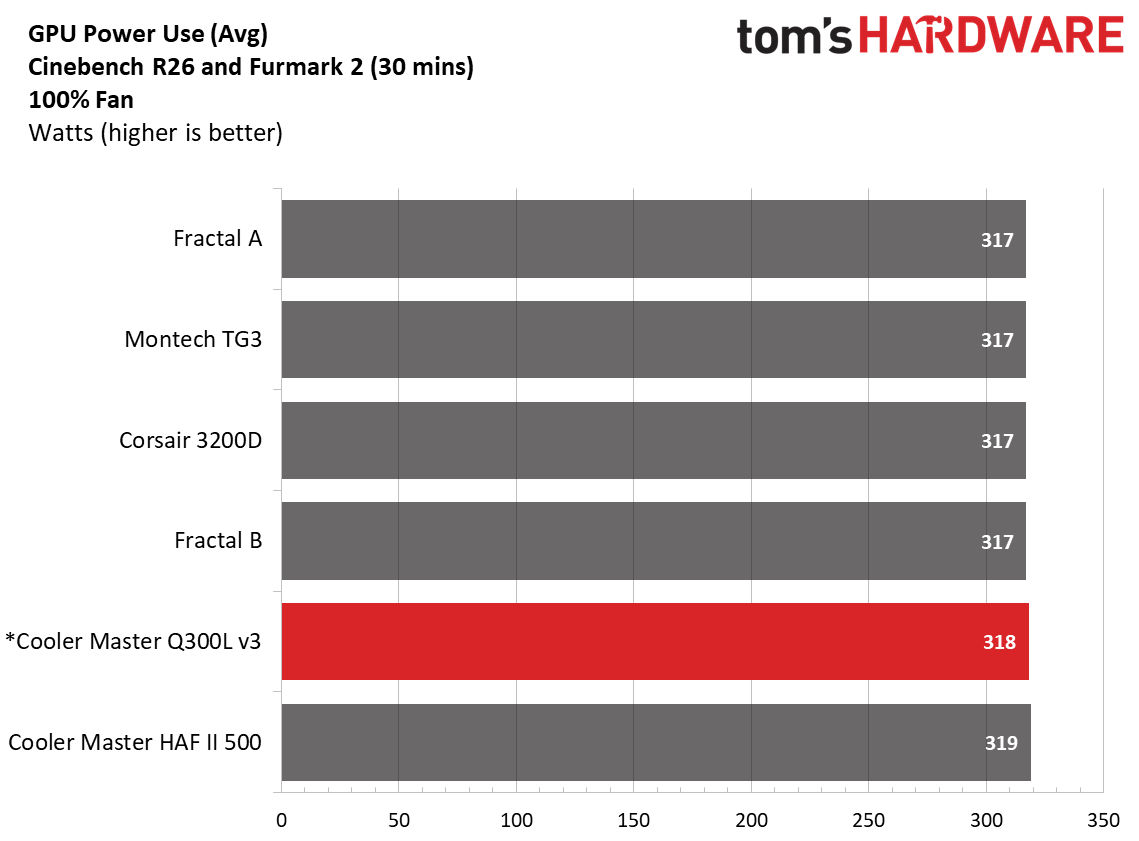
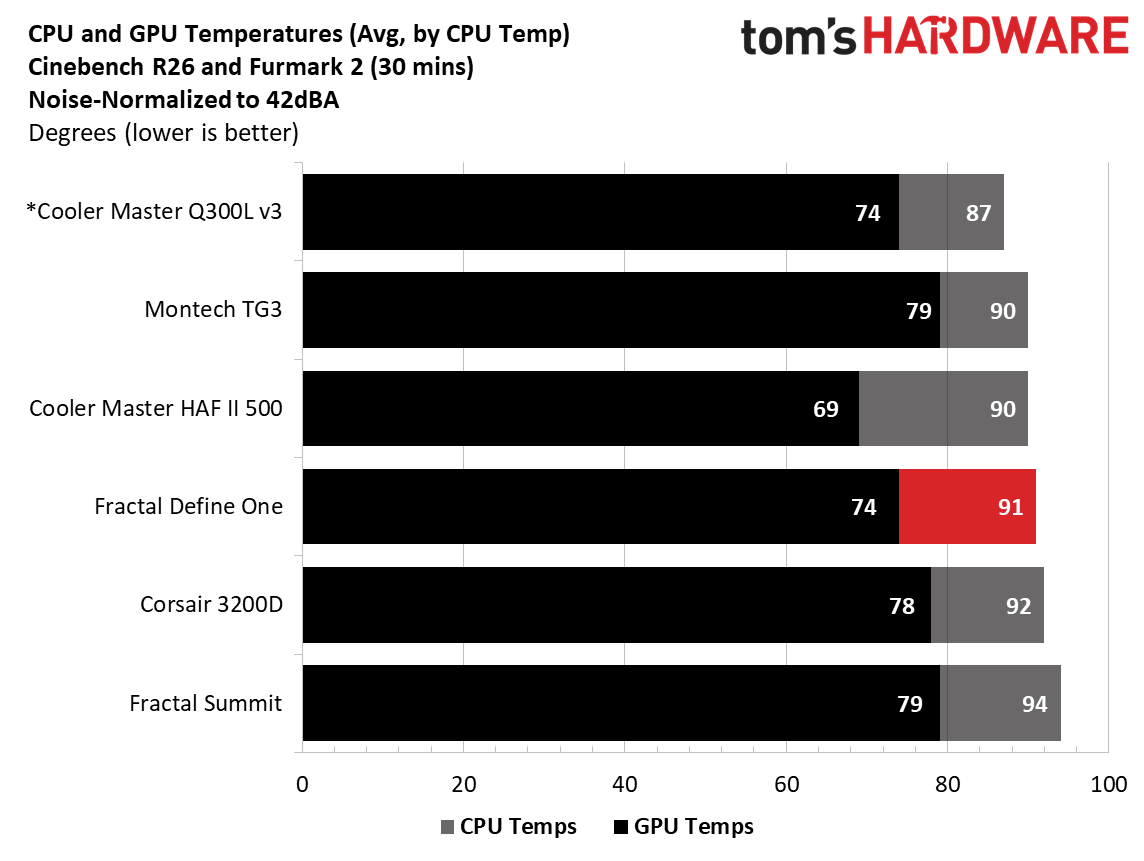
One thing we have to mention before you see the results of our testing is that we had to use a different video card for this chassis. The one we normally use, the Asus TUF RTX 4080, was far too long for the Q300L V3, so we used a shorter RTX 4080 FE instead. Another difference is that the motherboard we used limited power to around 210W. It wasn’t throttling; it was set to Intel's default Performance setting like the ATX Gigabyte board, but still settled at much lower power use. With a different cooling solution and a different motherboard in this smaller build, you can't compare these results directly to the existing data from the other hardware.

That said, the case kept our CPU at around 87 degrees Celsius with a two-fan configuration after adding a Masterfan M120 ARGB fan to the top front fan location. This is obviously cooler than the other results, but again, those systems pulled around 30 more watts, which would have raised these temperatures. The video card averaged 74 degrees throughout. Ideally, you’ll have two front fans and two top fans (or an AIO) to move more air through the case, and temperatures would improve. The temps here aren't bad, but we’re only using two case fans – and the case only ships with one exhaust.

Maximum thermal performance - fans at full speed

Our noise-normalized results are designed for folks who prefer silence, but what if you don’t mind additional noise and just care about maximum performance, or maybe you have to run things at high settings to keep high-powered devices cool? This testing is for you. Obviously, when you add fans or an AIO up top, things will change a bit, but this gives you a great idea of ‘out-of-the-box’ performance, noise be damned.
Cooler Master Q300L V3 - 100% results
Future
Cooler Master Q300L V3 - 100% results
Future
Cooler Master Q300L V3 - 100% results
Future

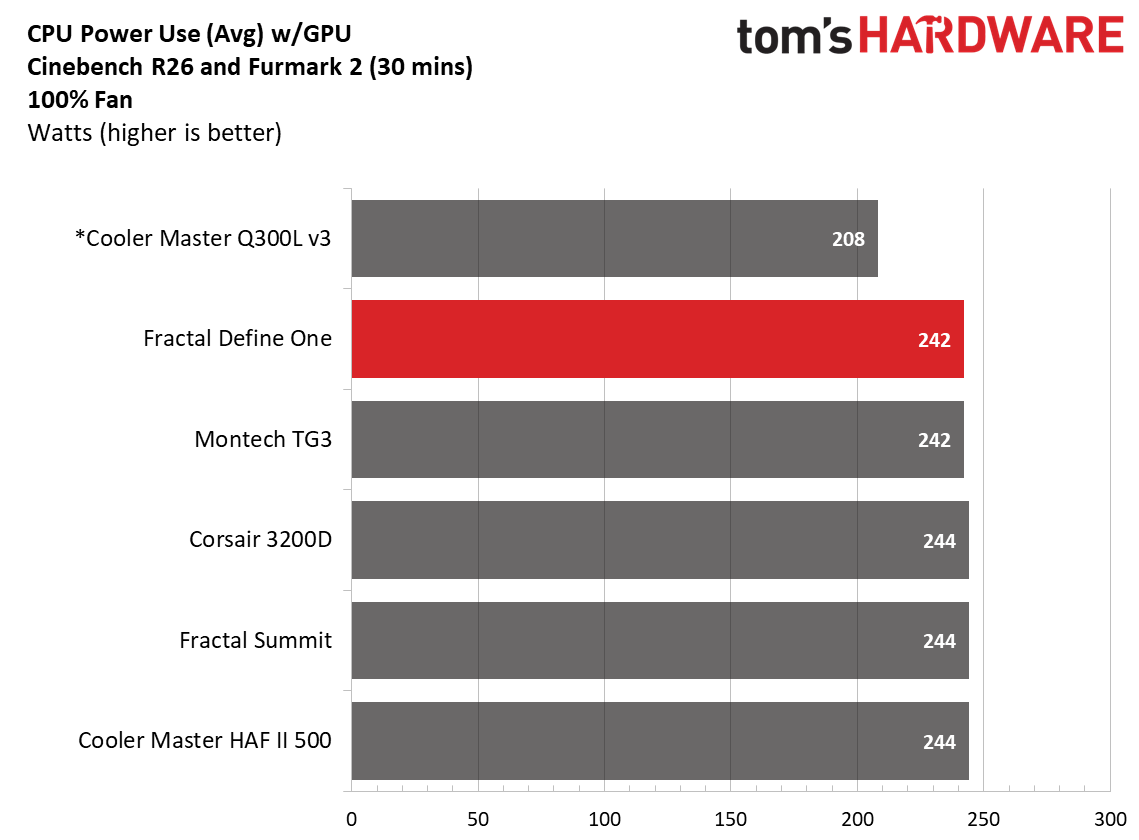
Once we set all the fans to 100%, temperatures dropped significantly across the board, with the CPU averaging 81 degrees Celsius and the video card at a low 63 degrees. There’s a fair amount of headroom for cooling in this smaller chassis. I’d personally make sure all available fan slots are populated.

Maximum Noise Levels

We measure the noise levels with a sound meter from one meter away from the computer case, with the pre-installed fans running at their maximum RPM. If a case does not have enough included fans for airflow (intake and exhaust) as configured, we add a Cooler Master M120 ARGB, since we expect most users will add at least one more fan in situations like these.

Cooler Master Q300L V3 - Maximum noise levels

(Image credit: Future)

When we cranked the included fan (and the Masterfan M120) to 100%, the case did get loud, sitting around 55 dBA, the highest we’ve tested so far. The OEM 140mm fan on the rear certainly made itself known at its 1,400 RPM maximum, as we know neither the Masterfan M120 nor the Thermaltake fans did that on any machine previously.

Conclusion

At a time when building a PC has become cost-prohibitive for many people, it’s nice to see companies focusing on the budget side of things. With an MSRP under $45 and a current price under $40, the Q300L V3 small form factor chassis is one of those items. The new V3 chassis improves things all around, with increased airflow potential via enlarged front-panel perforations, room for larger hardware, a stronger chassis with an upgraded motherboard tray, and reinforced fan mounts, which Cooler Master hopes will make for a refined building experience. A modern front IO with three USB ports, including one 20 Gbps Type-C, offers access to high-speed connectivity, a rarity in budget-friendly chassis.

That said, I’d like to see a front fan included, even if it pushes the MSRP a few dollars higher and the included fan gets loud at 100%. The good news is that performance was fine in our noise-normalized results at much slower speeds. I’d also like to see a couple of Velcro tie-downs to help with wire management behind the motherboard tray. But the list of complaints is small, especially given that the case is currently $39.98. In fact, we like the Q300L V3 so much that it made our Best Cases list as the Best Budget Micro ATX chassis. If you’re in the market for a budget case for a Micro ATX build, Cooler Master’s Q300L V3 should be at the top of your options list, as it’s easy to build in and has all the basics you need for a small-form-factor PC build.

DIY modder creates 'heat engine computing device' powered by a Stirling engine, can run Tetris, Snake, and Pong — 80 MHz processor operates on just 150 milliwatts of power

2026年8月11日 17:30

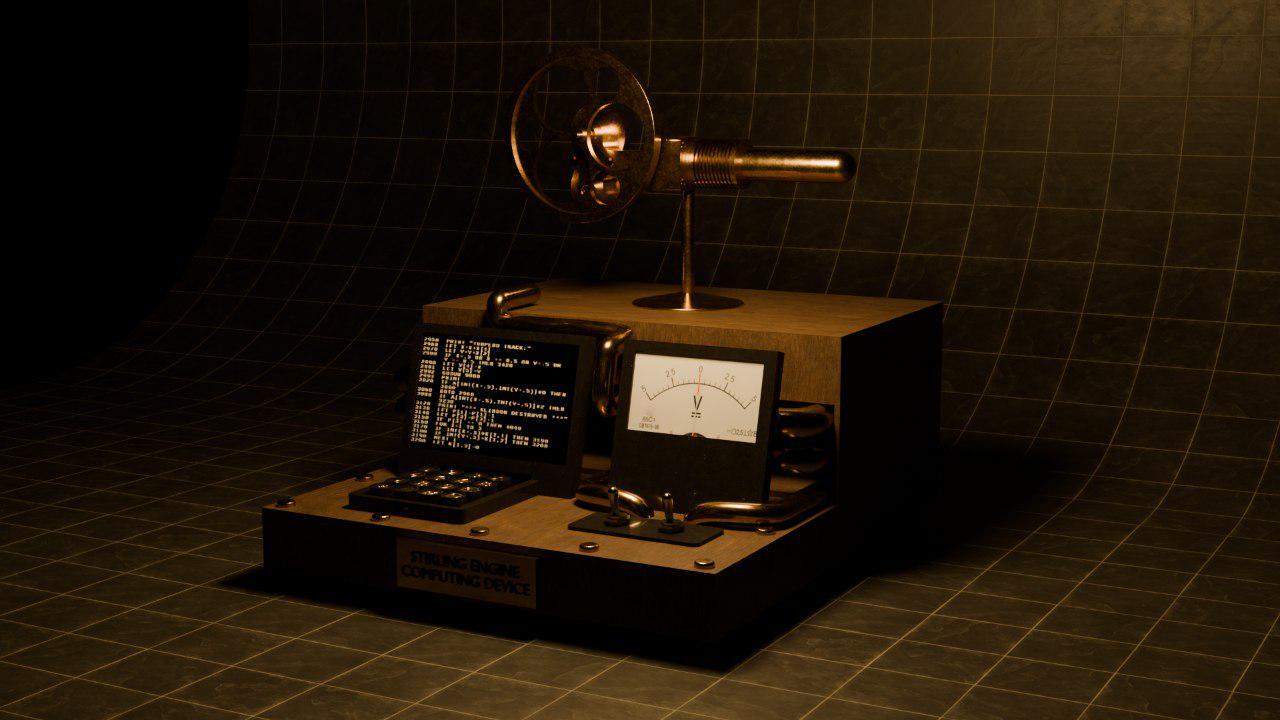
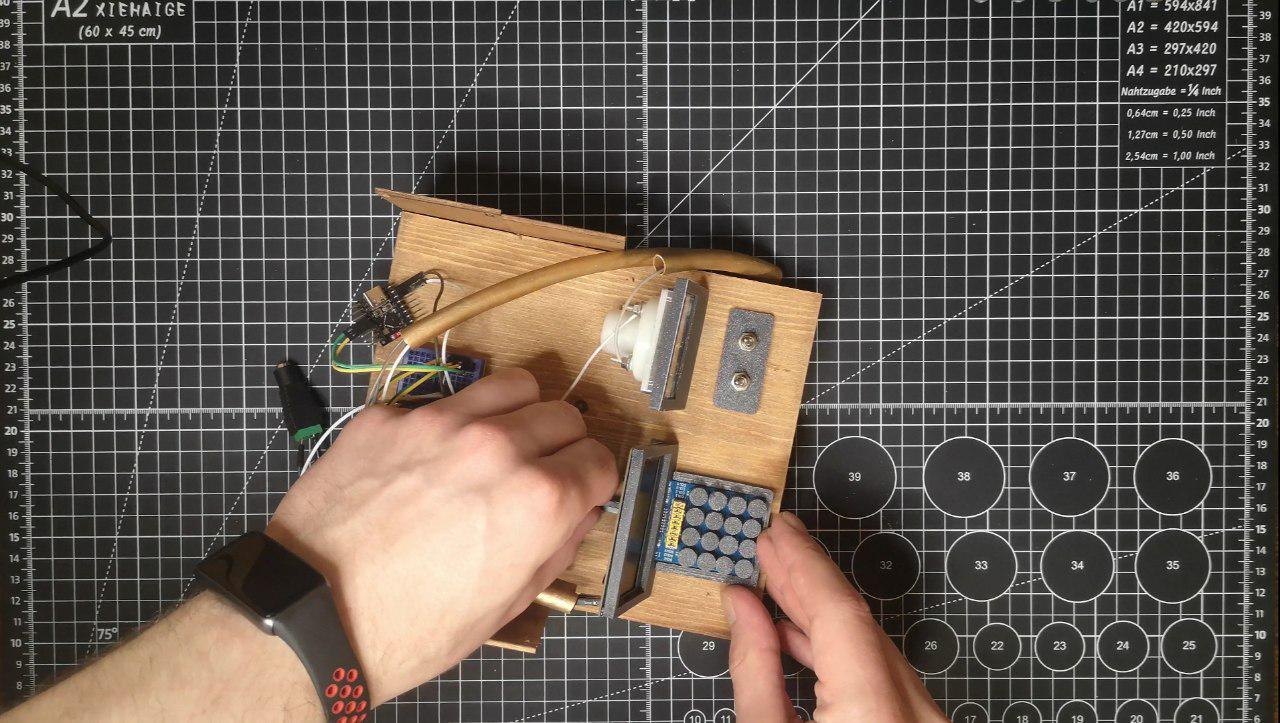
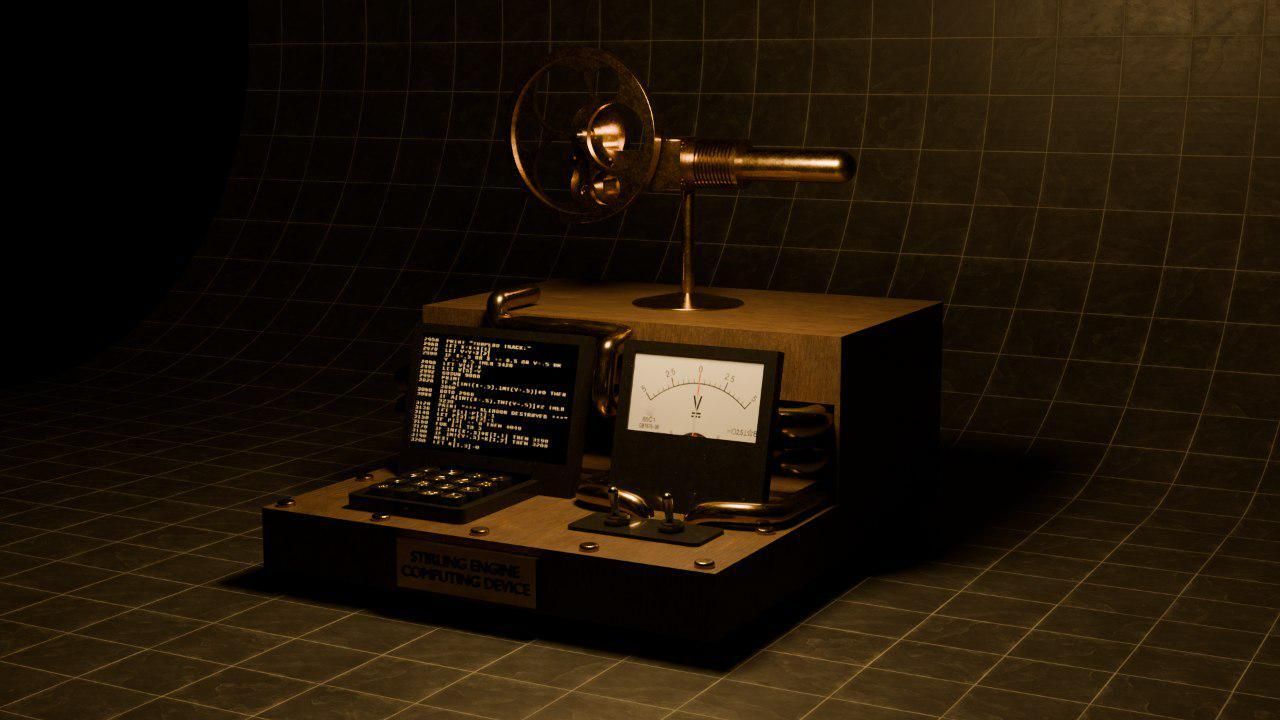
In one of the most unique DIY projects, Reddit user PickentCode has created what can be described as a completely off-the-grid "heat engine computing device." Instead of relying on solar panels or a battery pack, the creator went in a completely different direction, building a custom steampunk-inspired microcomputer which features a miniature Stirling engine to power the hand-crafted wooden console.

Originally patented in 1816 by the Scottish minister and inventor Robert Stirling, a Stirling engine converts heat directly into mechanical energy. By applying a flame to one end of a sealed cylinder, the temperature difference forces the air inside to expand and contract. This cycle pushes a piston that spins the flywheel, which can be used to power a simple generator that converts the mechanical rotation into usable electricity.

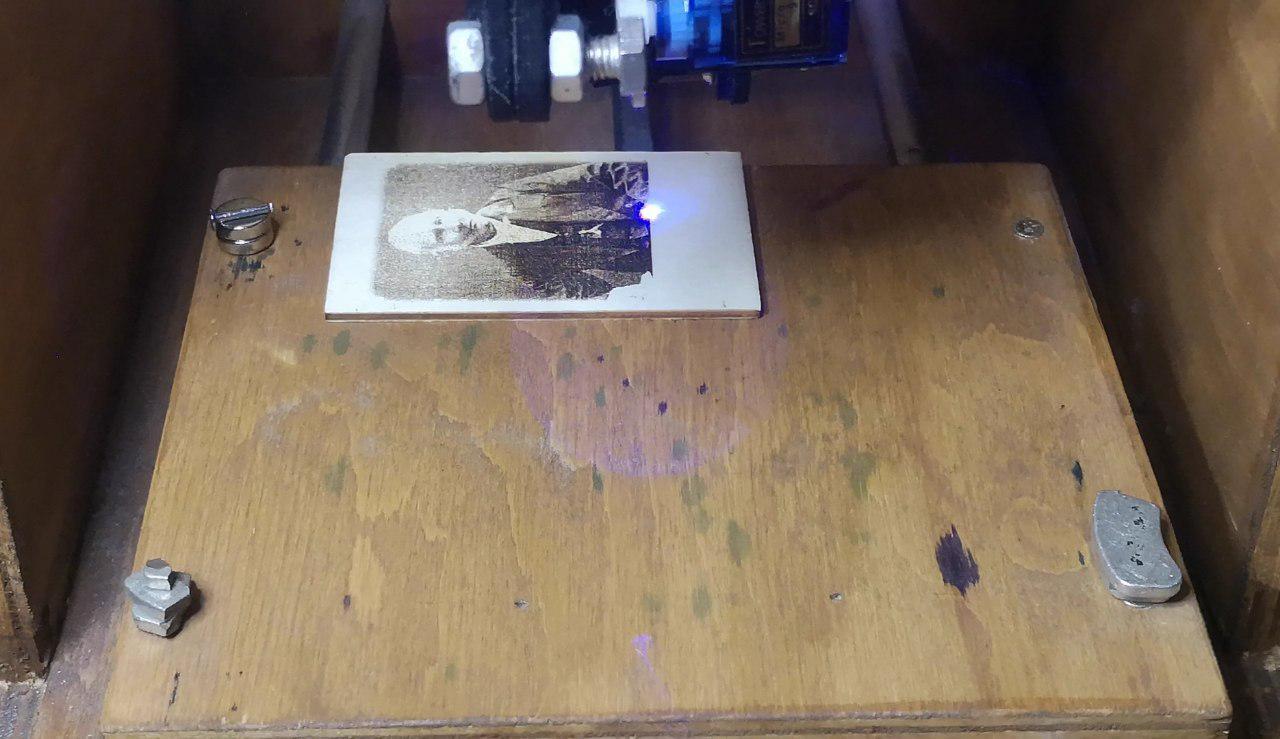
"The entire project took about a month to design, build, and program," PickentCode told Tom's Hardware. They first conceptualized a 3D layout using Blender before constructing the physical case out of wood. They even went ahead and utilized a DIY laser engraver to etch a portrait of Robert Stirling and his original 1816 engine patent sketch directly onto the wooden side panels. For the smaller structural elements, the electronic housings and the keycaps were custom 3D printed, while the decorative pipes winding across the frame were made from old shower tubing and some gold paint.

Build process of the DIY microcomputer powered by a Stirling engine
PickentCode on Reddit
Build process of the DIY microcomputer powered by a Stirling engine
PickentCode on Reddit
Build process of the DIY microcomputer powered by a Stirling engine
PickentCode on Reddit

The brains of the system are an ESP32 C3 microcontroller paired with a 2.42-inch monochrome OLED display with a 128x64 resolution, alongside a 16-key keypad. The electrical output of the generator is stabilized using small capacitors wired into the circuit. One can also actively monitor the voltage output using the analog voltmeter, which is wired in parallel, and the two toggle switches mounted on the front panel can be used to turn on the main circuit and the voltmeter.

Running an electronic device, in this case a microcomputer, purely on fire comes with obvious energy limitations. The model Stirling engine can produce only 150 milliwatts of power, and to stay within this tiny power budget, the creator implemented certain hardware and software optimizations. For instance, Wi-Fi and Bluetooth were completely disabled, and the screen brightness was kept low to conserve every milliwatt. PickentCode also tuned the ESP32's CPU frequency, reducing it down to just 80 MHz when updating the screen or interpreting opcodes, going all the way down to just 10 MHz while sitting idle in the main loop.

Despite the limitations, the computer is fully functional. It runs a custom CHIP-8 virtual machine preloaded with classic gaming ROMs like Tetris, Snake, and Pong. Impressively, it also features a built-in code editor, allowing users to type in CHIP-8 opcodes directly to write and execute their own custom programs on the fly.

Stirling engines are not exactly new to the world of computing. Earlier this year, we covered a project by Windows development guru Dave Plummer who showcased a cooling solution that used a small Stirling engine to convert waste heat from an AMD Threadripper system into mechanical energy, which was used to spin the engine's flywheel. While it isn’t an actual solution to an overheating chipset, it is claimed that the flywheel can spin up to about 200 RPM in a 20C/68F environment.

Noctua finds more than half of tested PC cases misstate CPU cooler clearances — hands-on checks reveal errors ranging from -3.5mm to +10mm, internal compatibility team conducted measurements of more than a hundred cases

2026年8月9日 22:35

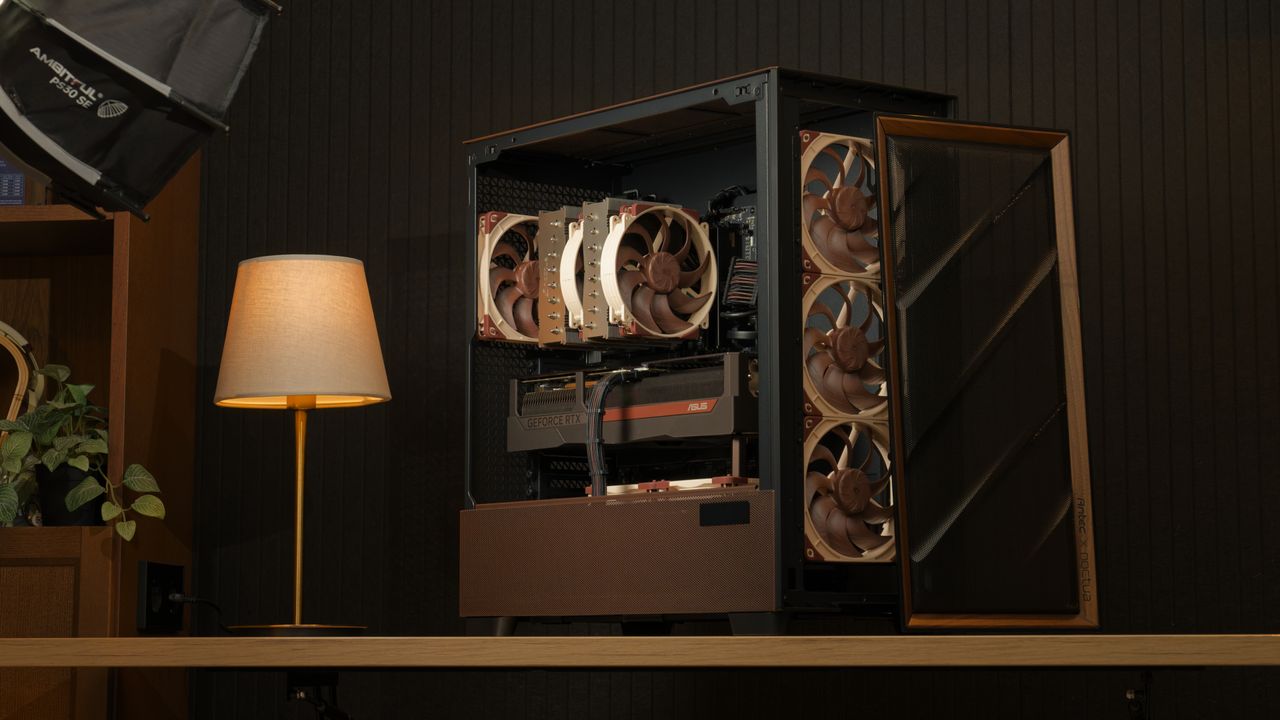
Noctua is known for making high-end, high-quality fans and air coolers, which it has been doing for over 20 years, recently expanding into AIOs. However, it appears that there were a few questions regarding its PC case compatibility database, which some PC DIYers say don’t match the data from the manufacturer’s website. The company cleared this up in a blog post, saying that it has undertaken its own measurements and it has determined that 56 of the more than 100 cases it has tested showed significant deviation from the details officially listed online.

The company gave two diverging situations of inaccurate official measurements. The first one is when the case is larger than what is actually written, which would allow PC builders to attach a larger cooler. Noctua said that the deviations aren’t minor, either. For example, the NZXT H2 Flow case is listed as being compatible with a maximum 75mm CPU cooler height, but the actual case can accommodate an air cooler up to 79mm. There’s also the Thermaltake TR100, which is 2.7mm larger than what the Thermaltake website says, and the Corsair Frame 4000D, which gives you 10mm of extra clearance.

This is a good thing, as any cooler you bought based on their website’s measurement means that it will definitely fit, but Noctua said that this is a missed opportunity. That’s because you could’ve bought a larger cooler that delivered more performance in the same case.

On the flip side, the company warned that there were also some cases that were actually smaller versus the numbers in their specifications. It cited two examples — the Asus Prime AP201 and the Lian Li B4-mATX. The former is 1.7mm shorter while the latter is 3.5mm shorter than what’s listed on their specific product pages.

This could to be a major issue, especially if you bought items that fitted the available space exactly, based on the manufacturer’s measurements. It would mean that these parts would either be touching the case panels, or worse, not allow them to close at all. If that’s the case, you’ll have to spend extra effort to return either the part or the case and get something that fits better.

The safest solution to this is for you to buy the PC case before you shop for the remaining parts of your build. This is especially true if you’re looking at the best mini-ITX cases, as the tight tolerances mean that you don’t have much margin if the numbers aren’t accurate. But by having the case physically available and measuring it yourself, you’re at least confident that what you’re buying will fit. Alternatively, you can check out Noctua’s compatibility search page, with the clearances of the cases in its database verified by its team.

This compatibility tool will give you peace of mind when shopping for the best cooler and is useful for confirming measurements even if you end up buying from another brand. But this begs the question — are the variations between official and actual measurements limited to the air coolers? Or are the numbers for other components, like the GPU, PSU, and other key components also inaccurate? Noctua’s website only covers coolers, so you’ll have to rely on other pages (or your own measurements) if you want some confirmation of a case’s specifications and clearances for other parts like GPUs and PSUs.

Montech TG3 Panoramic Mid-tower case review: a fantastic value, with four included RGB fans and panoramic views

2026年8月5日 19:00

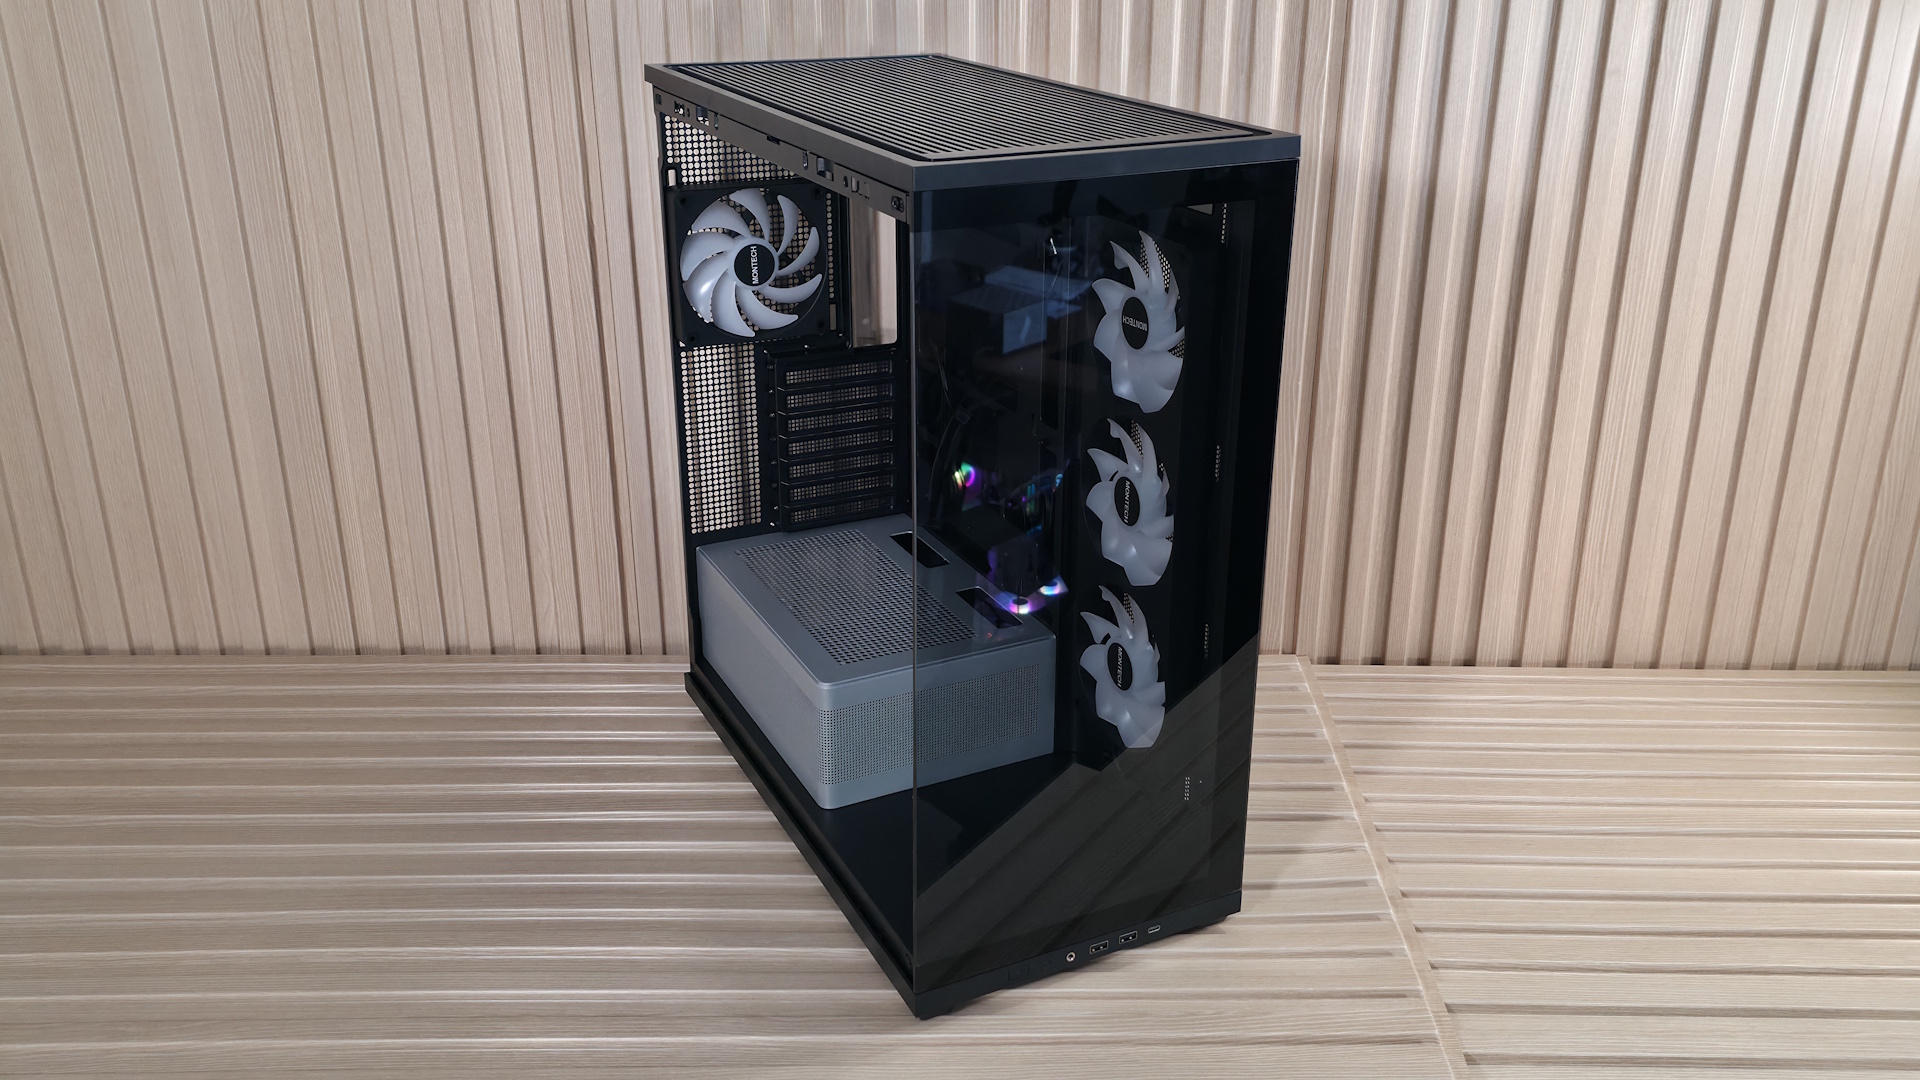
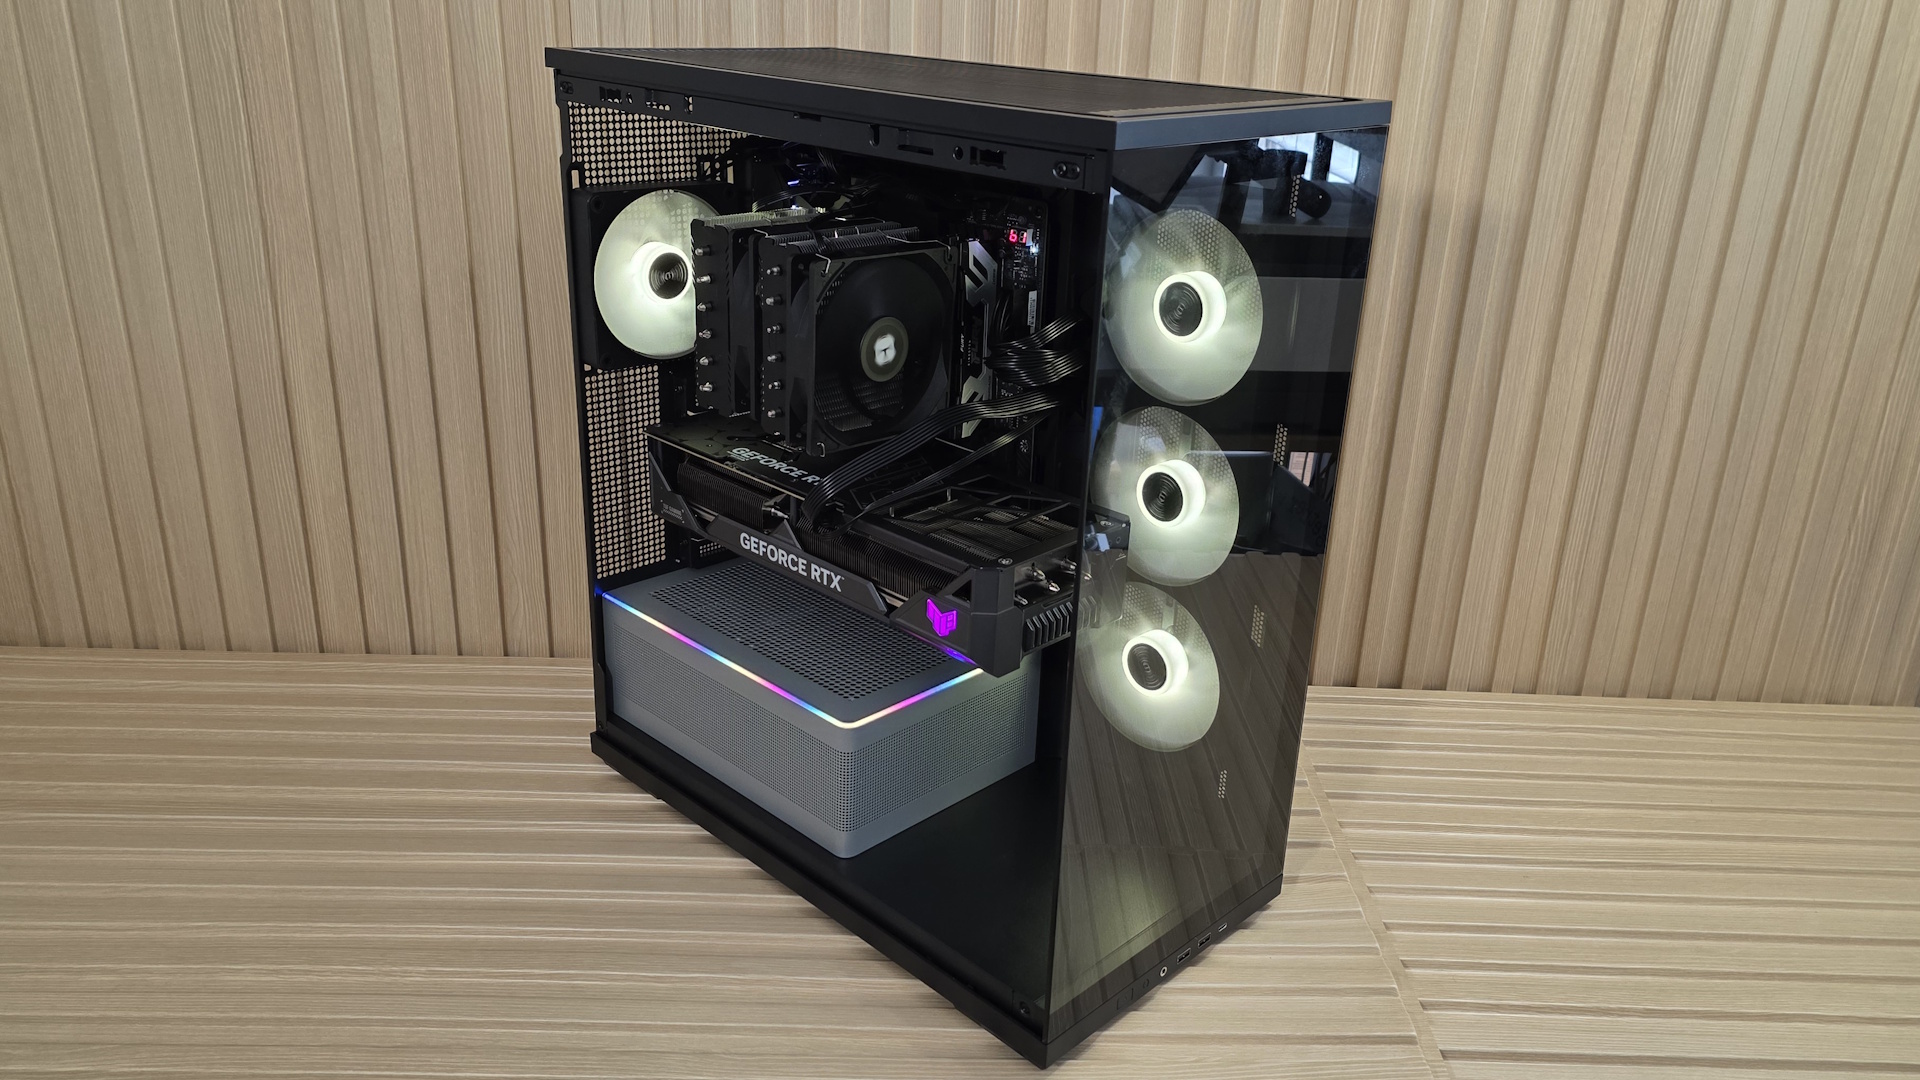
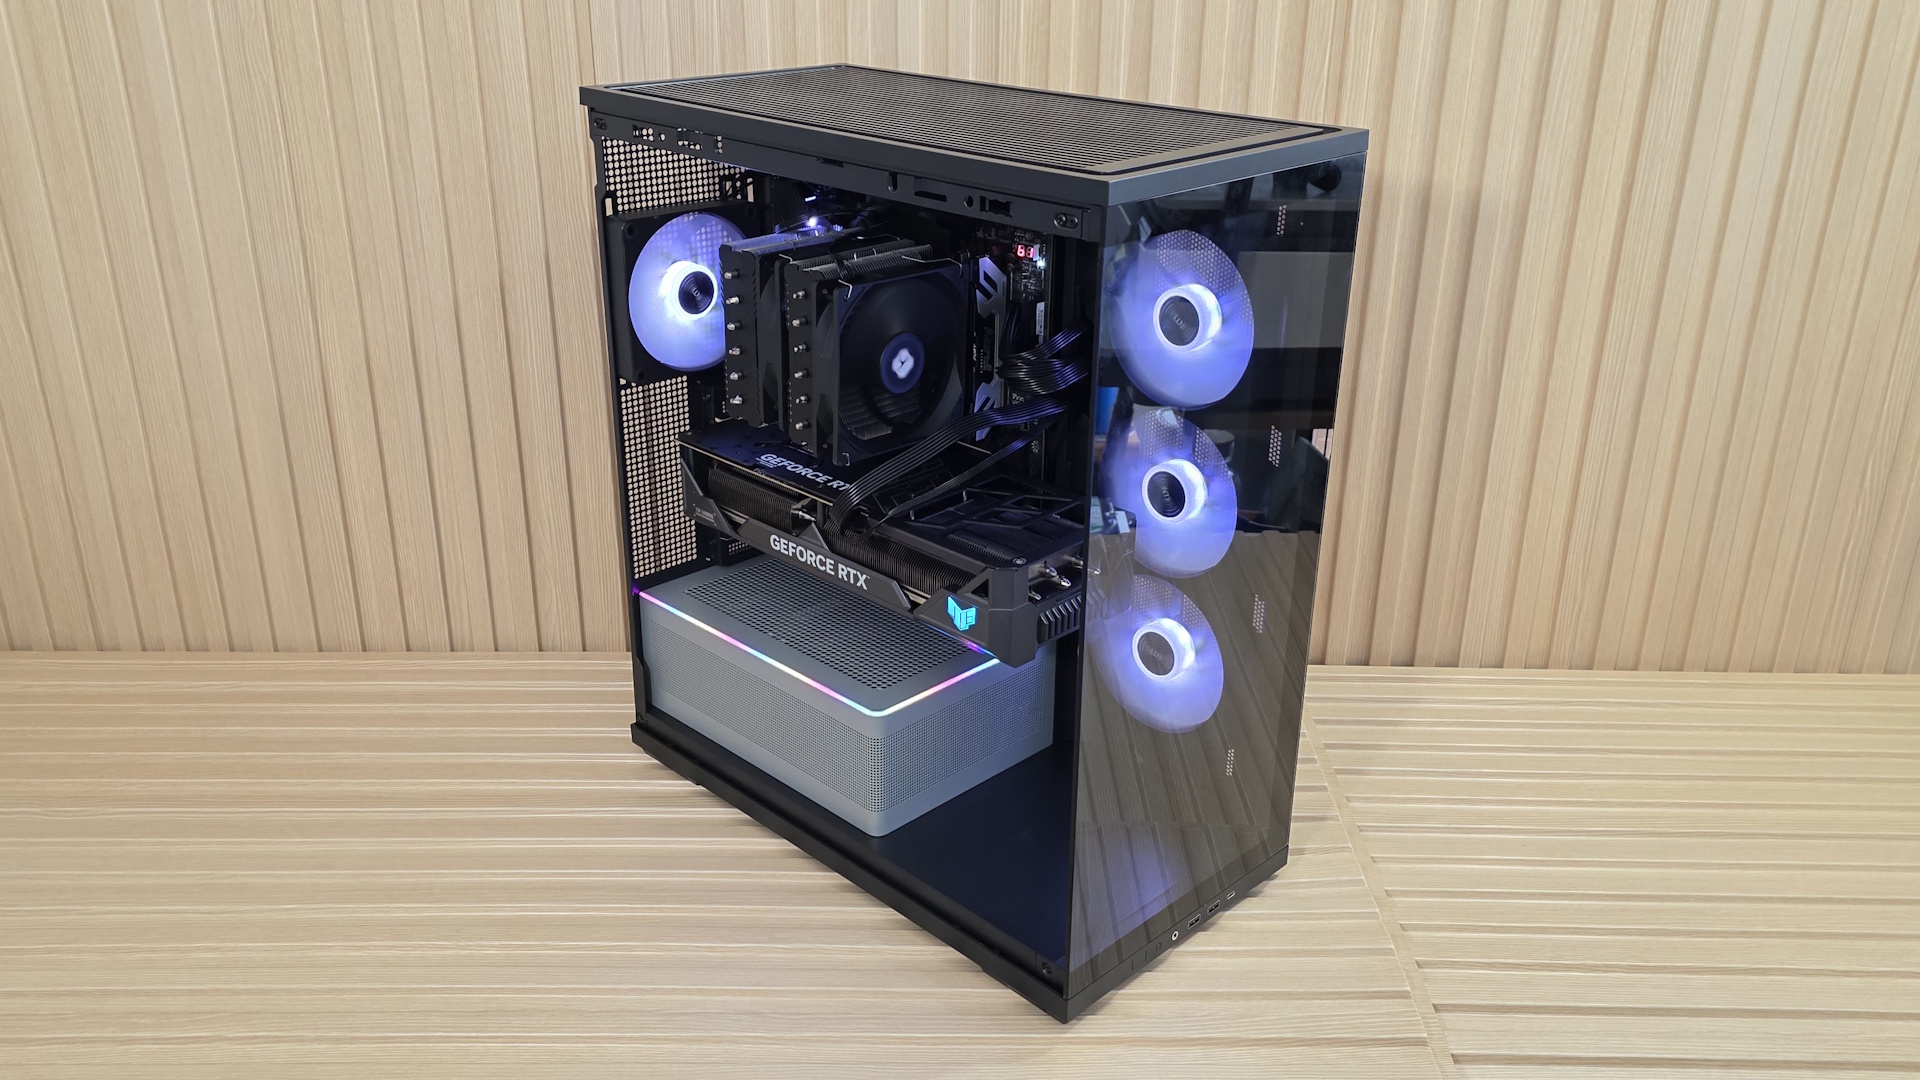
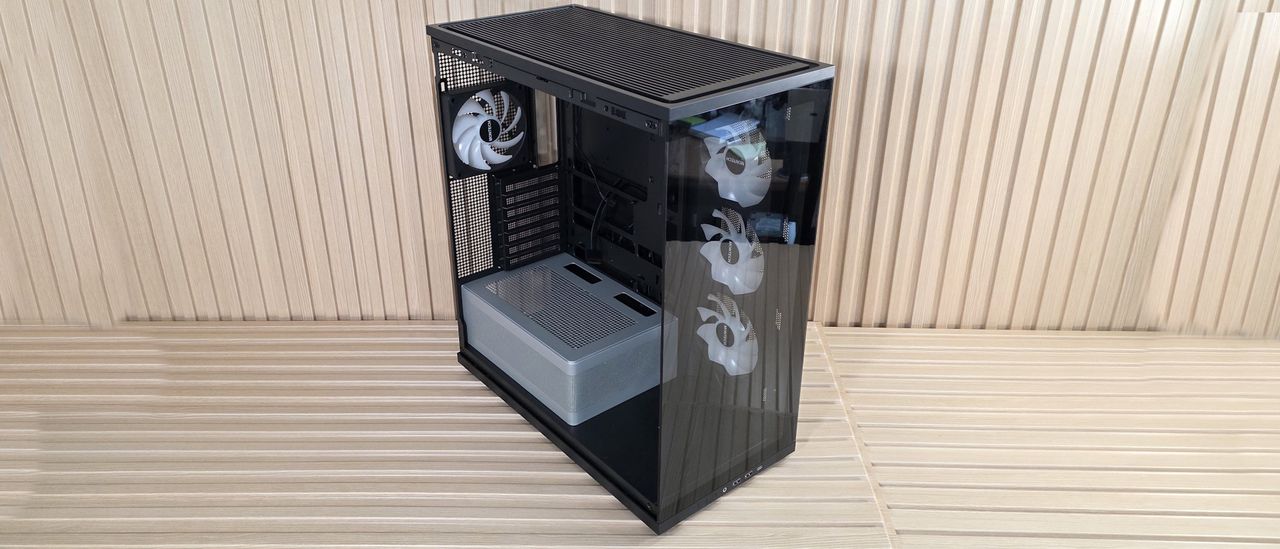
We first spotted Montech's TG3 case at Computex earlier this year. This panoramic mid-tower chassis offers a full view inside through the smoked side and front panel glass, and features a tiered bottom layout and an ARGB lighting strip around the raised power supply chamber. While the side intake isn’t a boon for high airflow, the case performed well in our testing with our power-hungry components, at least with the CPU, offering some of the best air-cooled temperatures using our new test hardware. Priced at $59.90 including four fans (or technically two, as one is a full-frame 360mm), it offers a great value in the budget mid-tower space.

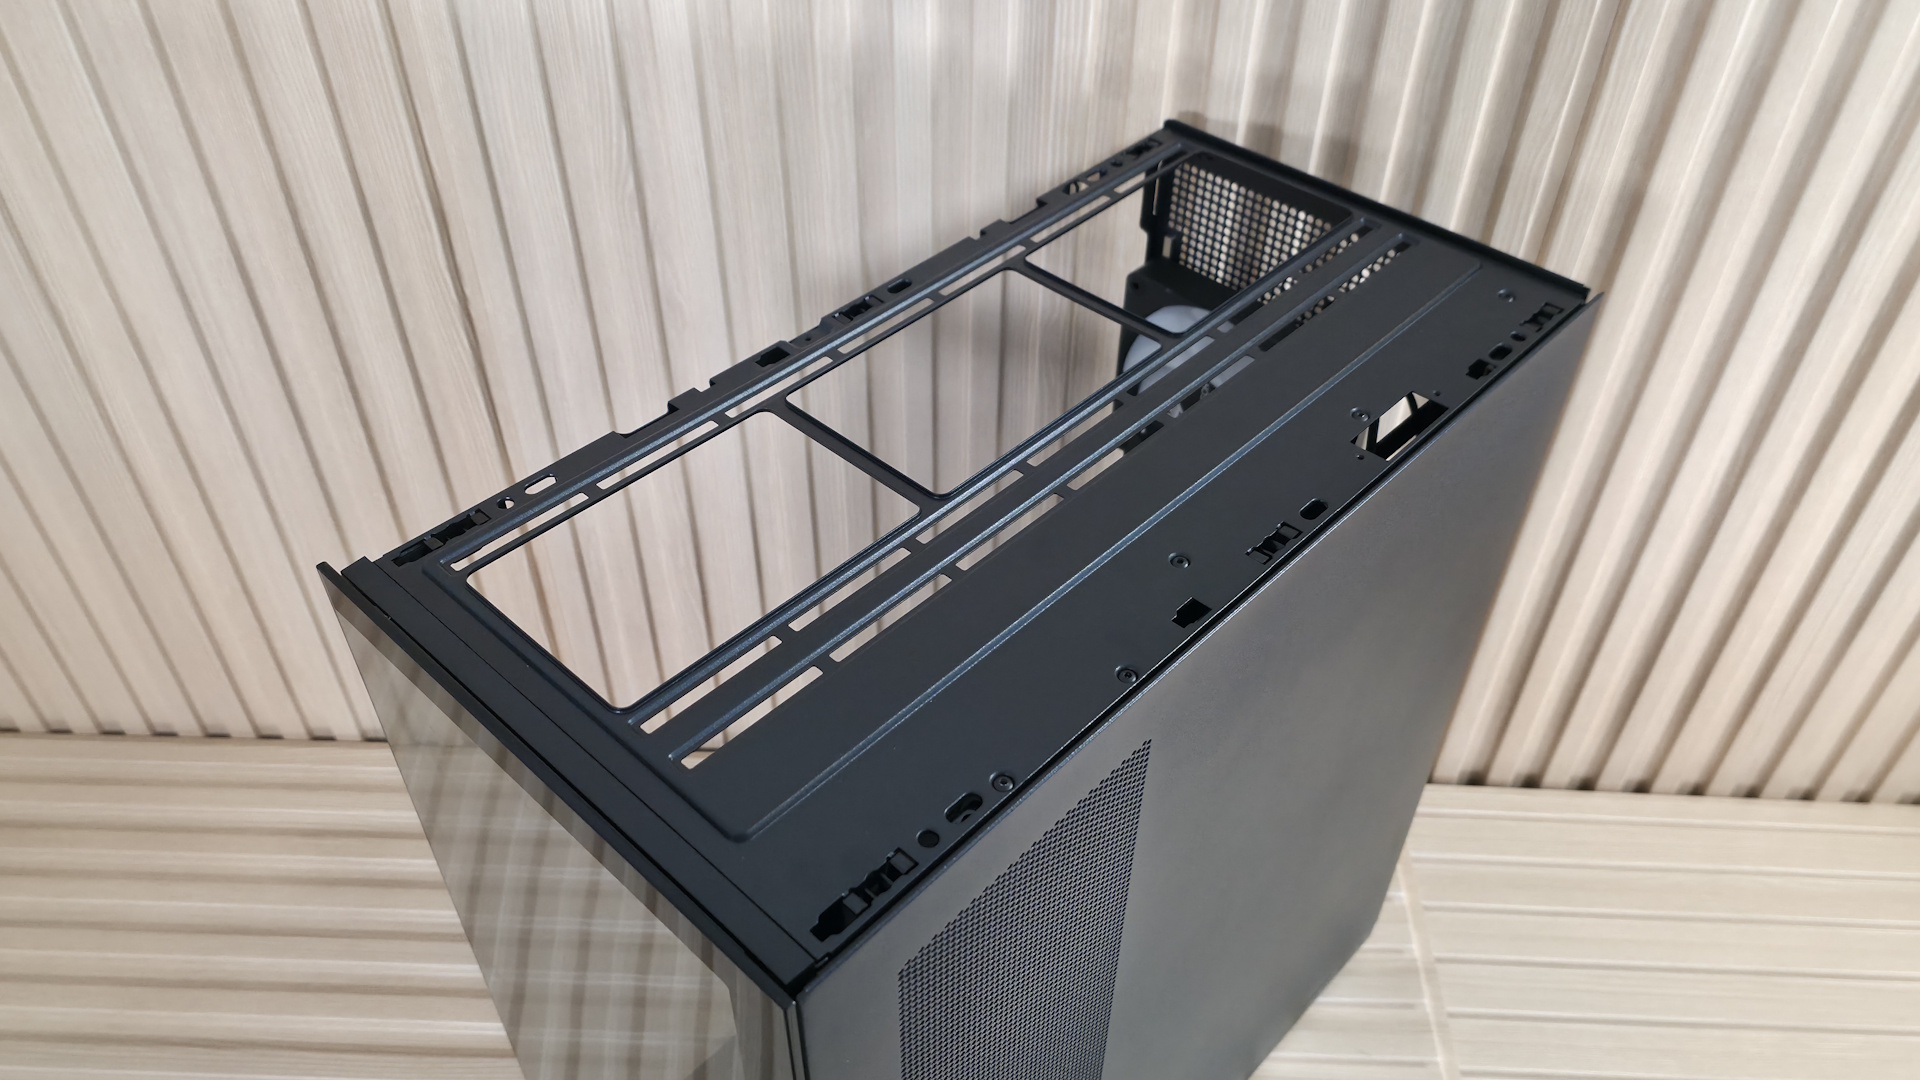
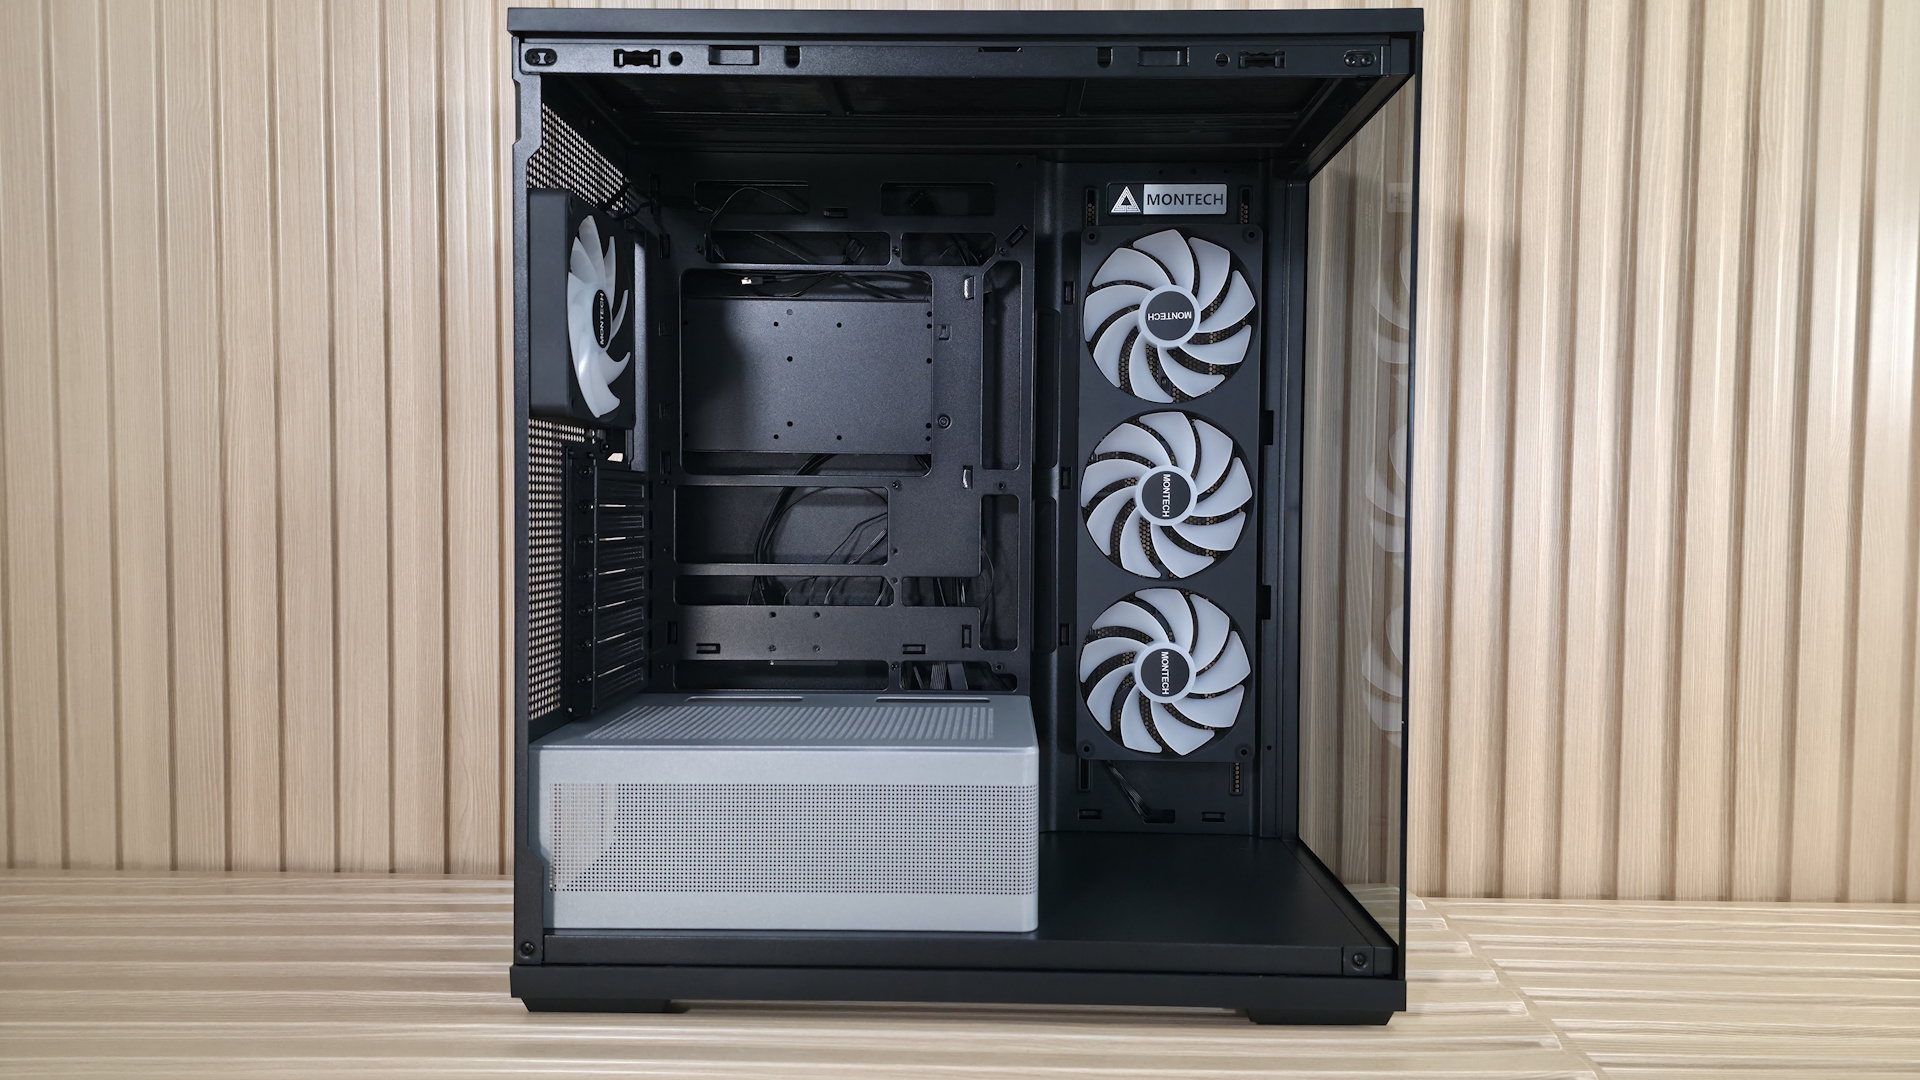
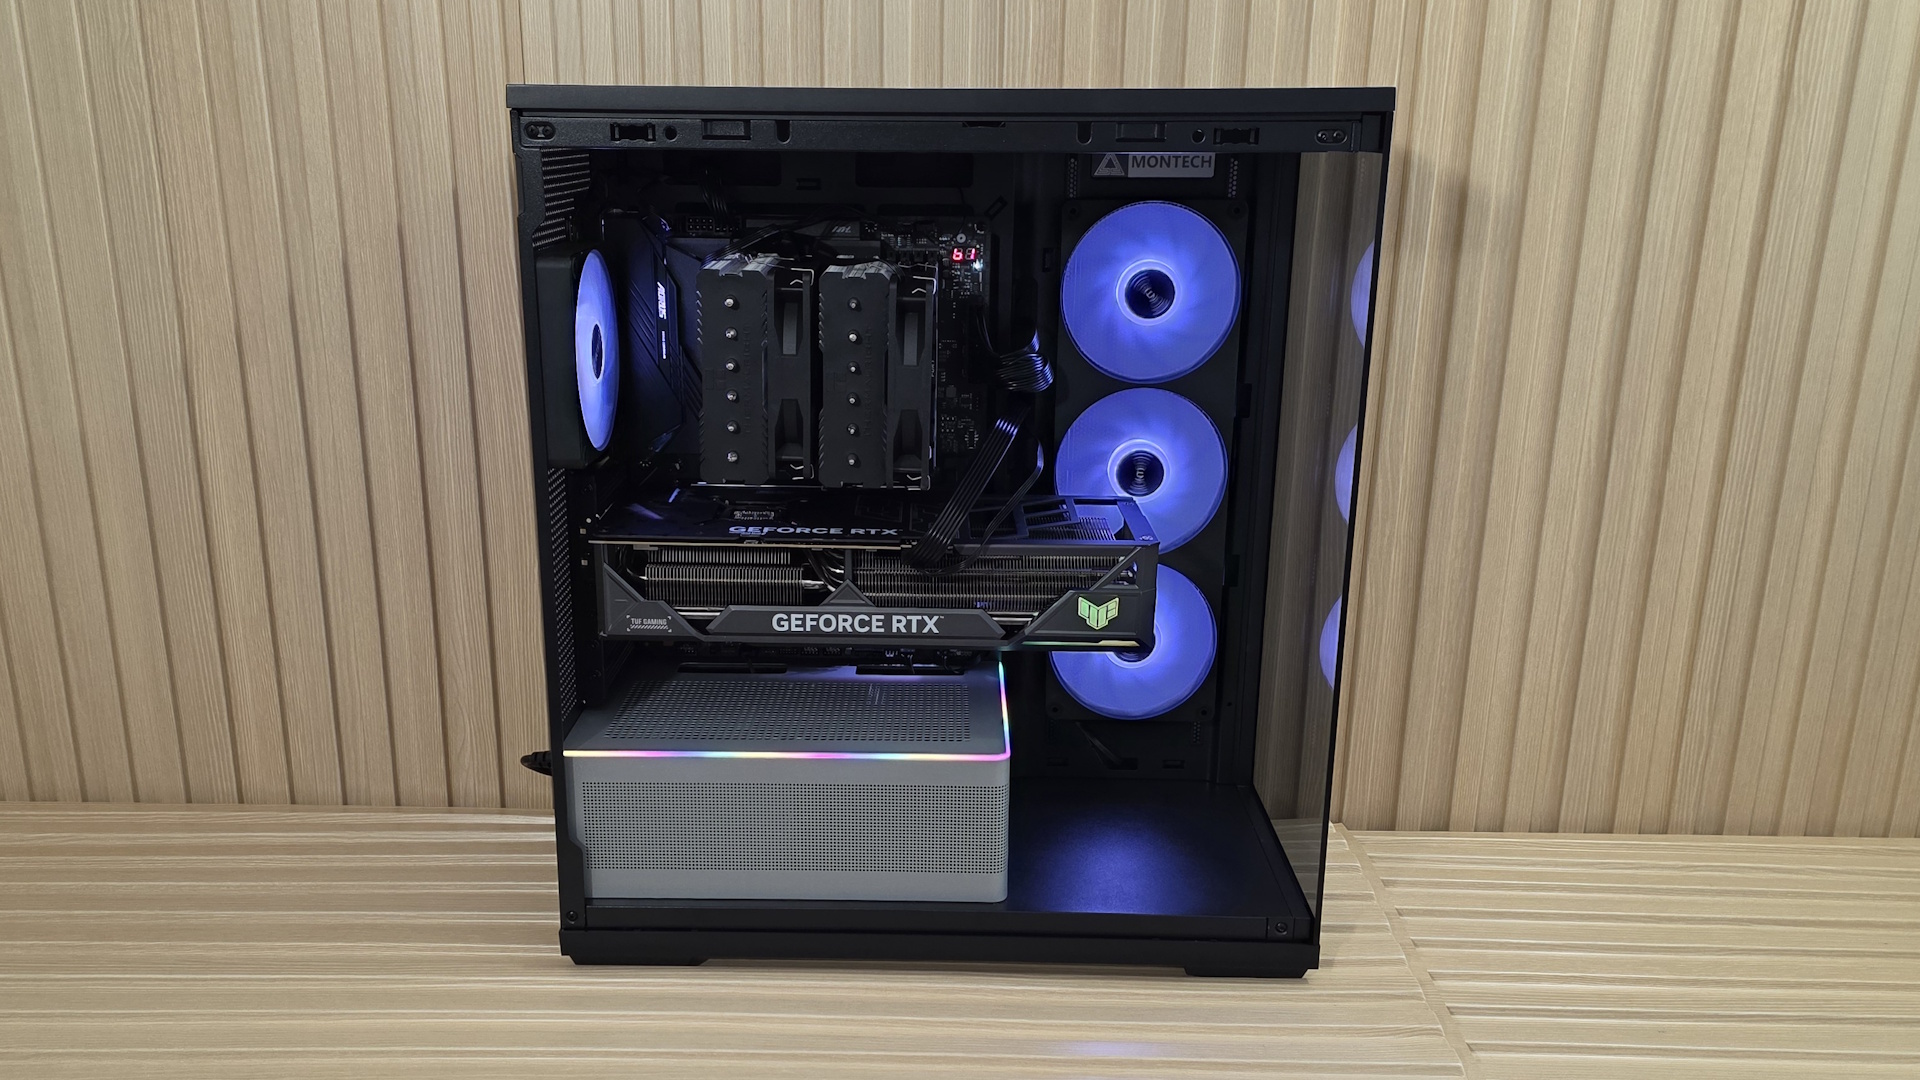
Inside, the TG3 comes with preinstalled unibody reverse fans (3x120mm) on the side and a single 120mm fan on the rear for factory-provided airflow. Up top, there’s room for three more 120mm fans / a 360mm radiator, too. The chassis supports motherboards from ATX down to Mini-ITX, and even handles rear-connect motherboards. The TG3 supports huge graphics cards, and even vertical GPU mounting (with a kit sold separately). The power supply sits in its own tiered chamber, silver in color, adding dimensional depth to the interior. The chamber sports a frosted RGB strip that runs along the top edge and casts a nice glow on your components inside the chassis. At the front of the case, on the bottom, is showcase space to show off a figure, or whatever you want that fits, or it’s wasted space.

Externally, this is a simple design, with two panes of lightly tinted glass on the front and side, showing off your internals. It comes in black and white, with the latter using a color-matched PSU chamber, unlike our black model. The IO panel runs along the bottom edge and offers two Type-A ports, a single Type-C port, along with power and RGB mode buttons. Overall, it’s a good-looking chassis, especially for the sub-$60 price point.

We'll cover many more details inside and outside the case, showcasing the features and any issues we may encounter during the build process. We also run the case through our thermal and noise testing to give you an idea of how it performs compared to other cases and to see if it has a chance of making our best PC cases list (spoiler: it does!). Below are the case's specifications, from Montech.

Montech TG3 Product Specifications

Type

Mid-Tower

Dimensions (H x L x W)

2.5 x 18.3 x 9.4-inches (523 x 465 x 239mm)

Motherboard Support

Mini-ITX, MicroATX, ATX

Back-connect Motherboard Support

Yes

Color

Black, White

Storage Support

(1) 3.5-inch -or- (2) 2.5-inch

PCIe Expansion Slots

7

Fan Support

Top - 3x120/140mm
Side - 3x120mm
PSU Shroud - 2x120mm
Rear - 1x120/140mm

Pre-installed fans

(1) GF360 U Rev (Side)
(1) GF120 U (Rear)

Radiator Support

Top - 120/140/240/280/360mm
Side - 120/240mm
Rear - 1x120mm

CPU Cooler Clearance

180mm

GPU Clearance

430mm

Vertical GPU Support

Yes (requires purchase of VGM 2 mounting kit)

PSU Length

250mm ATX

Dust Filters

Top, Bottom

Other features

3x included fans, Tiered ARGB PSU shroud back-connect support

MSRP

$59.90

Warranty

1 Year (case), 3 Years (fans)

Features of the TG3

▶️ External Features

While the TG3 looks fine externally, there’s nothing really exceptional going on. It’s another typical mid-tower panoramic chassis, with lightly smoked tempered glass panels to show off your internals. But it does have a unique ‘show space’ inside at the front to display whatever you like inside your PC case. If you’re interested in showing something off in that space, and assuming your graphics card doesn’t extend past the motherboard edge, you have about 7 x 7 x 17-inches (LxWxH) worth of space. If your graphics card is the size of our Asus RTX 4080 TUF (larger, it shrinks the length down.

Montech TG3 - Outside
Future
Montech TG3 - Outside
Future
Montech TG3 - Outside
Future
Montech TG3 - Outside
Future
Montech TG3 - Outside
Future
Montech TG3 - internal
Future
Montech TG3 - Outside
Future
Montech TG3 - Outside
Future

Each removable panel attaches to the case in the same way, using tabs that slide into slots in the frame, while the top uses ball-and-socket capture mechanisms to secure it to the chassis. The panels hold securely, and there’s nothing to worry about, but be careful when moving it, as any potential flex could break them free. The top grille, which also pops off, has slats on the top and offers plenty of airflow, and even has a removable dust filter, similar to the ones on the side intake and PSU shroud.

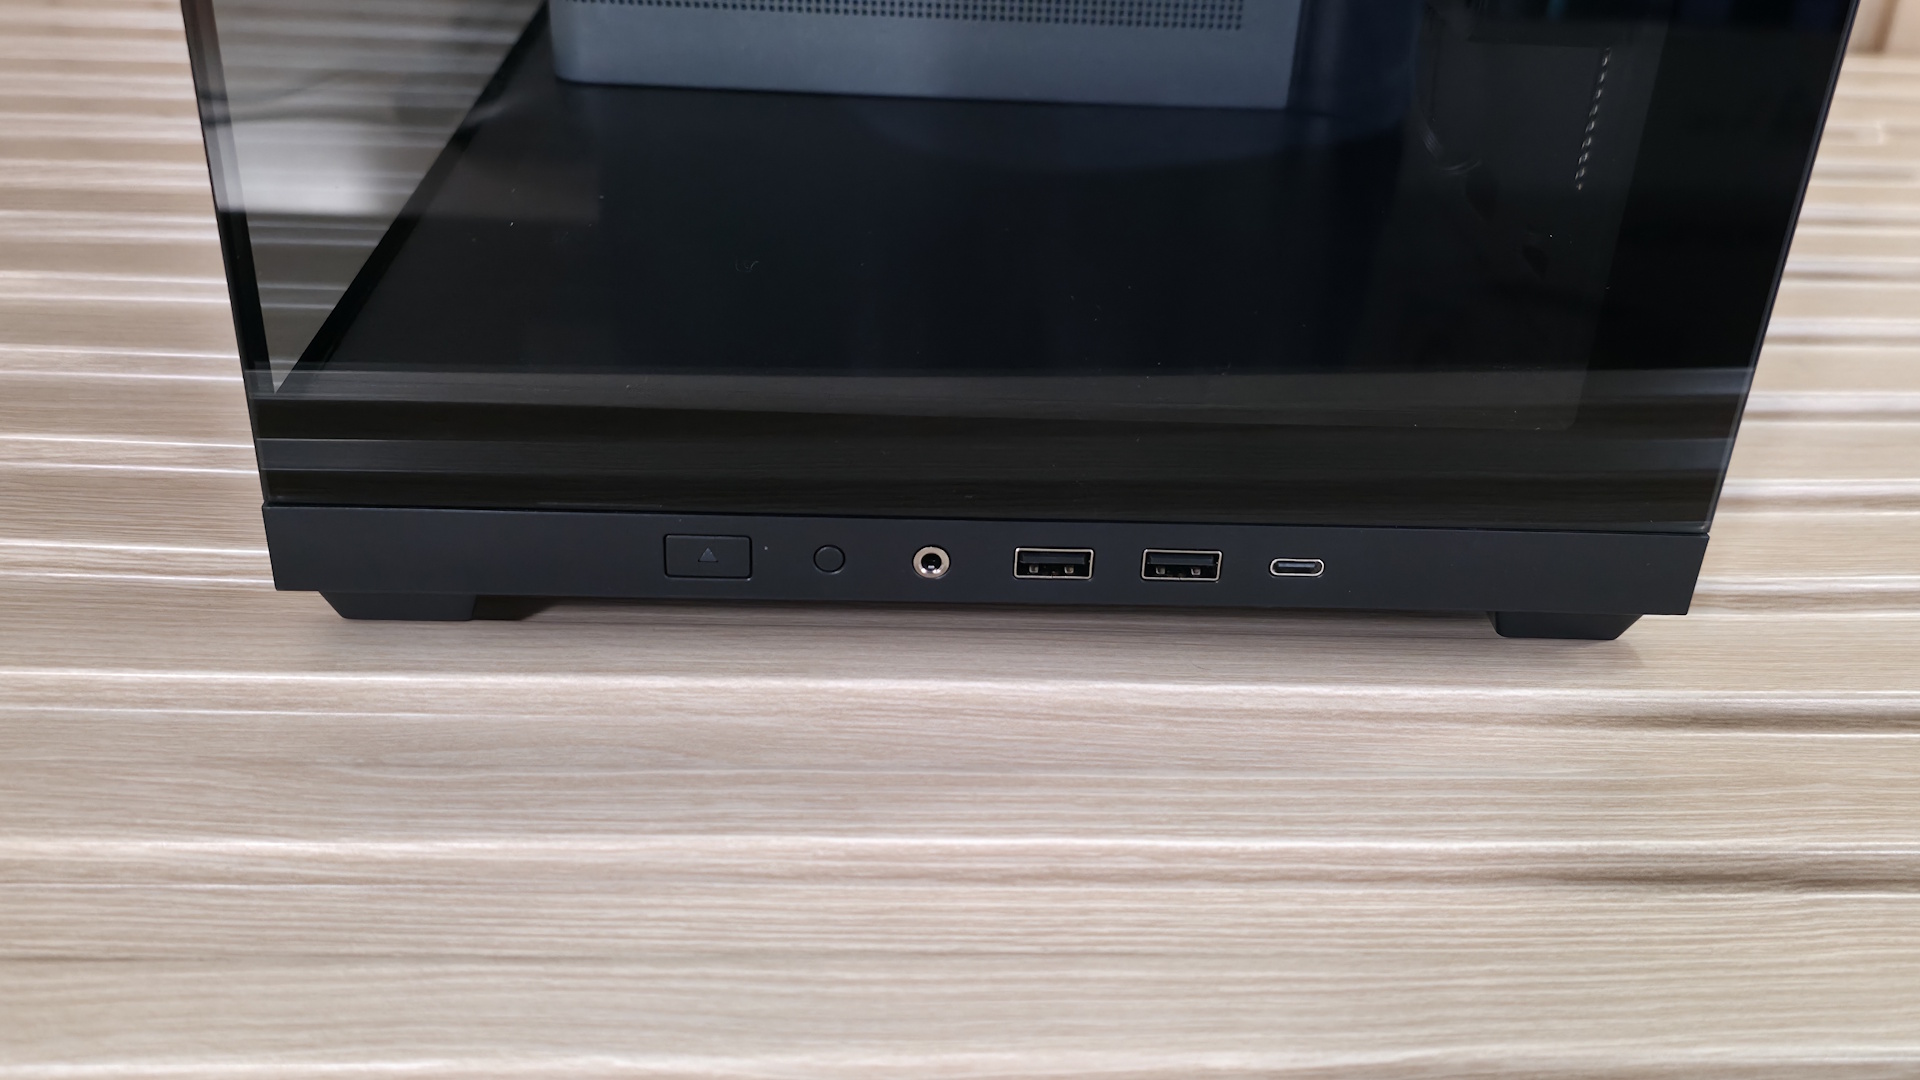
The front panel IO runs along the bottom of the case (so you'll probably want to keep this on your desk) and offers your typical fare of connections. Starting on the left is the Power button and LED mode buttons, a 3.5mm headset audio jack, two USB 3.2 Gen 1 (5 Gbps) Type-A ports, and one USB 3.2 Gen 2 (10 Gbps) Type-C port. Even though this is a budget case, I’d still like to see a 20 Gbps port on the front.

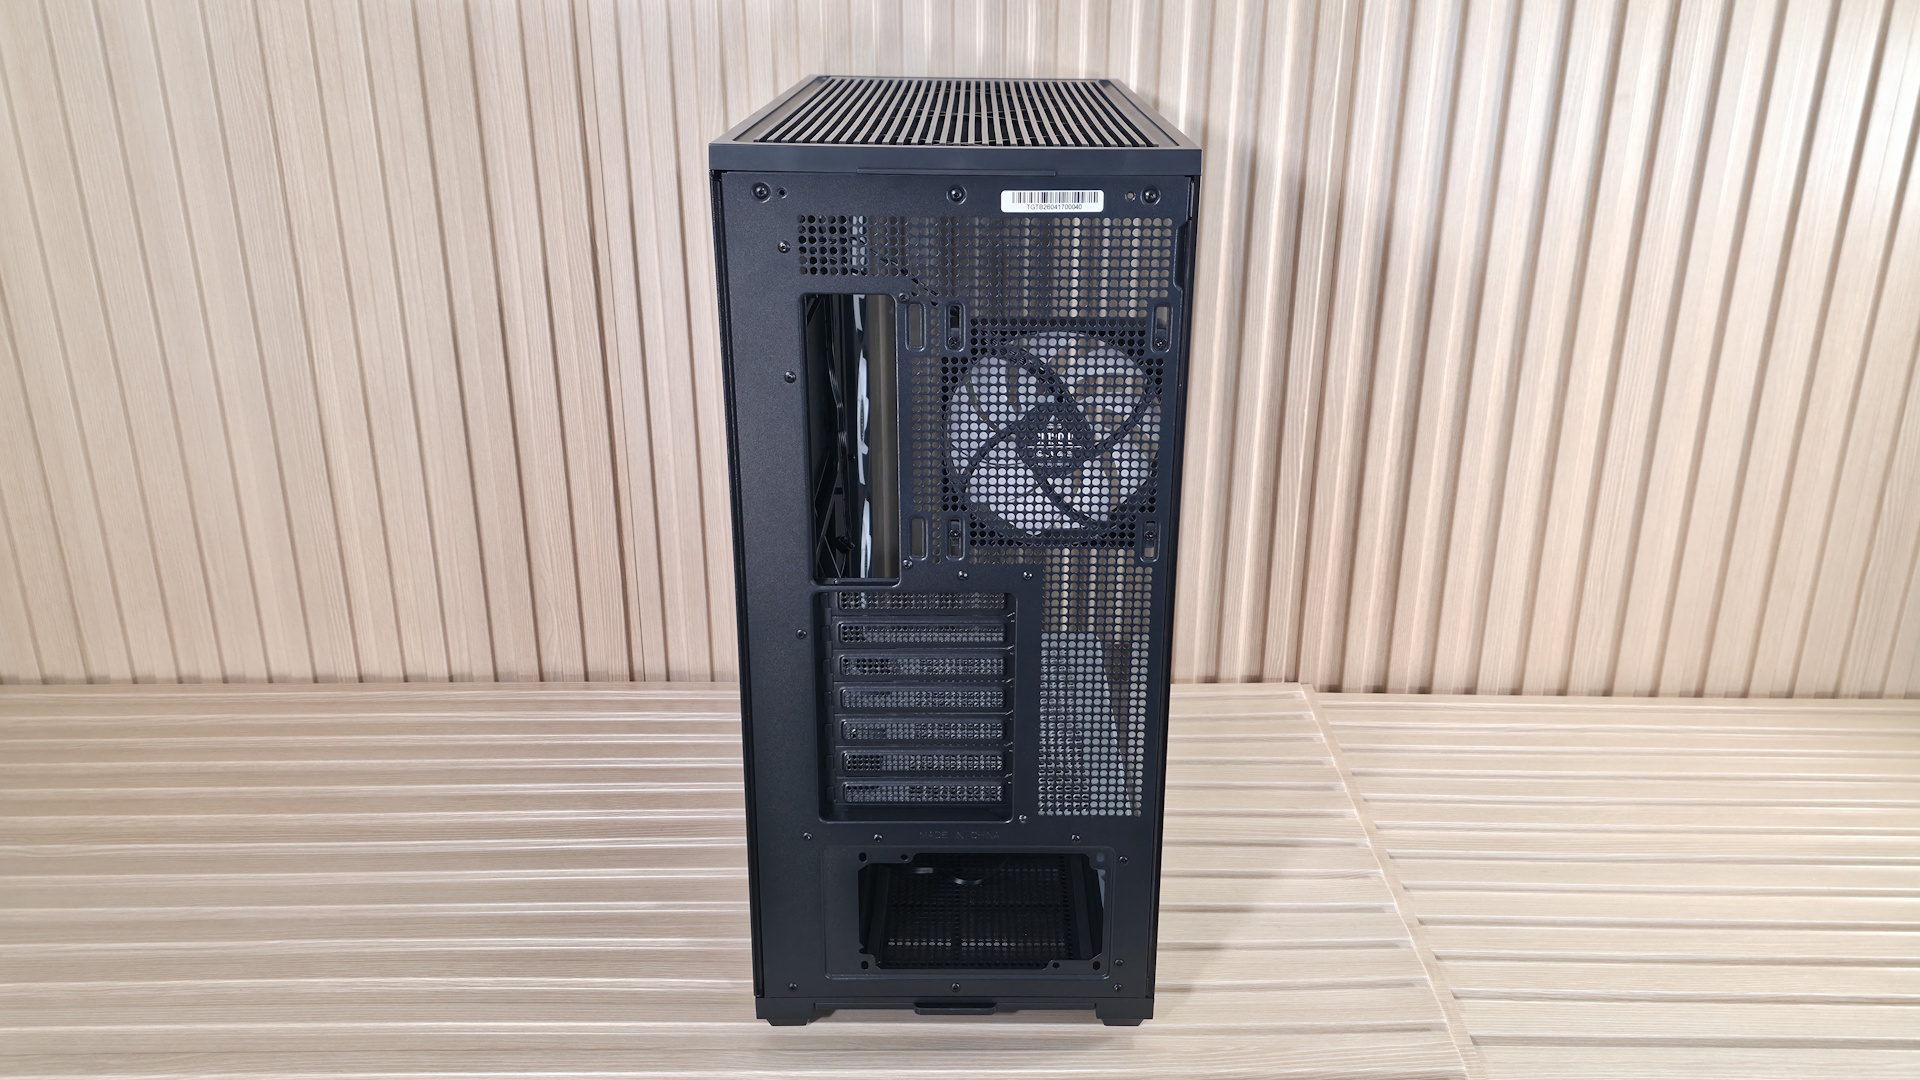
Flipping the case around to the rear, we see the circular vent holes for airflow and the included and height-adjustable 120mm fan (the case supports a larger 140mm fan if you want to swap this one out). You also get a great view here of the seven expansion slots and the PSU mounting location on the bottom. You can mount a vertical GPU too. But the VGM 2 mounting kit does come separately (~$45 on Amazon). The PSU chamber also has a removable dust filter to feed clean air to the power supply. The TG3 sits on four integrated raised feet, with rubber pads that slightly lift the case for better airflow.

▶️ Internal Features

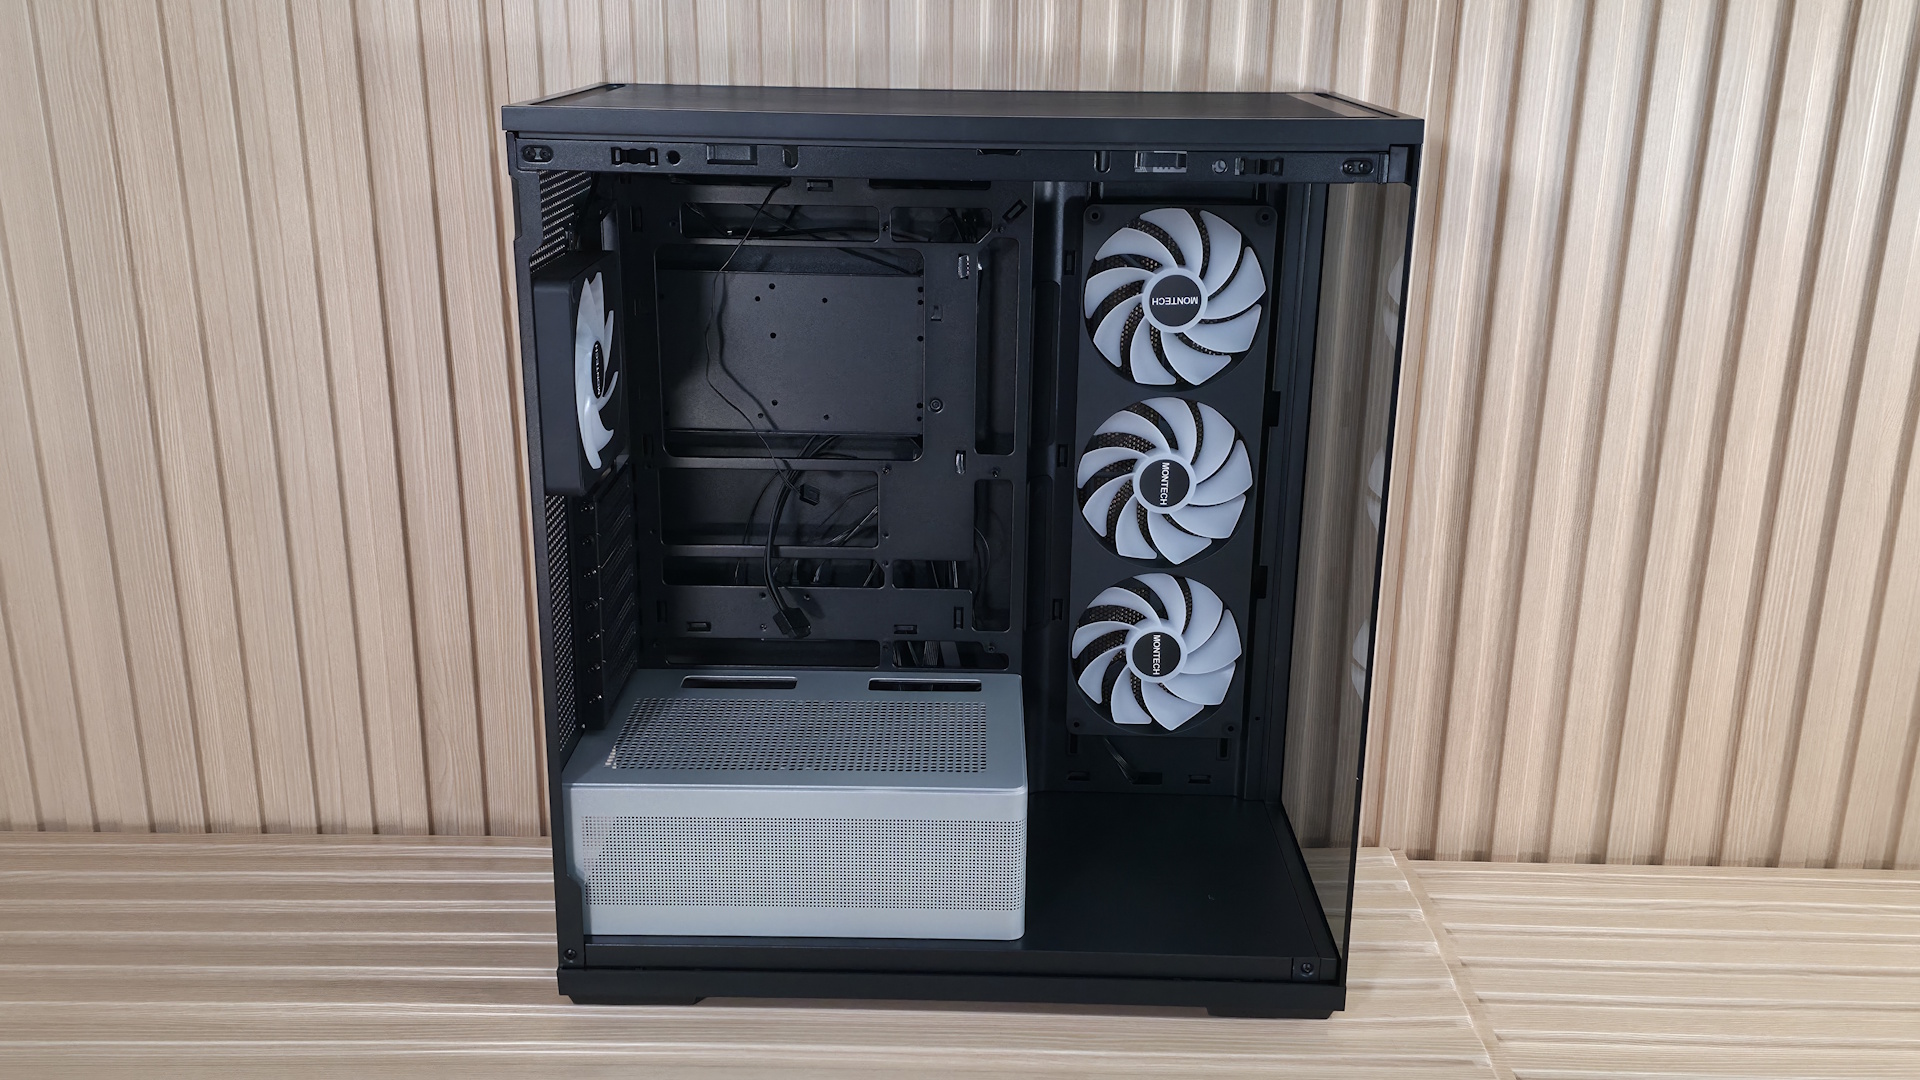
Inside the chassis, there’s quite a bit of space because of the side (not front) fans, which give you an extra couple of inches to play with up front. Montech decided to use the extra space at the bottom, between the PSU shroud and the front glass panel, as a stage for you to put something there to show off. Perhaps a Gundam figure, your waifu, or any other cool model or trophy to personalize the space. Otherwise, it’s just space that could have been better utilized, maybe as a sloped shroud directing cooled air up towards the GPU.

Montech TG3 - internal
Future
Montech TG3 - internal
Future
Montech TG3 - internal
Future
Montech TG3 - internal
Future
Montech TG3 - internal
Future

The motherboard panel supports up to ATX boards, with mounting points for Mini-ITX and MicroATX form factors. The best fit is for sure ATX and MicroATX, as that’s where all the cable management holes line up. It also supports rear-connect motherboards (BTF, Project Zero, Stealth) for that ultra-clean, wire-free aesthetic. There’s plenty of room to route the cables through the grommets. Speaking of grommets, I like when cases use these as it further hides the wires. However, they almost always come out of their spaces easily, including on the TG3. I wish they were glued in so you didn’t have to push them back in after you’re doing cable routing.

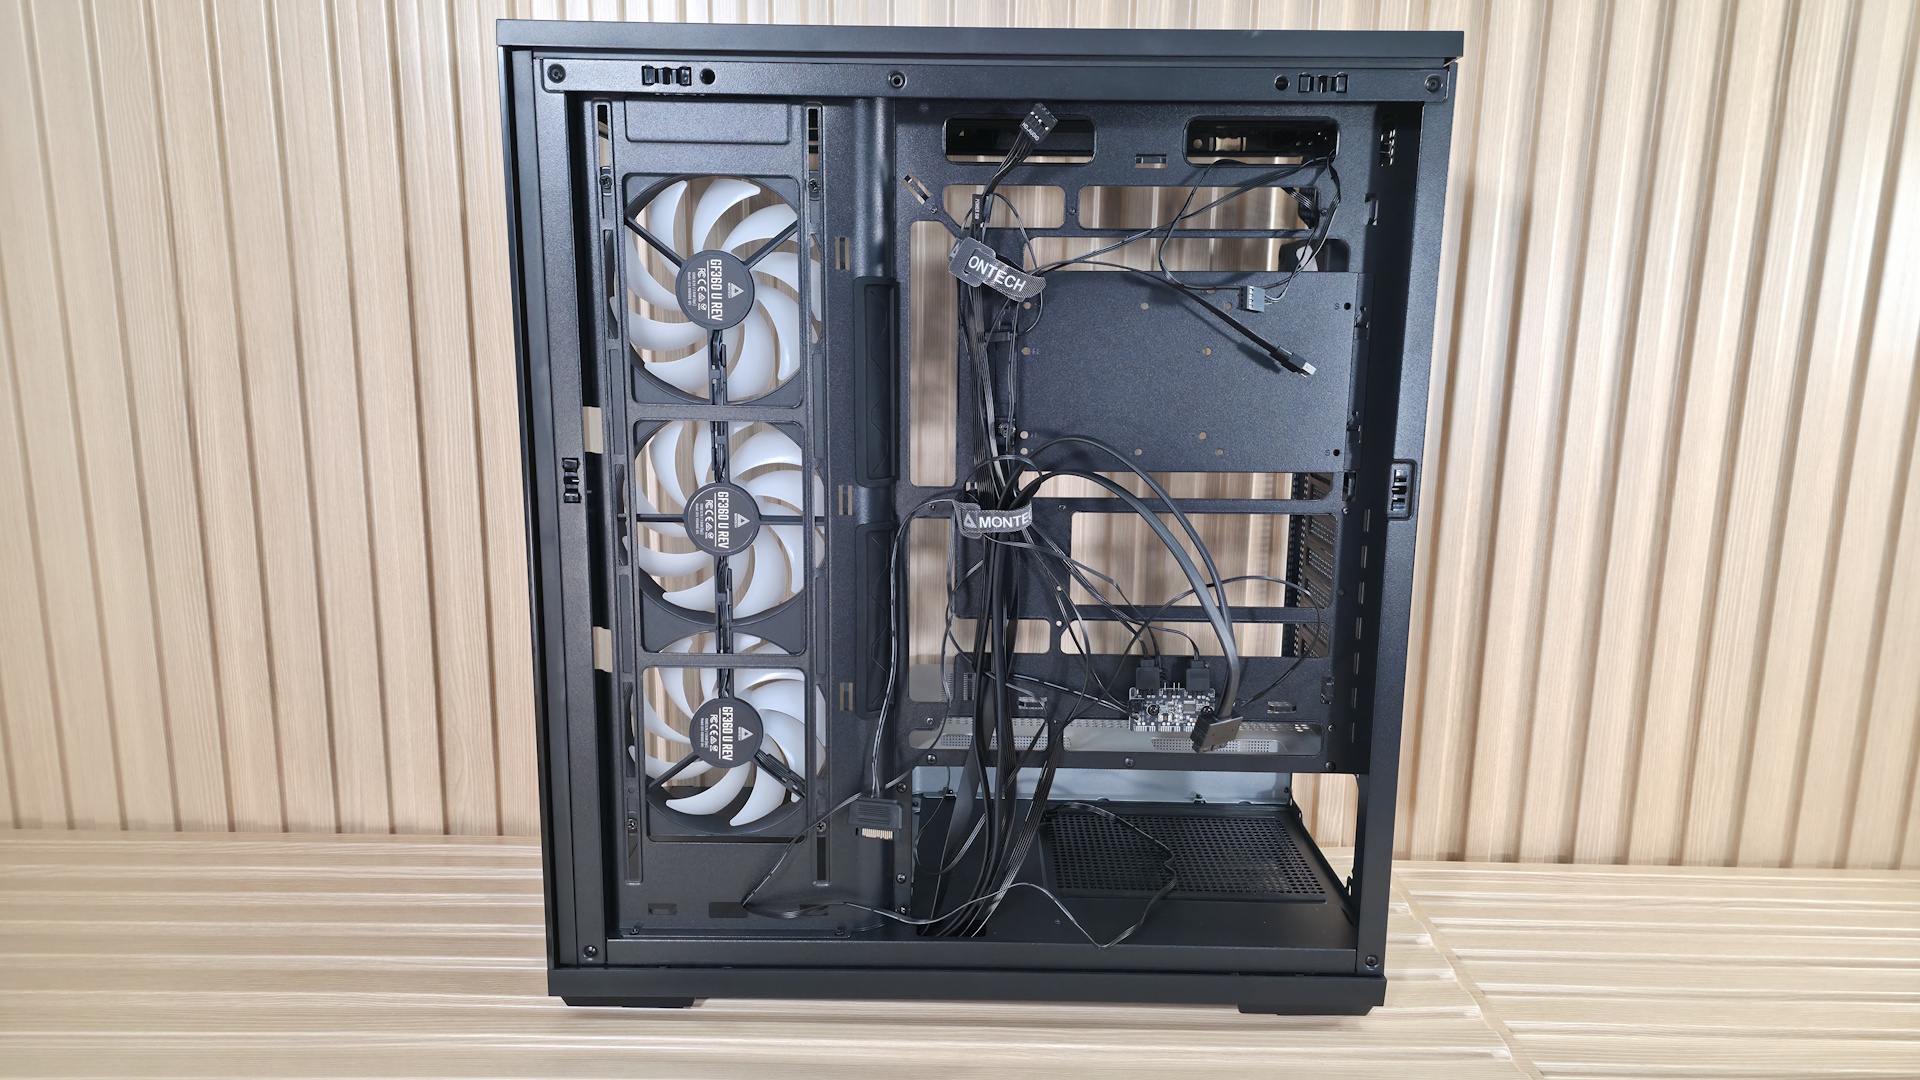
As you can see, the chassis comes with a total of four 120mm fans, with three on the side as intake and one rear exhaust. The fans hail from Montech's GF U line, specifically the unibody GF360 U Rev, and a GF120 U for the rear. Both 25mm-thick fans have ARGB blades and spin at 800-1,600 RPM on Hydrodynamic bearings. Montech lists airflow up to 73.1 CFM and static pressure around 1.71 mmH2O. That's not a lot of static pressure, but it doesn’t need to be, since they are case fans with relatively low resistance. Montech says it does so at a whisper-quiet 25.3 dBA. And while we can’t fully verify the fan's specs, the case was quiet out of the box during our full-load tests.

The top of the case pops off from below, by more of those ball-and-socket capture mechanisms. From the inside, you can mount three 120 or 140mm fans/radiators, with plenty of room for a standard-thickness radiator and fans. Outside of that, there’s nothing special in this area.

The next internal feature worth calling out is the PSU shroud. While it might sound boring, there’s actually a lot going on here. First, in the black chassis, the shroud is gray and doesn’t match. This was an intentional design choice to make it stand out in the black colorway, but personally, I’m not sold on it and would like to see it all in black. That said, the white TG3 does have it matching in white. Running along the edge is a frosted RGB strip that adds a bit more ‘native’ bling to the case. Finally, on top of the chamber there is room for two additional 120mm fans to cool the graphics card directly, but using those removes at least one PCIe expansion slot.

Flipping the case around to the back side and opening it up, we get a better shot of the unibody GF360 U fan mounting. Note that you have some vertical flexibility in mounting location (what you see is how it arrived). There isn’t a ton of space for stashing cables behind the motherboard panel, but enough, and Montech includes two Velcro ties for a cleaner look. When installing our test system inside, I stashed what I could in with the power supply, which worked fine, even if it was a bit tight.

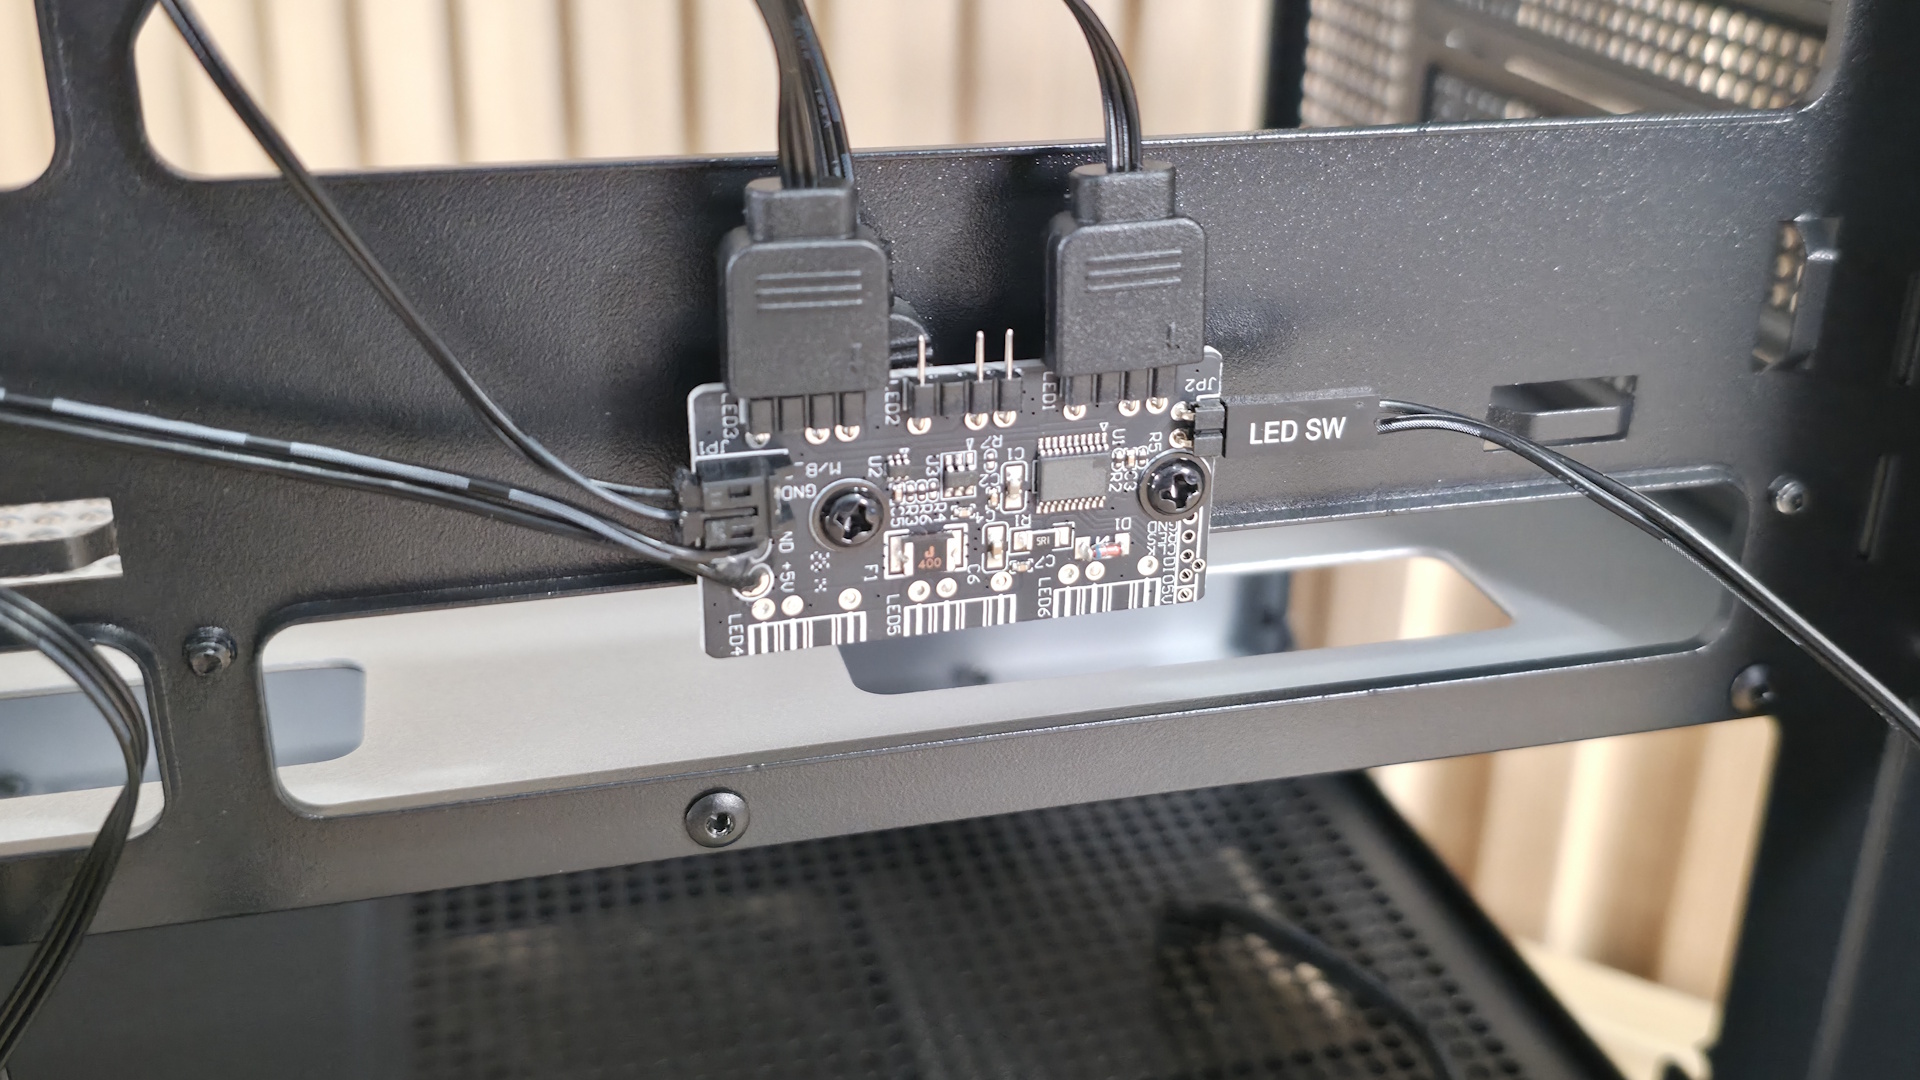
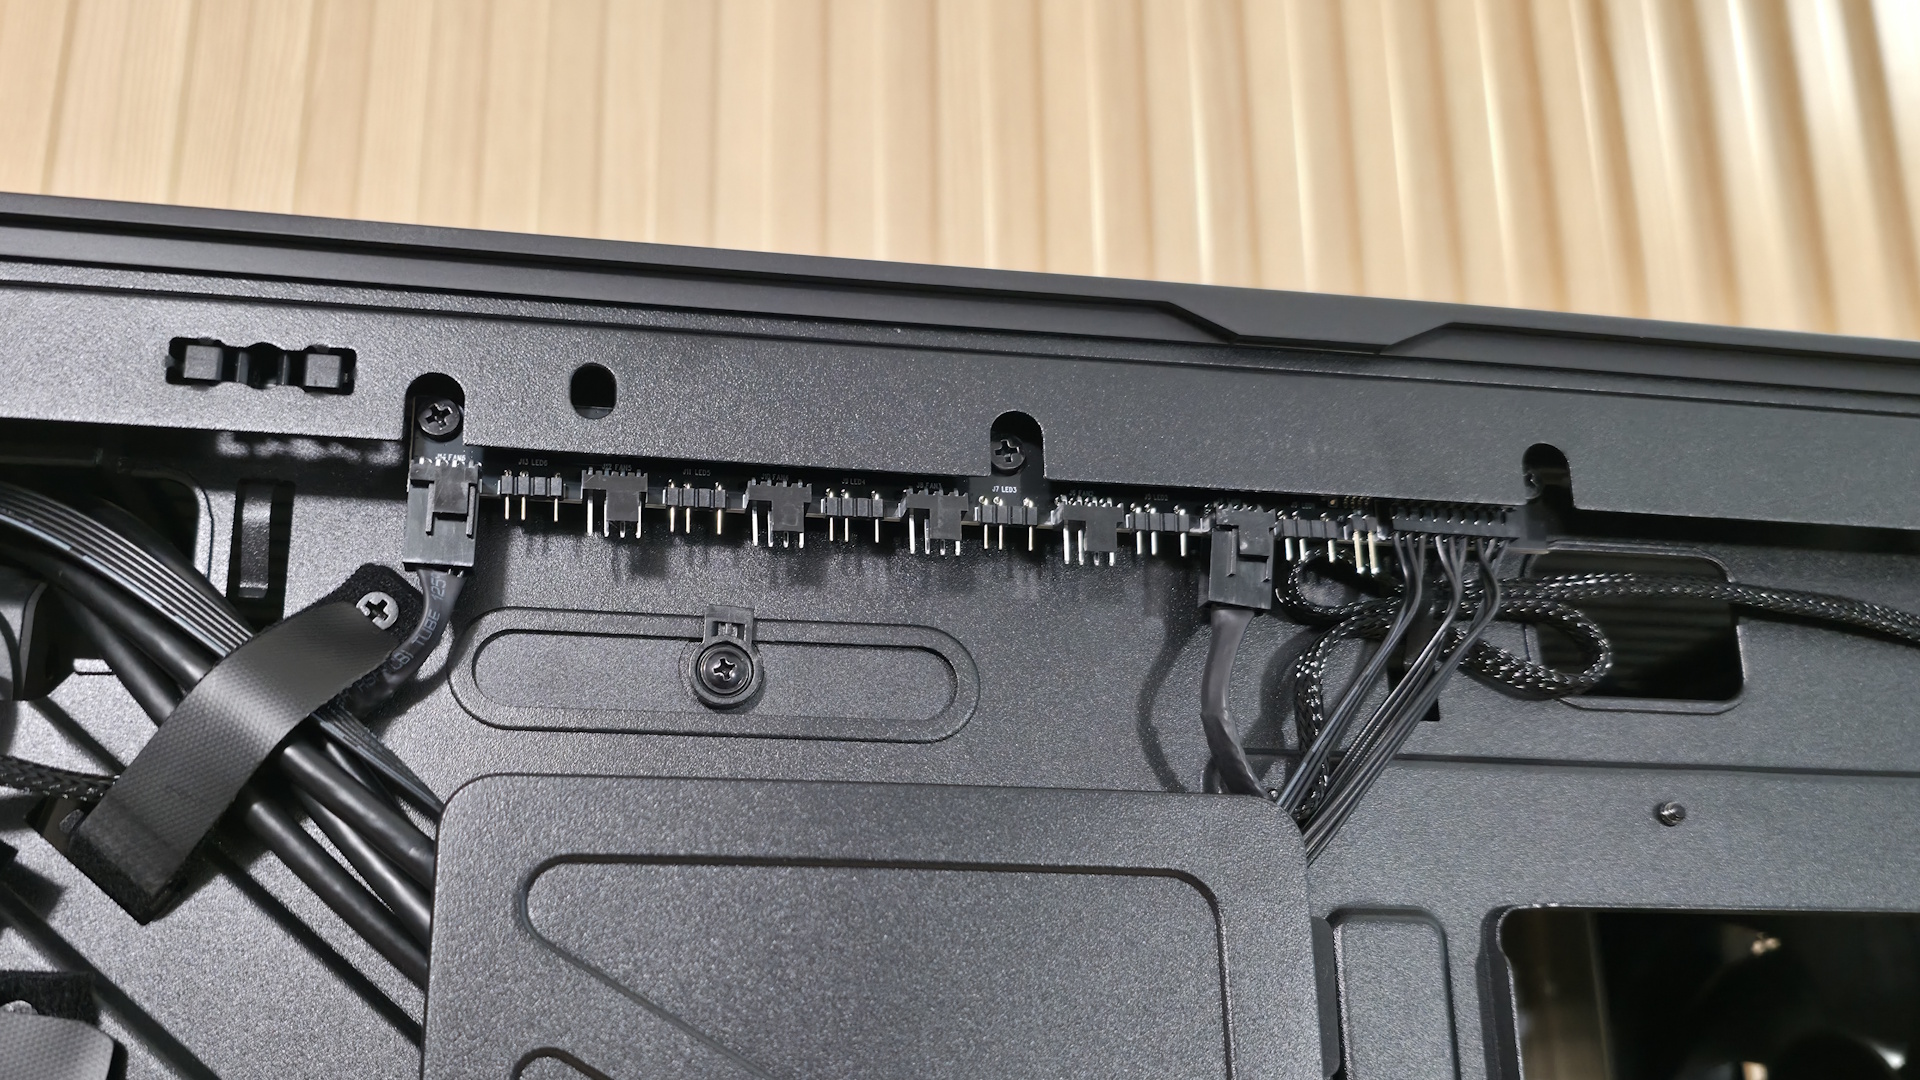
Surprising for a sub-$60 case, the TG3 also includes an ARGB hub mounted to the back of the motherboard tray. The hub supports up to three 3-pin ARGB devices. The GF360/120 U fans already take two, but there’s still one available in case you want to control the PSU shroud (or whatever you attach to it) by the button on the front of the case, too. Many would prefer the motherboard to control all their devices, but this is still a great value-add.

Montech TG3 - build
Future
Montech TG3 - build
Future
Montech TG3 - build
Future

My takeaways from this case are the great internal views and the unique RGB lighting strip that runs along the power supply chamber. There’s plenty of room for large air coolers (up to 180mm) and graphics cards up to 430mm and 3.5 slots thick with standard mounting. I also liked the strong out-of-the-box CPU performance with only the included fans, and how quiet it was with all fans running at full speed. Read on for details.

Test equipment, method, and results

Our thermal tests are presented to give you more information about the product’s performance, but aren’t intended as the sole basis for judging the chassis. The style, price, features, and noise levels of a case should also be considered, and we all have different preferences. What I might like in a case, you might not, and that’s OK. Our goal with these reviews is to give everyone, regardless of their preferences, enough information to decide whether a case is right for them.

To get heat into the system, we stress the CPU with Cinebench R26 (multi-threaded test) and the video card with Furmark 2 (1080p). CPU and GPU tests run concurrently for 30 minutes, allowing the air-cooled system to reach saturation and stabilize over that period. We then let the system idle for 15 minutes, adjust the fans to 100%, and test again.

Noise-normalized (42dBA) Maximum thermal Performance

This set of tests is designed to appeal to those who love quiet PCs, with both system fans and the CPU fan noise normalized to 42 dBA. Consider this a measure of the case’s thermal efficiency when noise levels are set to run quietly. It is audible, but just (at least for my old ears).

Montech TG3 - Noise Normalized results
Future
Montech TG3 - Noise Normalized results
Future

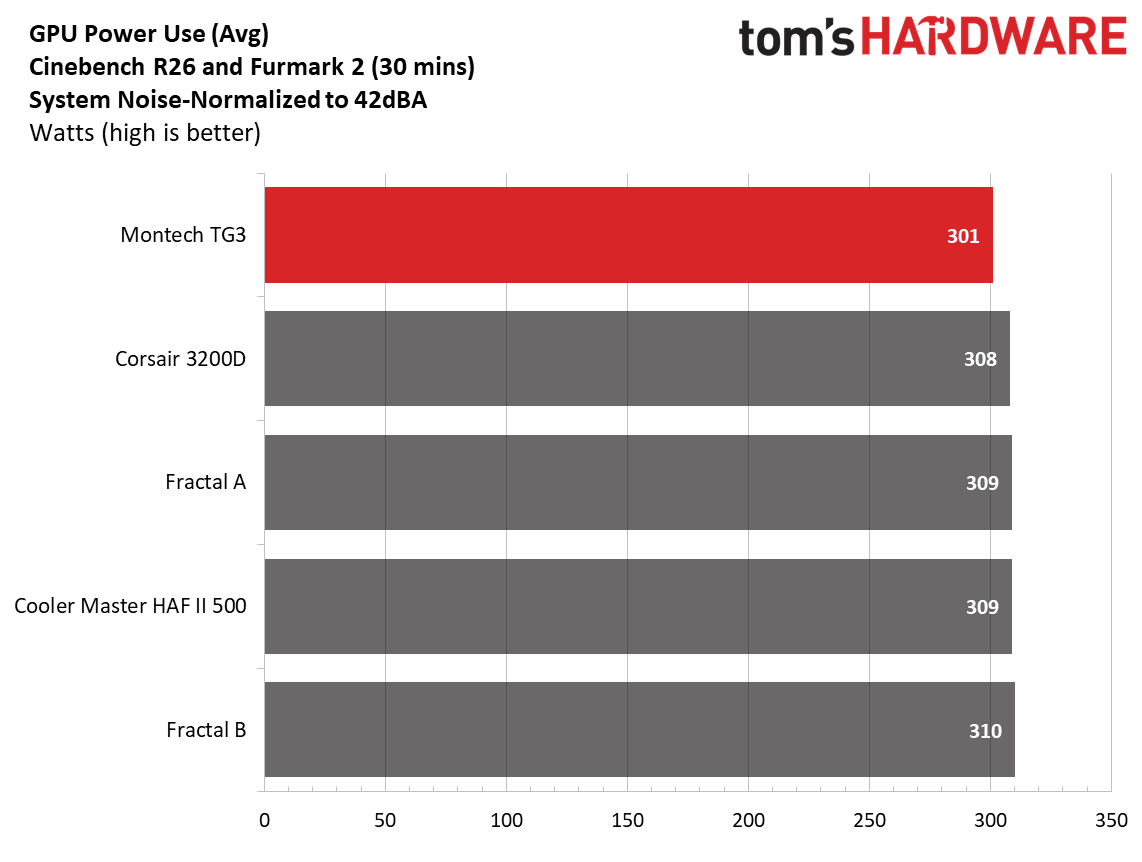
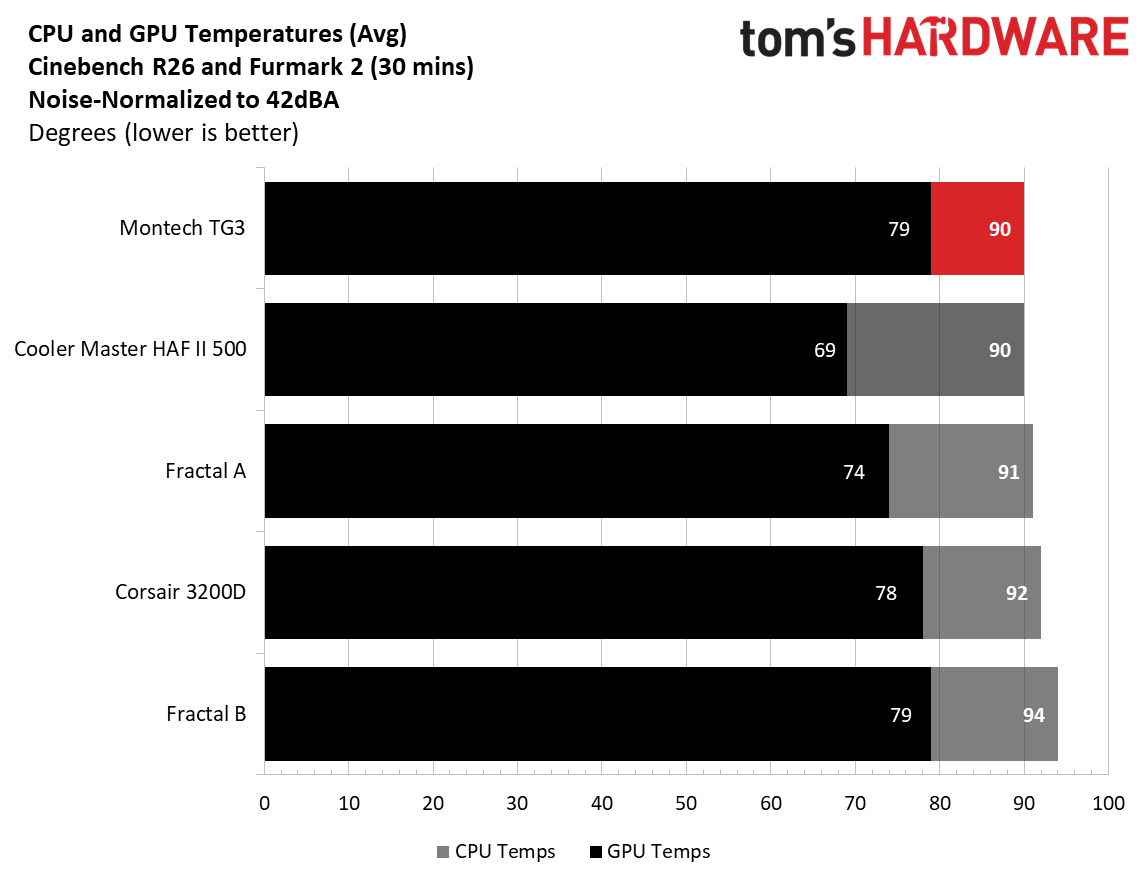
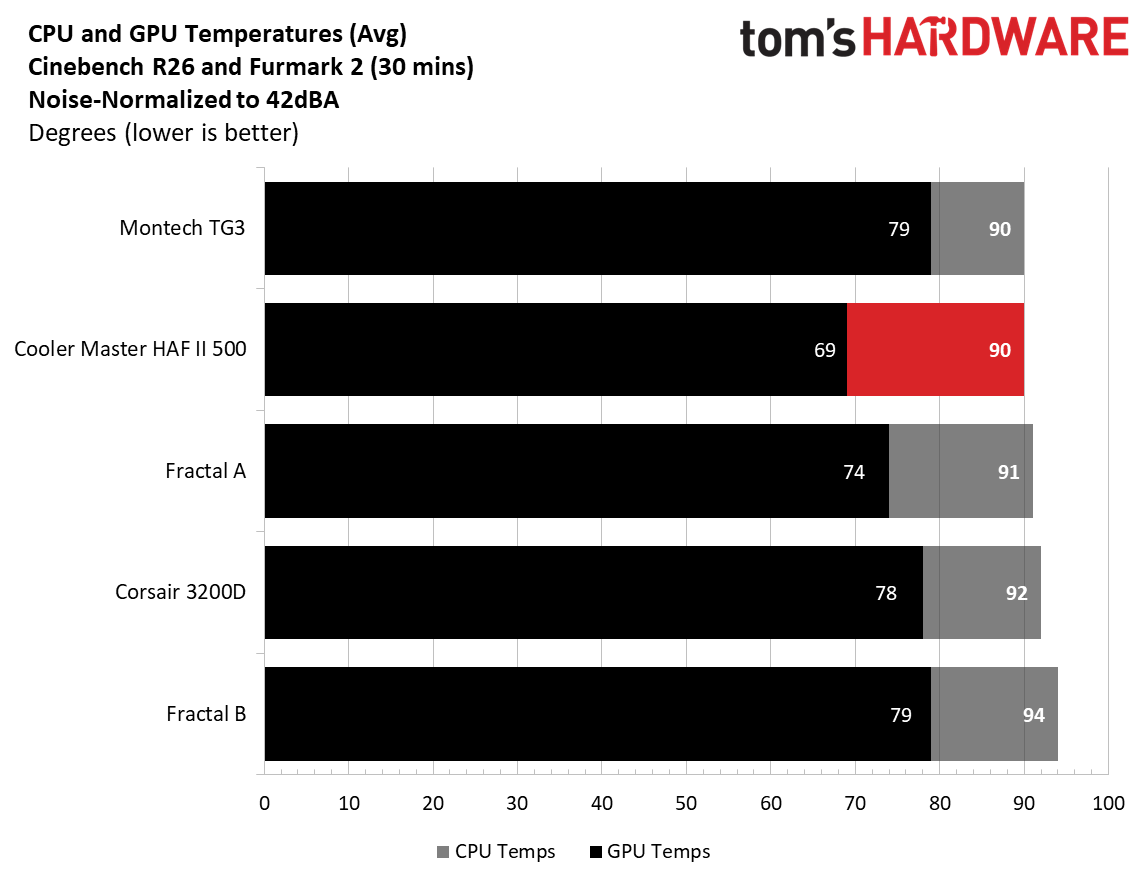
As far as noise-normalized performance goes, the Montech TG3 did well, matching CPU temperatures with the likes of the Cooler Master HAF II 500, and its massive fans at 90 degrees Celsius. Video card temperatures averaged 79 degrees, the highest so far, and tied with one of the Fractals. Adding more exhaust fans (alone or an AIO) to the top of the case should improve airflow and cool the GPU by a couple of degrees. Or, if you’re really concerned about keeping GPU temps low, mount two fans on top of the PSU chamber. We’re not at all worried about what you can put inside and keep cool.

Maximum thermal performance - fans at full speed

Our noise-normalized results are designed for folks who prefer silence, but what if you don’t mind additional noise and just care about maximum performance, or maybe you have to run things at high settings to keep high-powered devices cool? This testing is for you. Obviously, when you add fans or an AIO up top, things will change a bit, but this gives you a great idea of ‘out-of-the-box’ performance, noise be damned.
Montech TG3 - 100% fan
Future
Montech TG3 - 100% fan
Future

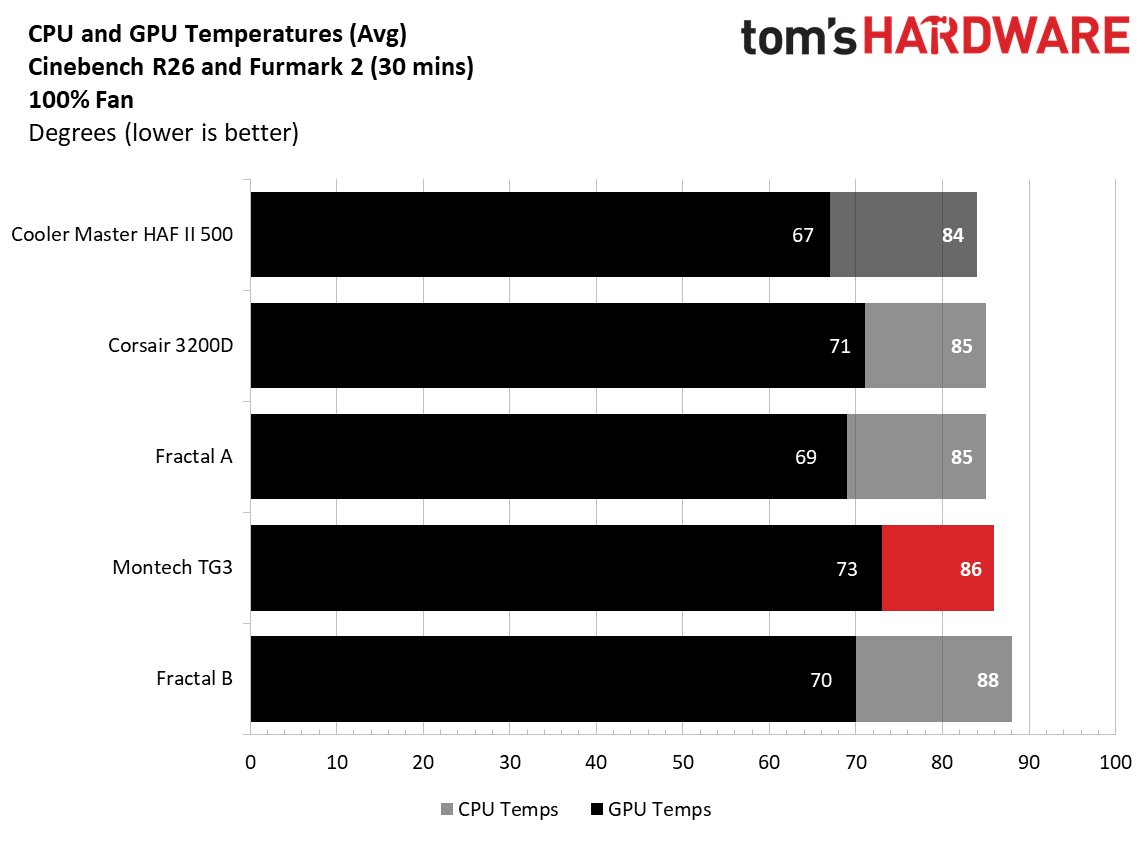
After setting the fans to 100%, the CPU only dropped four degrees Celsius and was on the higher end of the temperature range. The video card dropped six degrees, but still ran the warmest of our current data sets by a couple of degrees Celsius over the Corsair 3200D, which we covered a couple of months ago.

Maximum Noise Levels

We measure the noise levels with a sound meter from one meter away from the computer case, with the pre-installed fans running at their maximum RPM. If a case does not have enough included fans for airflow (intake and exhaust) as configured, we add a Cooler Master M120 ARGB, since we expect most users will add at least one more fan in situations like these.
Montech Tg3 - Max noise

(Image credit: Future)

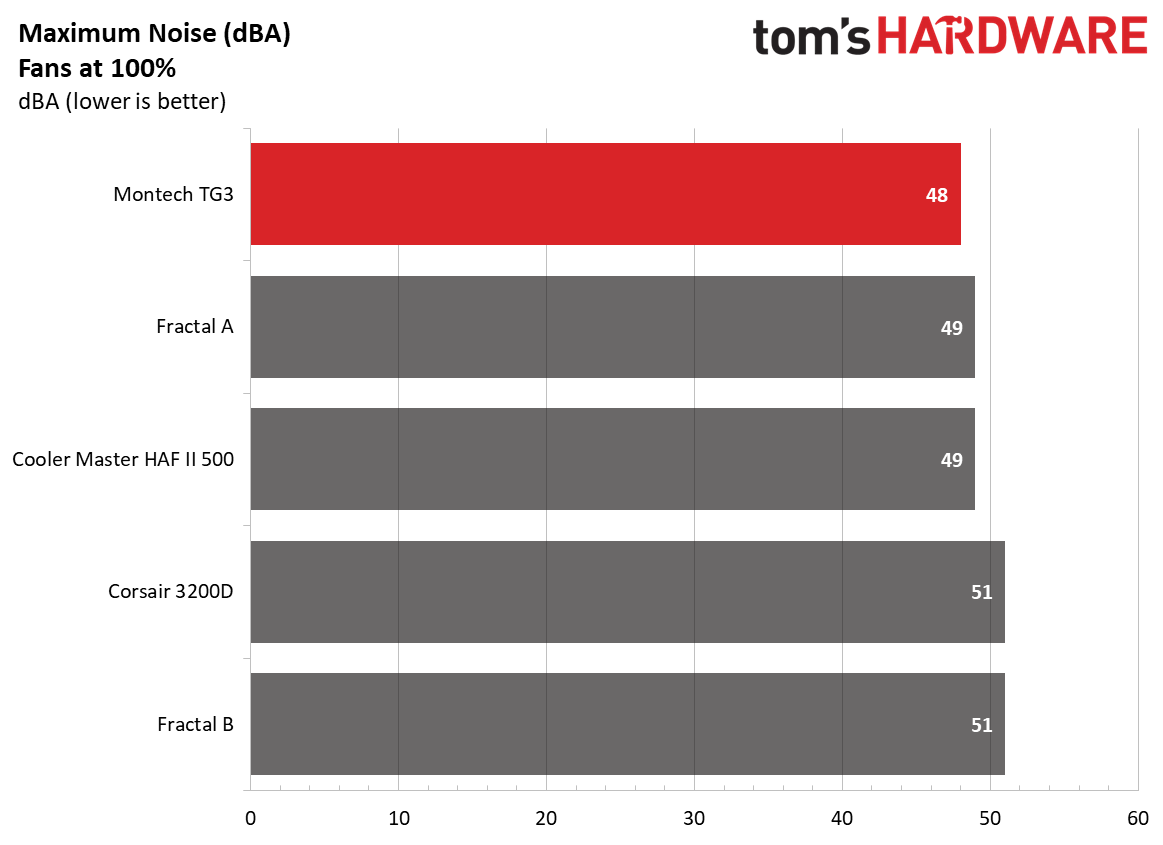
When we cranked the included fans to 100%, the TG3 was actually the quietest of our five data sets, at 48 dBA (only 6 dBA above our testing point), beating out even one of the Fractal units that comes with sound-damping panels. Impressive.

Conclusion

When I think about a $60 PC case, the words cheap, flimsy, and ugly come to mind. But lately, there’s been a push for cheaper cases in the market, likely due to the AI apocalypse that’s sent memory, storage, and video card prices to the moon over the past several months. Montech’s TG3 at $59.90 breaks that mold in my head, offering users a well-built and good-looking case that includes four (OK, technically two because one is a full-frame 360mm) ARGB fans, and it doesn't feel cheap, flimsy, nor is it ugly.

The case performed well overall, with good noise-normalized CPU performance, and was one of the quietest with the fans at 100% so far. It had good overall CPU cooling performance, but the GPU ran a couple of degrees warmer than most other chassis so far. The showcase space is cool if you plan to use it, but could otherwise be used to improve GPU cooling and for additional cable management space. I like the PSU chamber’s ARGB strip. It looks cool, and the silver color adds some contrast inside the all-black interior, but some may prefer matching black. I’d also like to see a 20 Gbps-capable Type-C port on the front panel, but I need to remind myself that this is a budget case and 10 Gbps is common at that tier.

Overall, Montech’s TG3 is a very good case for $60. In fact, I liked the overall value so much it found a place on our best cases list, knocking off the more expensive, longstanding Lian Li Lancool 2007 ($82.99) for best budget case. If you’re in the market for a new case and don’t have a huge budget, you get a lot of bang for your buck with the Montech TG3.

Cooler Master HAF II 500 Case Review: New HAF delivers on its name, with impressive airflow and a roomy chassis

2026年7月13日 23:00

Cooler Master's HAF series of cases burst onto the scene in 2008 with the HAF 932, and it quickly became a favorite among the enthusiast crowd for its high airflow (High Air Flow) and massive 200 mm fans. From there, we've seen the HAF X (2010), the cube-shaped, dual-chamber HAF-XB (which I owned), and the spiritual successor, the MasterCase H 500 series of 2017 (there are other iterations, but these are the major releases). The HAF name was resurrected in 2022 with the HAF 500, again sporting large 200mm fans and returning to a focus on pure thermal performance. Fast-forward to today, and Cooler Master has released the HAF II 500 ($199.99), which the company calls “the next evolution of the High Air Flow series…” and is designed for “industry-leading noise-normalized cooling performance.”

The beefy mid-tower sports two huge 220mm fans up front and a large 180mm exhaust fan (all 40mm thick) in the rear to move large amounts of air quietly and keep the internals running optimally. And let me tell you, there is a lot of room inside for just about anything. Are you working with an E- ATX motherboard? No problem! 3.5-slot, 350 mm-plus video card or two? Easy. Considering two 3x140 mm radiators? You can do that, too. There's a lot of room and flexibility for all kinds of components, and we haven’t even mentioned the MasterRail system yet.

Externally, the black (the only colorway currently available) mid-tower is more of a typical cuboid shape, though wider than most mid-towers – over 10 inches due to the massive 220mm fans up front. The front panel has vertical slats running from top to bottom, with the Cooler Master brand shape (an angular, rounded-off hexagon) woven over the slats, with the same pattern used on top. Overall, it's an aggressive but good- looking chassis, and you know it means business with the huge fans visible through the front grille.

We'll cover many more details inside and outside the case, showcasing the features and any issues we may encounter during the build process. We also run the case through our thermal and noise testing to give you an idea of how it performs compared to other cases and see if it makes our best PC cases list. Below are the specifications from Cooler Master’s website.

Product Specifications

Type

Mid-Tower

Dimensions (H x L x W)

21.5 x 21.9 x 10.1-inches (548 x 557 x 262mm)

Motherboard Support

Mini-ITX/DTX, MicroATX, ATX, CEB, E-ATX

Color

Black

Storage Support

(3) 3.5-inch -or- (6) 2.5-inch

PCIe Expansion Slots

8

Fan Support

Top - 3x120/140mm or 2x160/180mm
Front - 2x220mm, 3x120/140mm or 2x160/180mm
Rear - 1x180mm

Pre-installed fans

(1) Mighty40 V1180 (Rear)
(2) Mighty40 F220 (Front)

Radiator Support

Top - 3x120, 2x180, 240/280mm
Front - 3x120, 2x180, 240/280mm
Rear - 1x180mm

CPU Cooler Clearance

220/221mm (AMD/Intel)

GPU Clearance

430mm

Vertical GPU Support

Yes

PSU Length

150/210mm (North/South and East/West)

Dust Filters

Top, Front, Bottom (PSU)

Other features

3x included fans, 2x 3x140mm radiator support, dual GPU supports, MasterRail flexibility,

MSRP

$199.99

Warranty

2 Years (case), 5 Years (fans)

Features of the HAF II 500

▶️ External Features

As far as looks go, it’s a design (or at least a shape) we’ve all seen before, except that the HAF II 500 is a bit wider than most mid-towers. The front panel looks good and showcases the huge 220mm fans behind it, along with a filter to keep dust out. It also has the “HAF” and “500” branding on tabs on each side, along with a shiny Cooler Master symbol in the middle. The panel is secured by tabs at the bottom and magnets on top. It pops off with a gentle tug from the top, exposing the removable dust filter and those massive fans.

Cooler Master HAF II 500- Case outside
Future
Cooler Master HAF II 500- Case outside
Future
Cooler Master HAF II 500- Case outside
Future
Cooler Master HAF II 500- Case outside
Future
Cooler Master HAF II 500 - Front IO
Future
Cooler Master HAF II 500- Case outside
Future
Cooler Master HAF II 500- Case outside
Future

The windowed side panel and non-windowed back panel attach to the case similarly, with tabs to line things up at the bottom, a ball-and-socket capture mechanism, and a thumbscrew on top for each. The top panel, also filtered, hangs on via a single thumbscrew and slides off toward the back, giving access to the flexible MasterRail system on top. Also at the top front, angled down, is the IO panel. It consists of a power button with a white LED, a small reset button on the right, three USB ports, and a single 3.5mm audio jack for audio and microphone. You get one USB 3.2 Gen 2x2 (20 Gbps) Type-C port and two USB 3.2 Gen 1 (5 Gbps) Type-A ports that flank both sides of the power button. It’s nice to see a 20 Gbps port up front, as many cases use 10 Gbps.

On the rear of the case, you can see that all airflow holes are shaped like the Cooler Master branding/symbol and appear to have less resistance, at least by air-to-grating ratio, than most others with much smaller spaces. That said, it’s probably a good idea to run slightly more intake than exhaust, or you could pull some dust in from this area (something most cases have to deal with). The power supply mounts on the bottom, in either a fan-up or fan-down configuration, and last are the eight expansion slots capable of holding two massive GPUs or four double-slot cards.

The chassis sits on four feet integrated into the metal frame that raise it roughly an inch off the floor to help with clean intake. The bottom uses a small dust filter for the PSU area only. It pulls out of the back, so depending on where your case lives, you may need to move it to get it out. But the good news is that it’s short, so you don’t need as much clearance as if it ran the full length of the case, as others do.

▶️ Internal Features

Moving inside the case, one of the first things you’ll notice is the amount of room inside, the huge fans, and the scoop to improve video card cooling. Since it’s over 10 inches wide, it feels like you’re working in a warehouse, with room for whatever components you can think of (within reason, of course). Starting at the front, we get a better look at the two Mighty40 F220 fans that bring air into the space. These dual ball-bearing fans spin from 200-1,500 RPM, and according to the specifications, each one moves over 203 CFM of air at 3.1 mmH2O static pressure, and does so at a low 36 dBA. This area supports up to 3x 120 mm fans/radiators or 2x 180 mm fans/radiators (up to 72mm thick if the air divider is removed).

Cooler Master HAF II 500 - Interior images
Future
Cooler Master HAF II 500
Future
Cooler Master HAF II 500 - Interior images
Future
Cooler Master HAF II 500 - Interior images
Future
Cooler Master HAF II 500 - Interior images
Future

Inside, a split-level layout separates the power supply and drive storage areas from the rest of the case. Towards the front is a sloped baffle covering part of the bottom fan, directing most of the air up towards the video card. The rest is dispersed within the power supply chamber, cooling any 2.5-inch (up to six) or 3.5-inch (up to three) drives in the space.

The panel where the motherboard mounts has an interior-sliding panel and a rear door, which makes building your rig and routing cables much easier. You don’t have to play games moving from one side to the other to find and plumb them; just send the cables through the large gap when both are open and connect. Easy. Once you’re done, slide the interior panel and secure it at the top with a twist of the tab (the thumbscrew at the bottom lets it slide fore and aft), so you can’t see the wires. It’s a really clean look. Also attached to that panel is the mount for the GPU support strut(s). It comes with one already mounted, but includes another in the accessories kit, to support two graphics cards.

The HAF II supports up to E-ATX motherboards and comes with the motherboard standoffs already installed (as we expect at this price point). There’s a large cutout on the motherboard baffle and plenty of room to install cooling hardware with the board already mounted. One thing I’d like to see in this case that isn’t here is rear-connect (BTF, Stealth, Project Zero) support for motherboards. You’ll have to use a ‘traditional’ motherboard. Cooler Master does stamp out plenty of holes around the edge of the motherboard real estate for cable routing.

Cooler Master HAF II 500 - Inside
Future
Cooler Master HAF II 500 - Rear fan
Future
Cooler Master HAF II 500 - Inside
Future
Cooler Master HAF II 500
Future
Cooler Master HAF II 500 - Inside
Future
Cooler Master HAF II 500 - back panel door open
Future
Cooler Master HAF II 500 - Inside
Future

The rear of the case holds the third included fan, in this case, a Mighty40 V180. This big guy spins from 25 to 1,370 RPM and delivers over 161 CFM at 4.0 mmH2O static pressure, at only 34 dB(A), according to the specifications. Below that are the eight PCIe expansion slots, which allow you to install up to two 3.5-slot video cards (72mm with two cards, up to 40mm each if installing four cards), rare for a mid-tower. You can run a single vertical GPU, but you’ll have to buy an adapter (PCI 4.0 or 5.0) separately.

Sliding off the top of the case (it moves back an inch or so, then lifts) exposes the MasterRail multi-purpose mounting system for fans or radiators. The rails and fully adjustable mounting points allow flexible placement of fans and radiators, enabling easy upgrades and fully custom setups. This space supports up to 3x 120 mm fans/radiators or 2x 180 mm fans/radiators (up to 58mm thick).

Flipping the case around to the back, we can see the second chamber at the bottom, along with space for the power supply and drive bays. The three pre-installed drive caddies support up to three 3.5-inch drives or six 2.5-inch drives, which is a lot in the age of M.2 form factor SSDs. PSU clearance is up to 210mm when the drives are installed in East-West orientation (pictured), and 150mm when you turn them North-South. As is, there’s enough room to hide your cables, but I wouldn’t call the cable space plentiful with all the caddies in place and East-West oriented.

Cooler Master includes several pre-installed Velcro strips for cable routing, and when you take the time to use them, they can really keep things clean in this normally messy area. In the middle, you can see that ‘door’ we talked about earlier to help with cable management. Again, open this up, slide the front one back, route your cables, slide the front back, and secure this rear one with two captive thumbscrews. I’d like to see captive thumbscrews on the side and top panels, too.

Along the top edge, we can see the included fan hub. The SATA-powered device supports up to six 4-pin PWM fans and six 3-pin ARGB devices. It supports up to 32W, which means you can use up to six ~5W fans.

The takeaways for me here are how much room there is for components and fiddling around, the copious amount of airflow, and how quiet it is at low speeds (and how it performs there as we’ll see in our testing below).

Test equipment, method, and results

Our thermal tests are presented to give you more information about the product’s performance, but aren’t intended as the sole basis for judging the chassis. The style, price, features, and noise levels of a case should also be considered, and we all have different preferences. What I might like in a case, you might not, and that’s OK. Our goal with these reviews is to give everyone, regardless of their preferences, enough information to decide whether a case is right for them.

To get heat into the system, we stress the CPU with Cinebench R26 (multi-threaded test) and the video card with Furmark 2 (1080p). CPU and GPU tests run concurrently for 30 minutes, allowing the air-cooled system to reach saturation and stabilize over that period. We then let the system idle for 15 minutes, adjust the fans to 100%, and test again.

Noise-normalized (42dBA) Maximum thermal Performance

This set of tests is designed to appeal to those who love quiet PCs, with both system fans and the CPU fan noise normalized to 42 dBA. Consider this a measure of the case’s thermal efficiency when noise levels are set to run quietly. It is audible, but just (at least for my old ears).

Cooler Master HAF II 500 - thermals
Future
Cooler Master HAF II 500 - Noise normalized charts
Future

The HAF II 500 and its gigantic wind movers did a good job keeping our Intel Core Ultra 9 270K Plus running below its throttling point with ease, like the others. Temperatures peaked at 90 degrees Celsius, the best result (matched by the Montech TG3) among the five datasets we have on our new Intel-based test system. The HAF churned out the lowest video card temperature by far (5 degrees) in the group, which averaged 69 degrees Celsius, making this chassis great for high-power graphics cards for gaming, AI, rendering, or other GPU-heavy, compute-intensive workloads.

Maximum Noise Levels

We measure the noise levels with a sound meter from one meter away from the computer case, with the pre-installed fans running at their maximum RPM. If a case does not have enough included fans for airflow (intake and exhaust) as configured, we add a Cooler Master M120 ARGB, since we expect most users will add at least one more fan in situations like these.

Cooler Master HAF II 500 - Noise with fans @ 100%

(Image credit: Future)

With the three massive fans cranked and moving copious amounts of air, the new HAF peaked at 49 dBA, placing it in the middle of our current data sets. The Montech was the quietest at 48 dBA, a mere 1 dBA difference. Subjectively, the three Mighty40 fans' tone wasn’t unpleasant when fully cranked, and there was way more wind noise, with little audible mechanical noise. At the lower noise-normalized speed, it also didn’t emit harsh tones.

Maximum thermal performance - fans at full speed

Our noise-normalized results are designed for folks who prefer silence, but what if you don’t mind additional noise and just care about maximum performance, or maybe you have to run things at high settings to keep high-powered devices cool? This testing is for you. Obviously, when you add fans or an AIO up top, things will change a bit, but this gives you a great idea of ‘out-of-the-box’ performance, noise be damned.

Cooler Master HAF II 500 - Fans @ 100%
Future
Cooler Master HAF II 500 - Thermals 100% fan
Future

Maximum thermal performance – fans at full speed

Our noise-normalized results are designed for folks who prefer silence, but what if you don’t mind additional noise and just care about maximum performance, or maybe you have to run things at high settings to keep high-powered devices cool? This testing is for you. Obviously, when you add fans or an AIO up top, things will change a bit, but this gives you a great idea of ‘out-of-the-box’ performance, noise be damned.

Cooler Master HAF II 500 - Thermals 100% fan
Future
Cooler Master HAF II 500 - Fans @ 100%
Future

As we cranked the fans up, temperatures dropped 6 degrees Celsius from the noise-normalized testing to an average of 84 degrees for the HAF II 500. Video card temperatures only dropped two degrees Celsius to 67 degrees, but the HAF was still leading the pack. Overall, the huge fans did a great job of keeping our internals cool, especially with the graphics card.

Conclusion

Cooler Master’s new HAF II 500 ($199.99) carries on the HAF legacy, focusing on what made the series popular in the first place: moving a lot of air. The three pre-installed Mighty40 fans delivered excellent thermal performance in our testing, leading the pack on GPU temperatures and tying for the best CPU result on our new platform. The mid-tower not only supports a wide variety of hardware configurations, including up to four dual-slot graphics cards or two colossal 3.5-slot cards, but also cools them better than any of the five cases we’ve tested in this new setup so far. That may change over time, but for now, it’s the king of the hill, especially for video card cooling.

At just under $200, the HAF II 500 isn’t inexpensive, but it's built for enthusiasts who prioritize cooling performance without sacrificing acoustics. With massive fans, excellent airflow, a noise-optimized profile, flexible interior configurations, and a clean, built-for-purpose appearance, Cooler Master has delivered a worthy successor in the HAF lineup. It also made our Best PC Cases list as the best premium airflow chassis. So if you have the budget for a gaming, AI, rendering, or other high-power configuration, the HAF II 500 is a well-rounded sub-$200 chassis that keeps everything inside running optimally, and it does so without being loud.

Hands-on with Corsair's 2800X RS-R ARGB Micro-ATX PC Case – smaller footprint, roomy internals, includes three fans

2026年7月7日 20:00

Corsair recently launched the 2800X RS-R ARGB, an all-new chassis that's the first MicroATX case in their lineup since the 2500X (and 2500D), released in early 2024. According to Corsair, the 2800X is essentially a shrunken version of the veritable mid-tower 3500X. It shares a similar design with wraparound windows to showcase your internals. Still, it's two inches shorter and more compact, with a smaller footprint. Even though it's a smaller case, there's still plenty of room inside for large graphics cards and even 360mm radiators. At $89.99, it's aimed squarely at budget-conscious buyers and those who need a smaller-footprint case without sacrificing room to build.

The 2800X RS-R looks like a typical vertical MicroATX PC case with panoramic glass panels on the front and side. On top of the case is a magnetic dust filter, along with the IO panel at the front right. The back of the case is perforated (and filtered) to let cool air inside via the three included RS 120-R ARGB PWM fans on the other side. The rear of the case has room for a 120mm fan on top, four horizontal expansion slots that support large video cards, and a bottom- mounted power supply. It's an attractive-looking case overall, and does an especially good job of showcasing the components inside through the panoramic glass.

The MicroATX chassis supports Mini-ITX and MicroATX motherboards, as well as rear-connect boards for a visually wire-free, connector-free appearance. There are plenty of cutouts to route cables for either size motherboard into the ample space behind the motherboard tray. To prevent GPU sag, it also features an integrated support strut that stabilizes and holds heavy graphics cards. It also supports up to 10 fans in total and two radiator locations, which bodes well for cooling performance.

For under $90, the MicroATX 2800X RS-R offers good value in the small form-factor space and can accommodate full-size hardware without feeling cramped internally. Below, we'll cover the specifications from the Corsair website and share more detailed thoughts after completing a mock build.

Corsair 2800X RS-R ARGB Specifications

Motherboard Support

Micro-ATX / Mini-ITX

Color

Black and White

Type

MicroATX

Case Dimensions
(H x D x W)

436 x 447 x 232mm (17.1 x 17.6 x 9.1-inches)

2.5/3.5-inch drive support

1x 3.5-inch or 2x 2.5-inch

I/O Panel

Power button
(1) USB 3.2 Gen 2x2 (20 Gbps) Type-C
(1) USB 3.2 Gen 1 (5 Gbps) Type-A
(1) 3.5mm combo mic/headphone jack

PCIe expansion slots

4

Pre-installed fans

3x RS120-R ARGB (120x25mm)

CPU cooler clearance

170mm (6.69 inches)

GPU clearance

410mm (16.1 inches)

PSU length

ATX

Vertical GPU support

No

Radiator support

Up to 3
Top - 240/280/360mm
Front - None
Rear - 120mm
Bottom - None
Side - 240/280/360mm

MSRP

$89.99

Other Features

Three RS120-R ARGB (reverse) fans included, Rear-connect/BTF compatible, integrated GPU support, 360mm radiator support

External Design and IO Panel

Corsair 2800X RS-R X
Future
Corsair 2800X RS-R X
Future
Corsair 2800X RS-R X
Future
Corsair 2800X RS-R X
Future
Corsair 2800X RS-R X
Future
Corsair 2800X RS-R X
Future
2800X RS-R bottom
Future

Starting on the outside, the MicroATX chassis measures 17.1 x 17.6 x 9.1 inches and is right in the ballpark of other mATX cases. The chassis is made of steel, tempered glass, and plastic, and it does feel sturdy. The tempered-glass panels are clear (not tinted) so that you can see everything inside with ease from the front and side. Both the glass and metal side panels slide into grooves at the bottom and are secured by a simple ball-and-socket fastener. The front panel glass uses only the ball-and-socket to hold it on, but all are securely fastened.
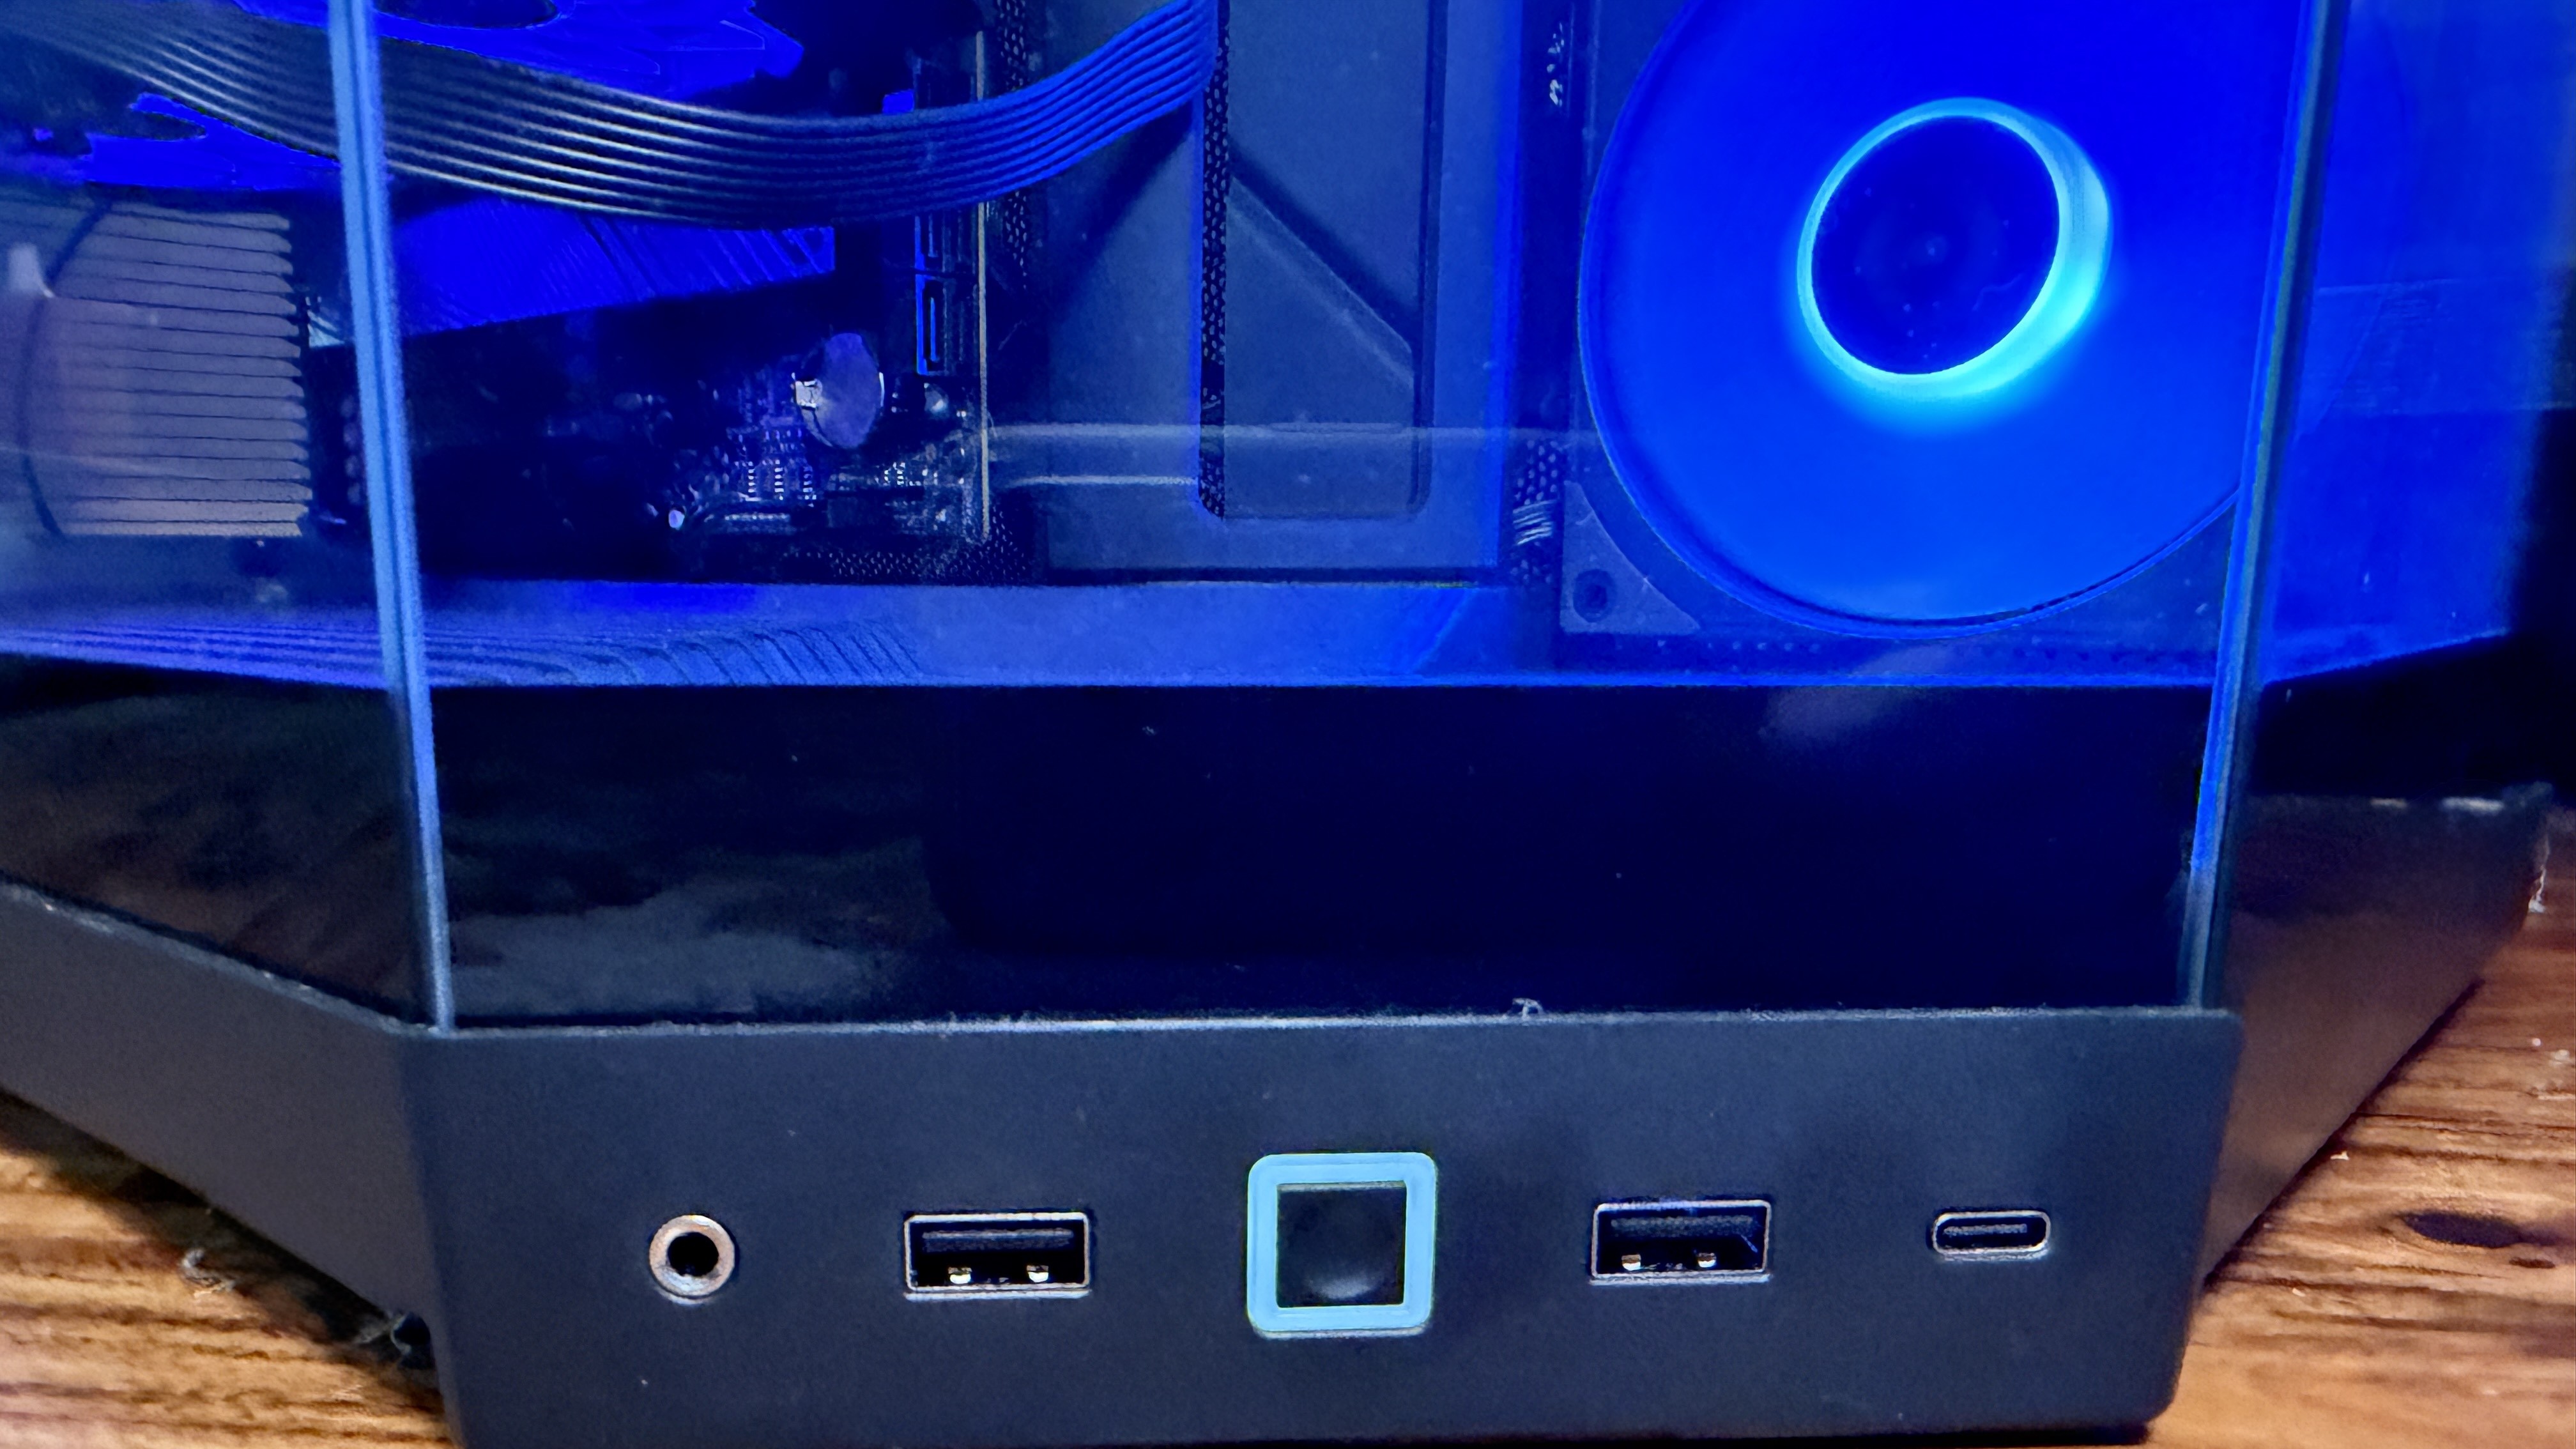
The bottom of the case has a removable dust filter that runs the entire length and slides out from the front for easy cleaning. I do like the fact that it slides out the front, as, at least for me, it is a lot easier than having to move your case to take the filter out from the rear. On top of the case is a magnetic mesh dust filter over the 360-millimeters of fan space.

On the rear of the case, you can see the space for a 120mm fan (adjustable height), the four horizontal expansion slots, and the bottom-mounted power supply. Note that for the captive screws to thread into your power supply, you must mount it with the fan down, which is ideal anyway. You have the option to mount it fan up, but you need to remove the captive screws to do so, and then you’re using the warmed internal case air to cool the power supply.

I’m thankful more and more brands are including fans at a lower price point, but I wish they would include ALL of the fans you need for proper airflow. In this case, I would like to see a fourth fan on the rear. An AIO cooler takes care of the top, but I’d still like to see a rear exhaust included, especially in cases like this, where intakes are on the side.

2800X RS-R IO Area

(Image credit: Future)

The front I/O panel includes a power button (no LED), a 3.5mm combo audio plug (mic/headphones), a USB 3.2 Gen 2x2 (20 Gbps) Type-C port, and, a USB 3.2 Gen 1 (5 Gbps) Type-A port, rounding out connectivity. It’s great to see these speeds on a budget case, as it’s often USB 2.0 and/or lacks 20 Gbps on the front panel.

Aside from the panoramic glass, the 2800X RS-R doesn’t stand out from the crowd. But it doesn’t really need to. It’s a good-looking case, and regardless of whether you choose the black or white option, it’ll show off your hardware and keep things cool inside. You’ll probably want to buy (or carry over from a previous build) at least one more fan (on the rear) for better airflow, however.

Internal Features

2800X - internals
Future
2800X - internals
Future
2800X - internals
Future
2800X - internals
Future

Moving inside, the case supports Mini-ITX and Micro ATX motherboards only, but the Micro ATX form factor fills the space better, covering the unused cutouts that are exposed with the smaller Mini-ITX board. It’s rear-connect compatible, supporting Asus (BTF), MSI (Project Zero), and Gigabyte (Stealth) boards. Behind the motherboard tray, there are plenty of paths (with pre-installed Velcro straps) to route your wires, and 24mm (0.94 inches) of space to hide them. Corsair also includes several zip-ties to help clean up the cable path and secure wires to the frame.

The 2800X RS-R supports up to 10 fans in the top, side, bottom, and rear of the case, with radiator support in the top and side. Corsair installs three RS120-R ARGB 120mm PWM fans ($39.99 for a 3-pack, $19.99 for a single). These fans spin up to 2,100 RPM, delivering up to 72.8 CFM at 4.15 mm H2O static pressure at a mere 36 dBA (according to Corsair), which is fine for case fans.

Control over the RGB is handled through the motherboard (a single aRGB header for all three). There’s plenty of room for radiators, too. You can fit up to a 360mm radiator up top and on the side, and a 120mm radiator on the rear. Corsair doesn’t list clearances, but you will be fine with standard-height radiators (27-30mm) and fans (25mm) and even a bit thicker.

The four expansion slots are typical for the MicroATX form factor and will accommodate some of the largest graphics cards, with lengths up to 410mm and 3.5 slots wide (four will fit, but with little airflow). It also has a built-in GPU Anti-sag stabilization arm to prevent your heavy video card from drooping and potentially damaging the socket or the card itself. If air cooling is your preferred method of keeping processor thermals in check, you can fit any heatsink up to 170mm tall, an overwhelming majority of those on the market. In short, you have plenty of room for your components and cooling, be it air or water.

The bottom chamber houses a full-size ATX power supply with ample room for cable management, and it’s completely hidden from view. On top, you can mount two fans, but you’ll lose room for your graphics card, too.

2800X Mock build
Future
2800X Mock build
Future

Bottom Line

After working with the 2800X RS-R, I found it easy to build in, with ample space for hardware and cable routing. The wraparound glass and clean design aesthetic make this an attractive small-form-factor chassis, and it has a smaller footprint. At just under $90 and with three included RS120-R ARGB fans, it’s also a decent value for a name-brand case. But if Computex was anything to go by, this case will face stiff competition in the budget space this year, which is good for consumers.

Like the 3200D we looked at recently, the 2800X doesn’t reinvent the wheel for small form-factor chassis. In fact, it is one of the larger MicroATX cases around (still smaller than ATX) but does put together a useful set of features like the built-in GPU support, roomy interior, reverse-connector motherboard support, and plenty of cooling room, which should be adequate for most setups.

MORE: Best PC Cases

MORE: Best Mini-ITX Cases

Taiwanese startup FormulaV Line wants to break into US market with two new unique cases — company expects products to become available on Newegg later this year

2026年6月6日 20:40
Taiwanese startup FormulaV Line wants to break into the U.S. market with these two new and unique cases. It also showed off a plethora of other components, including PSUs, cooling solutions, and even a gaming chair on the showfloor at Computex 2026.
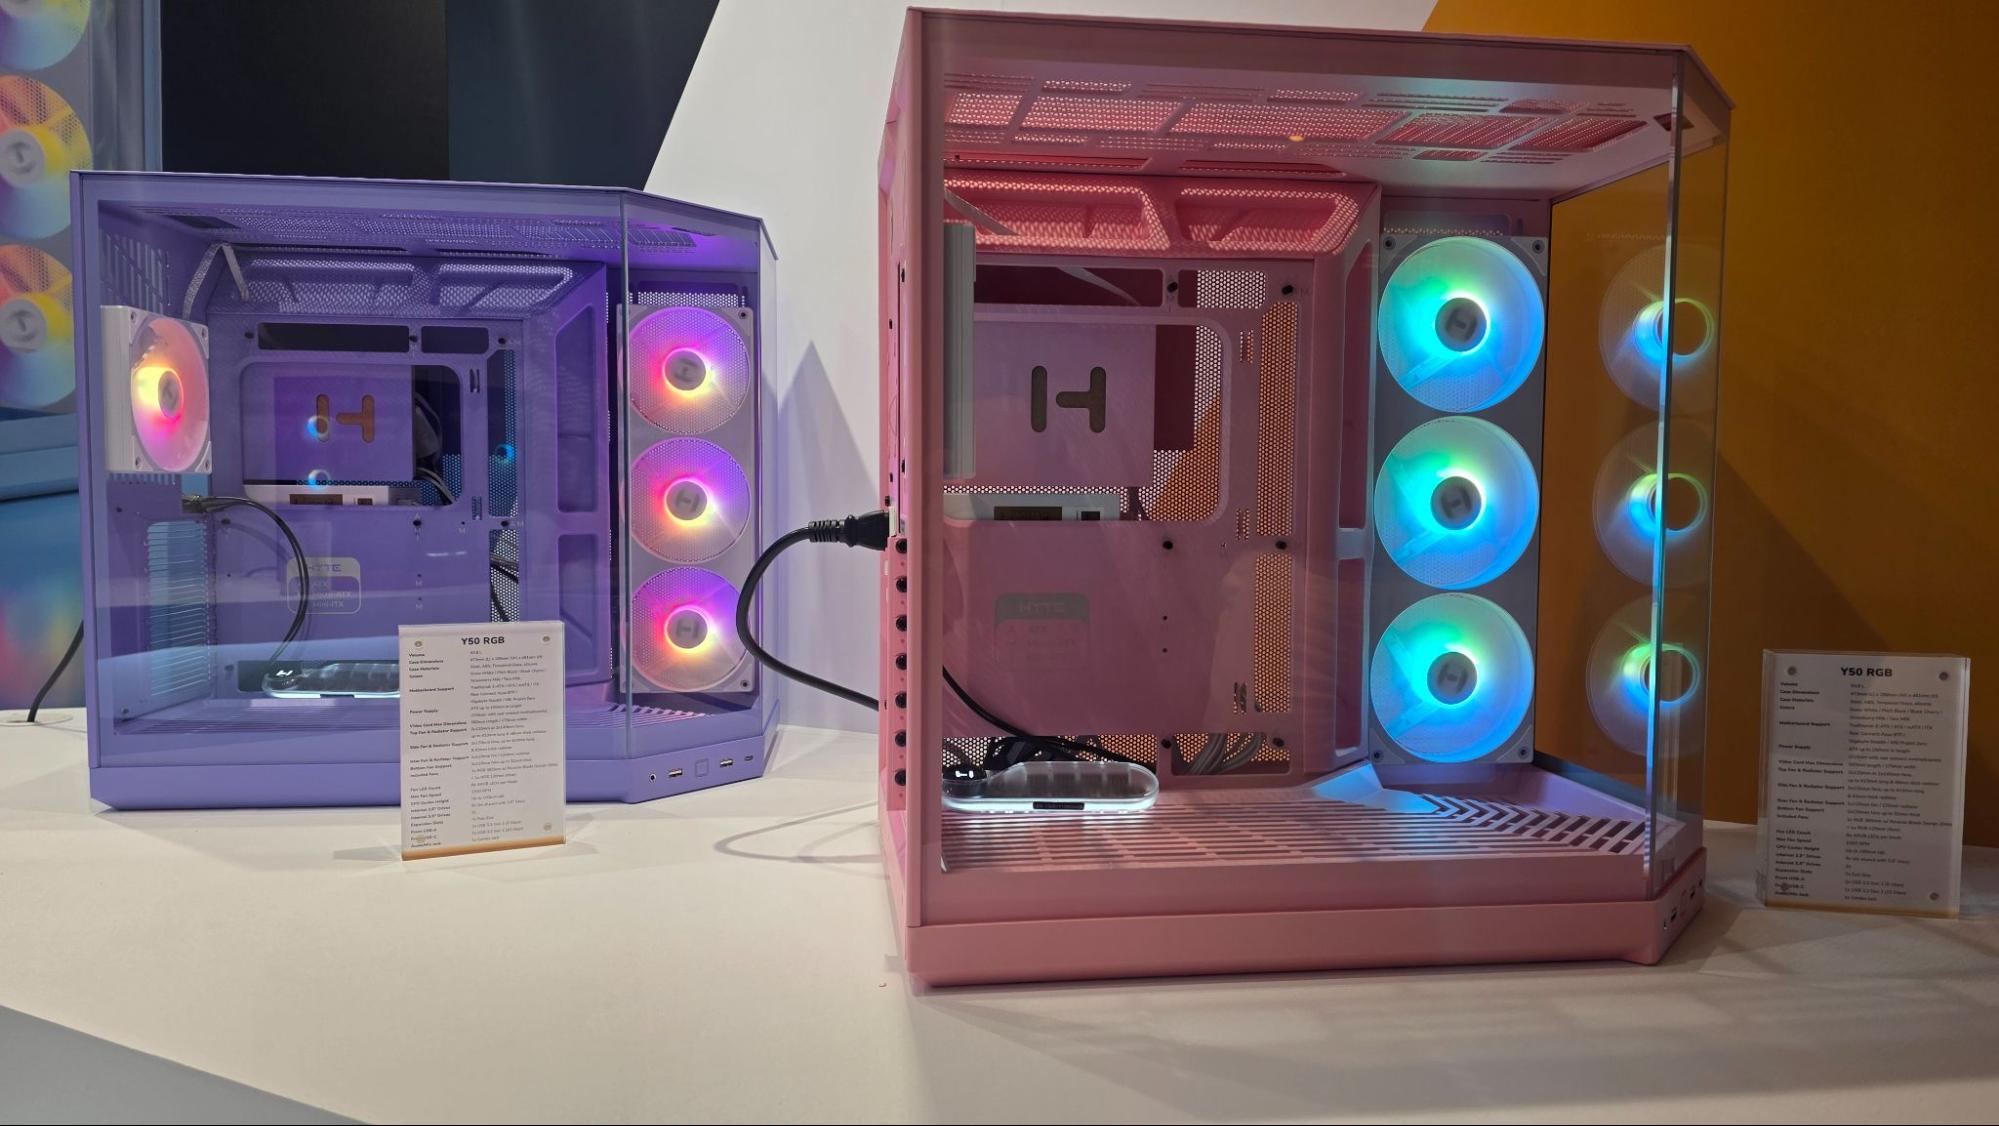
Hands-on with Corsair's 3200D RS ARGB Mid-tower PC Case: Budget chassis includes three fans and doesn’t empty your wallet

2026年5月29日 22:40
Corsair’s 3200D mid-tower chassis delivers strong airflow, support for large GPUs and radiators, plus three RS120 ARGB fans, all in a clean-looking windowed chassis priced under $80.

Endgame: What’s it Like to build the Noctua-everything PC inside the Antec Flux Pro Noctua-Edition

2026年3月18日 21:00
Antec and Noctua just released the Flux Pro Noctua-Edition case. And with it, we finally have all the ingredients required to build a 100% Noctua-Edition PC with off-the-shelf components. The question is, does building a PC this way make sense?
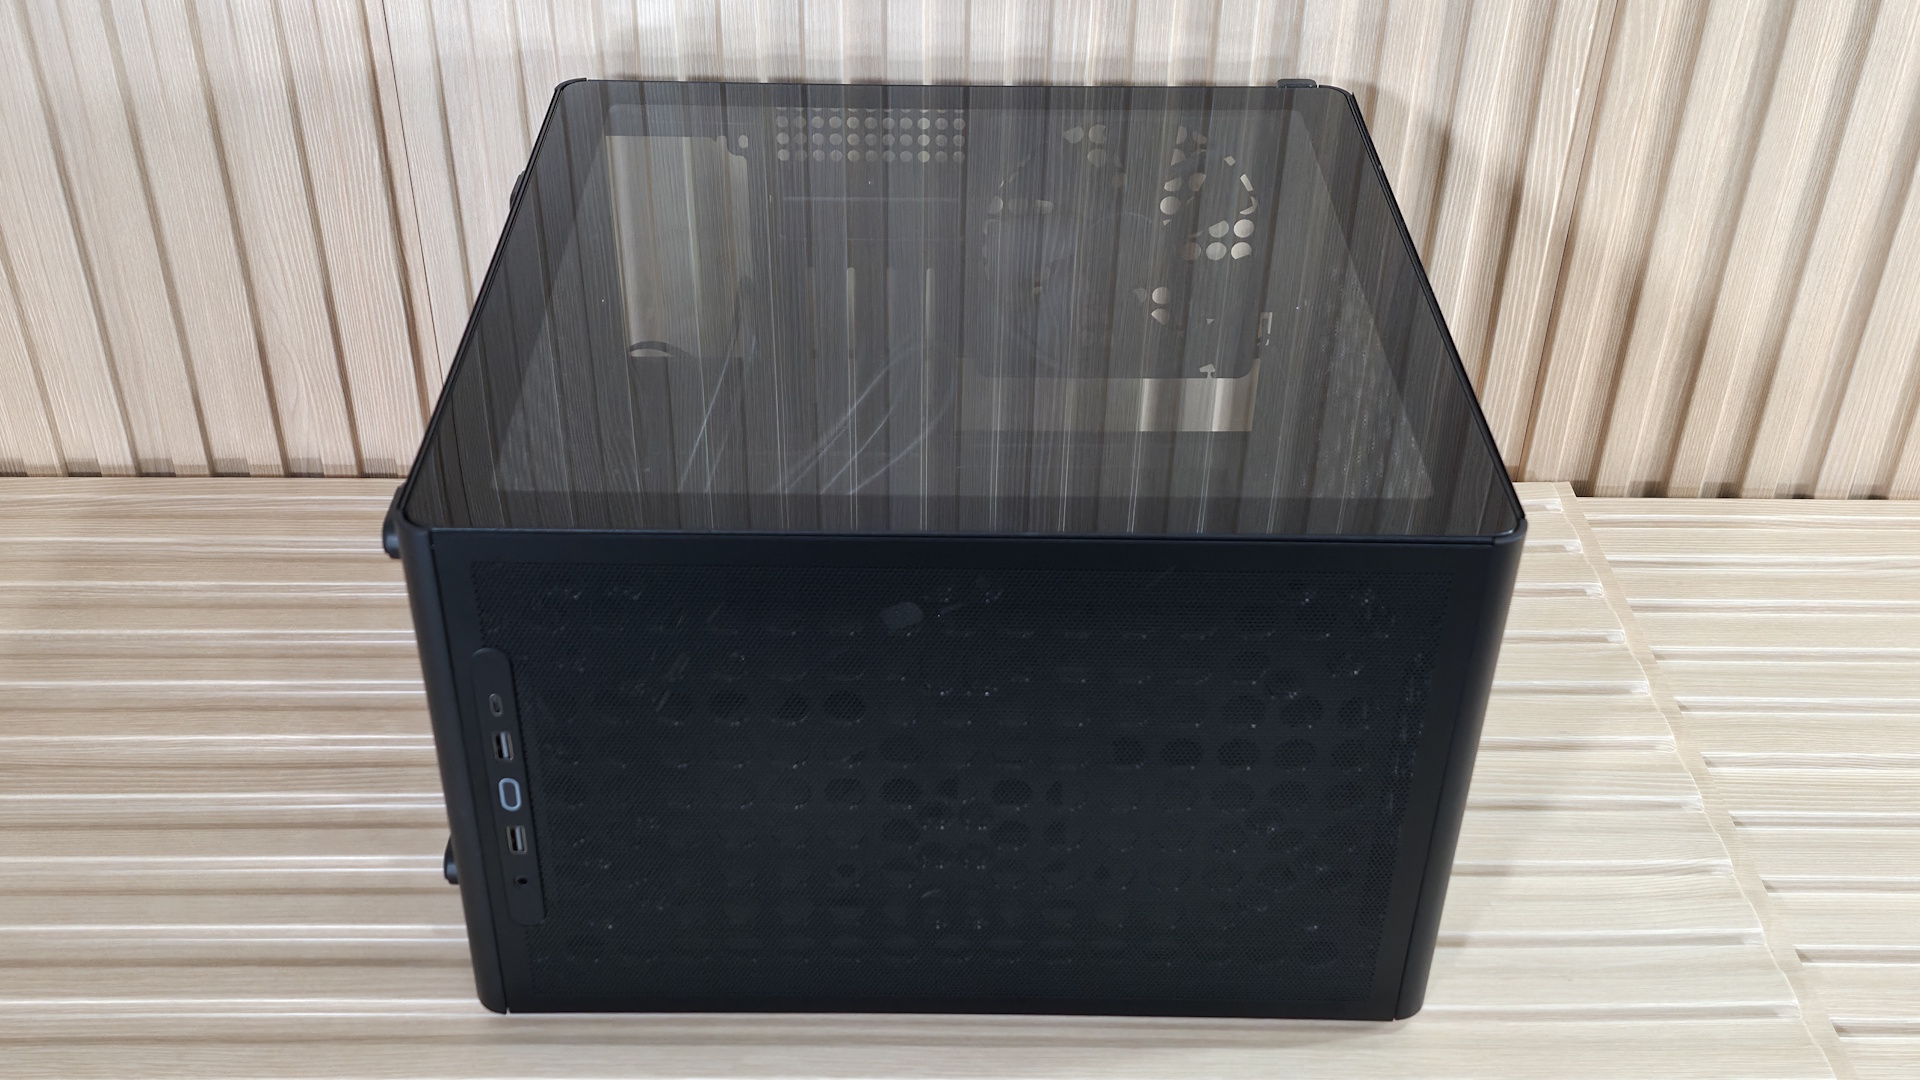
❌
❌